Posts for Toothache

Experienced Forum User, Published Author, Active player (276)
Joined: 4/30/2009
Posts: 791
So, a quick update, I managed to make a mistake somewhere in Stage 6, and ended up 27 frames slower compared to the old run (4040 vs 4067 total stage frames). 5 of that was having a bad RNG based on when the elevator stops after the boss (556 vs 561 frames after the boss dies), but this will mean I need to redo Stage 6 more carefully to see where I went wrong. It's a short stage so shouldn't take too long, and the boss is easy enough now that it is fresh in my mind. Expect a WIP shortly :)
Experienced Forum User, Published Author, Active player (276)
Joined: 4/30/2009
Posts: 791
Before you TAS a game: do your research. Is there an existing TAS or realtime run, and check the time of those. If you can beat the TAS especially, or at the very least the realtime run, that will be the first point. Second is to go over each section and wonder: can it be done faster? Try it out, go over every part of the run with a fine tooth comb. Learn to use frame advance and go one frame at a time to get the best approach for each part of the game. When you can do that, and have a run that beats existing records and at least looks optimised, then you may consider submitting. Check with other TASers, they may spot improvements you miss - fresh eyes can be the best after all. Only after doing all this should you consider submitting. TASing is all about being the most optimal in the shortest amount of time, not just doing a run once and figuring that is good enough. Be the best, and go for it!!
Experienced Forum User, Published Author, Active player (276)
Joined: 4/30/2009
Posts: 791
I always figure No Death Mode was a better place for 100% runs. Would like to see a run of NDM, either any% or 100% would rock and be a nice complement to the very glitchy normal TAS
Experienced Forum User, Published Author, Active player (276)
Joined: 4/30/2009
Posts: 791
For the FE6 run, I'd like to be able to work from this script: Download showstats.lua
Language: lua

uHP = 0x02039224 uStr = 0x02039226 uSkl = 0x02039227 uSpd = 0x02039228 uLck = 0x0203922B uDef = 0x02039229 uRes = 0x0203922A uHit = 0x02039276 uAtk = 0x0203926C uDf = 0x0203926E uCrit = 0x0203927C uWp = 0x0203925C uWpUs = 0x0203925F uAS = 0x02039270 uRnk = 0x0203923A eHP = 0x020392A0 eStr = 0x020392A2 eSkl = 0x020392A3 eSpd = 0x020392A4 eLck = 0x020392A7 eDef = 0x020392A5 eRes = 0x020392A6 eHit = 0x020392F2 eAtk = 0x020392E8 eDf = 0x020392EA eCrit = 0x020392F8 eWp = 0x020392DA eWpUs = 0x020392DB eAS = 0x020392EC eRnk = 0x020392B6 battle = 0x060000D6 staff = 0x0202187B --0x060000D6 --0x060000DA --0x060000DE --0x06000AE2 --0x06000AFE --0x06000B42 --0x06000B5E Weapons = {"None" , "Iron Sword", "Iron Blade", "Steel Sword", "Silver Sword", "Slim Sword", "Poison Sword", "Brave Sword", "Light Brand", "Durandal", "Armorslayer", "Rapier", "Killing Edge", "Lancereaver", "Wo Dao", "Sword of Seals", "Iron Lance", "Steel Lance", "Silver Lance", "Slim Lance", "Poison Lance", "Brave Lance", "Javelin", "Malte", "Horseslayer", "Killer Lance", "Axereaver", "Iron Axe", "Steel Axe", "Silver Axe", "Poison Axe", "Brave Axe", "Hand Axe", "Armads", "Hammer", "Killer Axe", "Swordreaver", "Devil Axe", "Haldberd", "Iron Bow", "Steel Bow", "Silver Bow", "Poison Bow", "Killer Bow", "Brave Bow", "Short Bow", "Longbow", "Miurgre", "Ballista", "Iron Ballista", "Killer Ballista", "Fire", "Thunder", "Fimbulvetr", "Elfire", "Aircalibur", "Fenrir", "Bolting", "Forblaze", "Lightning", "Divine", "Purge", "Aureola", "Flux", "Nosferatu", "Eclipse", "Apocalypse", "Heal", "Mend", "Recover", "Physic", "Fortify", "Warp", "Rescue", "Restore", "Silence", "Sleep", "Torch", "Hammerne", "Watch", "Berserk", "Unlock", "Barrier", "Fire Stone", "Divine Stone", "Demon Stone", "", "", "", "", "", "", "", "", "", "", "", "", "", "", "", "", "", "", "", "", "", "", "", "", "", "", "Dark Breath", "Eckesachs", "Steel Blade", "Silver Blade", "Al's Sword", "Gant's Lance", "Tiena's Staff", "Saint's Staff", "Wyrmslayer", "", "", "", "", "Runesword", "Spear", "Tomahawk"} function getdmg(atk, def) if atk == -1 or atk == 255 then return "--" else if atk-def > 0 then return atk-def else return 0 end end end function generaterankliteral(val) if(val >= 1 and val <50>= 51 and val <100>= 101 and val <150>= 151 and val <200>= 201 and val <250> 0) then rnks = rnks + 1 if(rnks == 1) then str[1] = generaterankname(i+1) .. ": " .. memory.readbyteunsigned(Rnk+i) .. " / " .. generaterankliteral(memory.readbyteunsigned(Rnk+i)) elseif (rnks == 2) then str[1] = str[1] .. " - " .. generaterankname(i+1) .. ": " .. memory.readbyteunsigned(Rnk+i) .. " / " .. generaterankliteral(memory.readbyteunsigned(Rnk+i)) elseif (rnks == 3) then str[2] = generaterankname(i+1) .. ": " .. memory.readbyteunsigned(Rnk+i) .. " / " .. generaterankliteral(memory.readbyteunsigned(Rnk+i)) elseif (rnks == 4) then str[2] = str[2] .. " - " .. generaterankname(i+1) .. ": " .. memory.readbyteunsigned(Rnk+i) .. " / " .. generaterankliteral(memory.readbyteunsigned(Rnk+i)) end end end return str end function nullstats(stat) if stat == 255 or stat == -1 then return "--" else return stat end end function printstats() gui.text(8,4,"Attacker\n\n HP:\nStr:\nSkl:\nSpd:\nLck:\nDef:\nRes:\n\nHit:\nDmg:\nCrt:\n\nWpn:\n AS:") gui.text(28,20,string.format("%s\n%s\n%s\n%s\n%s\n%s\n%s\n\n%s\n%s\n%s\n\n%s\n%s",memory.readbyte(uHP),memory.readbyte(uStr),memory.readbyte(uSkl),memory.readbyte(uSpd),memory.readbyte(uLck),memory.readbyte(uDef),memory.readbyte(uRes),nullstats(memory.readbyte(uHit)),getdmg(memory.readbyte(uAtk),memory.readbyte(eDf)),nullstats(memory.readbyte(uCrit)),Weapons[memory.readbyteunsigned(uWp)+1],nullstats(memory.readbyte(uAS)))) gui.text(200,4,"Defender\n\n :HP\n :Str\n :Skl\n :Spd\n :Lck\n :Def\n :Res\n\n :Hit\n :Dmg\n :Crt\n\n :Wpn\n :AS") gui.text(204,20,string.format("%s\n%s\n%s\n%s\n%s\n%s\n%s\n\n%s\n%s\n%s\n\n\n%s",memory.readbyte(eHP),memory.readbyte(eStr),memory.readbyte(eSkl),memory.readbyte(eSpd),memory.readbyte(eLck),memory.readbyte(eDef),memory.readbyte(eRes),nullstats(memory.readbyte(eHit)),getdmg(memory.readbyte(eAtk),memory.readbyte(uDf)),nullstats(memory.readbyte(eCrit)),nullstats(memory.readbyte(eAS)))) gui.text(212-string.len(Weapons[memory.readbyteunsigned(eWp)+1])*4,116, Weapons[memory.readbyteunsigned(eWp)+1]) local str = generateranks(uRnk) gui.text(8,140,str[1] .. "\n" .. str[2]) local str = generateranks(eRnk) gui.text(232-string.len(str[1])*4,140,str[1]) gui.text(232-string.len(str[2])*4,148,str[2]) end while true do if (memory.readbyte(battle) == 0 and (memory.readbyte(uWp) ~= 104 and memory.readbyte(uWp) ~= 105)) or (memory.readbyte(staff) == 0 and (memory.readbyte(uWp) == 75 or memory.readbyte(uWp) == 76 or memory.readbyte(uWp) == 80)) then printstats() end emu.frameadvance() end
Note that the memory addresses are different for each of the GBA games, so you'd have to do a bit of work to adapt this script for FE7 and FE8. My next task for this script would be to include sprites to represent the various weapon skills, character portrait and maybe the weapon sprites too, I know it's possible given how the Sonic HUD script works, so any help to make this a reality will be appreciated - I'll get the sprites organised myself as a starting point. EDIT: I figure the actual display would come across something like this: 
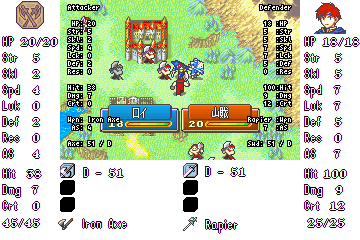
I realise getting images to pop up would be somewhat ambitious, but I'm aware it can be done, as the Sonic HUD script shows. Could always simplify it without the images, but it would make it easier in terms of screen real estate to show stuff like weapon skills and which units are fighting, as many units use the same map sprites.
Experienced Forum User, Published Author, Active player (276)
Joined: 4/30/2009
Posts: 791
Sweet, looks good. Now to FE12!! :)
Experienced Forum User, Published Author, Active player (276)
Joined: 4/30/2009
Posts: 791
From my understanding the RNG in this game is very fixed, even more so than the GBA games, because you can advance the RNG to where you want. It is understood if you change the internal clock you can change the RNG, but that's the only known way to do so atm, would be good to explore to find a way that doesn't involve such a slow method.
Experienced Forum User, Published Author, Active player (276)
Joined: 4/30/2009
Posts: 791
http://tasvideos.org/userfiles/info/16774700777169018 Stage 5: Lazy encode: https://www.youtube.com/watch?v=66zcEbwpx48 Once again health management was the key factor in clearing this stage fast, compounded by the fact I had one less HP Up to take advantage of so I had to be even more tight with the damage I took, having to pause for more potions and even waiting to get a good pattern with the flame jets in the second half of the stage. I had to take an entirely new approach for finishing the boss quickly too. Without a powered up Dragon Frye I lost a significant amount of damage (getting 1500 dmg/frame is a huge amount) and it wasn't worth bringing him out for 500/frame at L1, given the huge problems in positioning the shots as well as the RT positioning, not worth it in terms of DPS. Decided to use Boomerang Lizard here, again for the fact his shots aim so I don't need to worry about it, so he contributes nicely while I wait on RT to charge up. Speaking of the RT positioning, given how he moves across the arena I have to get to the back of the boss hitbox and move along with the back part of the boss you can damage, would have lost too much damage if I tried from the front because he gets past the RT point halfway through and you lose too much of the damage if you have to turn around mid-attack, especially since you only have 40 frames of invincibility after being hit and the RT takes up 33, and turning around takes up about 10 or so, not to mention even further positioning problems with that particular move as your jump will come out of the boss's damage-taking section in order to get the right height to maintain all this. So, I had to wait for the boss to come part-way out, jump through and turn around after getting hit, and do a full RT in the air, hitting with all the frames while moving along with the boss. The RT in the middle was a lot easier to pull off, as you actually walk at the damage section's level on that platform, but I have to do the same manoeuvre for the final RT, and finish the boss off with some regular damage as I finish about 700 points short even with the perfect RT positioning and BL's contribution. Overall, I do lose 519 frames in the boss fight due to all these changes, but overall I still come out ahead, with a total improvement of 1295 frames! That's the most difficult stage out of the way, so now we get to work on some of the shorter and easier ones. Hoping the last three stages go a lot quicker.
Experienced Forum User, Published Author, Active player (276)
Joined: 4/30/2009
Posts: 791
Do you need to use a bitmap, or can you use a custom TTF font?
Experienced Forum User, Published Author, Active player (276)
Joined: 4/30/2009
Posts: 791
After playing it myself, Shovel Knight. Oh yes, let's get a very recent game TASed!! In answer to the earlier point, Yacht Club Games are offering a DRM-free version for download from their site + free Steam key, but I assume the non Steam version is the one we want for Hourglass purposes. http://yachtclubgames.com/shovel-knight/
Experienced Forum User, Published Author, Active player (276)
Joined: 4/30/2009
Posts: 791
I was actually looking at something that can be turned into a tutorial for future encodes. Assume I don't know how to do any of those things, which would be pretty accurate. Just bullet pointing the steps involved is not enough. PS Lua is a word, not an acronym :)
Experienced Forum User, Published Author, Active player (276)
Joined: 4/30/2009
Posts: 791
So, how would one go about making an encode like this one, which displays the memory values on screen? https://www.youtube.com/watch?v=57jUrDd0fuw Would like to make a similar type of encode for my FE6 TAS, but don't know how to go about it yet.
Experienced Forum User, Published Author, Active player (276)
Joined: 4/30/2009
Posts: 791
The video there is private, can't watch atm. Might help to upload the gmv as well
Experienced Forum User, Published Author, Active player (276)
Joined: 4/30/2009
Posts: 791
A playaround video would need to be more strictly controlled and perhaps have even more clearly defined rules than a speedrun or superplay. If you want to just do arbitrary stuff, then it certainly wouldn't be good to submit to TASvideos, as we are in the habit of entertaining and breaking games. If the playaround was something that did something a TAS could only do, like the Link's Awakening playaround (http://tasvideos.org/2021M.html), then it will be worth doing, but if it is just an arbitrary goal or freerun, that would better served elsewhere.
Post subject: Stages 1-4: now with encode
Experienced Forum User, Published Author, Active player (276)
Joined: 4/30/2009
Posts: 791
http://tasvideos.org/userfiles/info/14852875168525118 Lazy encode for the lazy: https://www.youtube.com/watch?v=y73SRMzWzm4 Stage 4: I managed to figure out a big improvement, by avoiding the Blue Fairy completely, saves a delay there, and the biggest improvement comes from managing the boss with a single Rolling Thunder attack. I always knew I could do enough damage with one RT, but I never did enough testing until now to find the optimal method of executing this. Turns out I can abuse taking damage, as it delays the RT frames of attack while the mouth is closed enough for me to get the remainder of the RT to finish the boss off. So, taking a hit from the boss not only saved time but allowed for this strategy to work. Total improvement on this stage was a mere 16 frames, meaning 779 total frames of improvement, which I wasn't expecting more than half a dozen like Stage 2, so I'm very glad of this. Stage 5 will have a lot more for sure to save, so stay tuned!
Experienced Forum User, Published Author, Active player (276)
Joined: 4/30/2009
Posts: 791
The main thing that makes normal Hard Mode easy in a TAS, compared to 0% growths is that almost any unit, after a few levels will be able to crit and OHKO units with ease. In 0% growths you have to be more creative and actually have a strategy in order to deal with the enemies, so that's the main reason for preferring 0% growths for this. If you watch the NM run, you can see how boring it gets as just a single unit ploughs through everything, for the most part.
Experienced Forum User, Published Author, Active player (276)
Joined: 4/30/2009
Posts: 791
So, I'm thinking about revisiting this game with a new approach. There is a patch which I linked to earlier in the thread, which reduces all the growth rates to 0%. Stats can grow in other ways, for example from promoting or using stat boost items, but not via levelling, which means a complete change to strategy and makes a run far more interesting as you are not relying on one single unit to plough through everything. There are a couple of existing 0% runs done in realtime by dondon151, but they are purely 0% with no other restrictions. However, this is TASvideos, where we can strive to be much better than realtime runs. With 0% growths, in many ways you are going to be similar to a TAS as you manipulate the RNG further than almost any other sort of realtime run. So, in order to make things more unique and impressive, I aim to make a run with the following restrictions: 0% growths Hard Mode SS Rank achieved Hard Mode improves the stats of all enemies, with a few changes to recruitable allies, mostly coming from them gaining HM bonuses. As for a Ranked playthrough, you have to meet certain restrictions for each map, based on turns taken, enemies killed, Exp gained, levels gained, allies recruited and not killed, and total funds of items and cash. The toughest SS rank requirements are as follows: Complete the run in under 650 turns Gain 1001 total combined levels across all characters Gain 50,100 exp across all characters Recruit all possible allies for the routes taken and make sure they all survive Finish with 138,000 g worth of total funds (item value + gold) - must have Roy and Lilina with A Support (36 adjacent turns) Have a ratio of battles to wins of 40% or more Since gold can also be put to the use of buying boots with improve unit move ranges by 2 per set of boots, it will be hard to get a lot of boots and still maintain the Funds rank. I will have to choose carefully where the boots go for the last few chapters (they are bought in Ch21 secret shop - I didn't do it in the normal run as it would have wasted time to visit, distribute and use them, but with more chapters to play with in a best ending run, it will be worth it to use some boots). I think for variety, it will also be worth visiting the other routes not shown in the normal run, which will give me Elphin/Bartre, as well as the Sacae maps. All the other maps are more or less identical, with the addition of more enemies in HM, and I will do the best ending so you see all the gaiden chapters I skipped last time too. It is going to be a very different sort of beast, and one that will be extremely different than the NM run. For TAS requirements, this is where things become a little more tricky. Fastest time is still a given, but it does not mean I will necessarily be finishing each chapter in the fastest time. I will aim to complete the chapter-by-chapter rank requirements before moving on: for example, Chapter 1 requires 300 exp gained, so I will gain that before progressing. Turn count will also come before purely fastest time too: completing the chapter with the lowest number of possible turns means a better strategic approach and therefore a more intriguing run, imo. I will still perform actions as fast as practically possible though, but with more emphasis on turn count and meeting rank requirements over pure speed. I think for this sort of playthrough, which is more like a superplay of ranked mode with the added complication of 0% growths, this is the best approach. I'm already looking at Chapter 1 to see the best approach there. It is possible in terms of move count for one of the cavs to kill the boss, with Marcus' assistance, and complete it in 4 turns. I aim to give as much exp as practical to Wolt and Bors as they quickly become obsolete in terms of 0% growths, means I have less work to do later on to meet the Power and Exp requirements. Speaking of farming experience, this will often mean I won't be critting and one-shotting every enemy, so the entertainment comes from the strategies used to overcome the more difficult enemies.
Experienced Forum User, Published Author, Active player (276)
Joined: 4/30/2009
Posts: 791
Never ask to do something, just do it anyway, best approach imo :)
Experienced Forum User, Published Author, Active player (276)
Joined: 4/30/2009
Posts: 791
Something to bear in mind is that there are edge boosts that occur by jumping at the edge of a corner or platform, similar to Super Mario Land 2, it pushes B.O.B. forward a frame, so that's a technique that saves a lot of time, and explains why you see me jumping a lot. I think there might be improvement through better ammo management for the last boss fight, the Remo management is gonna hard to top though. EDIT: After rewatching, I noticed I had 5 spare wave shots after the last boss was killed, so I could probably make use of them in the previous boss fight, where I tried to save as much wave ammo for the last boss, wasn't sure how much I would need. The saving is tiny overall, but it is something to consider.
Experienced Forum User, Published Author, Active player (276)
Joined: 4/30/2009
Posts: 791
http://tasvideos.org/userfiles/info/14626472743665583 Stage 3: So, I did a lot wrong with this stage last time. First of all, I can wait until Stage 7 to improve the Boomerang Lizard there, which is all well and good. Second, I can use the Blue Fairy ability to optimal capacity, getting along the floating platforms at the top of the stage without stopping once, which was marvellous. The boss fight went basically the same plan as before, including a switch to the Thunder Raven to help damage the right most of the three enemies and allow for enough of a charge by the time I get to destroying the left most. Overall, I have saved 763 frames compared to the previous version up to this point, which is marvellous. Wonder how much more I can push out of this game, but I suspect a lot more can come off the time :)
Experienced Forum User, Published Author, Active player (276)
Joined: 4/30/2009
Posts: 791
Hi there, good to see someone else interested in this game. I did some initial testing of both the SNES and Genesis version, and I found the Genesis version both looking better and being slightly faster. There are likely improvements that I overlooked last time I touched this game, so feel free to explore and see what you can find, if any. Good luck, and feel free to contact me :)
Experienced Forum User, Published Author, Active player (276)
Joined: 4/30/2009
Posts: 791
<mike89> I'd also say for everyone that bar is different <Tompa> Whoring is the best <mike89> which I guess you allude to there :p
Experienced Forum User, Published Author, Active player (276)
Joined: 4/30/2009
Posts: 791
I want to reopen the can of worms that is the 100% definition, mainly for purposes of actually seeing a 100% of LttP at some point in the future. Now the main list should look something like this: All weapon and armor upgrades: Golden Sword Red Mail Mirror Shield All upgrade items: Moon Pearl Pegasus Boots Titan's Mitt Zora Flippers 1/2 Magic upgrade All Heart Containers and Heart Pieces (20 total at the end) All items in the main inventory screen: Silver Arrows Magic Boomerang Hookshot Bombs Magic Powder Fire Rod Ice Rod Bombos Medallion Quake Medallion Ether Medallion Lamp Flute Bug-Catching Net Book of Mudora Magic Bottle x 4 Cane of Somaria Cane of Byrna Magic Cape Magic Mirror *Could include the temporary items like the Mushroom and the Shovel in this list, but they are exchanged for permanent items. All Bomb and Arrow upgrades. As far as I can tell, the last one of those is the only contentious issue on the list of 100%, as it takes a long time to upgrade the bombs and arrows and thus takes a chunk of entertainment factor away from the run. Personally, I wouldn't mind either way, as it is up to the TASer themselves, but I can see points on both sides whether it should be included or not. Perhaps for completionist sake, I would err on the side of including the upgrades, but it wouldn't take anything away from 100% if it was not done, imo. EDIT: Forgot to mention heart containers/pieces
Experienced Forum User, Published Author, Active player (276)
Joined: 4/30/2009
Posts: 791
Marill is a great HM slave, as it can learn 5 of the 8 HM moves you get in the game: Surf, Strength, Waterfall, Rock Smash and Dive, and all of these are needed.
Post subject: Citra 3DS emulator
Experienced Forum User, Published Author, Active player (276)
Joined: 4/30/2009
Posts: 791
https://github.com/bunnei/citra/ http://gbatemp.net/threads/new-3ds-emulator.365154/ So, there's been work on a 3DS emulator, known as Citra. Seems like it is early days for now, but I'm impressed the work has started. Would be helpful for us to get on board and help build this thing up to scratch
Experienced Forum User, Published Author, Active player (276)
Joined: 4/30/2009
Posts: 791
On the video posted above, I was talking with UltraJMan (who runs La-Mulana in real time) and he was impressed with the effort done so far, noting it was a good few minutes improvement to beating Bahamut and Ellmec over the current route. The main difference being the lack of save/reload used in real time atm, but it seems that abusing this feature (which refills pots that have already been broken, instead of only containing something once) would save a significant amount of time over the course of the run. I am confident that video can even be optimised a bit more in the long run (collecting Save ROM after the Grail, then saving/reloading, and more manipulation of weight drops by killing enemies)