The Legend of Zelda (second quest)
- Aims for fastest time
- Manipulates Luck
- Abuses Programming Errors
- Uses a game restart sequence
- Takes damage to save time
- Uses a level password
- No predefined saves
- No Death
- Genre: Adventure
- Uses Emulator FCEUX 2.0.2
This run is 4 minutes and 13.60 seconds faster than Sleepz' published movie.
The Legend of Zelda is a game that needs little introduction to most gamers, however, here is a brief description:
The player controls the hero character, Link. Ganon, the prince of darkness, and his army attack the kingdom of Hyrule and steal the triforce of power--a legendary relic handed down to each generation of Hyrule's royalty. Now he needs to obtain the triforce of wisdom, but princess Zelda scattered eight pieces of the triforce of wisdom in dungeons around the game's fantasy setting called Hyrule. The princess also sends her most trustworthy nursemaid, Impa, to find a hero with the courage to face Ganon. Ganon, who is upset by Zelda's plot, captures her and imprisons her at LEVEL 9.
Impa is then cornered by Ganon's minions but rescued by a young man. His name is Link, our protagonist. Impa confides in Link, telling him the story of Gannon and the Princess. Now armed with a quest, but no sword, Link goes forth to save Hyrule. I still wonder how the Princess managed to hide those triforce pieces with all the monsters and locked doors in these dungeons...
Techniques and Technical Information
Luck Manipulation
Luck manipulation is the heart and soul of this run. The most rerecords are used trying to obtain ideal enemy movement in order to quickly kill enemies, bypass them, or damage boost off of them.
Enemy Dropping Patterns
One of the first objectives when starting this run was to determine exactly how the game determines what items enemies drop; with full control of enemy drops, the better we may plan our damage boosting and bomb rationing.
The enemies either drop or do not drop an item based solely on what frame they are killed.
What exactly they drop is more complicated. It is determined by two factors:
- The type of baddie (they are lumped into 4 categories based on what they are programmed to drop)
- The number in $052A
$052A increases by one every time an enemy is killed. This chart made by Baxter illustrates the concept better than words:
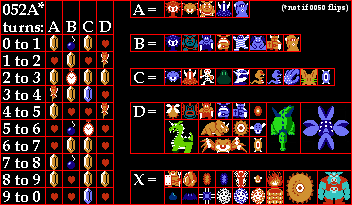
Knowing which enemies are up ahead, and the value of $052A, it was easier to plan our bomb and life boosts based on what would drop.
For example, some frames are used in LEVEL 6 to kill three bats. This increases $052A's value by three so that the digdogger (eyes) in level 8 will drop us a fairy and a heart, allowing Link to completely refill the health he used damage boosting towards LEVEL 8.
0050 will also count the amount of enemies that are killed, but it will drop to 0 again if Link is hit. Killing a number of enemies (for instance 10) without getting hit will cause $0050 to flip to 0 automatically in which case the item at the chart in the picture will be overwritten by a ‘good’ item such as a 5-rupee, a bomb or a fairy. This is how it for instance was possible to get two 5-rupees at LEVEL 1.
Luck manipulation of enemy movement
There are a few ways to control how the enemies move on screen.
- When Link enters a room on a different frame, the enemies' initial direction of movement can change. (Waiting before entering next room is done underneath the door, or spread out over the previous room, so that it won’t be very noticeable.)
- Pausing the game using the select button costs a minimum of two frames, but it can save a lot of time in certain situations because it directly effects how enemies behave.
- Enemies behave differently based on where Link is on the screen.
Even with all of these techniques to manipulate the monsters, it can still be difficult to control all the baddies in an optimal fashion; consequently, this is where many rerecords are spent. The only way to be sure that a room of blue darknuts, or bunnies, etc is completed as fast as possible is to keep trying to manipulate their movement, while at the same time sparing the least amount of frames. Unfortunately, all said techniques to control monsters' behavior use frames (except Link's position, but it can cost frames to move him for luck manipulation, too).
With this conclusion, it's easy to see that the game lends itself to massive amounts of testing. Generally, one will find that once a certain problem monster has been manipulated to behave in a desired fashion, the rest have all inconveniently changed their minds and are now doing something undesired. The best approach is to keep trying various combinations of the techniques until an optimal one presents itself.
Luck manipulation and gambling
There is a 4 frame rule at the gamble door (as well as all other doors that lead from the overworld to the underworld). The gamble rupee value can only be manipulated based on what frame the gambling den is entered at. So keep trying every 4th frame until desired rupee value is available. Getting the 50-rupee in the middle is obviously the fastest.
Combat and Movement Techniques
Combat and movement is fairly straightforward in Zelda, but there are some tricks to help save time.
Link's Movement
Some facts:
- Link can only move and face one of four directions--up left right and down--at a given time.
- He can only change direction on every 8th X or Y coordinate.
- These pixels where link can move any direction (i.e. {64,64}, {64,72}, {56, 64}, Let's call them a crossroad coordinate.
- Link moves at roughly 1.5 pixels per frame (there is sub pixel positioning).
- The memory addresses for Link's X,Y position are $0070 and $0248 respectively. Due to sub pixel positioning, when moving these addresses generally increase/decrease in this pattern: 1,2,1,2,1 etc
There is a timesaving technique in regards to the sub pixel positioning.
Link can move through an in screen block of area every 6 frames except when moving up followed by right, right followed by up, down followed by left or left followed by down.
In said case, Link moves at 5 frames per in screen block (8 x or y coordinates constitute a block in game). This is the explanation for zigzagging up and right or down and left--it saves one frame every 8 coordinates.
- Screen scroll glitch:
Sleepz posted this glitch some time ago, but it has yet to be used in a published TAS. In the overworld, just before entering a new screen, press a direction to Link's left or right for one frame when Link only has 5 more coordinates to reach the next screen scroll. It allows Link to wrap around the screen so that he is now on the opposite side! The timesaving implications are lucrative, especially considering the fact that link can wrap around the entire map, entirely skip the lost woods, and access areas that may otherwise be obscured by water or mountains.
- Similarly, the above technique may be used to get inside obstacles (blocks, bushes, etc), and sometimes allows Link to bypass areas that he would normally need to walk around. The first example of this is in dungeon 2: Link is able to enter the inside of a block from the top, and then exit the block from the right side. This is not easily performed during console play as it requires frame by frame input (it does not use left+right or anything). Due to the fact that Link can move halfway ‘below’/’inside’ solid blocks normally, this trick allows Link to pass through diagonally placed solid blocks.
Combat Techniques
- Pressing A + B with bombs equipped allow link to use his sword and deploy a bomb simultaneously--a very useful move on enemies that take multiple blows to kill. It’s especially useful since Link is unable to do anything for a few frames when using his sword, a bomb or another item.
- On a crossroad coordinate, Link may face any direction while thrusting his sword. Useful in striking multiple enemies that are on various sides of the hero.
- On a crossroad coordinate, press Left, Right, and A. Link will attack diagonally up and left!
- When hitting an enemy with the sword on the exact frame that a bomb explodes, the enemy will get damaged by both at the same time. This trick is used often to avoid enemy invulnerability time.
- When moving over the ladder or leaving a room, Link can use his sword while he is moving. This is especially useful for collecting pickups when leaving the room after for instance a bossfight.
- When fighting digdoggers (eye boss monsters), lay a bomb and quickly swap to the whistle. Blow the whistle, and the bomb's detonation timer will continue to count down despite the fact that all enemies and actions are paused while the whistle is in use. The bomb will instantly detonate once the whistle is finished playing, instantly exploding on the small eyes spawned by the large eye. (Bombs take 40 frames to detonate, memory address $0038 or $0039)
Route
The route begins much like Sleepz' run, but ends differently. Here's the brief description
- LEVEL 1
- Acquire rupees for gambling
- Heart Piece for damage bumps and the white sword
- Triforce Piece 1
- Reset
- LEVEL 2
- Along the way...
- Gamble
- Get Candle (needed for opening a 100 rupee cave after level 2 and opening level 7)
- Pick up the whistle
- Pick up Heart Container for White Sword
- Pick up Triforce Piece 2
- Along the way...
- LEVEL 6
- Get ladder. (useful in level 4 and level 5 and this particular level order, needed for entering level 8 on the way to level 4 also)
- Leave for now; bow and arrows needed to finish
- LEVEL 8
- Along the way...
- Pick up the bracelet; it's needed to open up LEVEL 4 so we can get the raft, and consequently the bow in LEVEL 5.
- Use stepladder to enter
- Triforce Piece 3
- Along the way...
- LEVEL 4
- Along the way...
- White sword (in this quest plenty of bosses which make it worthwhile to collect this)
- Pick up the raft for LEVEL 5 and the bow, which is required to finish 6 and 7
- Triforce Piece 4
- Reset
- Along the way...
- LEVEL 5
- Pick up Bow
- Triforce Piece 5
- Reset
- LEVEL 3
- Along the way...
- Use the secret road man in cave for speed
- Triforce Piece 6
- Along the way...
- LEVEL 7
- Triforce Piece 7
- Whistle to the lake by lost woods
- LEVEL 6
- Triforce Piece 8--complete triforce now
- LEVEL 9
- Silver Arrow
- Ending
Extra
It was also possible to glitch up the level 9 graphics due to entering it before the game expected it. Due to the frame rule of 4 frames, the glitching of the graphics can be avoid by entering a frame later, without losing any time. Fortunately it was possible to hexedit the version with the glitched level 9 graphics (it completes the game in the exact same amount of frames):

Personal comments:
Morrison: I lost motivation on this project numerous times and just disappeared for long stretches of time. I apologize to Baxter for this, as it is the main reason the run took such a long time to make. While I was away, he finished the dungeons 5, 3, 7, 6 revisited, and 9 all by his lonesome, so about half the run wasn't even a collaboration, but a solo effort. Hats off to you :) I'm not certain my name should even be on the project anymore. I am just glad to see it completed.
Baxter is a great TASing partner. Trying to beat the times on his WIPs is not an easy task; he's quite thorough and patient. :) I had a lot of fun spending time with him in irc while we were doing all the testing. Big thanks to all previous Zelda TAS authors, Baxter, Phil, Sleepz namely.
Baxter: The Legend of Zelda is one of few games in TASing where I both really like the results as well as the process. Researching routes, and optimizing rooms can both be quite fun. While the main idea of the fastest completion of a room might be the same, the specifics are not. Due to a change in the order of completion of the levels (…53769 instead of …56379) all of these levels had to be redone (level 5 also). Having to redo stuff that’s was completely optimized before is not fun, and this is when you notice that not each room can be done the same. Even though it’s called luck manipulation, there are frames required to manipulate this luck, and sometimes real luck is needed in the process. When redoing these levels, you constantly gain and lose frames to a previous version in each room, while they both may have been completely optimized for each initial conditions. It’s definitely a bit different from most other games, but very fun nonetheless.
The cooperation with Morrison was very fun, and he was a great partner. He often mentioned options I hadn’t thought of, and produced very accurate work. It was too bad that he lost his motivation for TASing, but more because I really enjoyed working with him than that I had to do more work myself.
Thanks to everyone who showed their interest in this TAS, which is always a great help.
mmbossman: Excellent planning, execution, and entertainment; Great job guys. Accepting as an improvement to the published "2nd quest" movie.
Bisqwit: Encoding. My first FM2 encode :)
Bisqwit: Unclaiming the encode, because I can't figure out why mencoder refuses to render the libass subtitles in the movie, and I have too little time to debug it.