Game objectives:
- Start with Bizhawk 1.8.4 to continue on 1.9.2 to 1.11.2 to finish in 1.11.8.2
- Aims for fastest time
- Takes damage to save time
- Uses death for save time
- Abuses programming errors
- Heavy luck manipulation
- Uses damage boost
- Uses save point for change respawn point
- Start with Bizhawk 1.8.4 to continue on 1.9.2 to 1.11.2 to finish in 1.11.8.2
- Aims for fastest time
- Takes damage to save time
- Uses death for save time
- Abuses programming errors
- Heavy luck manipulation
- Uses damage boost
- Uses save point for change respawn point
Once upon a time, in very old times, where the greenery gives birth to plains in pastel colors reminding the enchantment of a world where become entangled magic, chivalry and other creatures, living in peace within a kingdom, governed by a family the kindness of which was unprecedented.
But it was without taking in account the arrival of the terrible Ganondorf, Establishing a reign of terror, leaving only chaos and sadness on the whole kingdom ...
This TAS doesn't tell this story.
You will have understood, this game is a straight answer to NINTENDO from SEGA, concerning the famous and very good "The Legend of Zelda" released 5 years earlier on NES.
We are in 1991, on SEGA Master System, at the release of "GAW", although it's a reflection of "Zelda", it brings its lot of improvements, whether graphics or gameplay, especially NPCs that speak ...
The game is meant difficult, especially for fighting, where we find weapons with a very short range, against fast and unpredictable enemies.
The sound environment is rather good, but too little diversified, which makes the game repetitive.
Basically, it's a very good RPG I advise to everyone who like RPGs.
- WARNING
- Some actions or movements may seem unoptimized, due to having to handle luck for spaws, drops and enemies' behavior.
- Every object taken, either life, magic or horn, is necessarily useful and optimized for entertainment, I don't take more than I need, neither use more than allowed.
There's only one passage in this TAS where I allow myself to have 2 horns too much in my possession (at the end of dungeon 7), because dying doesn't allow to reach the desire number (see below "death and loss of money") and killing 2 enemies to obtain their drops would have been longer.
- The route planning has been studied so as to do things in a very specific order, always in order to save time.
- GLITCHS, TRICKS & MORE
- When triking during the fights, it is possible to shoot, push, raise or lower an enemy from a square, and then a better optimization of them.
Note: The fact of shooting an enemy towards you, necessarily causes damage to the player.
- The fact of opening a chest or collect one of the crystals, will automatically mark a downtime of 4 frames, once the text box has passed. However, it is possible to counter this by hitting while entering an input in the opposite direction, just before the opening of the chest link to pick up.
- It is possible to collect any object by hitting with our weapon.
- It is faster to go out then re-enter in a room, once the boss defeated, because his death animation is longer.
Note: It is not valid for the second dungeon's boss due to the configuration of the room.
- To leave a dungeon, commit suicide is generally faster than walk all the way back.
- Some enemies have the ability to disappear (eyes, mages), while others have the ability to freeze themselves to become invicible (false block red and blue) and for an undefined time in both cases, so it's faster to freeze them and slain them.
Note: once the long sword obtain, it is no longer necessary to procced like that on the blue mages because they can be killed before they disappear.
- The blue and gold shells are only percussible from the front, it means that the player must be in front of them to hit them. Furhtermore, they are very robust, often in excess and dealing very consequent damages. The most complex solution is to take damages while manipulating their behavior. If the player's life is too low, the faster would be to freeze them.
- Enemies can overlap one another that same time during fights.
- In the dungeons, there are slabs on the ground, the pattern of them is a cross chekerboard. Some of them do not have this motif and are actually triggers triggering traps, such as spears which spring from the walls or ghosts that spawns at random positions.
- Luck manipulation:
This one plays as much on the drops as on the appearance of the enemies on the screen. I have not found any series of inputs or other, allowing to obtain a specific drop or placement of extraordinary enemy recurring ... So everything passes from the placement of the player arriving in a room, the menu break , Going through blows in the wind, stops, the number of hearts and magic ... Everything is good to cause changes! The goal is to gather a group of enemies in the same place, to kill them as quickly as possible, obtaining the desired drops if necessary, while manipulating the behavior of the enemies so that they do not move away. All the fighting were done frame by frame, to have total control over the situation! I used this manipulation to save time, but also to create unlikely situations, danger, or even prevent enemies from appearing on several screens in a row, for the sole purpose of avoiding a monotony related to the Back tracking.
This one plays as much on the drops as on the appearance of the enemies on the screen. I have not found any series of inputs or other, allowing to obtain a specific drop or placement of extraordinary enemy recurring ... So everything passes from the placement of the player arriving in a room, the menu break , Going through blows in the wind, stops, the number of hearts and magic ... Everything is good to cause changes! The goal is to gather a group of enemies in the same place, to kill them as quickly as possible, obtaining the desired drops if necessary, while manipulating the behavior of the enemies so that they do not move away. All the fighting were done frame by frame, to have total control over the situation! I used this manipulation to save time, but also to create unlikely situations, danger, or even prevent enemies from appearing on several screens in a row, for the sole purpose of avoiding a monotony related to the Back tracking.
- It's open (glitch):
Basically, It is impossible to drop keys to any enemy of the game, because it is based on the principle of exploring dungeons to land in rooms, which once empty of enemies, will reveal a key as a fixed drop, allowing to be able to continue its way. After long searches based on drops, I came across this key drop, which surprised me a lot, because I know it is not normal (I play this game since I have 8 or 9 years old!), But it also made me smile, indeed, in my route planning, at the base I had to buy 12 keys to the merchant (480 horns) passing by a mini-game of chance 2 times One can only possess 255 horns at a time! So I pushed my research to understand how to get these keys, here are the conditions:
Do not get fixed drop in the current dungeon, have at least 1 key on yourself and manipulate luck by eliminating an enemy that has only to drop magic pots (refer to the "drops enemies" section). Indeed there are no other types of enemies that can favor this drop.
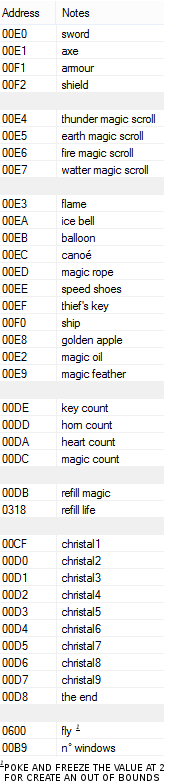
- Item's specifications and utilities
- Axe:
Allows you to cut trees and is required to access certain places on the map.
Allows you to cut trees and is required to access certain places on the map.
- Magic Rope:
Essential to complete the game and get "the Earth Magic scroll". It is used to climb walls to reach inaccessible places.
Essential to complete the game and get "the Earth Magic scroll". It is used to climb walls to reach inaccessible places.
- The Earth Magic Scroll:
You can not finish the game without. It is used to break rocks and blocks, opening up new issues.
It also serves to freeze enemies (not applicable to bosses, does just 2 damage).
You can not finish the game without. It is used to break rocks and blocks, opening up new issues.
It also serves to freeze enemies (not applicable to bosses, does just 2 damage).
- Canoe:
Required to access dungeon 5. It is used to cross rivers.
Required to access dungeon 5. It is used to cross rivers.
- Speed shoes:
Increases player's movement speed.
Increases player's movement speed.
- Ship:
Necessary to reach dungeons 8 and 9. It is used to navigate in deep water.
Necessary to reach dungeons 8 and 9. It is used to navigate in deep water.
- Ice bell:
It is impossible to finish the game without, as it serves to open the passage leading to dungeon 9. Can be used to discover the breakable trees and rocks of the game, as well as freeze the lava and kill any enemies of fire instantly.
It is impossible to finish the game without, as it serves to open the passage leading to dungeon 9. Can be used to discover the breakable trees and rocks of the game, as well as freeze the lava and kill any enemies of fire instantly.
- Golden axe:
It is the only weapon that deal damages to the final boss.
It is the only weapon that deal damages to the final boss.
-CONDITION TO OBTAIN THE EARTH MAGIC SCROLL:
Pay 50 horns to Battler.
Pay 50 horns to Battler.
-CONDITION TO OBTAIN THE THUNDER MAGIC SCROLL:
Give a golden apple to Gillian.
Give a golden apple to Gillian.
-CONDITION TO OBTAIN THE SWORD LONG:
Having 7 hearts and "the thunder Magic scroll", without its two conditions combined, it is impossible to open the chest containing this weapon.
Having 7 hearts and "the thunder Magic scroll", without its two conditions combined, it is impossible to open the chest containing this weapon.
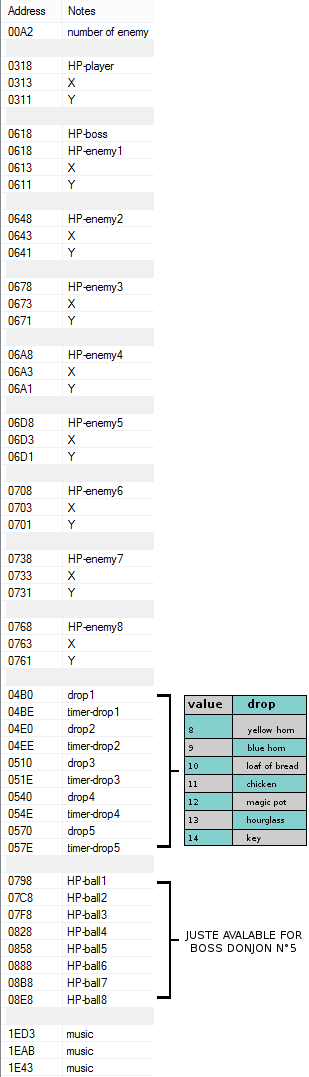
-ENEMIE DROP:
Below is a summary table of the drops, ranked from the highest to the lowest rate of occurrence (valid for all declinations of enemy colors).
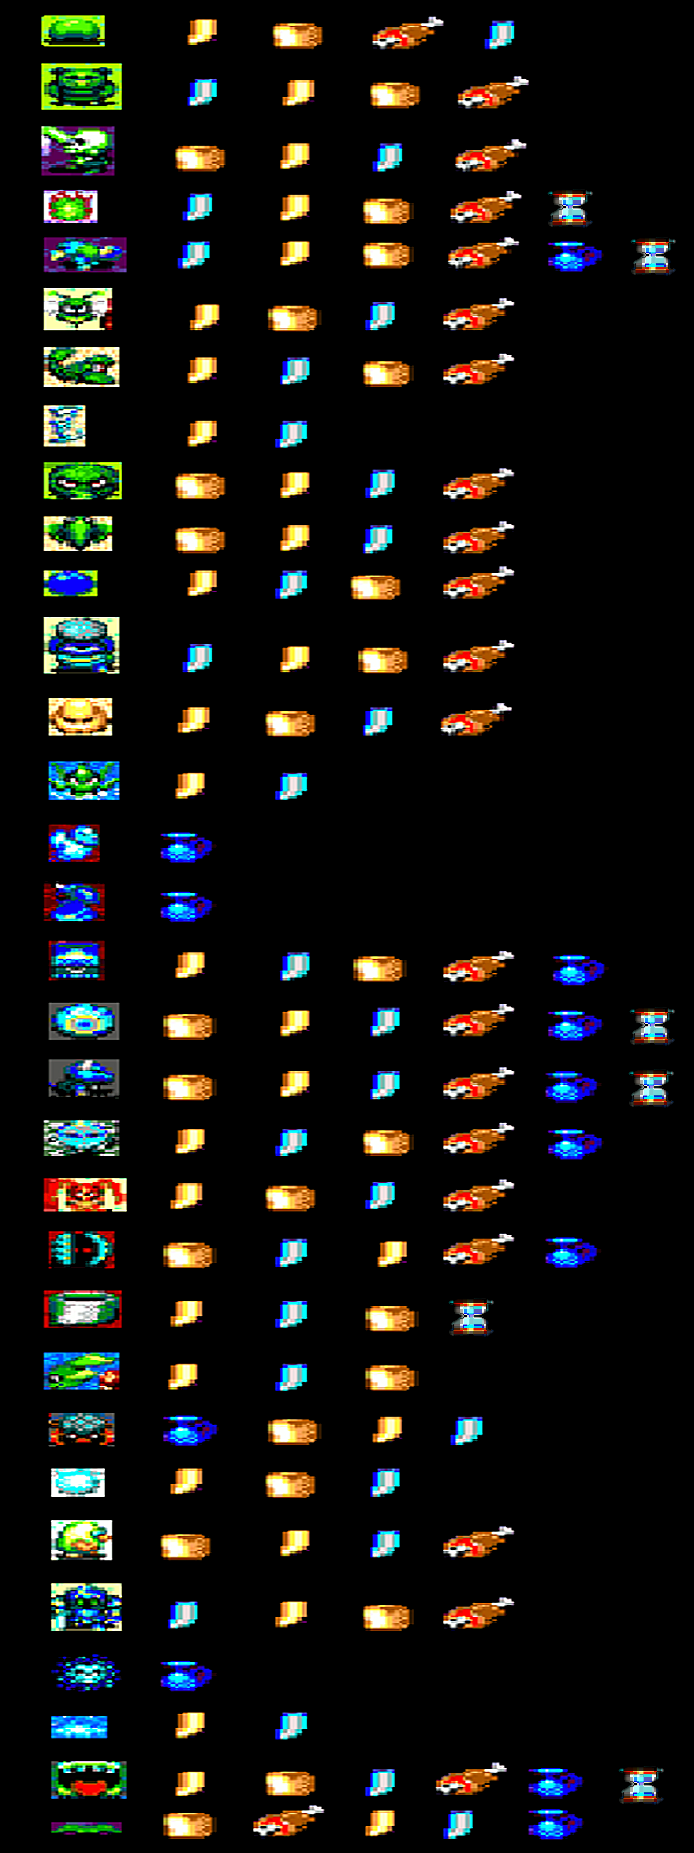
Below is a summary table of the drops, ranked from the highest to the lowest rate of occurrence (valid for all declinations of enemy colors).
- DROP BLOCKING:
Sometimes, in the dungeons, it will be impossible to get a chicken drop, indeed the fact that a door unlocks when the drop appears in the RAM, makes it resets to zero the next frame.
Sometimes, in the dungeons, it will be impossible to get a chicken drop, indeed the fact that a door unlocks when the drop appears in the RAM, makes it resets to zero the next frame.
- LIFE AND CRYSTALS:
Recovering a crystal gives an extra heart then causes the filling of all the missing cores, which is a waste of time. The ideal would be full Life, however, if we do not miss more than half a heart, there is no point in killing an enemy to fill this one, since it will take longer that filling bind to the crystal.
Recovering a crystal gives an extra heart then causes the filling of all the missing cores, which is a waste of time. The ideal would be full Life, however, if we do not miss more than half a heart, there is no point in killing an enemy to fill this one, since it will take longer that filling bind to the crystal.
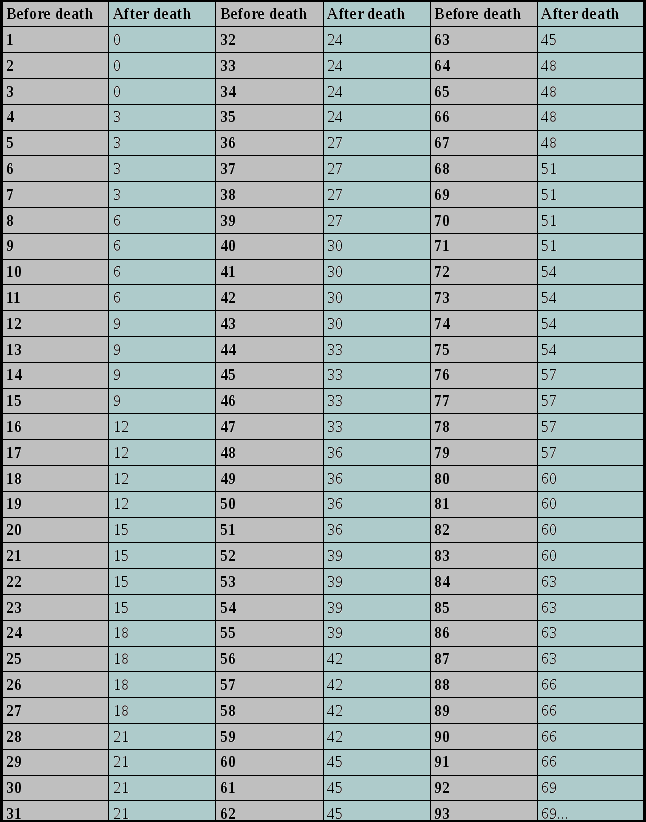
- DEATH AND LOSS OF MONEY:
At each death, a loss of money is attributed, depending on how many horns the player has.
Here is a summary table:
At each death, a loss of money is attributed, depending on how many horns the player has.
Here is a summary table:
- WEAPONS DAMAGES:
Here is a table summarizing the different weapons and their associated damages.
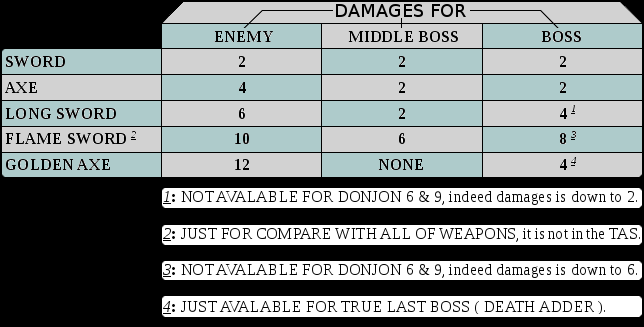
Here is a table summarizing the different weapons and their associated damages.
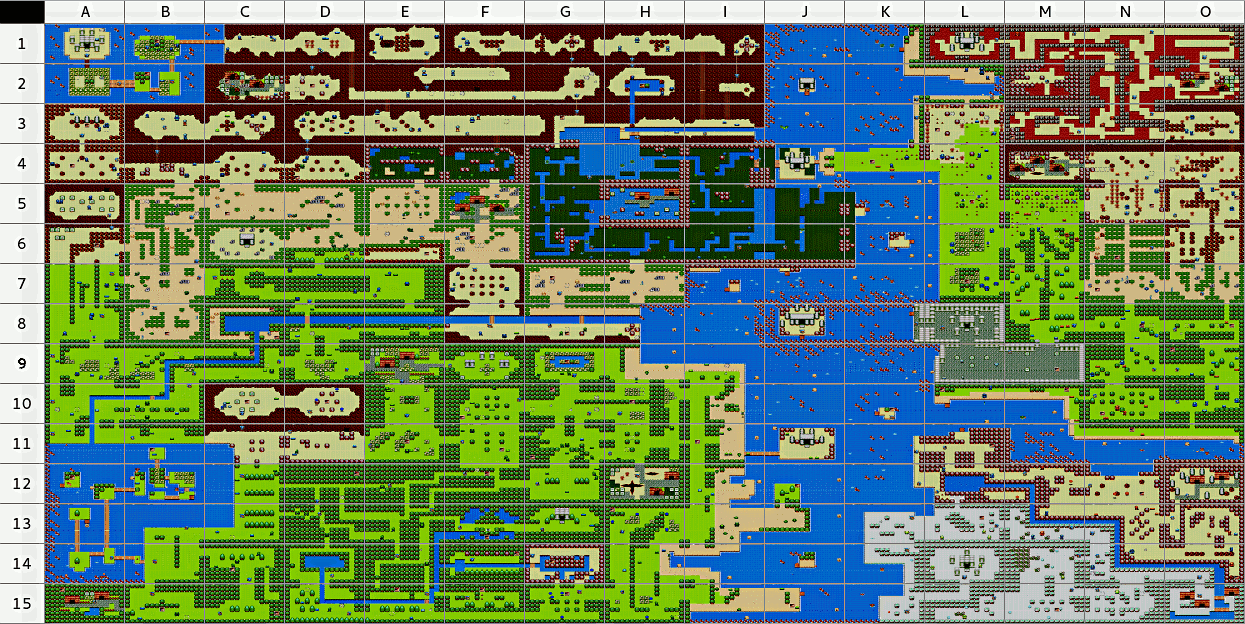
- MAP:
- ROUTE PLANNING:
Go to Dungeon 1, get the axe, 92 horns and kill the boss to obtain the orange crystal. Go out to the South to get a hearth then go West, take the golden apple, continue to West to arrive at a window where is a hidden trader. Kill all the enemies to discover the secret basement and get some horns to possess a maximum of 80. Meet the trader to obtain 2 keys.
Back in the plains, go North in the desert zone to access Dungeon 3.
In this maze, recover 4 keys, 50 horns, "The Magic Rope" and kill the boss to obtain the green crystal.
Once outside, return in plains to go to Dungeon 2.
Recover 1 key, 22 horns, and the yellow crystal by killing the boss, then go outside. Go South to meet Gillian and trade the golden apple to "The Thunder Magic scroll" then go North to meet Battler. On the way, recover 11 horns, for a total of 50 that will allow to buy "The Earth Magic scroll".
Go North-West, get the Long Sword then go to the top of the map to enter Dungeon 4.
Recover 4 keys , the canoe then kill the boss to obtain the blue crystal. Back outside, go to Dungeon 5 to get the "Speed Shoes", 3 keys the green crystal and 20 horns.
This dungeon is a crossroads allowing to access the 2nd part of the map, once this one done.
In this 2nd part, go South and discover a savepoint under a tomb (a death is so fast arrived).
Continue North to find Dungeon 7.
Kill the middle boss and get the "Ship", then kill the boss to obtain the grey crystal.
Once outside, go South to meet a coyote who, for 10 horns, will allow you to travel an inaccessible part of the map that leads to Dungeon 8.
Inside, kill the middle boss, get the "Thieth's key" and defeat the boss to obtain the blue crystal. Go outside to return to the savepoint and enter Dungeon 6. Kill the boss to get the grey crystal then take the "Ice Bell" before leaving.
Go to Dungeon 7 located in the North, kill the middle boss and the boss to finally obtain the red crystal, which allows to reach the last dungeon, guarded by the terrible Death Adder.
In this once, kill 2 middle bosses to get the "Golden Axe" and then exchange Mr. Adder's life for peace in Princess Tyris' kingdom.
- Bosses explainations
- Dungeon 1, green soldier:
you just need to manipulate its behavior to get him down and avoid him to attack under his protective sphere, which makes him invinsible for many frames.
- Dungeon 3, red soldier:
same thing as the 1st boss.
- Dungeon 2, green dragon:
we only can dodge his fireballs on the lower part of the blocks that protect him, so just manipulate its behavior to make him not attack on the upper part.
- Dungeon 4, green wizard:
this boss is the most RNG of the game, that force to manipulate luck to make him respawn as soon as possible on the screen. We can't attack him when entering the room, he must disappear once, then we can hit him a time everytime he appears.
- Dungeon 5, fire skull:
normallly, we must start by removing his eight fireballs that turns around him, to be able to hit him. But with a frame-perfect hit using "The Earth Magic scroll", we can deal 4 damages whilst freezing his fireballs on-site, that make gain a hit and 34 frames of invulnerability. His behavior his manipulable to make him stay at the bottom of the screen and not go lower than he does in this TAS.
- Dungeon 7, green crazy flame:
RNG boss where I manipulate his behavior to make him appear in the wished flame. After hitting him, you need to wait 92 frames to hit him again.
- Dungeon 8, red wizard:
same thing as the 4th boss, with an attack furthermore when he disappears.
- Dungeon 6, red dragon:
same as the 2nd boss, with an attack furthermore taht allow him to launch 5 fireballs instead of 3.
- Dungeon 9, false Death Adder:
launch 2 axes per attack. I use this glitch just to show that it's possible to wait at the entrance where he can't reach us.
- Dungeon 10, Death Adder:
same as the last one, with the particularity to be able to launch 3 axes and a power of explosion on the ground. I kill him at a very precise position, so that the hero doesn't have to move by himself to launch the final scene. I think he walked enough.
- USEFUL RAM ADDRESSES:
- MORE ADDRESSES:
- SOME NUMBERS AND OTHER SUBLETIES:
A death costs 202 frames (from his explosion to his respawn)
The player have 48 frames of invulnerability, whereas an enemy only have 34 (bosses included expect green crazy flame)
The loading time when entering a place is 89 frames and go out is 96 frames.
2'28" (8216 frames) is the time needed to obtain the "Long Sword" (hearth + golden apple + exchange + getting the sword)
37 is the number of fights that will take half the time compared to the axe.
36 is the number of frames that count the use of the pause menu.
The "Speed Shoes" makes the player 1.25 times faster.
More than 600, it's the number of attempts made on the original hardware (SMS2) to obtain one non-fixed key drop.
1000, it's the number of times I thank the people who makes BIZHAWK what it is!
- SPECIAL BIG THANKS TO:
STOVENT for translating this long submission text and the video encoding ;)
POKOTA for helping me to the lua script uppercase problem.
LAPOGNE36 & NIAMEK for answer and advise me, for my question of 100% categorie.
MARTYSLACKJAW for sell me the game to a good price ( my cartridge don't run normally !!! )
And YOU for watch and listen this!
Masterjun: Judging!
Masterjun: Great game, really impressive TAS with thorough planning! Really entertaining movements at places and overall an optimized, fast-paced run.
Accepting to Moons!
Spikestuff: Publishing.
Spikestuff: Updated the images to be onsite.