Hello and welcome to Hetfield90 and Flameberger's Mega Man Zero 2 TAS in 49:47.7(18:33 in-game time). It is a 5616 frame(1 minute and 34.0 second) improvement over the published run after accounting for emulator differences. The Japanese version is used since zips were patched out of the English version.
Encodes
Without cutscenes:
Rolanmen's encode(with filter):
Goals
- Emulator used: BizHawk 1.12.0(mGBA core)
- Genre: Action
- Genre: Platformer
- Aims for fastest completion time
- Abuses programming errors in the game
- Manipulates luck
- Takes damage to save time
Overview
Back around June of 2017, while Flameberger was still working on the Z1, I(Hetfield90) started TASing this game, primarily using Kuribon's individual level videos as references, and produced a first draft with a time of 50:27(which was a 54 seconds improvement over the published run after accounting for emulator differences). Shortly after, Flameberger joined the project and was able to apply his MMZ series TASing expertise he learned while TASing Z1 to its sequel. With both of us working on the project, we were able to further improve the run by an additional 40 seconds thanks to the game's many different movement mechanics, zipping opportunities, routing options, as well as many other factors for optimization.
About the Run
Movement Mechanics
Oh jeez, this game has some movement. Horizontal movement is fundamentally composed of stringing together dashes and jumps to maintain dash speed (3.5 pixels per frame.) There are, however, a number of more advanced techniques that can let us move a bit faster than that.
Ledge Dash: If we dash directly off of a ledge there will be one frame where we get double speed.
Ledge Walk: Same as above, except at walking speed. Default walking speed is 2 pixels per frame, when doubled by a ledge walk it's half a pixel better than dashing. Obviously a ledge dash is preferable when possible, but walks have the advantage of allowing us to instantly walljump from the ledge we went over. There are numerous cases where dashing over a ledge would lead us directly into a wall or enemy; we can use a ledge walk into walljump instead.
Wall Boost: This one is a bit trickier. If we just barely fall past a corner and then turn backwards into the wall it will actually push us away from that wall some amount of pixels, usually between 4 and 7. After this we would begin sliding on the wall and it would be awful. If we walljump we get kind of sucked into the wall and it's awful. However, if we are in an attack animation and then walljump after the boost, we get to keep our ill gotten pixels. This comes with an additional advantage, if we start the attack immediately before the walljump, nothing else of note happens. If we start the attack earlier than that, a smoke cloud will be kicked up on the wall when we boost off of it, affecting the RNG. This choice increases our ability to manipulate RNG. Generally wall boosts obsolete ledge walking, because they have the same advantage of ending in a walljump and they usually give a larger boost. There are some cases where it's not a viable option, for example if the attack would hit an enemy that we don't want to hit, if we are busy charging our weapons, or if we need to set up our x-axis sub pixels for some precise movement later on in the stage.
Chain Swings: After we equip the Chain Rod, Zero will go into Bionic Commando mode. Grabbing onto a ceiling from long range can be used to cover ground noticeably faster than regular dashing. On the frame the chain latches, we get a very sizable boost, often in the 8 to 11 pixel range, and then we can spend a few frames swinging at speeds ranging in the 3.5 to 5.5 pixels per frame. The main detriment is that after releasing the chain we lose dash speed, and are thus stuck moving at a mere 2 pixels per frame until we land on solid ground and start dashing again. If the ceiling is low enough there will only be 1 frame of walk speed before landing. If the ground we are landing on slopes upwards it's possible to spend 0 frames at walk speed. Even on medium height ceilings where it will take as much as 3 frames for us to land, there are still significant savings from swinging. We can also use a horizontal chain rod to grab onto a door and pull ourselves into it, resulting in a large zip near the door since the distance we would have covered swinging diagonally is redirected straight forward by the floor pushing us back upwards.
Vertical movement is relatively simpler, although it can be tricky to optimize exactly. The only notable technique is the delayed dash walljump. After starting a walljump there is a 4 frame grace period within which you can start a dash. This is advantageous because if we start the dash later it means we don't move as far away from the wall before we start going back towards it, allowing us to jump more frequently. The more complicated versions of delayed dashes that existed in Z1 do not work in this game. Note that delayed dashes can not be used if we are in an attack animation.
Lastly we have the zips, which are only possible on the Japanese version of the game. There are two main forms of zips, but they both function on the same basic premise. Due to Zero's hitbox not being completely centered, it's possible to get 2 pixels closer to a wall if you are facing away from it. Also, grabbing a ceiling with a vertical chain will move you backwards exactly 1 pixel. Therefore, if you are pressed up against a wall while facing away from it and then Chain Rod grab a ceiling, the chain will attempt to move you inside the wall. If the wall is on your right side you will simply be zipped all the way up to the top of that wall, assuming that isn't too far away. In the case of a left side wall, things are a bit trickier. On the frame that the Chain Rod latches a directional right input will cause you to instantly swing some distance in that direction, and will initiate a sort of glitched state where you will get zipped around left and right as you swing. Depending on left/right inputs made during this state and the terrain near you, it can be possible to clip into nearby walls or through the ceiling above you.
Getting pressed up against the wall backwards is a bit of a trick itself. The old setup was to slide on the wall for some time and then drop from it, turning you away from the wall but leaving you pressed up against it. A much faster setup is to abuse the fact that you can move left or right but can not turn around while in a chain rod attack animation. What we do is, while jumping towards the wall, turn away from it for a frame, Chain Rod directly up the next frame, then resume moving towards the wall while facing away from it. With the proper timing the chain will latch on the ceiling at the same moment as we hit the wall and we can initiate the zip instantly. While this is the fastest setup in most cases, you can only do it if you are still moving upwards during the frame you press up against the wall, so it cannot be done on walls where you are require to jump from very far away. The next best alternative is to use the old set up, but perform a wall slide slash to turn around on the wall instantly instead of waiting out the standard animation.
When going through doors, it's generally optimal to dash into the door. This causes you to hit the door from rather far back (because your hitbox is wider while dashing,) which in turn causes us to be very close to the door behind us on the far side. When we start our next dash the widening hitbox collides with the door behind us and pushes us forward some pixels. On the other hand, when entering boss chambers it's often preferable to jump into the door, causing us to be farther forward in the room. In many cases during pre-boss cutscenes Zero will walk forward to some specific X value, being farther forward means less time walking. There is also an acceleration period at the start of a walk along the ground, which can be completely avoided if you start a forced cutscene walk from the air instead.
RNG Manipulation
The RNG cycles only when random events occur; it does not change frame by frame. Furthermore, it gets set to an initial seed value at the start of every stage. This makes the run very conveniently editable, as saving frames generally does not affect our manipulation and changing one stage earlier run won't affect subsequent stages. Examples of events that cycle the RNG include shooting a wall with the buster, killing enemies, and kicking up smoke while sliding on walls (but not when dashing on the ground.) We often found ourselves limited in RNG changing options that would not cost time. We spend only a small portion of the run with the buster equipped so that's not generally an option. Changing the enemies we kill can cost hitlag frames and also impact our experience and stage score routing. The discovery of wall boosts with optional smoke clouds did open things up a little bit, thankfully.
Boss Fights
This game uses a combo system where certain sequences of attacks can continue to hit even if the boss has invincibility frames. Zero's standard three hit slashes will combo into each other. Charged saber swings, jump slashes, rising slash, and the down stab all have the same combo value as the first swing of that sequence. We can combo any of those into a triple slash, though only the 2nd and 3rd hits of the sequence will deal damage in those cases. A very powerful combo later in the run is charge saber into charge chain rod, especially when we can take advantage of an elemental weakness. Here is a table that shows which tier each attack belongs to(note that charge attacks and ex-skills deal more damage when attacking with an elemental weakness, and the 3rd combo slash does more damage with Rise Armor equipped).

On some bosses, the fight won't end properly until Zero goes into an idle state. I believe this happens on fights like Panter and Hyleg where it would be possible to kill the boss while over a pit, and they don't want to take control away from you right away in case you need to get back to solid ground. This rule is in effect for the entire boss rush and can affect our strategy. One example is the Panter fight, where we take a damage boost at the same moment as we end the battle; this cancels our attack animation much faster than waiting for it to time out. This is not always an option, for example on Hyleg we are already in i-frames at the end and thus can not take damage. During the boss rush we only have enough health to use this once.
Routing
Overall, routing was the most difficult aspect of making this run. As far as stage order goes, Panter is first to farm triple slash from the auto scroller and get A-rank for Phoenix's ex-skill(rising slash) with subsequent stages being ordered around minimizing the number of pause menus. The difficulty of the routing, however, comes from getting A-rank and the different levels of charge attacks at specific points in the run while minimizing hit lag generated from attacks.
Rank
You get ex-skills from bosses by being A-rank during their stage, but since getting an ex-skill from a boss gives you an extra 43-frame dialogue box at the end of the score screen, you only want to be A-rank on stages that give ex-skills useful to the speedrun, which are Phoenix's(rising slash) and Leviathan's(downward stab). Note that you only need to be A-rank during these stages; the score you get after the end of the stage doesn't matter for getting that particular boss' ex-skill.
You need an average of 86 mission points across all previous stages to achieve A-rank for any given stage, and the only ways to increase your mission points in a speedrun are by either killing more enemies or taking less damage(the points you get from other factors contributing to mission score, those being mission objectives, clear time, retries, and elf usage, are usually set in stone).
You lose a consistent 1 mission point out of 15 for every 5 points of damage taken on each stage, but the amount of points you gain per enemy killed varies from stage to stage. This table shows how many enemies you need to kill for each of the 15 point thresholds on each stage pertaining to getting Leviathan's ex-skill(intro is left out since you need to get 85 points on that stage regardless to avoid Panter's ex-skill, and Panter is left out since the autoscroller gives you 15 enemy points no matter what). The top row represents each of the 15 potential rank points you can get for enemy kills on each given stage, and numbers below are the corresponding number of enemy kills required to get that many points on each stage(the highlighted boxes being the number of kills we got for that stage).
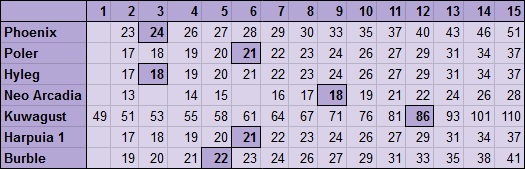
As you can see, even within stages, not all enemy kills give the same amount of mission points, and not all enemies require the same amount of hit lag to kill either, so the rank route required a lot of tweaking over the course of making the TAS as we found more efficient ways to obtain points before it was actually finalized.
Weapon Experience
In addition to balancing the rank route around minimizing hit lag, the experience routes for saber and chain rod had to be balanced around hit lag as well. Since killing enemies usually grants both mission points and weapon experience, optimizing all 3 routes while ensuring we were getting fewest number of hit lag frames possible required months of planning and backtracking before we were satisfied with the result.
For saber xp, 2nd combo slashes give 2 xp, 3rd combo slashes give 4 xp, charge slashes give 8 xp, and every other kind of slash gives 1 xp. Since the elemental golems are the earliest boss you can realistically have charge slash by, we farm just enough xp to get it on the final enemy of their stage, since many optional enemies killed for rank points on subsequent stages can be farmed for multiples of 8 saber xp with charge slash. Quick charge saber is obtained at the start of the Leviathan fight since getting it for any earlier bosses would require more hitlag to farm than it would save on those bosses.
For chain xp, all of the optional farming is done on the Kuwagust autoscroller and Rainbow Devil fight since these are the 2 places where you can get the highest ratio of chain xp per frame of hit lag in the game. The Kuwagust autoscroller was the lynchpin of xp routing in the run for both chain and saber xp, since you have the most freedom to stack multiple hitboxes on top of eachother during it.
Stage Comments
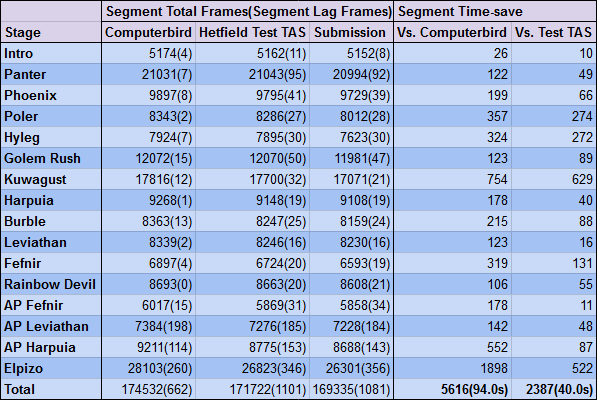
This table compares to both Computerbird's published run on VBA as well as Hetfield90's unpublished test TAS on BizHawk. Lag frames are removed from comparisons to the published run due to emulator differences, but left in the comparisons to the test TAS on BizHawk.
1. Intro Stage(26 frames saved) 
Oh boy, here we go. This stage doesn't have a whole lot going on but the jagged terrain does give us a lot of opportunities for ledge dashes, ledge walks, and wall boosts. Interestingly, the rubble blocks that fall when we touch them can not seem to be wall boosted from, so I ended up doing a lot of ledge walks on those. Scorpion King is a pretty simple boss because we don't have any combo moves unlocked, just killing him one hit at a time. We start with a charged buster to hit him as early as possible, since the fact that it only does 3 damage does not increase the amount of hits it takes to kill him, and it reduces 4 frames of hit lag. The charging of the buster is significant, it ended up being optimal to be one frame short of finishing the charge when we trigger the boss cutscene. Not having the spinning charge particles dodged a lot of lag frames during the scene where the stone wall crumbles. Note that you cannot gain weapon experience yet on the intro stage, so buster is heavily prioritized over saber here for hitlag reduction purposes, except when saber is needed to reduce the number of attacks it takes to kill the golems or Scorpion King.
2. Panter Flauclaws(103 frames saved) 
We slash quite a few enemies on the way through this stage because we don't want to be fighting any more bosses without combos. Unlocking the double slash, which grants two xp per hit, at the start of the autoscroller let's us farm those enemies much more efficiently. Then we unlock the triple just in time for Panter, otherwise the stage is trivial.
Panter always seemed like a really dumb name to me, like it's a mean nickname someone would use for him if he was out of shape. Basically we just triple slash him a lot and time our i-frames so we get damage boosted out of our last attack exactly as he dies.
3. Phoenix Magnion(187 frames saved) 
The bombs in this stage can be launched in various directions based on how you hit them. After being launched, the bombs can still be attacked for experience without destroying them or changing their angle. We use this to our advantage by launching bombs in such a way that they will fly near other enemies, allowing us to get doubled saber hits for more experience. In some cases, we launch bombs such that they will destroy other bombs, earning us more enemy kill points. The shield boomerang gets its brief moment of fame almost exclusively on this stage. A tricky shield throw in the room before the first reactor destroys one bomb offscreen, hits a second bomb behind us on its way back, and then that second bomb's explosion destroys a third. The reactors are destroyed with damage stacking, a technique of overlapping the saber/shield hitboxes that causes them to alternate dealing damage every frame. In the room after the first reactor, a bomb needs to be launched into a spike wall with exceptional precision. We jump over its explosion and then get damage boosted forwards by it on the far side. It seemed impossible to get the required angle with a saber slash; only the charged shield throw could manage it. Conveniently, the shield kills another enemy behind us as it returns. The next damage boost was also pretty tricky: two bombs needed to be launched at the right times and angles to collide in midair in such a position that we could dash under the explosion and jump into it for another forward boost. If they collide too far left, the turret enemy won't be destroyed (costing us a point), too far right and we run into that turret before we can get the forward boost.
Phoenix is wonky. At the start of the fight, he won't do anything until you try to attack him. We set up an orbiting shield throw around us such that as soon as the fight starts, the shield is close enough to him to trigger his counter. We also use charged shield throws as parts of our combos, saving us hitlag (since only the 2nd and 3rd slashes combo after the shield,) and also doing a little more damage. On each of the reactor rooms you'll have noticed us sliding on walls to kick up a lot of smoke clouds, this was RNG manipulation for this fight. There is only one Phoenix pattern that facilitates a 4-cycle fight: flame dash>mirror images(low spawn)>flame dash>mirror images(low spawn), so it is extremely lucky that his stage has plenty of downtime to manipulate it.
4. Poler Kamrous(357 frames saved) 
We get a few final uses of the shield at the start here, killing enemies for points without generating hitlag. After that, it's Chain Rod time from here till the end of the run. Towards the end of the making of this run, our semi-final routing optimizations resulted in a saber experience surplus, so getting as many hitlag-free kills as possible with the shield in this and the previous stage was paramount in being able to retain our required rank points while shaving off excess saber xp.
You'll see our first uses of chain rod swings as well as several zips. We spend a little extra setup time on the golem miniboss so we can do the final triple slash facing left. This causes the final hit to destroy both the boss and one of the icicles he spawned. Since the third hit of the combo is worth 4 xp per hit, doubling it was very valuable.
5. Hyleg Ourobockle(324 frames saved) 
This stage turned into a major breakthrough for the route. There's a giant crusher at the end running on a global timer. Early versions of the TAS weren't close to being able to make the cycle so we spent the extra time farming a lot of very efficient saber xp. As more and more movement tech was discovered we were eventually able to beat the cycle, saving a million frames but requiring us to find our xp elsewhere. Before climbing up to the interior half of the stage, we've got two large pits to get over. The second one, we simply swing across because it's too wide. The first features a bit of an interesting use of the Chain Rod. After grabbing onto a wall with the chain and then releasing, Zero's falling speed is reset to zero. We use this to keep ourselves from falling quite as far before getting in range to walljump. The upcoming wall has a lot of indented spaces but we can only zip out of the top one because there is a limit on how far the game is willing to send you. The end of the stage features a really tricky left wall zip where we had to pull a block into position to set it up. Our first instinct for optimizing this was to grab the box as early as possible, with the idea that that would lead to it getting in position as early as possible. It turns out it's preferable to go further to the right before grabbing it because the box gets pulled more rapidly when it's far away from you.
6. Elemental Golems(123 frames saved) 
I have nothing to say about this stage.
7. Kuwagust Anchus(750 frames saved) 
This stage starts with us moving across some bug ships or some such. They slowly move left and right, thus acting basically as conveyor belts. Ideally, we would be jumping a lot when they are moving left and dashing along them while they are going right. Unfortunately, one of them shoots a lemon that would get in our way if we went any faster, so we can only really apply this strategy on the last couple of ships. In the second room inside the ship, we fall down a chute and get hit by a lightning bar in the way. It's possible to zip into the left wall and fall past safely, but that ends up costing a little more time than it's worth. Then we come to the autoscroller. Heck this autoscroller right to heck, tbh. Basically, we've got 90 seconds and 85 enemies to burn. Our exact strategy here changed quite a bit over time and had a major impact on the overall routing of the run. Eventually, we settled on the very practical approach of killing the enemies almost exclusively with the rising slash, since it and other ex-skills do not generate hit lag. Alternative strategies we employed previously involved using a lot of charged saber and chain attacks to get large amounts of xp per hit lag. Those strategies allowed much earlier quick charge level ups, saving us some time on bosses, but overall losing too much time to hitlag. We do still need to farm some extra xp for both weapons. With the saber, we setup a situation where three enemies are stacked up for us to triple charge slash, granting an exceptionally efficient 24 frames for one instance hitlag. We also do one double hit later(thankfully the routing did not require a second triple hit because setting those up and executing them without lagging is extremely difficult). For the Chain Rod, we take advantage of the fact that the uncharged chain can hit health and energy crystal drops. By manipulating enemies to spawn in the same locations and to all drop stuff, we can make a stack of up to 4 items and then farm repeated hits off of those for massive xp. Overall controlling the RNG during the scroller is rather limited. If the enemies are spawning near the far left we can find time to kick up a few smoke clouds on the wall there. Otherwise our only option is to choose between killing the guys before or after they start rotating. After exiting the autoscroller you will see us zip through the door into the next area. No, we can't use that to skip the autoscroller. Doing so would skip flags and then the boss would fail to spawn. During the Kuwagust fight, we'll take several damage boosts immediately after hitting him. This is done to cancel out of our attack animations, which is important because we can't start charging a weapon until after its previous attack animation is finished.
8. Sage Harpuia(177 frames saved) 
There is almost nothing noteworthy about this stage. The large number of optional enemies and the simplicity of manipulating the boss does make it a convenient choice for adding or removing mission points as needed by the route.
9. Burble Hekelot(215 frames saved) 
The boxes in this stage count as enemies, so the 4 as you enter the building can be farmed for mission points and 32 saber xp at the cost of 4 hit lag frames plus 2 lag frames.
Burble is one of the most demanding boss of the run as far as acceptable patterns go, and one of the most difficult to manipulate since you need to get at least 87 points(requires at least 19 enemy kills, AKA nearly every enemy in the direct path) on the stage to bring the rank average up to 86 to get Leviathan's ex-skill in the next stage, so there aren't many options for killing different amounts of enemies.
The way Burble's AI works is that he'll choose 1 of 2 actions on any given RNG value depending on whether he was just knocked back or not. His list of actions include wait, short jump, long jump, jump to tree, jump to wall, but he can't do a short or long jump immediately after being knocked back, so you need him to wait before doing one of those actions for it to work. Incidentally, in addition to being the most difficult to manipulate, the short/long jumps are the best patterns for him to do since you want him to stay near the ground for combo slashes. Furthermore, he cannot repeat short jump for two consecutive non-wait actions, making a decent pattern even more rare. Due to the limited nature of RNG manipulation in this game, and on this stage especially, getting an ideal fight of all short/long jumps is impractical. Luckily, you can do one airborne chain rod combo if he jumps to the wall or tree, still kill him in the same number of combos, and farm 6 chain rod xp in the process. As for the jump to the wall at the end, you have to wait a few frames longer for him to fall to the ground than a jump, but this actually ended up being 2 frames faster than the only other acceptable fight within the range of reachable RNG values. In addition to these 2 frames saved, we also saved a mission point from taking less damage, and got an additional 2 mission points from 2 caterpillars which spawned and died offscreen right before the end of the fight, allowing us to take 12 frames of hitlag out Harpuia's stage.
10. Fairy Leviathan(123 frames saved) 
Since we're at exactly 86 average points here, we need to kill as few enemies as possible on this stage to get 85 points to avoid getting Fefnir's ex-skill, which means killing the spiked wheel carriers for 16 saber xp is out of the question.
We get quick charge saber at the start of the Leviathan fight since it saves a net 31 frames over getting it at the start of the Fefnir fight, requiring only 1 extra double charge slash kill on the Kuwagust autoscroller.
Leviathan needs to be killed low to the ground so the camera takes less time panning up to her for her post-fight dialogue.
11. Fighting Fefnir(319 frames saved) 
The zip at the start of the stage will kill you if you move offscreen too soon, so you have to wait a bit before moving right.
This stage is heavily cycle based, since all of the lava containers run on a single timer that starts at the beginning of the stage. There are a number of them that you just have to wait for, so you have time to set up perfect X-axis positioning and backwards chain rod jumps over them.
Backwards chain rod jumps are particularly useful for wall jumps where you need to fall next to the wall for at least 3 frames before walljumping, which occurs fairly often on this stage because the the lava containers are usually directly overhead.
The left wall zip next to the girder near the end of the stage is actually the only zip in the run that needs to be set up with perfect subpixel positioning beforehand, since you're not jumping next to a wall before you zip. Luckily since we have to wait for the other girder to fall out of the way first, we can chain the ceiling to set up our subpixels.
The stun on the spiked wall beyblade before the last zip in the stage is more precise than it looks, since you have to avoid hitting the cyber elf container(you can't hit both at the same time). Doing an attack prevents delayed dash walljumping and forces you to face the same direction for part of the animation, so the climb had to be done in a very specific way to pull this off w/o getting two separate instances of hit lag.
12. Rainbow Devil(106 frames saved) 
It's possible to avoid the 1 frame walljump at the start of the stage if you don't do the first ceiling chain, but it's impossible with the ceiling chain as far as we know because it changes the position that the pantheon you have to jump over stops on, even if you line up your subpixels exactly before spawning him. We have literally no idea why this happens, but even with the wall jump, it's still a net save of 1 frame to chain the ceiling.
There's another really precise jump to get over a pantheon while avoid a wall jump immediately after the first ion cannon pantheon, but this one can luckily be set up with the ceiling chain before it.
Because of the problem with Zero only being able to increment RNG at even amounts, the only actual way to get to the other set of values without losing time in this stage was by stunning the ion cannon pantheon that blocks the low-ceiling corridor instead of killing him.
In addition to requiring a frame-perfect charge slash, the jump before the ice turret needs to be set up in an otherwise slightly sub-optimal way to kill the turret in 1 slash without getting the ground recovery animation.
While it's 2 frames faster movement to do 3 ceiling chains in a boss corridor instead of 1 door chain, ceiling chains end up being a net time loss since the position you enter the door in delays the start of the fight by 4 frames.
Here is where we farm the rest of the optional chain xp needed for a quick charge chain AP Fefnir fight. Since attacking Rainbow Devil while he's coalesced creates extra hitboxes that stack on top of him, you can hit multiple hitboxes at once for 4, 6, or 8 xp per hit. It is possible to get 10 xp in a singe hit but not without damaging him, and the optimal fight involves never actually damaging him with chain rod since it only deals 2 damage and refreshes his i-frames. The rapid back and fourth movement during the chain is to avoid hitting him during frames where not many hitboxes are active, so we ensure we are getting as much xp per hit lag as possible. We ended up farming 40 xp here at the cost of 39 frames, which is 1 frame better than what we would have gotten from manipulating another quad stack from the Kuwagust auto scroller.
As for the actual strategy for killing Rainbow Devil goes, originally our fight consisted 2 spray attacks. Since we made each of the later stages separately before hex editing them together, we didn't notice until attaching the Temple of Flame stage to the main project that it was actually impossible to get the ideal AP Fefnir pattern despite any and all attempts at RNG manipulation. Thanks to some disassembly, Flameberger was able to find a memory address which was being used miscelanneously by various bosses and which was determing AP Fefnir's action. The value on this address was being set to 0 during the first Fefnir fight, and only incremented after that on Rainbow Devil when he did a bounce or punch move. Having the devil change that value by using one of those moves was the only way to get a good pattern on AP Fefnir. Thankfully, we were able to get a spray>bounce fight that was as fast as our original fight.
13. Temple of Flame(178 frames saved) 
The lava section of the stage is unforunately too laggy to allow more than one ceiling chain.
While it would normally be slightly faster to strictly alternate between saber and chain every other hit rather than doing two consecutive charged slashes once during a 3-hp bar elemental weakeness fight, it's actually impossible to hit Fefnir with all 3 chain rod hits at the start of the fight without first taking damage to gain i-frames. Because of this you can't cancel the first chain rod animation by taking damage, so you need to do 2 consecutive charge slashes before you're charged for the next one.
14. Temple of Ice(142 frames saved) 
Leviathan's first attack is always a jet across the room, but her second attack happens to coincide with one of your charge slashes, so you want it to be homing ice dragons so you can kill them immediately as they spawn. You have no such luxury for her 3rd attack, but the least laggy pattern to get when you can't kill it immediately is the ice laser.
15. Temple of Wind(552 frames saved) 
There is a memory address(562C IWRAM), in addition to the normal RNG address, which helps determine the random actions of certain enemies in the game. It's value gets set to 0 when you spawn the bees at the beginning of the stage, and decrements by 1 if you kill the barrier attacker near the end of the stage. Originally we had been going up the left side of the barrier attacker's platform and killing him, but once we discovered it was much faster to go under it and vertical chain the right side of it(leaving the barrier attacker alive), the corresponding change in the value of this address was causing an RNG desync at the very beginning of the boss rush. Since we couldn't pass up the nearly 1 second of time save this new tech offered, we ended up having to find a way to resync the RNG of the boss rush instead.
16. Elpizo(1888 frames saved) 
Continuing with the problem created by not killing the barrier attacker in Temple of Wind, the aforementioned address will cause the zombie pantheons at the beginning of this stage to either jump or continue crawling. If they jump, they increment RNG by 1, and if they continue crawling, they don't increment it at all. While it was impossible to get Hyleg start the fight with a jump without killing an extra enemy and creating an extra dust sprite for manipulation with a value of 0 at 562C, leaving the barrier attacker alive in Temple of Wind allowed us to get that Hyleg pattern without doing either of those things, saving us time in this stage as well. The RNG was able to be resynced on Hyleg by creating dust sprites on the short walls of the snake.
It seems that the flag that causes boss fights to not end until Zero is in idle animation is tied to stages and not specific boss fights, since every boss fight in the boss rush ends once Zero reaches idle animation, not just the ones with pitfalls in them. However, this rule does not apply to either Elpizo fight.
There are a lot of possible zips in this stage, but also a lot of triggers that need to be hit to advance through the stage, those being you have to go the 2nd boss door before each set of 3 bosses and you have to kill all 3 bosses in each teleport room before you can spawn the next set of bosses or Elpizo. The 2nd boss door requirement prevents a couple of zips from being useful, and the boss kill requirement of course prevents you from just zipping to the end of the stage and fighting Elpizo.
It's one frame faster to bonk Poler at the start of the fight and pick up the health before the zip afterwards, but since this increments RNG at an even amount, it makes it impossible to get an optimal Burble pattern later on. We do however, bump into him at the end of the fight to cancel our last attack animation and end the battle earlier.
The Burble refight was definitely the 2nd hardest RNG manipulation hurdle in the run after the Kuwagust autoscroller. It has all of the same difficulties as the first Burble fight, only you have to get an optimal Panter fight immeditely beforehand w/ enough time in between to create a whopping 1 dust sprite. The bulk of the manipulation for this had to be done during the Phoenix fight, with trial and error to find out if you could still get an optimal Panter fight. Luckily it didn't matter which order you did Burble/the beetle brothers in, so you can try doing the beetles first if Burble isn't cooperating.
The Kuwagust and Herculios fight is strictly a cycle-based autoscroller. The only way to end the fight is by them crashing into eachother, so the fight is simply optimized by reducing hit lag and normal lag. Since the downward stab causes no hitlag at all, this is used predominately, with one double charge slash being necessary to make the fatest possible cycle. It is possible to make a faster cycle by using a cyber elf that cuts their hp in half, but unfortunately the animation alone takes so long to use it that it makes the fight slower over all, let alone the time you lose from picking it up/feeding it.
The first Elpizo fight alternates between a fixed action and random action every other move. His 1st action will always be a short backhop, 3rd action a long jump, 5th action a block, and 7th action a stab attack, with even numbered actions being random. The only way to mess up this cycle is by knocking him back with a charge attack. The charge chain is used at the end of the combo that conincides with his mandatory long jump since the 3rd slash doesn't hit him until the tail end of its animation, which would lose frames in a 3-hit combo, but not a 4-hit combo where you have to wait out the full triple slash animation anywhere before you can use the chain rod.
Luckily it doesn't waste time during the transition to drag Elpizo over near the right, so you can use the wall to help manipulate a golden platform for phase 2. Phase 2 is effectively an autoscroller since you can only do the triple slash when the platform is in a specific position. Other than that you just want to cancel chain rod animations which you can get high enough to bonk Elpizo with, and use the down stab when possible to reduce hit lag.
Closing Remarks
Acknowledgements
Kuribon: Kuribon's time and effort he's put into optimizing this game through his RTAs, ILs, and theory TASes were invaluable assets to making this run, especially during the earlier stages of its development. He also checked over the WIPs to notify us of possible improvements, and was able to answer any questions we had about general game mechanics.
Cleartonic: Also offered unique ideas and strategies throughout the creation of the run, a number of which ended up being significant time saves.
Rolanmen1: Started working on his and McBobX's Z2 100% TAS at some point during the middle of this any% run's development and was able to critique our WIPs and offer new ideas for time saves, most notably a handful of new zips in various stages as well as faster techniques for zipping in general.
NrgZam: Put up with months of discussion on autoscrollers and Burble Sequences.
Screenshot Suggestions
feos: Accepting to obsolete [1589] GBA Mega Man Zero 2 by computerbird in 50:54.88.
feos: Replaced the movie with a 9 frame improvement.
fsvgm777: Processing again.