Iji is an action-packed strategic platform shooter with a detailed story, large levels with multiple paths, powerful bosses and lots of secrets. There are alternate gameplay events, dialogues and scenes depending on what you do, a wealth of extras and bonus features, and seven stats to upgrade through a leveling system. Iji herself has superhuman strength and abilities, and can crack Nanotechnology, use her enemies' most devastating weapons against them, and be a pacifist or a killer - the story adapts to how you play.
The aim of this TAS is to get as close to full completion as you can in a single playthrough.
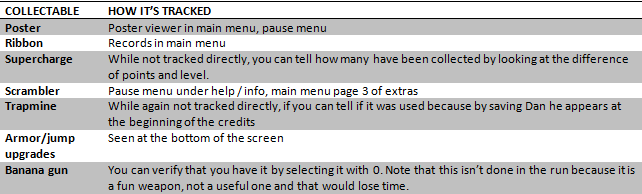
A collectable is a unique item that you can pick up that directly influences in-game statistics aka can be tracked (if you are confused look at this table) and can be aquired within a single playhrough. This includes:
- All posters, ribbons and supercharges
- Yukabacera's scrambler
- Trapmine
- Banana gun
- All armor and jump upgrades
Posters, ribbons and supercharges are all listed on the official items list in the game guide made by the developer himself. There is one of each in each sector. They are not required to beat the game but ribbons and posters are tracked in-game and are required for unlocking some of the later secrets. Most of them require certain nanoweapons to be collected.
Yukabacera’s scarmbler isn’t technically an item but you can collect it and it permanantly unlocks it and that’s why it’s included.
All jump upgrades are required to beat the game anyway but they fit in the category of collectables so that’s why they are included. All armor upgrades means maxing out armor, it doesn’t matter which ones you get (they stop spawning after you get two).
The reason that nano, armor and health pickups aren’t included even though they are listed as items on the official game guide is that firstly collecting all nano pickups in impossible due to the level cap and collecting health and armor pickups would be extremely tedious because you would have to damage yourself to collext them. Plus routing the game for minimal nano pickups is more entertaining than going to the max level every sector.
Nano overloads are also on the official list of items. There are none in sector 1, there is one in sectors 3, 4, 6, 8 and X; there are two is sectors 5, 7 and 9. Here is why they aren’t included:
- They are quite inconsistantly placed. Some are on your path and take no extra time to collect (one is sector 2, 7 and 8 but there is also one in sector 8 you have to collect (there is no way around it)). Some take very little extra time (5-10 seconds) but some (like one in sector 2 and 5) which take 20+ seconds, most of them you have to go there and then backtrack the exact way you came from.
- They don't do anything useful, they may even be harmful (in some cases you don't want to revive or you don't want to tech damage/reflect projectiles because you want to damage boost) but any harmful effects can be avoided with some rng manipulation.
- After the effect runs out it's like you didn't collect them at all.
- All in all they would add on an additional 2-3 minutes for nothing in return.
- They aren't tracked in any way
The only other item you can get in a single playthrough is the Massacre (which you get for being a pacifist) but seeing as you cannot colect some posters or get the scrambler while being a pacifist it cannot be collected. I favour having more items collected over getting the massacre.
The Null driver is on the item list but it isn’t included because it would require beating the game several times.
This run is done on normal (easiest) difficulty. This is because most importantly doing this on ultimortal is impossible for obvious reasons but doing it on extreme is impossible too. In sector 6 you need 27 points for velocithor in order to get the poster. You are capped at level 18 and would have 6 supercharges max. This means a maximum number of 24 points. While it is true that doing the run on hard is possible, Iji is very much the same but longer. Because of the level cap you would have to just spend extra time collecting nano and killing enemies. Bosses would be the same except for Tor, which would have 1050 hp instead of 900, causing a more dragged out fight. Krotera would remain identical because of rng manipulation. The only change here is the amount of damage the turret heads deal to Krotera, but it isn't optimal to use those anyway. Asha 1 would just get nuked anyway. Proxima would be identical as the only change is the amount of damage done to proxima by lightning, which I don't use since I wouldn't get the supercharge. Iosa 1 would be the same fight just dragged out because lasers from the ceiling deal 35 instead of 40 dmg. Iosa 2 would be the same. While Asha 2 could attack faster, I can already use rng manipulation to shoot the buster gun almost all the time anyway, meaning that the fight wouldn't differ much. There would have to be more nanofield reboots, meaning wasting time on leveling up skills. The only difference would be that health pickups restore 1 hp instead of 2. This is insignificant and doesn't change the gameplay in any way. There is never a situation where you have to rely on health pickups.
For encoding purposes the credits version.
When running and recording I got the best results with:
- Multithreading Mode: Allow known threads only
- Multimedia Timer Mode: Synchronous
- Message Sync Mode: Asynchronous
- Wait Sync Mode: Asynchronous
Also before you run the TAS, you need to:
- Go into the settings and set Screen shaking to low, Show time to on, go to more... and set Gamma and Special effects to off/low.
- Go into a game and exit whenever (this is to save these settings).
- Exit out of the game
These settings are done to increase stability. Hourglass is known to crash a lot when playing Iji, these settings help reduce that a bit.
feos: Judging...
feos: Replacing the submission file with the version that reaches the credits. Reasons described in this post onward. In theory this is trivial input to append, but the way Hourhlass is designed makes it hard and annoying (increasingly so, every time you have to do it). Improvements will be compared by the time the final boss is beaten anyway.
feos: It's been a long ride, but we can finally have a solid full completion definition for this game.
The common agreement on what to collect and what not to collect boils down to this: collectables are items you can pick up that affect your stats and are tracked by the game, and that can be collected in a single playthrough.
I watched this movie while checking each item listed as required, and here what this movie gets:
- All 10 posters: one per sector.
- All 10 ribbons: one per sector.
- All 10 supercharges: one per sector.
- All 2 Jump upgrades: sectors 2 and 5.
- 2 armor upgrades: sectors 3 and X.
- The ones in sectors 7 through 9 are skipped, but the last one present maxes out the stat anyway. It was just a routing decision to collect it there. Getting the earliest ones right away would result in the same final stat, but would make death abuse harder.
- Yukabacera’s scarmbler: sector 6.
- Trapmine: sector 8.
- Banana gun: sector 9.
- It is right next to a poster, so it costs basically no time to collect.
As discussed in all the possible details in both threads, getting any other items doesn't make sense as a part of this goal, mostly because it's impossible to have all at once.
Accepting to Moons.
fsvgm777: Processing.