Magicland Dizzy is the fourth core game in the Dizzy series. The Evil Wizard Zaks is back from his demise in the original Dizzy, and teleports the Yolkfolk to Magicland, casting evil spells on them to imprison them there forever. Dizzy must free them all and end the reign of Zaks for good. 25 years later, the game was remade by The Oliver Twins for the NES as Wonderland Dizzy.
This run saves more than a minute on the previous TAS, due to faster methods of item warping and a complete reroute to take full advantage of them.
Game objectives
- Emulator used: BizHawk 2.9.1
- Model used: +2A
- Aims to beat the game as quickly as possible.
- Uses death to save time.
- Heavy glitch abuse.
Comments
This is a tool-assisted speedrun of Magicland Dizzy for the ZX Spectrum. It completes the any% category, defeating Zaks and giving the devil 30 diamonds as quickly as possible.
TAS timing (power on until last input): 51847 frames, 17:16.525
RTA timing (press SPACE to start the game until "CONGRATULATIONS!" appears): 32789 frames, 10:55.518
Model
The run is performed on the Sinclair ZX Spectrum +2A. Magicland Dizzy synchronises its game engine to the screen's refresh rate, and therefore generally runs marginally (~0.1%) faster on 48K than on 128K versions. However, 128K versions of the Spectrum run their Z80 processor at a slightly higher clock rate, and the +2A and +3 also have some improvements in memory access speeds; this means that menuing and room transitions are faster on these models. The +3 is a disk-based system, and Magicland Dizzy has never been officially released on disk, so the run uses the +2A and loads the game from tape.
General information
The game runs at a relatively constant 12.5fps (one in-game frame every four screen refreshes). Menuing and screen transitions take longer than this and are simply processed as quickly as possible ignoring framerate. For the rest of this section, "frame" refers to in-game frame.
Dizzy moves horizontally at four pixels per frame, whether on the ground or in the air. While standing or walking on ground, he can stop and turn around instantly, but he cannot be controlled in the air. A jump can only be performed while standing or walking on ground; this pushes Dizzy upwards at a fixed velocity and sends him into a roll. He cannot be controlled while rolling and will continue rolling until he is both on the ground and on his feet.
Dizzy can pick up and drop items, and the game revolves around his using this ability to solve puzzles. By pressing the menu button, the inventory will open. If an item is within Dizzy's reach, he will also pick it up. Dizzy can initially hold two items at a time, and picking up a third item will cause Dizzy to automatically drop the first. Selecting an item in the inventory will make Dizzy use or drop it. The menu can only be opened while standing still, and items do not act under physics; once dropped, they are stationary and do not move until picked up again.
If an item is dropped within its designated use area, the item will (usually) disappear and some interaction will occur (e.g. opening a bridge). An ancient lamp produces its own trigger area that a cloth duster can be used on. There are also items that are used by simply holding them; for example, holding the power pill will allow Dizzy to defeat ghosts. In addition, some items have no purpose and exist as red herrings. Something sticky and Excalibur cannot be dropped once held, and permanently fill an inventory slot.
All rooms start in a fixed state, but maintain their state between visits. Enemies move in fixed patterns and cannot be manipulated. Dizzy starts with three lives and a full health bar; contact with enemies results in a draining of health, with a life lost when health is fully drained. Being bitten by Elvira, squashed by Daisy, or falling into water is an instant loss of life. Health can be restored by collecting diamonds.
Intended route
In order to beat the game, you must destroy Zaks' ring and talk to the devil while holding 30 diamonds. Of course, you can't do that immediately from the start of the game:
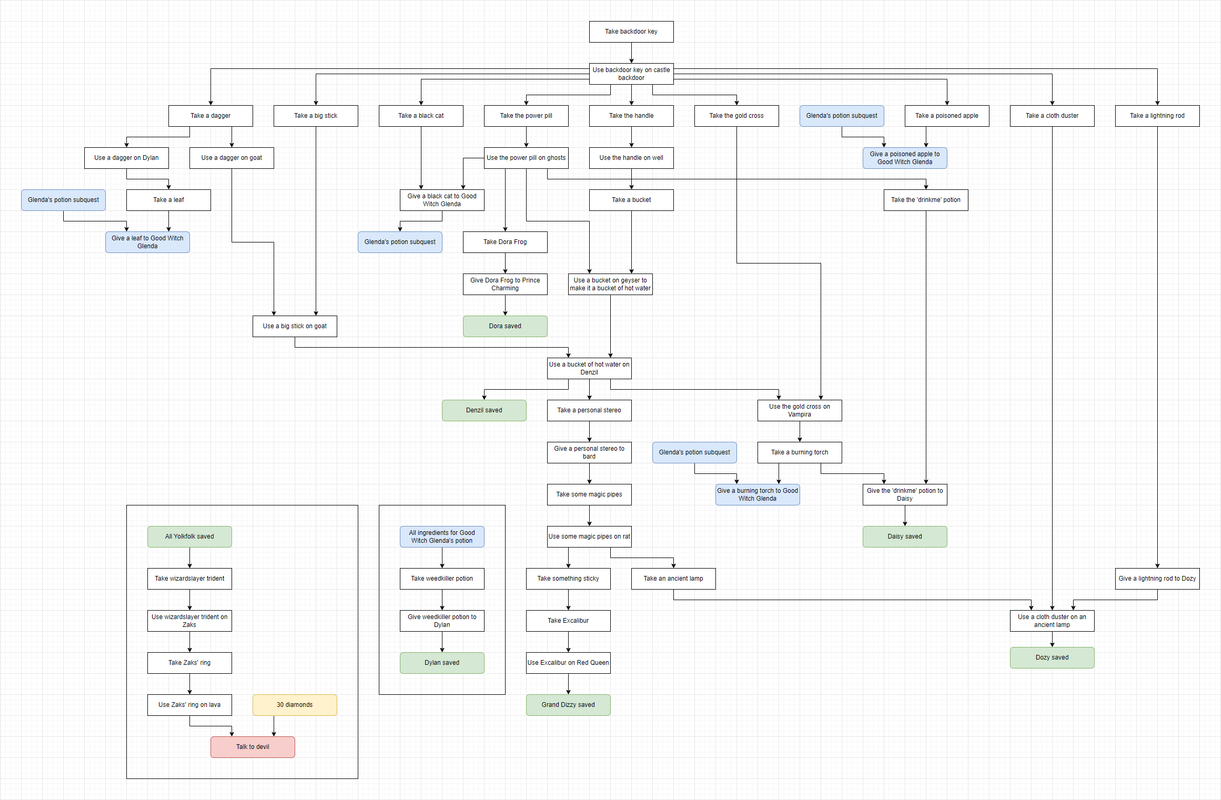
Death warp
On death, your position is usually reset to the last solid ground you stood on. In some cases, this can be fairly far away, especially when traversing clouds. Some rooms override this behaviour; for example, dying in the well resets your position to the top of the well. We use this to collect the diamond in the well without the long series of steps required to get past the rat.
Item embedding
If we drop an item such that any part of it overlaps a solid tile, the item collision takes priority and "erases" the collision of the solid tile. This isn't particularly useful by itself, but in combination with a few other glitches this is insanely powerful. Having said that, we do use this to get out of bounds twice.
Up zip
Dizzy has two hitboxes; the internal hitbox is smaller to allow small slopes and steps to be climbed without jumping; he can walk "into" the terrain by a small amount and then he will be pushed upwards when the external hitbox finds him colliding with it. If we get ourselves into a position where we are standing inside terrain, we will be continually pushed upwards until we escape. We use this to get out of bounds once.
Dialogue skip
In most cases, the trigger to talk to characters is smaller than the trigger to use items on characters. As such, you can use items on characters without triggering their dialogue first. Even with characters where this doesn't apply, by dropping an item on the edge of their dialogue trigger you can walk into the use trigger and have it take priority due to picking up the item first. This can be done to skip dialogue from Daisy, Dozy, Prince Charming, Dylan, and Good Witch Glenda. However, we no longer talk to any of these characters, thanks to...
Item warping
If we drop an item during a screen transition, the game places the item in the room we just left, but in our new screen position, i.e. on the opposite side of the screen to where we were. Depending on a number of factors related to collision and Dizzy's state, Dizzy himself can also warp from across the screen.
This is much easier said than done, of course. The menu cannot be opened while moving, so we need to create special conditions to allow us to move between screens without moving. This is done in two different ways, depending on whether we want to warp vertically or horizontally:
Vertical item warping
Some staircases can be climbed by walking (using the up zip for its intended purpose); should one of these staircases go up between two screens, it's possible to walk into a step and then stop walking and open the menu before it has finished pushing us up to the next screen. This consistently warps the item to the bottom of the screen, but will not warp Dizzy.
Instead, we must also place an item at the bottom of the screen above, embedding it in the ground and erasing the step such that Dizzy repeatedly gets pushed up by the lower screen's step and falls down again. With the collision erased from above, Dizzy will sometimes wrap along with the item.
With this method, Dizzy will only be able to fall vertically. In order to fall diagonally, Dizzy must create a wider hole with multiple overlapping items, and this takes longer and requires more items, so in the previous run we didn't do this as it was slower.
However, while we were experimenting with the Dizzy Three And A Half 1-diamond run, Faddy found a faster method of doing vertical item warping that allows falling diagonally. By placing the item on the above screen and walking away and back to it, it's possible to warp in a similar way to normal but retain horizontal movement on clipping.
With this, it's now faster to skip both the troll and Denzil, which we do three times. This means we don't have to pick up a dagger, a big stick, the handle, a bucket, or a bucket of hot water. We also use this to create a hole under Dylan for a fast final trip to the Denzil skip, and chain multiple vertical wraps to allow us to take some sticky stuff and an ancient lamp much earlier than we should be able to.
Horizontal item warping
Usually when opening the inventory, the game immediately halts to open the menu. However, in some situations the game continues for a little longer; for example, in THE HAUNTED SWAMP this delay is always present.
Unfortunately it's impossible to warp Dizzy himself in THE HAUNTED SWAMP, and warping items there is pretty much useless. But after some experimentation, I found that while the genie is firing lightning bolts, this delay is present on most frames. As a result, it's possible to warp horizontally on any screen with one side open and a wall blocking the opposite side. We use this to get out of bounds twice.
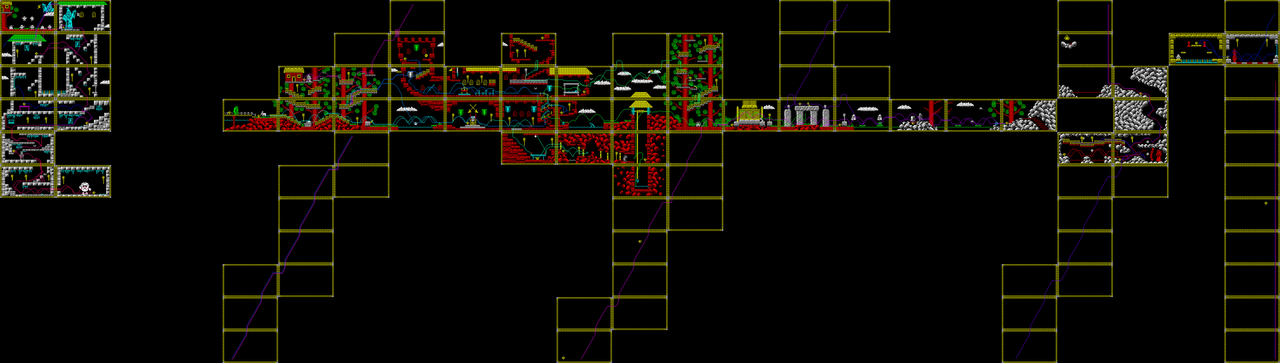
Out of bounds
The map outside of boundaries generally consists of empty screens. Some screens contain garbage data, the title screen itself is a screen in the game world, and one screen is used to store items that have either been removed from the game world or have not yet appeared there.
The more relevant point to the run is that the map wraps, but the top and bottom do not line up perfectly; after falling through the bottom of the map, Dizzy will wrap to the top, but three screens to the left. This allows us to save travel time heading leftwards by falling through the map, as well as going from the far left of the map to the far right by falling straight down.
Ghost skip
The ghosts are intended to block entry to the right side of the map. However, with careful movement, it's possible to pass through this screen without defeating them. This means we don't have to collect the power pill, saving us a short trip and an inventory slot.
Early lamp
Getting an ancient lamp normally involves rescuing Denzil, giving his personal stereo to the bard in exchange for some magic pipes, and playing the magic pipes for the rat to get it out of the way. This is a long trek for a key item in the run, so instead we use vertical item warping to skip all of that and get it early.
Yolkfolk skip
Normally, the far side of the volcano is off limits until rescuing all of the Yolkfolk (the main goal of the game). However, by utilising a horizontal item warp we can get out of bounds and fall straight into it, leaving our friends and families cursed forever as we ignore them.
Volcano return/"The Hole"
To get back from the volcano, we need to get out of bounds again. We embed a couple of items into the ground to create a hole we can fall through, and fall to the left through the void to end up back at WEIRDHENGE. Even without Yolkfolk skip, it's faster to do this than to travel normally.
Crypt deathwarp
When dying in the crypt, you respawn where you entered the room, as it could otherwise result in an infinite death loop. If you manage to leave the room during the death animation, your room entry point will be updated but it will still respawn you in the crypt in that position. We use this to skip a small amount of backtracking.
Actual route
With the above glitches in mind, most of the "necessary" items can be skipped:
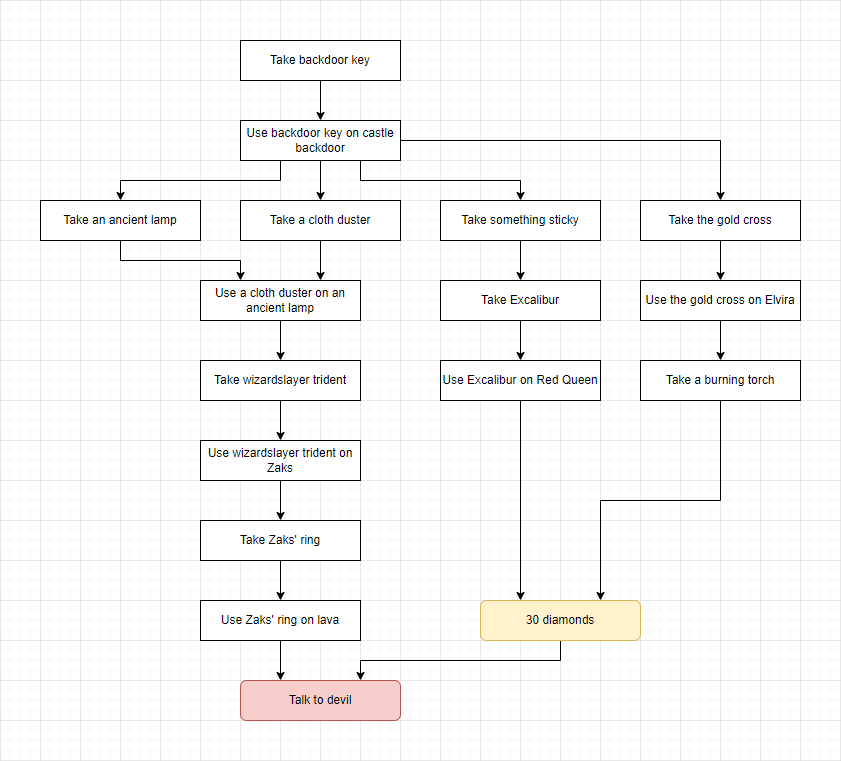
We start by talking to Dylan. It's a weird way to start the run considering talking to Dylan is entirely optional, but it's faster to create a hole under Dylan to shortcut some of the backtracking, and doing so triggers his dialogue so we get it out of the way first. We then drop down the well to collect the diamond down there and drown ourselves to deathwarp back to the top of the well. We finally make it to the castle backdoor and open it with the backdoor key, picking up a bag of rubbish and the empty milk bottle as we do so.
We jump across the clouds to get a cloth duster and embed it under Dylan with the vertical item warp. We pick up a railing and repeat the vertical item warp, which picks up a cloth duster and automatically drops a bag of rubbish; we manually drop the empty milk bottle to put embed items in the same spot.
We re-embed the cloth duster on the bottom step of the screen above, leaving us stuck between screens and allowing us to embed a railing on the top step of the screen below. We use this erased step to move the empty milk bottle one step along to make the hole big enough to drop through.
With the hole prepared, we pick up a railing, a cloth duster, and a big stick and use them to get an ancient lamp early with the vertical item warp. We also pick up something sticky while we're down there, and then retake the cloth duster and go and flip the drawbridge switch, which also opens the upper window.
We use something sticky to take Excalibur and get the genie out of the lamp to create a bunch of lightning bolts, which creates enough lag in the game to allow us to perform a horizontal item warp. In this case however, we don't want to warp Dizzy or any item - we use it to collect the diamond behind the troll instead, and then pack our stuff and go home. We have to wait for the genie's animations to finish before we can leave the room, otherwise we won't be able to use an ancient lamp again in the future.
We leave an ancient lamp behind before we jump out of the window, as we need to make another trip through the castle anyway and juggling both a cloth duster and an ancient lamp makes inventory management messy. We take a railing and embed a cloth duster on the bottom of the screen and a railing on the bottom of the screen above. We go back through the castle, take the gold cross and retrieve an ancient lamp, swap the gold cross for a cloth duster and clip out of the map and fall to the left.
We eventually land on Zaks' screen, stuck between two screens until we get past it, fall through the title screen and on top of the west tower. From there we head left and clip into the magic mirror area to collect those diamonds before using the genie again to perform a horizontal warp. We clip out of the left side of the map and fall straight down, wrapping around to the volcano.
Speaking to the devil, we take the wizardslayer trident and use the rest of our inventory (including yet another railing) to create a hole to fall through, arriving back in WEIRDHENGE. We use this trip to mop up the remaining diamonds, and also pick up the drinkme potion for later. When we reach Dylan we use the other hole we created at the very start of the run to take us directly to the tree tops, mopping up the remaining diamonds there and swapping the drinkme potion for the gold cross, clipping out of bounds.
Taking the same journey as last time to the west tower, we jump from the west tower and clip directly into Zaks, killing him immediately and taking his ring. The genie's lightning bolts are still active so we use them to horizontal item warp a second time to embed Zaks' ring in the wall before using the gold cross to allow us past Vampira to pick up the remaining diamonds.
Taking a burning torch to open Daisy's chamber, we drop the gold cross so we can deathwarp in the crypt to make our way out of it quickly. We jump into the pocket in the wall created by embedding Zaks' ring and pick it up to remove the hole, which up zips us to the top of the wall and allows us to walk out of bounds again. Back at the volcano, we throw Zaks' ring in the lava and ask the devil to take us home.
Other comments
Dizzy is one of my favourite 80s/90s videogame series, and Magicland Dizzy is my favourite in the series. It hit that sweet spot of being a large enough world to be interesting without being so large that it becomes a chore to navigate, and the addition of a health bar means that "accidents" are much less punishing than in previous games. It also helps that it opens up very quickly, and you can easily make progress by solving puzzles along multiple routes and concentrating on one of the Yolkfolk at a time.
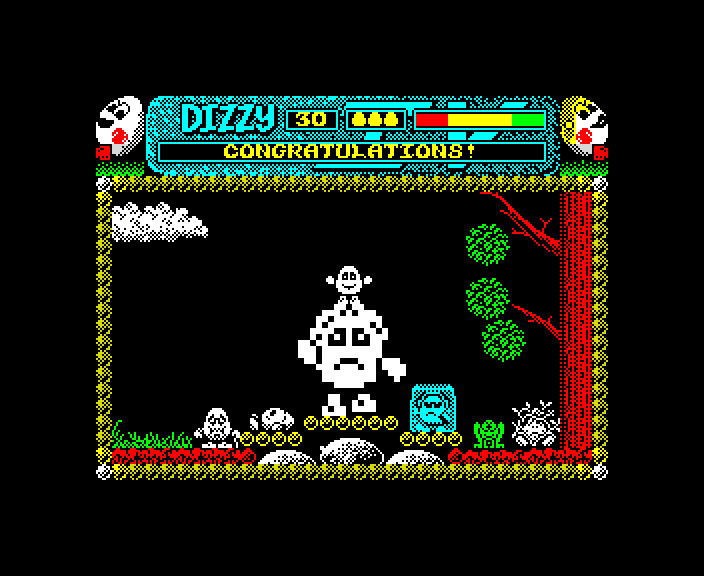
Special thanks to Faddy and TwoSpacesSG for finding most of these skips and pointing out areas of improvement in each iteration of the run. While we were experimenting with the Dizzy Three And A Half 1-diamond run, Faddy found a faster method of doing vertical item warping that allows falling diagonally, and we set out to re-route the entire game to make the best use of it, saving more than a minute in total. Dizzy now saves absolutely none of the Yolkfolk, and no longer caring about his friends and family he just escapes as quickly as possible. The ending screen still shows them saved though, so I thought I'd fix it:
Further special thanks go to The Oliver Twins for making the game, Sir Clive Sinclair for making the Spectrum, and everyone in the Speedtrum Specrunning community for keeping da speccy alive.
Suggested screenshot: 34149
nymx: Claiming for judging.
nymx: Wow, impressive improvements. Having watched the previous run, I had forgot about some of the tricks used here. This time around, I saw more and it reminded me of various tricks I have performed across many games. They never get old. The abuse was extreme in this TAS and I only wish that I could find a game that uses all I know in one TAS. Well, you did and it still is quite a good showing. Also glad to hear comments from Faddy3.
Accepting over [5844] ZXS Magicland Dizzy by DigitalDuck in 18:37.65. Great job!
fsvgm777: Processing.