PCSX-rr Resync Required Files:
- PCSX-rr v0.1.3f
- Eternal SPU Plugin - Star of the show for plugins.
- PCSX-rr v0.1.3 - Plugins. You do not need the executable.
- PcsxrrEncodeWofkflow - Bundle of files that you can either put in the root where PCSX-rr is located, or in a folder that's accessible. The former is preferred.
- LuaPackSetup
- PlayStation Bios Files. They're most typically SCPH1001. (If the movie is failing to sync refer to the compiled sync notes from Spikestuff if you're stuggling to get a title to sync.)
- Optional: Pete's Soft Driver 1.54 - Only if you're doing the PlayStation Oddworld series as that reqires Special Game Fix No Sprite Transparency enabled.
NOTE: The resync process is very slow on modern hardware.
It is recommended to do this within a virtual machine running Windows XP (32 bit).
(Even having hardware based in that era is also more preferred than modern hardware.)
It is recommended to do this within a virtual machine running Windows XP (32 bit).
(Even having hardware based in that era is also more preferred than modern hardware.)
There is a forum thread that partially tracks information about what to do, and a good area to ask questions.
That area will also provide files for Windows 10/11 machines, but again it's better if this done in a Windows XP enviroment.
That area will also provide files for Windows 10/11 machines, but again it's better if this done in a Windows XP enviroment.
[1506] PSX Crash Bandicoot 2: Cortex Strikes Back "item glitch" by pirohiko in 11:34.85 will be referred to, as it is a great example on things that can go right, and things that can go wrong.
Running PCSX-rr:
- Download the files from above, and place all the files within a pcsx emulator directory.
- Install LuaPack.
- Make sure all plugins are inside the plugins folder.
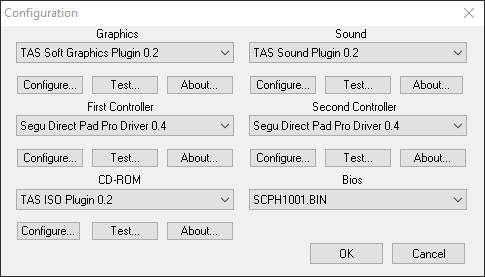
- Launch PCSX-rr and go through first time setup (refer to the first image) and click OK, relaunch the program.
- Enable: Tools > Skip SPU Loadstate (Note: If this causes problems, disable it.)
- Configuration > CD-ROM and select the ISO that PCSX-rr will automatically start with.
- Rereferal: Spikestuff has compiled sync notes for each problematic movie in terms of what bios and settings the CD titles are required to be in.
- Disable: Configuration > Options - Pause After Playback.
- Within the Configuration > Plugins & Bios
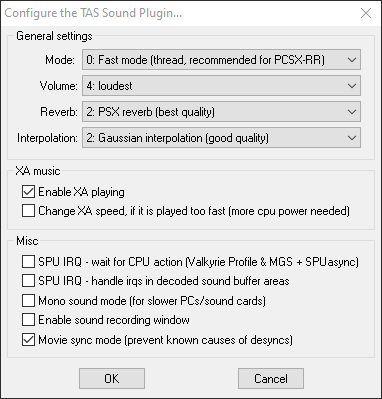
- Sound > Select TAS Sound Plugin 0.2.
- Under Sound, Select Configure... and validate that Movie sync mode is checked (refer to the second image).
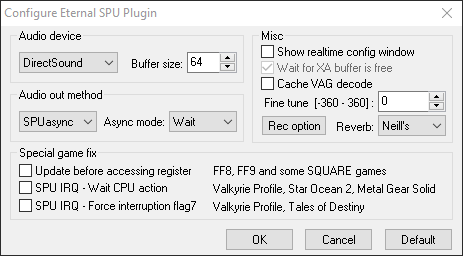
- Sound > Select Eternal SPU Plugin 1.41.
- Under Sound, Select Configure... and change Audio out method to SPUasync and Async Mode to Wait (refer to the third image).
- After selecting OK reselect TAS Sound Plugin 0.2 as the sound plugin.
- Graphics > Select TAS Soft Graphics Plugin 0.2
- Under Graphics, Select Configure...
- Quick Default Settings to Nice
- Select Windowed Mode (640x480) and change Stretching to 1:1 (faster with some cards)
- Uncheck Show FPS display on startup.
- Check "Use FPS limit".
- Under Graphics, Select Configure...
- Sound > Select TAS Sound Plugin 0.2.
Setting Up and Running the Script:
NOTE: If the movie you're attempting to resync is above 200,000 frames refer to the Troubleshooting section below this one first.
- Open pcsxrrWorkflowConfig.lua in a text editor and at the line 45 put the whole path to your movie file inside the brackets, including the file name. If the file isn't located to where you're referring to the process won't start at all.
- If the files are all in the same directory as pcsx-rr, and you have placed the pxm inside the movie's folder you don't have to write a whole path and instead can do this:
movieName = [.\movies\pirohiko-cb2cortexstrikesbackglitched.pxm];
- If the files are all in the same directory as pcsx-rr, and you have placed the pxm inside the movie's folder you don't have to write a whole path and instead can do this:
- File > Lua Scripting > New Lua Script Window.
- Select detectCheckpoint.lua and run it. The movie must start, telling you in the Lua prompt what step the script is doing. When it's over, stop the script (emulator might crash).
NOTE: Be sure to create a copy of the folder it produced, for if any issues come out from here on out.
- Run detectCheckpoint.lua once again. It will start waiting for incoming desyncs.
- Start another instance of PCSX-rr.
- Sound > Select Eternal SPU Plugin 1.41.
- File > Lua Scripting > New Lua Script Window.
- Select syncCheckpoint.lua and run it.
- After both instances finish their job (sending desync info and resync states to each other), stop the scripts (emulator might crash).
- Start a new instance of PCSX-rr.
- Now, as you run syncCheckpoint.lua with Eternal SPU, it will automatically load the required states at desync points.
- Keep an eye at it at this state, because it may sway and desync unexpectedly. If that's the case...
Troubleshooting the script:
- If the movie you're attempting to resync is above 200,000.
- Open the pcsxrrWorkflowConfig.lua and go to line 84, adjust the number under "hashFrameSplit" to be above the movie you're trying to resync.
- For example: Croc 100% is 282926 frames, changing the hashFrameSplit to 300,000 will allow the movie to sync to completion.
- If a desync fix fails to get fixed, and falls into a loop it's due to lacking the automatic reduction of the distance it needs to go back to resync the state.
- You will need to either reduce, or increase that distance manually in syncCheckpoint.lua at line 237.
- The backwards distance is composed of 2 numbers that are subtracted from the framecount:
desyncPoint = emu.framecount() - desyncAlertCount - 2;. - The value
- 2can be adjusted to- 4or+ 4for instance, whatever the number is required for the situation that's needed for it to resync and complete the resync. - Do not delete the intermediate files! Existing checkpoints will be used up to that point, and then it will try to create new ones that are closer back to the desync point.
- The closer it is, the more guaranteed it is to fix the desync, but the more apparent it may be that a state was loaded.
- If this doesn't work, then restart again from the file that you made a backup of and use that new desyncPoint value you're using.
kkapture Required Files: 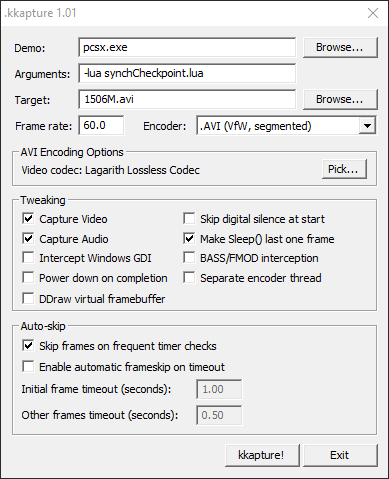
- PCSX - kkapture
- Visual Studio - If you're using Windows XP download 2008 (this is for kkapture).
Running kkapture.
Please also refer to the Encoding Guide as well, if anything changes.
Be sure to have Eternal SPU selected before running kkapture, and also uncheck "Use FPS Limit" in the video settings.
Be sure to have Eternal SPU selected before running kkapture, and also uncheck "Use FPS Limit" in the video settings.
- Demo > Select the emulator executional file.
- Arguments >
-lua synchCheckpoint.lua- This is assuming that kkapture is in the same area as pcsx and synchCheckpoint.lua
- Target > Select the AVI file name and path.
- Frame rate > 60.0 (all PCSX-RR TASes are NTSC-U/J).
- Encoder > .AVI (VfW, segmented).
- AVI encoding options > Pick a lossless codec, preferably Lagarith.
- Enable these settings under Tweaking and Auto-Skip, anything else should be disabled.
- Capture Video and Capture Audio.
- Make Sleep() last one frame.
- Skip frames on frequent time checks.
- Push kkapture! button.
After the movie is completed, you can validate the dump, and be done... well almost.
As referred to at the start this Crash 2 TAS was going to be referred to later, and we'll explain why here.
As referred to at the start this Crash 2 TAS was going to be referred to later, and we'll explain why here.
During its dumping process, after it successfully dumped it originally had audio issues within the Komodo Bros. fight where the wrong audio samples would play.
Be sure to always create two resynced files if need be (maybe more), and try changing things up such as with the desyncPoint, or remove savestates it created if you need to.
Be sure to always create two resynced files if need be (maybe more), and try changing things up such as with the desyncPoint, or remove savestates it created if you need to.
Another nice to have at least for the audience viewing the TAS is actually creating two dumps if necessary.
Again sticking to Crash 2, it showcases the vast difference of what it used to sound like, and what with the effort of going through it, what it actually should sound like with "Restored Audio".
There's no shame in showing a blemish with how TASes used to sound, and it should be shared for others to enjoy the little quirks.
In other cases you may need to change and work with a different value for desyncPoint if the audio outright disapears and causes hitching.
If that's the case for you try doing the positive value to what you placed there instead. So for instance if you already changed it to
The movie should still sync with the opposite value of what you initially used, and hopefully not get stuck in a loop.
This will create some grunt work and some stitching but this is what can happen when you're going with Eternal SPU.
If that's the case for you try doing the positive value to what you placed there instead. So for instance if you already changed it to
- 4, then switching the value to + 4 should help the process.The movie should still sync with the opposite value of what you initially used, and hopefully not get stuck in a loop.
This will create some grunt work and some stitching but this is what can happen when you're going with Eternal SPU.