Active player (278)
Joined: 5/29/2004
Posts: 5712
Whoa, I just found something strange while playing around. It seems that when I let Dizzy drown, he drowns half as fast the next time. What I mean is, normally water starts to damage Dizzy by 1 pixel every 4 frames without the aqualung. But if the water kills him and I take him into water without the aqualung again, he only gets a pixel of damage every 8 frames. If he dies twice by drowning, then next time the water will only damage him by a pixel every 16 frames. After three times it'll only drain him a pixel every 32 frames. (You can tell how slow this is as by this point the damage actually sounds like the "whooshasha" sound effect repeated rather than just buzzing.) So I got my end-of-game savestate with the perfect 9 lives and starting drowning Dizzy to see how slow it could go, only to find that it stayed at 1pixel/32frames for the next 4 lives. Then after I lost 8 lives, it went back to 1pixel/4frames for some reason. But that just goes to show that if you can spare the lives, you may be able to explore more of the water without the aqualung than you thought. I also wonder if there's some effect on the rates of other things that hurt or heal Dizzy. Oh, and this also happens in version 2... Intentional? But in that version it's possible to reach the island with the aqualung with a simple jump, so dying to breathe longer is more likely to be pointless in that one. But again, your higher speed would let you make better use of it...
put yourself in my rocketpack if that poochie is one outrageous dude
nesrocks
He/Him
Player (241)
Joined: 5/1/2004
Posts: 4096
Location: Rio, Brazil
Very interesting, it does feel like it is intentional as a way to make the game easier for those having trouble, but it could be a fortunate coincidental bug.
Active player (278)
Joined: 5/29/2004
Posts: 5712
I don't know if that makes it much easier, seems more like it gives false hope to players instead of encouraging them to find the aqualung. But I guess it could be intentional, like "Dizzy gets better at holding his breath with practice!" ...except on the last life... Or maybe a bit just got shifted over and didn't get shifted back for a while.
put yourself in my rocketpack if that poochie is one outrageous dude
Active player (278)
Joined: 5/29/2004
Posts: 5712
To the mines! Blue diamond mines Red diamond mines Blue railway track Red railway track Some observations: When you chop the bridge over Silver Stream, it removes five logs. Four of them are replaced by sprites that hang down, but the middle one just disappears! The three floors of the mine interior are all the same length and match up on both edges, no shifting necessary, although I had to cheat to get into the wall to scroll the bottom floor all the way to the left. (Hacking Dizzy's position also revealed that no, there's nothing behind the dragon, don't get excited.) The rock formations fit together very nicely across all four floors. Can't say the same for those support beams that don't reach the ground! It's funny to notice that just before you reach the cymbals, you stand on a thin layer of rock directly over the dragon. I'm pretty certain that bat on the middle floor always starts a lot farther to the right in the red version than in the blue version; that coordinate's not so variable like its height. I don't know if I mentioned this before, but I can't figure out how to capture flying enemies' positions more accurately because there's some oscillating "flapping" motion that positions the graphic higher or lower than what the Y coordinates I find tell me, and when the coordinates are loaded, it seems as if the enemy gets to move in a random direction for a frame before those memory values show up, because they vary by a pixel or two either way. The blue version's elevator controls are unique for using a button toggle puzzle instead of an item, but did you know that the set of which switches are already activated is randomly generated whenever you enter the mine? In fact, it's possible to enter with all four switches on if you're lucky enough, so I think it's a lot faster to spend a bit of time manipulating your luck outside rather than pushing even a single button. There are only 16 possibilities, and waiting 1 frame changes what you get, so it should take less than a second. I noted before that collecting stars in the red version doesn't make enemies or other kinds of items disappear, but I don't know if I realized that it can make you unable to collect other stars. I think some stars will have to be collected during backtracking in that version just because they were too close to other ones and it would take too long to wait for them to reappear. The surfaces of the lava pools are more of those "load in tiles" animations, and the two tiles have their animations staggered so you can't really say which ones are supposed to match up together. I picked the Crystal Falls capture by which frame of the animation had the least color clash; for the lava, I think I went by what had the most symmetry, or what filled out the dimensions of the graphic, or what was... pretty? Oh well, it's all arbitrary. You know how I said you can just barely jump through the dragon's flames in the blue version? Well, I just found out that I can't do it in the red version. Even though I had Dizzy's higher speed, frame advance, and savestate abuse to work with, it appears that the dragon also breathes fire much faster, and I couldn't work out a safe opening. Maybe someone smarter than me can figure out a way, but this may end up being a blue-only sequence break. Also, the logic of whether the dragon lets you pass gets a little goofy if you play around with stealing the eggs and re-entering and setting them back down, but I don't think it's that important, so someone else can try to figure out all the rules too. In the mine cart ride, the trolls are given 1 of 3 palettes randomly, with randomness affected there by which tracks you've taken so far. Since I saw no reason to prefer one, I cycled through all three colors throughout the map, which may make it easier to remember what the last troll you saw on it was as you browse it. The second troll appears twice on the map because it will appear on whichever track you take, so you have to avoid it either way. I don't know why that wasn't done with any of the other trolls in the rest of the mini-game. I noticed that when the ground fissures form, the screen shakes, and it gets randomly displaced to the left by up to 3 pixels. (A rare case of multi-directional scrolling in this game!) So I took screenshots and added in as many of those 3 pixels on the right as I could manage. In the longer quakes, I saw a pattern: 192 pixels of a ground tile, then 48 pixels of plain black, just like the split between the play area and the status bar. If I copy that pattern across the right side, it matches up with all the other quake edges I caught, suggesting that there are 240-pixel-tall screens of this stuff repeated somewhere. I end up with only 24 pixels of black at the bottom, though, and the total height is 24 away from a multiple of 240, so maybe the game is starting 24 pixels away from the true bottom, but I don't know how to alter the scrolling safely, so I think it's good enough. I noticed the 16-bit versions of this game actually extend the graphics to over 320 pixels, and I think they shake the screen over to the right. Now, just because a fissure crosses a track on the map doesn't mean you can't take that track--remember I'm just recording their end states. All fissures are avoidable by staying at the top of the screen. In the blue version, one fissure lasts so long while you travel at such a high speed that it doesn't finish extending before it's scrolled off the screen, and the end of it appears 240 pixels up! The fissures were one thing that was changed in the red version. They're all shorter! In fact, almost all of them are shortened enough that they don't threaten Dizzy, and the one that still does cross a track I had a tough time getting killed by because its hit detection is buggy. I was a little disappointed that the game wimped out like that, but consider that there are now 20 stars to collect on the tracks, and you can understand that it would be unfair to punish the player for hanging back when they need to see which track contains the next star. (I looked at the Genesis map and noticed the falling boulders were the same way: Only a few boulders actually land on the track, and some of those are where trolls were anyway. Oh, and also some stars are on different tracks, so don't use one version's map for the other.) Another change is that while the blue version's cart speeds up multiple times, the red version only speeds up once near the end, only reaching the second speed from the blue version. So again it's a little easier, but helpful for making decisions about where to go for the stars next. The stars themselves actually make the ride easier the first time you play, as they show where a safe path must be. Those changes made it so I couldn't capture quite as much of the right edge, but on the bright side, the fact that the ride takes longer in the red version means that you get to hear a full loop of the music! Yay? I noticed about halfway through that the time when the cart ride speeds up seems to depend on Dizzy himself passing over a certain point, not just the screen scrolling to it, so you should note those points and make sure to hug the top of the screen then. How soon the speed-up begins can affect other subtle things like making the next troll appear one pixel higher than usual. The stars jiggle over their normal positions in these vertical scrollers because they seem to only catch up with the scrolling every other frame. It's interesting to note that although Dizzy's cart takes off to the left in the regular side-view area, the exits are progressively further to the right, so I like to imagine that his cart made a 180 just off-screen. When Dizzy exits the cart in the red version, he may slide a bit to the left from the momentum he had entering the cart, or to the right if you hit the backwards butterfly. Except, that doesn't happen for the third exit, so maybe they decided to neutralize Dizzy's momentum just in case it made him slip off. And for the fourth exit in both versions, Dizzy automatically rolls off to the right, but if you die before leaving Bridge Street, Dizzy will reappear standing normally at that exit. Nothing strange happens up there, though. The second exit is the most interesting. I found it was the red version that added the ability to re-enter through that exit and appear in front of the mine cart. If you get stranded there in the blue version, you have to die in order to re-appear at the mine cart, but you can do that in the red version too. It's a mysterious conditional thing; I think the way it works is that if you die before leaving Carber Bay and without holding the aqualung or the flippers, then you respawn in the mine. Otherwise it just uses your last entrance like usual, as either the flippers or aqualung will allow you to leave safely, and reaching higher ground shows that you were able to as well. And there's a weird bug where sometimes when you move the cart forward into an exit, Dizzy will act as if he crashed on it and die instead of exiting as he should. I know it last happened when I was testing the second exit in the red version, so don't hold a button into the exit when you're playing casually, I guess. When I was playing around in Carber Bay, I noticed a serious problem with the red version's controls. Whereas in the blue version your main issue is that jumps are often just barely reachable, in the red version you tend to have more problems with landing on short platforms because you have to deal with a slippy-slidey Dizzy who rolls too fast and slides right off those platforms. I found it was next to impossible to jump onto the sunken galleon the normal way, and it's suicide with the crabs running around. If you want to get on top of the ship without the flippers, I recommend getting onto the ledge to the right first and running off with a moderate amount of speed, and you should land right on the treasure chest. You know, that treasure chest that I think should have been replaced with a stepstool or something for those who never played Treasure Island Dizzy on a platform other than NES where they would have been forced to use an empty treasure chest that way. I guess it helps that it's labeled "empty", so they don't think they need a key to open it and get the treasure, but that just makes them think they have to put something into it then. It's really just there to fit the "ol' pirate ship" theme. Lately I watched a playthrough of Fantasy World Dizzy, and I found it interesting that almost all of its puzzles were repeated in some form in The Fantastic Adventures of Dizzy. This fits with the rumor that The Fantastic Adventures of Dizzy was originally going to be a port of Fantasy World Dizzy. The layout of the world is completely different, though, so I wonder if the programmers started by making sure all the puzzles worked before creating any of the lands Dizzy would roam. I noted before that Treasure Island Dizzy also had a lot of its puzzles revisited in Fantastic Dizzy as well as its item system to some degree, but I think this game even takes after the original Dizzy with its "Dodging small animals EVERYWHERE" style! So although it's a whole new world, Fantastic definitely took a "Dizzy's Greatest Hits" approach to the elements of the adventure.
put yourself in my rocketpack if that poochie is one outrageous dude
Active player (278)
Joined: 5/29/2004
Posts: 5712
Ah, sorry I haven't posted in so long, to anyone who's been following this topic. I actually finished the map of the blue version's Keldor Town a long time ago, but I didn't want to upload it until I finished the red version's too. But the town was so much work to map, I wanted to take a break, so I tried mapping the castle shootout mini-game enemies, only to get discouraged when I messed something up. Then I got sidetracked with playing other games, especially that one I made a tool-assisted play of. Recently though, I felt it was wrong to keep sitting on this map when people could be looking at it already, so here it is. http://www.box.net/shared/rpz5rqy2hb I hope to start on the other version's map soon. As a bonus, I discovered a new video on YouTube today that showed off some glitches I hadn't seen before. http://www.youtube.com/watch?v=4-ykq4hfMhQ I would need someone to translate the annotations in order to understand all the special cases being pointed out, but I got the general idea of the main glitch, which is that if you hit Select while Dizzy is recovering damage, he will become completely immune to certain kinds of enemies, until he touches any other kind of hazard. This could be a big deal for any speedrun that needs to pass through a lot of enemies, and I tested it and found that it also works in the red version! It works with fruit as well as diamonds; I don't think it has to do with Dizzy's eating animation, but rather just the fact that the damage bar hasn't reached its final value yet. Today I worked out a variation of the glitch I saw in the video but didn't understand: You can gain immunity to the same enemies by hitting Select while Dizzy is taking damage from any enemy. This also has the side effect of leaving Dizzy stuck in his hurt face until something else changes his face again. I remember I got Dizzy's face stuck that way on accident a few times, but I didn't realize what I did or that it was making him invincible! This will definitely be the faster way to get the invulnerability, as you just need to take a smidgen of damage, enter and exit the detail display, and you're good to go. So far it appears the immunity applies to enemies with a one-dimensional movement pattern: Spiders, ants, rats, and guillotines. Didn't work in the river mini-game, though. And I noticed that the red version makes Dizzy wait a lot longer between successive item grabs (acceptance of the B button) than the blue version, especially if there is no item for him to grab. This makes sense with the new inventory system if you're mostly transporting one item at a time and don't want to accidentally pick up what you just dropped, I guess.
put yourself in my rocketpack if that poochie is one outrageous dude
Active player (278)
Joined: 5/29/2004
Posts: 5712
...Right, so it took about a year for me to find the motivation to make more maps. Here's Keldor Town, red version! I suppose I should explain my rationale for arranging the town like that by now. It may be natural to think of Castle being on the bottom and Bridge on the top, so that you're ascending the whole way from the falls to the graveyard, but the in-game maps over the tunnels in Fantastic Dizzy put Castle on top, Bridge in the middle, and Dock on bottom, and after thinking about it for a while, that makes more sense to me. If you consider the transitions required to get from Castle Street to Bridge Street outside of town, you go downhill four times and uphill three, placing Bridge Street below Castle Street. With Dock Street it's a little shakier to assess as there are no normal transitions to anywhere but the pirate ship, but if the ship is considered level with the island in Carber Bay, then that puts Dock Street a screen below Bridge Street. This scheme is also borne out by the tunnels, which are longer when connecting Castle Street to Dock Street, which makes sense if Bridge Street is in the middle. The mouths of Bridge Street's tunnels are the only ones to switch sides, making it so that Dock to Castle is always the same direction, with Bridge as a midpoint. The one weird thing about this is that the river accessible from Bridge Street must curve upwards sometime after its stop at Dock Street so that it can reach Castle Street and Crystal Falls again. As for placement of the tunnels, I lined up their midpoints with the tunnel entrances, and I placed all the Castle-Dock tunnels over Dock Street so they wouldn't get in the way of others. There's only one tunnel whose entrances don't line up even when I have everything else lined up: the leftmost Dock-Castle tunnel, where they're 64 pixels apart, so I put the midpoint of the tunnel 32 pixels away from each entrance. I have no idea whether anyone will be able to make sense of this. :/ And here are some interesting facts about the three streets I noticed: Castle Street has 6 tunnel entrances while the other two have only 4, as there is only one Bridge-Dock tunnel, while Castle gets 3 tunnels to each of the other two streets. Castle Street is the only street to have two dividing walls, giving it three isolated sections, while the other streets are only divided once each. (Idea for small sequence breaks: Find a way to boost Dizzy over those walls?) Dock Street is unique for having its name on multiple outdoor signs, at least in the 8-bit versions; it might be Bridge Street that got more than one sign on 16-bit. Besides the stars and Dozy's key, the one change I saw for version 2 was that a spider from the middle of Dock Street was removed, beside the tunnel to Castle Street's castle entrance. Since that's not very exciting, as a bonus, I also "mapped" the one-screen mini-games: Sliding puzzle, split apart so you can see the edges of each piece Keldor Castle shoot-out, with a guard placed on top of every spot I have ever seen a guard appear That's 17 places I've seen them pop up, and boulders seem to fly from those same approximate locations, though it's not usually well-timed with a guard appearing there. Curiously, I've never caught a guard in that lower large window on the left tower. There are three graphics I've seen them in, and only one of them uses all three palettes. I think I found a couple of unused sprites, though: A more important fact I noticed about that mini-game was the rubberband difficulty, where the number of points you have determines how many guards you can see at once. If your score falls between 3/8 and 1/8, you can see as many as 4 guards simultaneously. At 4/8 and 5/8, that drops to 3 guards. Then at 6/8 you only get 2 at a time, and at 7/8 you're going for the 1 that got away! This could be useful to remember for luck manipulation, in case holding off on shooting a guard for a moment allows the next one to appear sooner from the lower score. One more thing I noticed as I collected the winch wheel to reach that castle was that when you first climb up to the riggings of Blackheart's ship, you can make the ascent to the platform above you in one rope swing rather than two; just hang on and let Dizzy swing back to the left, and he will get just enough height to jump up there if you time it right. This can be considered another NES-exclusive trick like the Select-button damage freezing and the collecting of objects in the air and while rolling, since other versions of Fantastic Dizzy force Dizzy to jump off the rope at a certain point automatically. Now the sad thing is that I did a search just the other day to be sure no one else had started maps of the 8-bit versions of this game... And it turns out Blublu already had, back in 2006: http://www.vgmaps.com/forums/index.php?topic=150.0 Blublu might have even had most of it done! Did anyone save the files from those Imageshack links that are now dead, if only so I can compare how I'm doing? I wonder if it's worth asking Blublu, whose last post was a year ago, though Blublu hasn't really been active on the board since 2009. (I'll admit Blublu was credited for Kickle Cubicle last month, though!)
put yourself in my rocketpack if that poochie is one outrageous dude
Active player (278)
Joined: 5/29/2004
Posts: 5712
Okay, I finished the trolls' castle the other week... Keldor Castle, blue version Keldor Castle, red version I'm still a little amazed at how Dizzy can be displayed in front of the wall at the same time that he's hidden behind one of the pillars. I know there's only one background plane, so does the game designate half of Dizzy as a front-priority sprite and the other half of him as a back-priority sprite at those places, or what? These castle areas had to change a lot for Dizzy's new running style. I think more of this castle is different than is the same! The main thing is that the tricky jumping zones in the upper corners were redesigned, but there are other silly little changes, like removing a pillar with the floor it supported and placing the fruits directly under the torches so you're forced to bump into one or the other. I think the red version might have an issue with the fruits near the fireplace not showing up, too. Originally there was an effort to copy the bottom 32 pixels of the upper floor onto the top 32 pixels of the lower floor... except for that little area around the right mirror... but now there are more platforms you can jump up through due to them existing only at the bottom of the top floor, yet for some reason you can't stand on the dining tables anymore. Also, version 1 had wall tiles behind the barrier on the left, as if the castle extended beyond where you could play, but version 2 replaces them with sky, and the window in the upper-right no longer stretches off the top of the screen. As for the platform challenges, single square blocks aren't acceptable anymore with Dizzy's increased slipperiness. This means that anyone who played a version of FD other than the original will never have to deal with this ridiculous jump in the sequence to reach the bridge kit: 
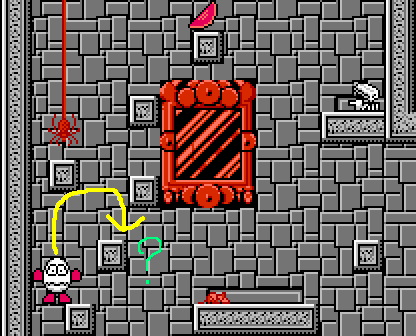
What makes me mad isn't that you need to jump off one particular pixel, but that even if you do jump from that exact pixel, there's a good chance it will fail and Dizzy tumbles off the next block anyway. Success there just seems random! I've tried all sorts of ways to make that jump easier with no real luck. The platform with the rat on the right doesn't seem to work, as Dizzy's jump is always a little too short from there. I even looked for an invisible rope hook somewhere, but nope. The one thing that seemed to help was if I started about 3 pixels from the starting spot of that jump, walked those 3 pixels over, then immediately jumped to the right--but I can't see anyone pulling that off with a D-pad in real time! Why didn't they test this more? How could they send the game out like that?! *GRUMBLE GRUMBLE* The one nice thing is that you don't actually need to do the same jump to the next block on the right; Dizzy's jump is just high enough to go directly to the block with the hanging spider on the left, where you can't fall off to the left because the gap's too narrow, and if you get yourself some spider immunity, then you can take it easy at that point. ...Still, the fact that they made it appear that you needed to do the impossible jump twice... >:-( Um, maybe I should move on and mention that the Blackheart's ship map is well on its way. In there the artists were much more dedicated to the 32 rows of duplicated pixels concept, as I only noticed one flaw in the background art copying--maybe that cannon was added later on? There are some things I was debating with myself about adding, like where exactly Blackheart jumps down to make you walk the plank, or where you can swing the rope from--I mean, hey, you can see where the rope attaches, but you don't know where to throw it from but by experimenting, and sometimes the same hook can be grabbed from more than one spot! I probably won't add them, though, since they might be too obvious or cluttering in a confusing way. One thing that does occur to me would be good to add is what characters give to you when you trade something, like with Denzil, Grand-Dizzy, Dylan, Dozy, Prince Clumsy, and the shopkeeper, just so there's a record of where every object first appears.
put yourself in my rocketpack if that poochie is one outrageous dude
Active player (278)
Joined: 5/29/2004
Posts: 5712
Yeah I guess it's time for the pirate ship stuff now. Blackheart's ship, blue version Blackheart's ship, red version Bubble pit, blue version Bubble pit, red version Not much to say about the bubble mini-game, but that it was a very quick one to map in the blue version, while the stars were a little annoying to capture because they drag a few pixels behind while scrolling, as usual. It didn't seem beneficial to add any other sprites, because you can guess Dizzy is going to fall straight down to the middle from the end of the plank, and then the bubbles are random. I like how the second bird you see on the first section of the ship is on a very long leash, able to fly anywhere above that top deck. A lot of the stars in the red version there were added to make you have to walk into the dead-end passages that otherwise served no purpose but to confuse you, but then there's just one silly star added to the bottom-right corner that you can't miss because it's right on top of a key item. And on top of that is an acid drop that falls very infrequently compared to the others; interesting that they bothered to include a "frequency" variable for a simple enemy like that. The one major change to the terrain was up in the rigging, where the first jump to the left needed its platform extended of course, but then a long platform on the right was actually shortened so that you can continue jumping to the right once you land on the second rope point below that. Oh, and they added another star on the far right, so ignore what I said about hanging onto the rope unless you're playing version 1; you'll have to stop and go to that star on the right first, then either climb up and over or swing back over to the left, whichever turns out to be faster. Also, as I was messing around with poking Dizzy's position, I found that the platform Blackheart stands on is real, but Dizzy can walk through Blackheart harmlessly up there, hm. Messing with Dizzy's position to get him in the water there, around the outside of the ship, and/or underneath the boarding ramp, also drops Dizzy into glitchy versions of other areas where many of the enemies fail to appear, Dizzy can't interact with any objects but stars, and edge exits lead to the wrong places. (I recall seeing a way to do this without cheats, I think by jumping backwards onto Blackheart on Dock Street, but I can't find the video about it now.) I think it's similar to some glitches done in TASes of early MegaMan games, where part of the game code thinks the hero character is in one place, while another part of it thinks he's many screens away. Something this reveals about how the game is coded is that death pits are objects placed at absolute coordinates, not part of the regular terrain, as in the glitchy mode Dizzy will simply fall through them into new areas, even the forest pit full of spikes! The waterfall pit traps Dizzy at the bottom, though. Also interesting is how the trigger for "walking the plank" is quite the hard X-coordinate check, as there's no way to escape from it once you've passed it: Even if Dizzy is falling under the plank, the bottom edge now takes him straight to the bubble game! So I may not have drawn any ropes, but I did feel like mapping the door of that locked compartment in both positions. Something strange I learned you can do there is to stand in the middle of that space and continuously jump in place. Every other time Dizzy reaches the next screen, he'll take a smidgen of damage from something you probably can't see: It's a mouse, which is first spawned in mid-air there, but is suddenly warped over to its boundary on the very next frame. It's just a dumb side effect of the way enemies are relocated when a new screen is loaded. I learned a few things on the way to Blackheart, too. Did I ever mention that in the NES versions of the game, if you jump into the end of a tunnel, Dizzy will automatically jump out of the tunnel in a standing pose when he appears on the street? It turns out that if you hit B at the right moment as Dizzy exits a tunnel, he may slide out of there at running speed while spinning around to grab/drop something. So that's another way to drop an object without stopping, even when you aren't collecting something at the same time. You can even combine A and B to make Dizzy jump and grab at the air, which may be the easier way to do it in real time. And if you're ever forced to wait out the time Dizzy spends eating a fruit for some reason, jumping before grabbing it so that Dizzy jumps in place while eating is funny too. I noticed that when you throw the meat to the boar, it takes away your ability to pick up objects for a few seconds longer than normal; even trying to pick up objects during a jump doesn't work. So, uh, I guess it really doesn't help to try to set down your stuff and pick it up in a new order there. As I was going for screenshots of buying the magic bean today, I rediscovered a trick I learned in the Genesis version that also works in the NES versions: You can fall through the space beneath Dylan's elevator from where you grab his door key, so long as you've already plugged in the elevator key. The cool thing is that even if the elevator has already descended, you can trick it into going back up by simply jumping anywhere on the right half of that platform that held Dylan's door key. Another thing I wondered about as I traveled was how the game is a bit inconsistent about whether Dizzy will roll when he jumps down from a height of 16 pixels, such as up 2 stairs in the town. He usually doesn't if I start him from a standstill by jumping in place first. By the way, I wonder if I should have started using the Name Table Viewer sooner, if only to see where the true edges of loaded maps were. I noticed that in the mine cart game, the stuff on the right side of the name table was just a big field of tile 03, followed by the status bar, so that would explain the pattern I was seeing when the screen shook. (Can you tell that I've been sitting on this post for a few days during the site's downtime?) I also played the SMS version again just to compare a few things, and while I was messing around, I got up to Shamus with the magic bean but not the shamrock. So I tried inching up to him while dropping the bean, and eventually I got the beanstalk to sprout, even though Shamus was still in the way. I couldn't jump onto the stalk without getting knocked back, but as Dizzy's damage maxed out on the last jump, he got knocked upwards and landed on the cloud above. Surely enough, this started Dizzy out on the cloud when he returned to life, meaning that bribing Shamus to move is no longer necessary to reach Zaks' castle in that version! It does mean wasting 2 extra lives to transport 5 objects up there, though. Sometime someone should test whether this actually requires the beanstalk to be there and whether it works in any other version of the game. I also discovered that opening the inventory in the SMS version resets where Dizzy will respawn after he dies. It's probably not too useful since all you could grab and snap back from would be stars, and you'd typically be fine with going back to the room entrance anyway, but it's nice to keep in mind if you need to kill off Dizzy for any reason.
put yourself in my rocketpack if that poochie is one outrageous dude
Joined: 5/24/2012
Posts: 3
Location: Poland
Hello there Bag of Magic Food. Pardon me, as I'm newcomer to this forum (I was observing TAS videos and speeddemos as anonymous for the years). For some time beeing I was really interested of conception creating some TAS/speedrun to this particular game. The primary question is: Are you planning to create TAS video of it? I'm intending to do it also and I would feel bad to come across you or anyone else. The idea comes to close realisation because creating the TAS could come as a subject of my thesis for master engineer degree. But that is so far the concept, nothing so far exists on the paper. But already consulted with some professors in my university and they like the idea of work. What really matter in thesis are two things: First thing.On a "world map" I would create the thing called graph in which: - the vertices would be representations crossroads, items, stars, doors, etc. - the edges would representations possible road connecting them. The goal is to find the optimal path (the fastest one) possible to finish the game: Now the second aspect. As another part of my would-be thesis, I would create algorithm finding the optimal walkthrough on those edges. So I should not actually interfere with manual walking. To make matter easier for complexity problem, I would make no dying/no taking damage run/no gltich run. I'd come later and translate the video for you as it's my native language. Hope to hear from you.
Post subject: Translation
Joined: 5/24/2012
Posts: 3
Location: Poland
Source video: http://www.youtube.com/watch?v=4-ykq4hfMhQ OK, so you asked someone to translate it, here you go: Section 1 - 0:30 You need to get some huge load of damage (this player took half of a health bar). At 0:36 he''s taking some food to regain health. WHILE you see the damage bar is dropping you press SELECT, don't let it drop to zero. Whenever you get back to select screen a small tile of damage bar is dropping, but not in "real time". As you can see in 1:00 he's invicible at this spider. But 1:10 the fire actually "resets" the glitch, thus you are invicible no more. The things which "removes invicible", THUS giving damage - birds - volcano - drowning - pirate, leprechaun, dragon, guard at some city tunnel - tenctacle The things in which invicible works: - spiders - mices - ants - guilottine - fish - crabs - water drop At 1:51, he notices that removing "invicible state" gains us the rest "food's damage reduction" (jeez the inverted health bar is a bit confusing, hope you understand). In the 2:20 he showing much clearlier. Ad at 2:22: the "invicible effect" is not working on 2 conditions: - the dmg bar is equal 0 - the dmg bar was decreased by constantly pressing select Section 2: I saw the trick at 3:00 in previous video so, there's nothing really to say, Section 3: Bubble dizzy. At any time yor on the bubble and floating up. You need to try "jumping off of it", so it seems you won't be on the bubble for some moment. At any of this moment the bubble is regaining some durability. At 5:00 he just hit the obstacle. Section 4: Dragon trick. To make this work you need the inverse moving from butterfly. He noticed that its same effect as in the pirate captain or the guard in tunnel. When the dragon hits you you "fly" on other direction. At 6:00 you are keep pushing inside the lair, but at some point it will stop. And another trick at 6:20. Another trick around 7:00? 7:29 - showing that you can enter inside the dragon without getting any hit. Section 5 - credits: You can gain "invicible effect" WHILE taking damage from spider you press SELECT. But whenever you lost that invicibilty you take the rest of damage. That would be all for the time beeing.
dart193
He/Him
Player (34)
Joined: 1/20/2013
Posts: 61
Fantastic adventures of Dizzy always was one of my most favourite games on NES. So bad that there is no speedrun. But with recent TASeditor in FCEUX 2.2.0 i am now interested in creating my own speedruns. I have already tried it on SMB and it works very good and fast, so i am thinking: maybe try this game? Some glitches are known to me, so i will be able to save some time on them. Well, i am pretty new however, so i have two questions: 1) Is anyone currently making a speedrun already? 2) What ROM version should i use? I would like to make a speedrun for blue edition (the one with no acceleration), as i have this on real console and due to constant speed it would be a little easier.
Patashu
He/Him
Joined: 10/2/2005
Posts: 4017
As you can see in the posts above, Bag of Magic Food is (was?) working on a TAS of this game. Maybe you'd like to catch him and ask what he's up to?
My Chiptune music, made in Famitracker: http://soundcloud.com/patashu My twitch. I stream mostly shmups & rhythm games http://twitch.tv/patashu My youtube, again shmups and rhythm games and misc stuff: http://youtube.com/user/patashu
dart193
He/Him
Player (34)
Joined: 1/20/2013
Posts: 61
As from the posts above, i see that he is working on maps and seearching for glitches and checking other things, not making TAS itself. I will PM him however.
Joined: 5/24/2012
Posts: 3
Location: Poland
Back from the dead! @Bag of Magic Food I. Map stuff First of all I made some other maps for BLUE version. I've added to pack also the one which Bag of Magic Food has already made, so all credits goes to him. https://dl.dropbox.com/u/2872963/faodblue.7z I've added: - zak's castle - carber bay - grasslands (with clouds above) - graveyard Due to lazyness/inexperience the carber bay is a messy. The water is unsynchronized, accidentally some parts are moved by one pixel making it a bit unfortunate in final effect. II. TIPS I haven't founded it in your texts, BUT, you can pick-up item without "action animation". Whille, beeing near (but not at the range of picking it up), you can "jump on it". And while beeing midair you can pickup, saving frames for picking up animation. Second one is resetting some enemies position by hitting menu screen. While getting back to game, some enemies (mices for sure), they are resetted to starting locations. Although it takes quite lot frames for that trick, it may save your time if you somehow have to avoid them. III. Strategy While I'm pretty sure you don't want to share it, I want to ask if your strategy includes: - picking up objects and dropping them somewhere for future usage - taking damage for saving time, the problem is that fruits are only one-time usable @dart193 You want to talk about strategy? I'm listening XD.
dart193
He/Him
Player (34)
Joined: 1/20/2013
Posts: 61
It is pretty sad to see that there is no progress going. I was highly hopeful that this game will be TASed. This is not an easy game of course, but i have seen jRPGs TASes so that should be pretty possible for our community.