1 2 3 4 5 6
12 13
Joined: 3/15/2007
Posts: 131
cheetah 7071 wrote:
Nitrodon wrote:
Also, I still mentioned trading Orson's weapons to Ephraim at the end of turn 6 before dropping him, which will probably save a pitiful 10 frames or so from your current version (the time it took to change Orson's equipped weapon).
Sorry, didn't notice that. Given that Ephraim's group will have to do some movement in chapter 8 anyways (as enemies will carge at them whether I like it or not), I'll have plenty of opportunity to trade Orson's weapons away from Ephraim, but I don't know if I'll take that opportunity. On the one hand, if I will be trading during chapter 8, it doesn't matter when Orson gives away his silver sword, as it'll take the same time to give it to Ephraim or Forde. So I just need to decide if I need the sixth javelin. Buying another from the shop is I believe out of the question, as it will be sent to storage. I think I also get a short spear some time during Eirika's route, though that may be a drop from an enemy I won't be killing, and I know I get a javelin from Tana in chapter 9. So 7-8 ranged weapons, over 10 chapters...I think I should be fine, given that some of those chapters are 1-2 turn victories. So I guess that means I ought to trade the silver sword to Forde, making me redo from midway through turn 2, same as last time. And here I was, hoping I'd be able to keep up through the beginning of turn 3. Oh well. At least I'm starting to get really good at redoing this chapter.
At least by the time you finally finish this chapter you can say you made sure it was as perfect as you could get it [=. I'm enjoying the WIPs, though I've only played the game once - though it was for like sixteen hours. I kept retrying the levels because I didn't want anyone to die
Former player
Joined: 5/29/2006
Posts: 200
Here's hoping it's the last one. 1113 frames ahead of my first version, or ~18.5 seconds.
At least by the time you finally finish this chapter you can say you made sure it was as perfect as you could get it [=. I'm enjoying the WIPs, though I've only played the game once - though it was for like sixteen hours. I kept retrying the levels because I didn't want anyone to die
I just know that when this run eventually gets obseleted, the new run will be faster on every chapter, and will be able to sum it up smugly as "better luck manipulation".
Active player (283)
Joined: 3/4/2006
Posts: 341
There are 2 diagonally adjacent spaces that are 7 spaces away from Seth on the final turn, perfect for wasting RNs for the critical against Zonta. Otherwise, this chapter looks perfect. (You don't need to bother releasing another update until sometime after you beat chapter 6.) There's not much risk of your run being obsoleted, since you and I are probably the only ones crazy enough to TAS a Fire Emblem game.
Former player
Joined: 5/29/2006
Posts: 200
I've done some testing on chapter 6, and would like some input on a question I have before I actually do the chapter. Basically, I have the choice to either rush the boss with Seth, or with Vanessa. If I use Vanessa, I'll get four levelups, but in the end it's faster to not critical the boss on turn four, due to extreme amounts of RNG abuse required. All in all, I'd say Seth is faster by ~300-400 frames, not counting the levelups he won't be getting. I'm personally of the opinion that this time will be made up later because of Vanessa's levelling up earlier, but I'd like to see if other people disagree.
Former player
Joined: 5/29/2006
Posts: 200
Bah, it turns out the AI behaves differently if you use the code to turn fog of war off. Looks like I'll have to do all my planning with it on now, as the code doesn't seem to work in the middle of the chapter to view enemy positions midway through.
Active player (283)
Joined: 3/4/2006
Posts: 341
Interesting. I wouldn't have known that, since I never TASed a fog chapter after learning how to turn off fog completely. My old vision+15 code should still work without affecting enemy AI, since I used the same type of code to plan turns in my old FE7 test run with no problems. I am curious as to what the AI did differently with and without fog.
Former player
Joined: 5/29/2006
Posts: 200
Actually, come to think of it, it may be due to me moving Eirika to the side to avoid an eventual cavalier coming at her. But at any rate, the enemies attacked from different positions, and different numbers of RNs were wasted in between enemy movement than before. I'll try leaving my initial setup as it was when doing my testing (that is, not touching the unit selection screen) and see if that was the cause of the AI difference. EDIT: I guess moving Eirika was the cause of the AI difference. Strange. I'll search for a position to move her to that won't affect anything. EDIT2: Turns out just bringing Eirika by herself caused troubles too, as now some of the cavaliers go after Vanessa...this is aggravating, but the fastest way to deal with this issue is to luck manipulate, rather than restore things to how they were in my test session.
Former player
Joined: 5/29/2006
Posts: 200
Sorry about my lack of updates, but I've just gotten Odin Sphere so I've been distracted. I fully intend to work on it tomorrow, though.
Former player
Joined: 5/29/2006
Posts: 200
Well, I finally started this up again. Here's chapter 6: http://dehacked.2y.net/microstorage.php/info/1201037247/FE8Speedv4.vbm I'm fairly certain this is optimal. The initial move by Eirika is because otherwise an enemy will move into her viewing ranger, forcing to screen to scroll to bring that into view. I'm rather happy that I found a strategy that caused Vanessa to never be even at risk of dying, thought at the cost of 5 (?) uses of a javelin.
Former player
Joined: 5/29/2006
Posts: 200
Joined: 2/26/2007
Posts: 1360
Location: Minnesota
I look forward to viewing the WIP, although I don't know how much help i can be (only played through FE8 ^_^;) There is another FE:SS thread, so I propose that a helpful moderator should merge the two. If it will help, I think angerfist's avatar is sexy and moving and stuff XD I will edit this once I have time to view the WIP and post comments
adelikat wrote:
I very much agree with this post.
Bobmario511 wrote:
Forget party hats, Christmas tree hats all the way man.
Active player (283)
Joined: 3/4/2006
Posts: 341
It's good to see you're doing this again. I have no major complaints for either chapter, but here are some minor ones that only another Fire Emblem TASer would notice. Chapter 6: Moving Vanessa during turn 1 instead of in the preparations screen will save two screen transitions. Chapter 7: You can move Eirika 3 spaces instead of 5 on turn 1. Also, when manipulating the critical against Murray, I think the spaces 3R1D and 2R2D are faster. I haven't tested to confirm it is faster or anything, but those are the spaces I'd use if I were doing the TAS. Also, remember the L button will return you to Eirika's position during this time, which would certainly save time with your current RNG manipulation. It may also be worth burning more RNs with Vanessa in previous turns so Eirika doesn't need to waste as many, since she can burn some RNs without losing any time at all. EDIT: I just noticed you select "check map" from the menu in the preparations screen in chapters 4, 5, 6, and 7. It's faster to just press B. (except that I already mentioned it's faster not to change formation in chapter 6 at all)
Former player
Joined: 5/29/2006
Posts: 200
I implemented your suggestion in chapter 6, but the RNG in chapter 7 didn't want to cooperate, and it turns out that I was abusing it optimally. Your other suggestion did save time with the ten RNs Eirika had to burn, though.
Former player
Joined: 5/29/2006
Posts: 200
Killing Tirado in chapter 8 is giving me headaches. Anybody know offhand when Big Shield is checked in the RN sequence? (RNG abuse is common enough in FE that there's at least a chance somebody knows). Nearest I can figure out, the same RN is used to check whether you critical and whether your opponent activates Big Shield, which seems silly and will make most general bosses a huge pain. My reasoning for this is as follows. Here's the sequence of RN's in question (Tirado has 47 accuracy and is level 1 (meaning only an RN will activate big shield, wherever its checked), Seth has 73 accuracy and 6 critical): 1. 45 2. 47 3. 7 4. 84 5. 61 6. 54 7. 0 8. 73 On my first attempt, I had Tirado attack me with the second RN, causing him to hit and fail to critical. Seth then used the next two RNs on his accuracy check, but Big Shield activated. So, I thought that maybe the game just checked Big Shield in between accuracy and critical. Thus, I wasted one less RN in my next attempt. Tirado used the first three RNs hitting me, but then Seth hit, without criticalling or activating Big shield. The only conclusion I could draw from this is that Big Shield uses the same RN as criticals, but I'm hoping somebody else can come up with something that makes more sense.
Active player (283)
Joined: 3/4/2006
Posts: 341
First, Big Shield activates in this game based on the attacker's level, not the defender's level. Still, Seth's level is likely less than 20, so that's hardly relevant to this situation. I checked this point in your old run. In that, Seth is level 6 with 74% accuracy and 6% critical. 1. 39 2. 16 (these two RNs easily give a hit) 3. 83 (easily avoids big shield) 4. 5 (causes a critical hit) 5. 51 (I don't know, but it was compared with 0 for some reason. Possibly silencer as in FE7.) 6-12: some numbers (level up) Are you sure you actually used the particular RNs you listed on your second attempt? You seem to be saying that Tirado is attacking you, and I can see that he isn't the first unit to act during the enemy phase.
Former player
Joined: 5/29/2006
Posts: 200
...I'm so embarrased. I didn't notice that wasting one fewer RN caused Tirado to miss, thus screwing up my alignment. Sorry for making you do all that work for me. It seems a waste to delete the wall of text I had prepared, so here it is: Here's my WIP through the beginning of the turn where I would start wasting RNs. My plan was to waste RNs, drop Eirika off outside of the range of the archer, equip the silver lancer, and position Seth in front of the boss. The first RN of the turn is F2A8. If I end my turn without wasting RNs, Tirado is the first enemy to move (though several enemies waste RNs deciding not to move). The number of RNs wasted between the turn ending and Tirado attacking should be constant, because no enemy needs to have a path drawn. 70 or so RNs after the F2A8 mentioned is the 0 RN I'd like to critical off of. So, ignoring Big Shield, I'd want Tirado to attack on 79E6, and I need to end my turn with 6587 up next. Under the theory that Big Shield is checked before critical, wasting one fewer RN and ending with 778A next should work. Indeed I have confirmed that doing this moves Tirado's first RN up by one as intended. [This is where I realized the mistake I had made]. Again, sorry for making you do this.
Active player (283)
Joined: 3/4/2006
Posts: 341
It really wasn't much trouble at all, so don't worry about it. Basically all I did was play your movie up to that point, fire up the debugger, set a breakpoint, and note what happened when the RNG was used. I suspect you checked Seth's evasion while he still had the iron blade equipped. Tirado's accuracy against Seth without anything weighing him down is 45% (not 47%), thus making him miss with a 47 and a 45. (I usually get the accuracy/damage/critical by turning animations on, since that's much easier and less prone to error.) The 0 you selected is thus inaccessable; however, there seem to be plenty of other RNs to choose from for the critical, including the earlier 0DBC and the later 0B50 and 0886 (the last of which will give you both strength and speed).
Former player
Joined: 5/29/2006
Posts: 200
I did calculate accuracy with the silver lance, I just tested the different RN without checking the spreadsheet and then somehow didn't notice Tirado missing. At any rate, with Big Shield factored in, several previously inaccesible RNs become accesible, and while before I would have wasted hundred and hundreds to even get str and spd, now I was able to get str, spd, and skl only about 60 RNs in. Here's the completed chapter. I'm going to have to think hard about chapter 9, since it's a rout chapter. I'll definitely want to check Molotov's run, but I'm currently thinking of dropping Seth off near the boss, and somehow having the rest of my army (such as it is) deal with the north. If nothing else, I'll have to think carefully about who I want to bring.
Former player
Joined: 5/29/2006
Posts: 200
Well, I came up with a strategy for chapter 9. However, it would be so horrendously difficult to implement that I've decided to describe it here first and see if anybody else has any better ideas. First off: Seth has to be brought down to the bottom area. He's the only one who can deal with the boss with anything even resembling speed. Second: Vanessa has to deal with the northern enemies. She's the only person who can 2HKO the mercenaries (though admittedly she can't double them with anything but a slim lance). That leaves Tana to deal with the pirates and the lone myrmidon further south. This is a problem, since all three will have to be dealt with as criticals during the enemy phase. This is the main reason testing this strategy would be very difficult. EDIT: Nitrodon, I just noticed you saying I ought to press B instead of doing check map. It should be hex editable. I'll do that before starting chapter 9. Note that which order I move the three relevant units in is still in the air and will be decided as I do the chapter. So, I have pictures! 
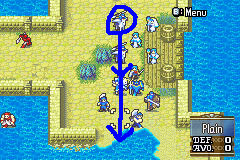
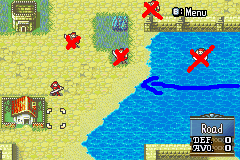
First off, Tana grabs Seth and moves as far south as she can. The pirate moves up to attack her, she criticals him. Dodging isn't strictly neccesary, but she can't be afford to be hit more than once overall throughout the chapter. 
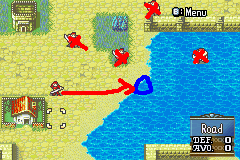
Vanessa moves all the way forward, and kills the soldier behind her with a javelin, levelling up and gaining strength and speed. The strength allows her to 2HKO to sniper with a javelin, and the speed allows her to double the pirate who'll appear soon with an iron axe. This is the enemy phase for Vanessa. The picture's a bit confusing, but the idea is that everything that can attack her does. The sniper, archer, and soldier all die, but the mercenary survives. 
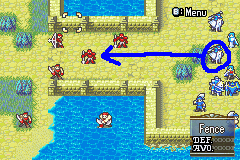
Tana then moves down and drops Seth off at the filled-in circle, trading to equip his javelin. Tana will probably equip her heavy spear, since she can't kill the archers anyways and countering takes time, but if that makes the archers too accurate it might be faster to leave her with her javelin. Meanwhile, a pirate reinforcement has appeared at the empty circle. Vanessa moves to the indicated square and equips her iron lance. I don't know exactly where the lower two mercenaries will be at the time, so the exact square may change, but the main point is that she's in the range of every nearby enemy. She kills the mercenary she had attacked once before, as well as the pirate on the counter. The pirate should have moved straight south the previous two turns, so if Tana moves here and equips her javelin, she can counter him. 
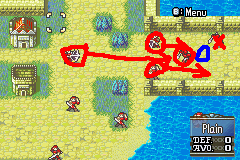
And so Tana criticals him on the counter. Seth moves down next to the boss and OHKOs him with an iron blade critical. Some archer reinforcements have appeared, but I can ignore them this turn. Two reinforcements have appeard above Vanessa: a mercenary on the right, and a mage on the left. Vanessa can kill the mage in one round without a critical, so she criticals the mercenary with her javelin. 
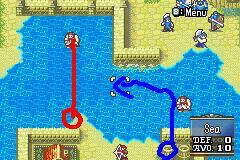
On the fourth and final turn, Tana moves all the way left. And counter-criticals yet again. Seth moves to this square and equips a javelin. Some more reinforcements have appeared, but he should be in range of every enemy. At this point he should have 25 or so javelin uses left between the two. Hopefully that will be enough. More reinforcements have appeared near Vanessa. The one on the right is a solder, and easily killable on the counter, so she kills the mercenary on the left with an iron lance critical. So, that's the idea. I can't afford to miss even once, and there'll be plenty of times I'll have low accuracy. Tana needs three dodge-criticals during the enemy phase. It's entirely possible that this will require so much RNG abuse that it's just faster to take more turns. At any rate, if anybody has any better ideas before I start this suicidal venture, I'd appreciate it. EDIT: Apparently pirates use lances in typo-land. Also, left and right are backwards.
Active player (283)
Joined: 3/4/2006
Posts: 341
Your plan seems like a good start, but it won't work in its current state. I'm too tired at the moment to give this as much thought as I'd like, but a few main points: 1. The archers who attack Tana on turn 2 will not be able to attack the space you indicated on turn 4. 2. Seth cannot move from the space you indicated in turn 3 to the space you indicated on turn 4. 3. Vanessa will have a terrible time trying to survive her part, possibly worse than Tana. It's possible to make Tana's part slightly easier by making someone else (such as Eirika) counter-critical the pirate on turn 1.
Former player
Joined: 5/29/2006
Posts: 200
1. Well, I had assumed the archers would charge at Seth on turn 3, and then reach him on turn 4. 2. Right, mounted units take three movement to get through forests. This can be fixed by killing the boss with a javelin. 3. This is an incredibly big point. After looking more carefully at the offensive stats of the enemies (previously I was paying more attention to the defensive ones), the mercenaries have somewhere in the vicinity of 80 hit, not counting all the other types of enemies. This would be doable if I didn't have to manipulate Tana's criticals as well, I suppose, but... Tana has to move her full range on turn 1 in order for Seth to reach the boss on turn 3. This would be fixed by having Vanessa carry Seth, but then I need to figure out another way to deal with the northern area. Vanessa is quite simply my only unit who can 2HKO the mercenaries while simultaneously not being double by them. She can use a vulnerary on turn two to easy the burden of luck manipulation, but that's a very ugly solution, and plus turn 1 will be the hardest turn to manipulate anyways (Vanessa needs to dodge both bow attacks, and I need Tana's counter critical). If Vanessa hangs back by one space on turn 1, she can javelin critical the sniper, but in exchange can't kill the pirate on that same turn, and has to put up with it for another turn. Bah, I'll take another shot at thinking this through when I've had more sleep myself. FE10 has been destroying my sleep schedule.
Active player (283)
Joined: 3/4/2006
Posts: 341
Those archers won't charge Seth if they can't reach him. Tana is fully capable of moving 6 down and 1 left and letting someone else deal with the pirate on turn 1. I haven't checked fully, but Kyle may be able to help with the top area if necessary. If he gains 1 strength and 1 speed, he can also 2HKO the mercenaries with a javelin without getting doubled (and he can do that at his current level with a steel sword).
Former player
Joined: 5/29/2006
Posts: 200
Well, I haven't fully thought this through yet, but I can have Vanessa drop Seth off, then use the fact that she starts farther south to have her escape the archers entirely, and then kill the pirate and possibly even myrmidon with no need for counter-criticals. Kyle will have a somewhat easier time up north, with 3 more defense (though no triangle advantage over the mercenaries). At any rate, Kyle only takes a manageable 2 damage from mercenaries, and 4 from soldiers, so with 25 hp, he isn't likely to die. If he gains one point of speed, he can afford to equip a javelin, and thus let the archer deal with itself, though he'll want to critical the sniper. I'll want to manipulate spd and def for him on the first turn for sure, though of course str and skl are always welcome. With this, it looks like Kyle can definitely handle the north in four turns, to time it with Seth's destruction of the south. After taking a closer look at Vanessa''s intended path, it definitely seems doable. I have Eirika or someone counter-critical the first pirate, then Vanessa gets the second one during the player phase, and if she gains a point of str, she can double and 2HKO the myrmidon during the fourth enemy phase.
Former player
Joined: 5/29/2006
Posts: 200
I just want to tell everybody that this is still in progress, but that chapter 9 is doing everything it can to prevent a 4 turn victory. I just discovered that the pirate that spawns on turn one doesn't charge at you even if you're in range, making me throw out a whole turn's worth of progress, and I've already had to start from the beginning three times (one of which was starting all the way from the preparations screen). So...don't expect this soon, but if you don't hear from me in a week, then give me a gentle prod to remind me about it.
Joined: 2/26/2007
Posts: 1360
Location: Minnesota
you prefer pitchfork or cat o' nine tails? ;)
adelikat wrote:
I very much agree with this post.
Bobmario511 wrote:
Forget party hats, Christmas tree hats all the way man.
1 2 3 4 5 6
12 13