The Game Gear Shinobi is the first of the two Shinobi games released for the Sega Game Gear, the level design structure starts off with a non-
linear stage select, players must rescue all 4 ninja pals and use their combined strength to get through the City of Fear.
Game objectives
- Emulator used: <Bizhawk 2.3.1>
- Aims for the fastest time
- Collects all life expansions
- Cheats death by jumping from spikes unharmed
Run Comments
After watching Mike89's Donkey Kong Land 3 TAS, I got motivated to produce a proper TAS which I haven't done in a very long time. I initially started with its sequel: The G.G. Shinobi 2 but then, I decided to produce a run for the first game because that one is a lot shorter of the two.
100% simply collects all life expansions as that is an upgrade to the character and you get to see some interesting damage abuse strategies in the later levels to cut down a decent amount of time.
Ninja types
When you clear a level, you unlock a new ninja.
Each Ninja has its own unique abilities:
Red - Only character who can damage the final boss.
Ninjutsu: Full-screen quake attack, destroying breakable blocks.
Blue (clear Valley) - Only character who can use his Cresent Blade Yo-Yo to swing across gaps.
Ninjutsu: Twist himself so fast to become a tornado, allowing him to fly for a few seconds.
Green (clear Woodland) - Only character who can double jump and fire shurikens (16-bit Super Shinobi style).
Ninjutsu: Mijin, if you're familiar with the self-destruct spell from the Genesis games, he does the same thing here but the Ninpo count will always drop to 0 regardless of how many the player had before using it.
Pink (clear Highway) - Only character who can crawl across ceilings and throw bombs.
Ninjutsu: Full-screen flash which can light up dark rooms, freeze enemies/bombs and restart the electric floor trap in one of the rooms.
Yellow (clear Harbor) - Only character who can walk on water and can fire a (charged) Shinobi Force orb shot.
Ninjutsu: Ikazuchi, the art of thunder allows the Ninja to protect itself from damage but it does not protect the user from instant-kill spikes.
Game Mechanics and Tricks
Frame perfect turtle hop
When jumping on the frames before landing, it's possible to jump without having to see the ninja's walking sprite but doing this kind of jump has reduced horizontal speed for a few frames making it slower than a normal timed jump. You do get to see this kind of jump when dealing with a certain type of obstacle because there is a 1 (in 30fps) frame window where you can hop off from them unharmed.
Jumping off from spikes unharmed
This little trick is one of the reasons why the TAS run is notably faster than the current best real-time runs. However, there are a few factors that make the trick not so easy to pull off. Falling speed and pixel positioning when landing on the spikes. There is a small row of pixels that are considered to be safe to land for 1 frame, the ninja is restricted to execute the slower turtle hop but if you play as Green, it's possible to execute multiple spike jumps by adjusting the timing of Green's double jump.
Vertical block zip
This trick was discovered near the end of the run and it requires Blue to move closer to the block from underneath and hold up to go through part of that block. When deactivating the tornado due to time expiration or character change, the ninja's feet needs to line up with the base of the block for the zip to work. I had a look at the maps in the game and there isn't a way to zip into the sealed section and fully skip boss refights completely in Neo City.
Super short hop
A tap hop executes a jump at a reasonable amount of height but there are 2 ways to reduce the height of a tap hop.
1) Use ninjutsu.
2) Change character.
Menu navigation
As Green, it's faster to reach to Red/Blue by scrolling through the bottom, you only lose an extra 2 frames if you have at least 1 ninpo which is still super fast than scrolling upwards to select Blue.
Route history
100% only has 2 viable routes.
My old 2015 stage order was: Highway -> Harbor -> Valley -> Woodland
The current route now goes: Valley -> Woodland -> Highway -> Harbor
I thought Highway first was the fastest but I lose a lot of time in the second section of Highway due to the lack being able to double jump to reach higher levels and it's notably slower than Valley first.
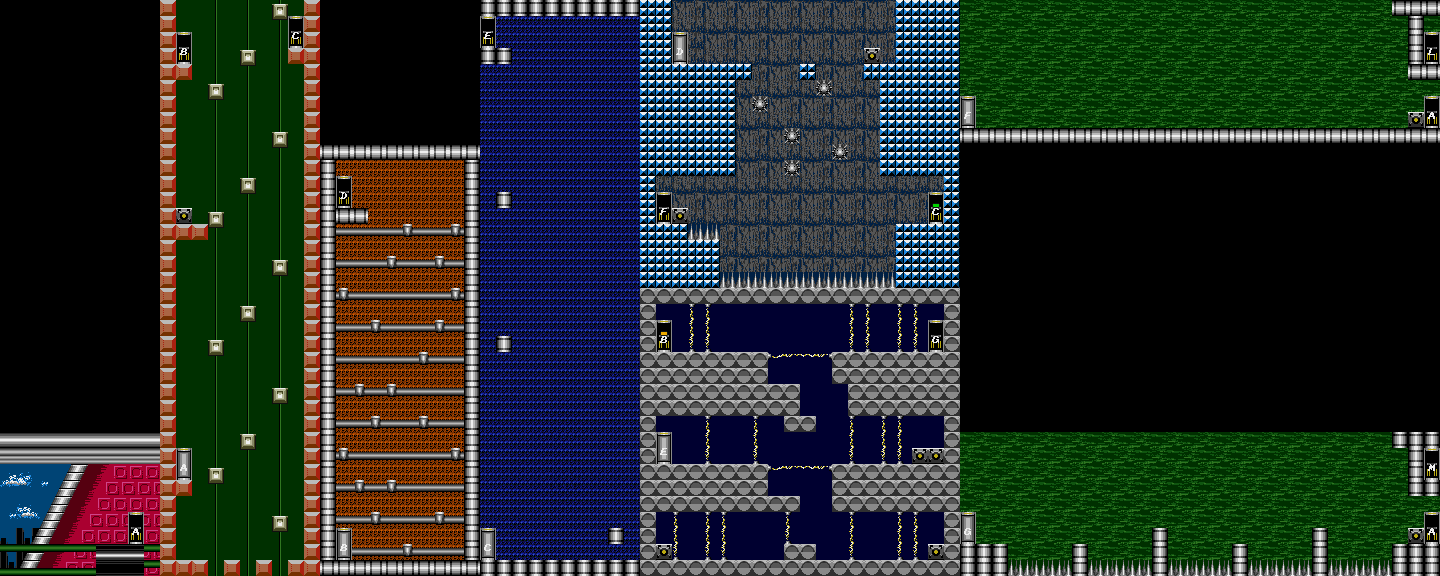
Stage by stage comments
Valley 1
With only the red ninja, I had to wait for logs to appear, there are 2 types. A slow log and a fast log. The first life expansion is found right next to the first pair of whirlpools but the distance is too far to reach when using a log, so I had to take the higher route and drop down from an unusual position to get the faster log spawn as soon as possible without the whirlpool from stopping it.
Valley 2
This section has a lot of jumping, some can be done a few frames faster but doing so messes up the position of the 2 spike enemies inside the topmost dark cage segment as my character would end up taking 2 hits instead of 1. The other problem is that even if a new version was ahead by 1-2 pixels, it wouldn't be possible to only break open the rightmost box that has a ninpo pickup as it will hit a left box and spawns a small life refill to recover 2 HP. I took damage on purpose in the first area to reduce LIFE BONUS points delay which is 100 points per frame.
Valley Boss
The waterfall boss appears based on the Ninja's current location, ~1 second before spawning.
Woodland 1
If Valley was brutal for using logs, this level can be brutal too with less HP as some enemies can dish out 2 points of damage. The first section has a lot of height jumping and it has a frame precise and pixel-precise trick right after the life expansion which is done by duck walking which happened right before picking up the life expansion.
Woodland 2
The first Tornado was used at a certain location for 2 reasons.
1) The moment the ninja jumps after using the second tornado, I can still walk forward an inch without having to waste overall steps in the area
2) You can deactivate the tornado by changing character but that requires a pause, I want to deactivate tornado at an appropriate spot.
Woodland Boss
Taking a hit here allows me to save 1 frame after completing the level, the 3 evil ninjas have various HP but from lowest to highest it's Left, Right and Middle. Since middle takes 5 hits, that one was the main target for optimising the battle.
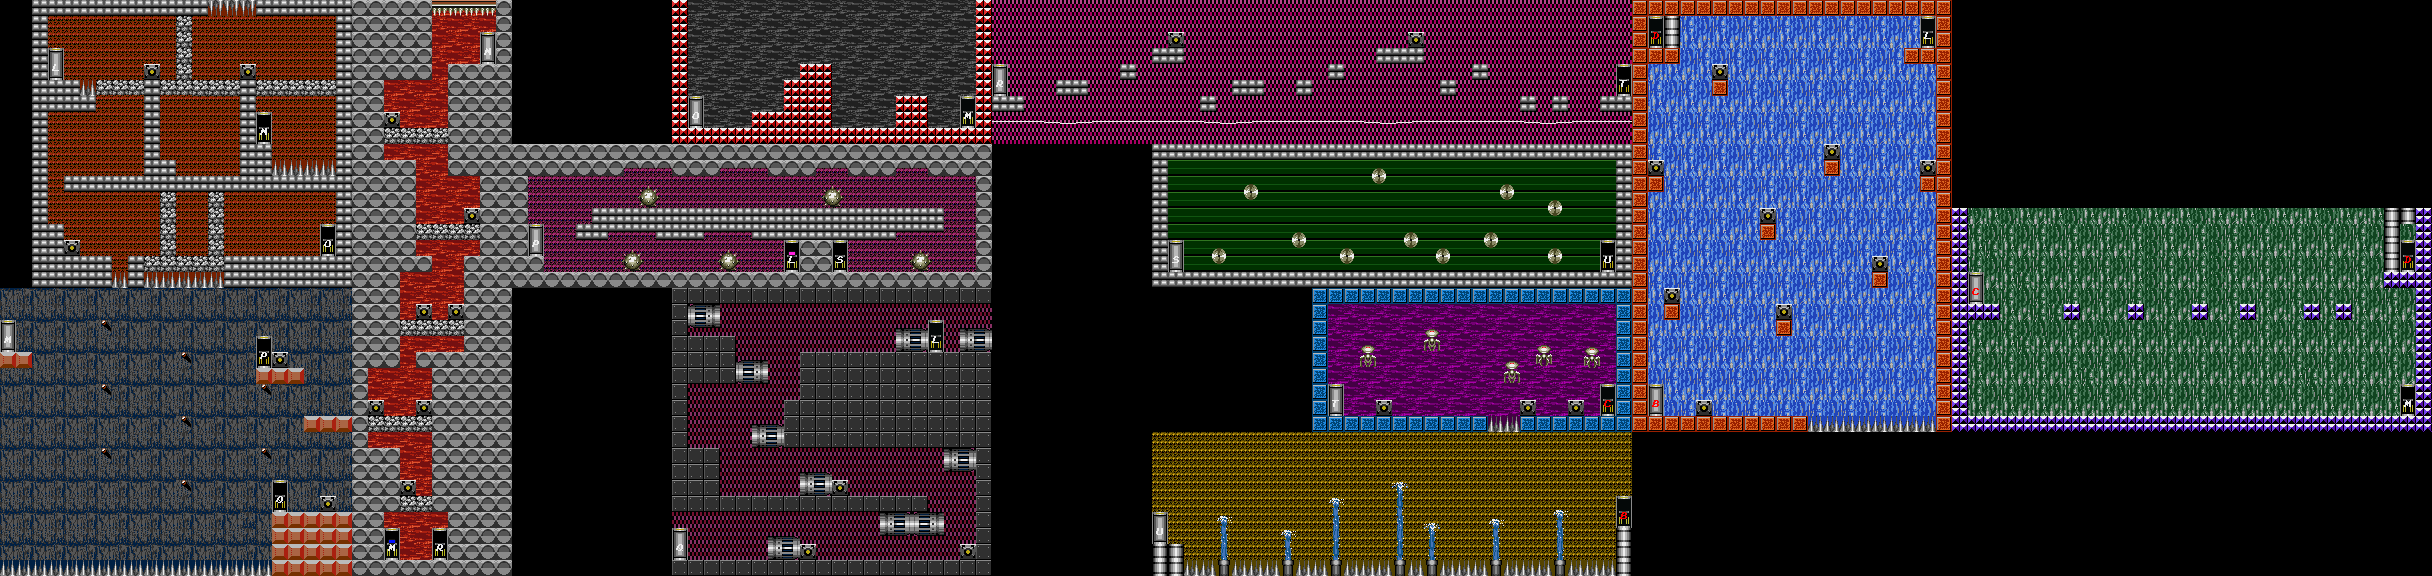
Highway 1
Green Ninja has the ability to double jump and use shurikens to hitstun the army soldiers, Green is also the best ninja to break open item boxes without having to stop moving. A 5-way shot was used at the end at a specific time to reset the small self-destruct timer, this way it gets caught in the explosion and take damage to reduce the LIFE BONUS score.
Highway 2
It may look slow but double jump to Blue's tornado is the fastest way to reach the first floor, I switch to green because it's possible to double jump and not lose horizontal speed which the tornado has problems with when going diagonally. The main reason why the tornado was going straight up is because, part-way through a series of double jumps, I would have to deal with a hammer guy and going a few pixels ahead can cause problems because a (point blank) spread shuriken shot is the most effective way to kill him in a single hit.
Highway Boss
The helicopter's swoop patterns are based on the ninja's current position. Green shurikens are very weak and so it's ideal to switch to blue, not only for stronger damage output but it has the reach which is vital for saving precious frames during the 4th cycle. Extra damage I took was intentional to reduce the LIFE BONUS score, I had to preserve some HP because I will need at least 11 during the final stage.
Harbor 1
Green Ninja is the only character who can complete this section without having to stop whatsoever.
Harbor 2a
The first few steps were scripted by the game itself, not me being forgetful on how to optimise jumps properly.
Harbor 2b
One of the biggest challenges in this level was to figure out how to keep on moving right after the last life expansion, it turns out that a short hop and a shuriken shot right before landing puts the enemy into hitstun and allows me to go through him without any kind of knockback reaction.
Harbor Boss
Pink's bombs are very powerful against most of the bosses in the game reducing the hit count from 8 down to 4. It's possible to save a few more frames by taking damage after throwing bomb 3 but I didn't because:
A) I needed enough HP for the last level and
B) there is a global timer running at all times in certain rooms of the final stage and not taking damage, speed up one of the rooms which negates the very small time loss during the boss fight.
Neo City part 1
The labyrinth level, it has 3 main sections, each section has 2 doors leading to refights, defeating a boss will unlock a door that will take the player to the next main section. A casual player would assume that you have to refight all 4 bosses before entering the final main section but that is not the case in a speedrun.
Route doors (by using the SMSpower link)
A -> B -> D -> C Giant Face refight -> C Block Room -> E -> G -> M
Rooms B, E and G have assets that are running on a global timer. Room B, in particular, will exit the room in a certain time (assuming menu-based actions are exactly the same) even if my previous 4 stages were faster by ~30 frames. It's probably faster if I've found new gameplay timesavers that add up to 2-3 seconds worth but as of this submission, it wasn't enough.
Room D shows the first instance of spike jumping.
This trick has 2 factors, falling speed and (sub)pixels. The first spike jump was to avoid dying from the spike ball trap, changing characters during that jump allows me to execute a super low hop which simply stops the rising vertical speed the moment a character is changed. Green is great for spike jumping thanks to its double jump which was vital to reach the higher platform leading to Room C.
Room C blocks are running on a global timer and using the tornado spell in this scenario to the point I take intentional damage in the next room (E) is 54 frames faster than not using the spell. This is because when I enter the next room, I get to see an end to an earlier cycle which cuts down the waiting time before the damage boost. I still would have to pick up an extra ninpo later on (28 frames) in the level but I save more time than losing so it was worth using it (26 frames faster overall).
Room E is a cycle based room, the execution window to damage boost to the right, next to Door G is very tight to pull off.
Room G is the most annoying rooms for real-time runs because it's possible to reach to the end without stopping but the execution window isn't forgiving. Spike jumping isn't useful here because it slows the ninja down slightly and it's not possible to reach to the top right door without having to use the lower floor first.
Neo City part 2
Route doors (by using the SMSpower link)
Start at M -> P -> L Chopper refight -> L block room -> O -> M -> P -> S -> U -> B -> D
Room M is straight forward, the L block room abused spike jumps in a unique way to minimise character switching. The first super short hop was caused by using ninjutsu and then a character switch after the first spike jump. I changed to blue because he was required when entering room M for the second time.
Room P to S, the first spike ball obstacle from the upper level had a longer wait time if I tried to avoid taking damage.
Room U to B: (water geyser with spike traps) to reduce character switching, Green was the most reliable character to execute multiple spike jumps in a row thanks to his 2nd jump which can alter its (sub)pixels to land on the very safe zone of the spikes. I tried copy pasting the inputs to get consistent heights but even that wasn't enough to get it working, you can tell a spike jump will not work if the ninja does not show a walking sprite before dying.
Room B to D: (lots of blocks room) because I picked up an extra ninpo partway through the level, I can just double jump immediately and then switch to blue to cast a tornado. I character switch at a certain spot to zip through a block vertically, this saves 9 frames over not using the trick and there weren't any more global timer obstacles so these time savers were worth using.
Neo City part 3
The final straight,
Normally you would have to use Pink's ninjutsu to freeze the proximity bombs multiple times.
RTA runs you would use Green's double jump and then switch to Blue's tornado to reduce ninjutsu usage.
The TAS run doesn't use any ninjutsu at all and abuses spike jumps.
The final boss was originally going to be done with only 1 HP remaining but it turns out that a damage boost at the start allowed me to get some early hits, most notably the fourth hit which saved a decent amount of time.
Phase 2 was straight forward as there is a forgiving invincibility window which allowed me to sacrifice frames without wasting any time so instead of 3 hits per big jump, I did 2 hits per small jump which made the last 2 hits easier to figure out as I would have to move my ninja to the right to avoid the fireball trap, getting hit from that after selecting STOP Movie would have killed my character.
Possible improvements:
I noticed that one of the map presses was 4 frames too late, while I did try to fix that error, it lead to a new problem where the fountain room ended up being 4 frames longer, negating the time I saved from earlier.
Better spike jumps optimisation in one of the late game rooms, ideally if I can figure out a way to get more or close to full double jumps I could reduce 1 spike jump.
See if Green's 5 way spread shot can dish out more damage against the helicopter boss per cycle, this can cut down 2 pauses which are menu based and should not affect the global timer in any way.
Figure out a better route in Woodland, I need to test and see if I can pick up extra ninpo from one of the forest areas without missing a fountain cycle in the final stage, if I can get 1 extra ninpo and not waste time when I reach to the electric trap damage boost room I could save nearly 20 more frames for not having to open up an extra box inside the red room where ninjutsu is required to break the blocks.
Special thanks:
obiiwan for setting a good RTA time for this category of under 10 and a half minutes.
Mike89 for indirectly motivating me to get back to TASing after I watched his DKL3 run.
SMSPower for those map images of Neo City which made it easier for me to add information about that level.
You for reading this submission page.
Screencap frames:
21429, 21471, 31467
ThunderAxe31: Judging.
ThunderAxe31: File replaced with a version with more subtitles. Also, 1 blank frame removed at the end.
ThunderAxe31: This movie is reasonably optimized, even when it doesn't use obviously TAS-only tricks.
Regarding the branch, I have to note that the game doesn't seem to have any internal definition of full-completion. However, we can still aknowledge unofficial conditions for full-completion, provided that they meet our full-completion rules. In that regard, I don't see any problem with using the health upgrades as a requirement, as it seems to be the only thing that can be used as a yardstick for the purpose of recognizing full-completion.
On a side note, I have to point out that we can come up with a more appropriate movie label for this branch. The speedrunning community currently uses "100%", which is not indicative for this game, as there isn't any kind of gauge meter. After discussing with feos, he suggested to use "all upgrades", as it explains clearer the goal of this movie and avoids possible misunderstandings.
There wasn't much discussion in the submission thread, yet we currently have 11 Yes votes alone, and I agree with them. Accepting for Moons.
feos: Pub.