Table of contents
- Introduction:
- Plot:
- Controls and Mechanics:
- Submission Format:
- Common Tricks:
- Timesave Table:
- Level-By-Level Analysis:
- The TASing Process:
- Potential Timesaves:
- Special Thanks:
- Concluding Remarks:
Introduction:
Are you ready for some Battletoads? I hope so, because we've got a new TAS of the game right here ready to go! Before we get into the nitty-gritty of all the tricks used in the TAS, however, let’s go over a brief summary of what the game’s plot actually is (since we’ll be skipping all between-level cutscenes for the purposes of speed).
Plot:
It was a peaceful day in the galaxy, when the evil dark queen kidnapped Princess Angelica and the Battletoad named Pimple! The two were held captive deep under the surface of the planet known as Ragnarok’s World, with all of the dark queen’s minions helping to guard them. In spite of this, the 2 remaining members of the Battletoads, Rash and Zitz, set out on a daring mission to rescue their fallen comrade and the princess. After being dropped off on the surface of Ragnarok’s World, the 2 toads are going to need to use all of their speed and reflexes if they want to survive the journey to the core of the planet, and to win their final showdown against the dark queen. Will the Battletoads emerge triumphant, or will the dark queen succeed in her nefarious quest? Stay tuned to find out!
Controls and Mechanics:
In Battletoads, each toad is capable of a variety of attacking moves. If a toad is running at full speed and presses B, they will do a “ram attack” (during which the toads grow actual ram horns!). At slower speeds, the toads will do an attack which is determined by random chance, which could include booting an enemy offscreen, doing a downward punch, an upward smash punch, and many more.
If you hold right, your toad will slowly build up speed until their speed caps out at 128. However, if you press right, release right, and tap right again a frame later, your toad will start running with a speed of 192. This technique is of course used throughout the TAS wherever possible to save time.
Some of the levels in the game are 3D, while other levels are 2D. A large portion of these 3D levels, however, are skipped. These skips occur as a result of touching warp portals, which are objects hidden throughout the game which skip you 2 levels forwards. In this particular TAS, warp portals are activated in levels 1, 4, and 6 in order to skip ahead. After level 6, however, there are no more warp portal locations in the game, so we have to advance level-by-level after that.
Submission Format:
Only levels 10 and 12 of this TAS have any difference in them relative to my previous 2P Warps TAS. As such, for all other levels of the game, I have included a link to my earlier 2P Warps submission, since this contains all of the information neccesary to explain each of the other levels. I generally don't like to include a link to another movie for a description, since this often leads to a wild goosechase of looking through multiple submissions for an explanation of a trick, but since 100% of the info needed to explain the other levels is included in that submission, I feel that this is the better course of action. My old 2P Warps submission notes can be found here: #6807: Lobsterzelda's NES Battletoads "warps, 2 players" in 10:44.74
Common Tricks:
Across the TAS, there are certain tricks which I use repeatedly to save time. Below, I have compiled a list of these tricks, along with a description of how they work. Note that this list doesn’t include tricks that are only used once in a specific level. Those tricks will be described in the individual level descriptions section down below.
- RNG Manipulation
- In Battletoads, RNG is stored in 4 memory addresses, which are combined several times with the exclusive or operation every frame. Additionally, certain other memory address values also alter the value of RNG each frame. One of these addresses is the address which stores player 1’s input on the last frame. Each of the 8 buttons is given a value between 1 and 128, which are added together to produce a single value that represents what buttons were last pressed. This value is then used to alter the RNG on each frame. Because of this, by pressing select on random frames and a random number of times, we can alter the game’s RNG to work in our favor! Doing this, we can manipulate favorable outcomes without losing any time whatsoever.
- Cutscene Manipulation
- The cutscenes between each level can generate a different number of lag frames based on the value of RNG. Thus, by doing the RNG manipulation described above, we can save 1-3 frames off of the number of lag frames between each level.
- Combining Lag Hits
- Certain finishing moves that the toads execute generate multiple frames of lag. However, if both toads perform their finishing move at the same time, then only 1 finishing move will cause lag, but both finishing moves will damage enemies! (for example, if a move takes up 8 lag frames, if both toads do it on two enemies at the same time, then only 8 lag frames will pass, but both enemies will be hit. This is faster than if the toads hit the enemy on different frames, which would cause 16 lag frames to occur instead).
- Jump Boosting
- In 2D levels, if you are jumping up and pass a specific spot near the edge of a platform you are jumping towards (while below the platform), then the game’s collision detection will cause you to get boosted up so that on the next frame you are on top of the platform. This is able to save about 3-4 frames per jump in sections where this trick is used, which can add up to some nice timesaves in the long run.
- Passing Through Checkpoint-Walls
- In levels 4 and 9, if you alternate pressing right and pressing nothing every other frame while a checkpoint-wall is to your right, then you can actually clip right through the wall (the same technique works with pressing left when a wall is to the left of your toad).
- Left+Right Simultaneously
- In 2D levels, a toad’s x-coordinate determines how far to the left or right they are in the level, and the toad’s z-coordinate determines how far up or down the toad is. The y-coordinate is not used in 2D levels, and instead is a fixed constant which doesn’t change. However, if you hold both left and right on the same frame in a 2D level, then the toad’s y-coordinate will start to increase. This causes the toad’s sprite to rise on the screen. Collision with certain objects rises with the toad, while collision with walls, floors and other objects remains in place. If the toad’s y-coordinate gets past 255, it will wrap around to 0, which will cause the toad’s sprite to suddenly fall back down to a normal level. This trick is often used to force the screen to scroll up, or to reach certain locations sooner than would otherwise be possible.
Timesave Table:
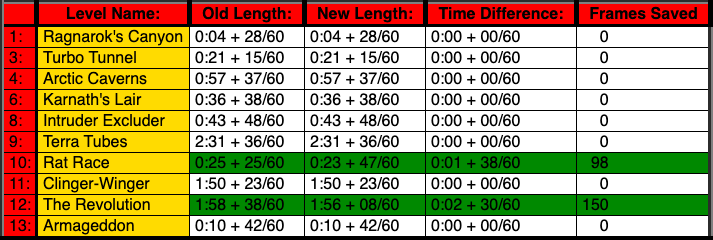
Below, I have included a table which shows the length of each level in my TAS, the length of each level in the old 2 players warps TAS I made earlier this year, and the amount of time saved in each level. The length of each level is measured as the first frame of lag from the cutscene after a level ends minus the last frame of lag from the cutscene before the level starts (the Dark Queen fight/level 13 is the one exception to this, with the level length being measured as the last frame of input minus the last lag frame before the level loads). Each time is reported in the format minutes:seconds + frames/60, where frames/60 represents the extra frames that don’t fit into a second or minute (there are 60 frames per second, and 3600 frames per minute). For example, a level that took 3760 frames would be listed as 1:02 + 40/60. The frames saved column, on the other hand, just lists the actual number of frames saved between my TAS and the original TAS. Each row is color-coded, with levels with timesaves appearing in green, and levels with no time saved appearing in white.
Level-By-Level Analysis:
From here, I am going to give you a level-by-level analysis explaining what I did to make each level of this TAS as fast and as entertaining as possible!
Level 1: Ragnarok’s Canyon
There is no change in this level compared to my original TAS. For a description of all the tricks used to save time in this level, see my level 1 notes from my old 2P Warps submission here: #6807: Lobsterzelda's NES Battletoads "warps, 2 players" in 10:44.74
Frames Saved: 0
Level 3: Turbo Tunnel
There is no change in this level compared to my original TAS. For a description of all the tricks used to save time in this level, see my level 3 notes from my old 2P Warps submission here: #6807: Lobsterzelda's NES Battletoads "warps, 2 players" in 10:44.74
Frames Saved: 0
Level 4: Arctic Caverns
There is no change in this level compared to my original TAS. For a description of all the tricks used to save time in this level, see my level 4 notes from my old 2P Warps submission here: #6807: Lobsterzelda's NES Battletoads "warps, 2 players" in 10:44.74
Frames Saved: 0
Level 6: Karnath’s Lair
There is no change in this level compared to my original TAS. For a description of all the tricks used to save time in this level, see my level 6 notes from my old 2P Warps submission here: #6807: Lobsterzelda's NES Battletoads "warps, 2 players" in 10:44.74
Frames Saved: 0
Level 8: Intruder Excluder
There is no change in this level compared to my original TAS. For a description of all the tricks used to save time in this level, see my level 8 notes from my old 2P Warps submission here: #6807: Lobsterzelda's NES Battletoads "warps, 2 players" in 10:44.74
Frames Saved: 0
Level 9: Terra Tubes
There is no change in this level compared to my original TAS. For a description of all the tricks used to save time in this level, see my level 9 notes from my old 2P Warps submission here: #6807: Lobsterzelda's NES Battletoads "warps, 2 players" in 10:44.74
Frames Saved: 0
Level 10: Rat Race:
We now arrive at the first big timesave of this TAS! The timesave in this TAS was actually discovered many years ago (probably in 2012) by DyLaX, but was forgotten about until recently. Special thanks to Koorvex for finding DyLaX's old input file from an abandoned TAS which contained this timesave, and for bringing the old TAS to my attention!
In my old TAS, player 2 picks up player 1 and jumps, which causes the screen to start scrolling down. Player 2 then throws player 1 when near the floor with the bomb, which stops the screen from scrolling. In my new TAS, however, players 1 and 2 both jump up while holding left+right to start the level, which makes the camera start scrolling the screen down faster. One toad then punches the other near the floor with the bomb on it, which makes the screen stop scrolling. After player 1 kicks the bomb away, player 2 punches him to cancel out his attack animation.
From here, we reach the biggest timesave of this level. In level 10, you can't jump after destroying the bomb until the falling rat hits the ground. As such, the old TAS rammed the rat after he hit the ground, and then jumped up to kick the rat when he started to land again. Doing this causes the game to incorrectly set the rat to be "defeated," and since the rat has a boss flag set on it, this tricks the game into ending the level immediately!
In this new TAS, we make player 2 charge up a kick by throwing player 1 and standing over his body (you can only charge up a kick when next to an enemy or when standing above a toad lying on the ground). Player 1 then moves out of the way, and punches the falling rat on the same frame as player 2 kicks the rat, both of which occur on the same frame that the rat hits the ground. Doing this causes the rat to be set to "defeated" without having to do the extra ram attack or waiting for the rat to fall a second time, which causes the level to end immediately, and saves about 1 + 2/3 seconds!
To see a comparison of the differences in strategy between the new TAS and the old TAS, you can look at the GIF below, which shows level 10 from my new TAS on the left and level 10 from my old TAS on the right:

Frames Saved: 98
Level 11: Clinger Winger
There is no change in this level compared to my original TAS. For a description of all the tricks used to save time in this level, see my level 11 notes from my old 2P Warps submission here: #6807: Lobsterzelda's NES Battletoads "warps, 2 players" in 10:44.74
Frames Saved: 0
Level 12: The Revolution
Beginning
Finally! We’ve arrived at the meat of the timesave from this TAS!
To start things off, just like in my old TAS, I beat a cycle of the dissapearing green platforms by using an attack pattern on the first enemy that generates more lag and more total frames but takes up less non-lag frame, since the timer for the dissapearing platforms only changes during non-lag frames.
Another trick I use throughout this level is performing fast spring jumps off of the springs. Normally, you jump off the springs with a speed of 64, but if you press and release right frame-perfectly as you are jumping off the springs, then you can jump with a horizontal speed of 192, which speeds things up quite a bit.
We Need to Talk About the Red Faces...
Once we reach the red faces that blow bubbles, we arrive at the biggest timesave of the entire TAS! This timesave occurs by reducing the amount of lag frames that the red faces generate. The way I discovered that this was possible was when I was trying to resync an old TAS for my 2P warps movie, and noticed that a different number of lag frames occured in the sections with the red faces than the original TAS had. From there, I soon discovered that the direction that the bubbles were blown was based on RNG, and that certain directions could reduce the number of lag frames.
At the time, I didn't know what specific direction reduced lag the most or how manipulatable it was, but I did know that I could alter RNG by pressing select on player 1's controller a random number of times before the red face appeared. From here, I was able to write a simple script that would press select a random number of times for 100 trials and find the combination that best minimized lag. Using this, I was able to make each red face go from generating about 100 frames of lag to about 43 frames of lag, which was a nice improvement! The red faces each blow bubbles for a total of 256 non-lag frames, so any frames of lag that you save compared to an older TAS represent an equal number of frames saved in the new TAS.
I could have just stopped there, and decided that I'd done a good enough job with my lag reduction techniques. BUT, I wanted to completely finish off my Battletoads 2P TASing, and to do so, I had to be sure that there wasn't an easy way to save more time compared to what I'd already done. If I didn't, then someone could just run a similar script for lag reduction for more trials than I did and get, say, 42 frames of lag, and obsolete the movie. While a movie can be easily obsoleted, it's hard to really think of the category as being "done," so I got to work looking for how RNG directly influences the pattern of the bubbles in the level.
Before explaining how I figured this out, it's worth explaining in more detail how RNG in Battletoads works, which was previously figured out by earlier Battletoads TASers. Essentially, there are 4 memory addresses which each store 1 byte, which act as RNG addresses. These addresses are 0X25, 0X26, 0X27, and 0X28, which can be thoughout of as RNG_1, RNG_2, RNG_3, and RNG_4 respectively. On every frame the values in these addresses are combined and XORed with each other a number of times which changes on each frame. Additionally, the inputs from player 1's controller on the last frame are used to change RNG on each frame (a single number can represent what buttons player 1 pressed by representing each button as 1 bit of a 1 byte number which is 1 when pressed and 0 when not pressed, since there are 8 bits in a byte and 8 buttons on an NES controller). Because of this, you can effectively directly control the RNG values using player 1's inputs. However, because there are 32 bits worth of RNG values, there are 4 billion total possible RNG states, which means that simulating through every possible combination of RNG values is not practical (which could be done if there was only 1 RNG address, since there would then be only 256 possible RNG values).
Keeping all of this in mind, I decided to write a script that would freeze the value of RNG_1 and play through a section of the red faces blowing bubbles, and report how much lag was generated. The script would initially set RNG_1 to 0 and play through a section. It would then repeat this process with RNG_1 frozen at 1, and then 2, etc, and report which state caused the least lag.
After all of this was done, I repeated this process on RNG_2 as part of my efforts to figure out which of the 4 RNG addresses were controlling how many lag frames occurred. While changing the values of RNG_1 didn't have much of an impact on how many lag frames occurred, changing the value of RNG_2 had a MASSIVE impact on the number of lag frames that occurred, with a very low number of lag frames generally occurring about once every 8 frames, and a very high number of lag frames occurring on the frame after a very low number of lag frames occurred. On the frames with a low number of lag frames, the bubbles also generally moved up much faster than they did on other frames, and on frames with high numbers of lag frames, the bubbles generally blew straight across the screen from one end to the other without moving up or down. There was definitely a pattern going on, but due to random variability in how much lag each possible simulation generated, it wasn't immediately obvious to me what this pattern was. I was curious if RNG_2 needed to be a specific value on all frames or only on the frame when a new bubble spawned in order to reduce lag, so I wrote a new script that only changed RNG_2's value on frames where a new bubble spawned, and found that it produced an equally low number of lag frames, so I knew that RNG_2 was setting some initial property of the bubbles when they spawned in to make them generate a low number of lag frames.
In order to figure out how RNG_2 influenced the bubbles' properties to reduce lag, I set a breakpoint to occur whenever a new object spawned, and set the code to output to a trace log. I then advanced to a frame where a bubble spawned, scrolled to the breakpoint listed in the trace log, and then looked for where the value of RNG_2 was used. From all of this, I discovered the following 5 lines of code, which explained exactly what was going on:
LDA RandomValue_2
AND #$07
SEC
SBC #$03
STA Objects_Z_speed,X
In other words, on the frame when a bubble spawned, the value of RNG_2 was bitwise ANDed with 7. Then, 3 was subtracted from the resulting number, and this value was stored as the bubble's Z-speed, which controls how quickly the object moves up or down. Thus, all bubbles have a Z-Speed value ranging from -3 to 4. A Z-speed of 0 caused the bubbles to go all the way across the screen from one end to the other, which caused the most lag, while a Z-speed of 4 made the bubbles move offscreen the fastest, which reduced the lag the most. As such, by manipulating RNG_2 on the frame when a bubble loads to have a value that, when ANDed with 7, equaled 7, I could minimize the number of lag frames that occurred, and effectively make the bubbles fly up really quickly offscreen. It's worth noting that each bubble has a random chance of spinning straight up or far forwards from its original path on a given frame (which causes more lag to happen), so even if every bubble spawned with a Z-Speed of 4, it would still require a lot of testing to find the pattern that best reduced lag.
After this, I got to work writing a script to brute force an optimal bubble pattern for me. The basic logic for my script was that whenever a new object was created, if the value of RNG_2 & 7 wasn't equal to 7, then the last-created save state would be loaded, and random inputs would be supplied on player 1's controller to try again. This process would repeat until RNG_2 had a correct value, at which point a new save state would be made, and execution would continue from there. This process would continue for 400 frames, at which point the trial would end, and a new attempt would begin starting from before the first bubble spawned. The button presses from a given trial and the number of lag frames that happened were all kept track of, and when a new best for number of lag frames occurred, the button pressed needed to make this happen were output to a text file in a format that would let them be copy and pasted directly into the "Input Log.txt" file of a bk2 file, which could allow them be copied directly into my tasproj file.
This all did a really good job at reducing lag, but I decided that I could go further. Eventually, I wrote an altered version of this script which would only run until 10 objects spawned, at which point the current trial would end. This would effectively break each red face section up into 3 smaller sections (about 30 bubbles are produced by each red face), which made better outcomes become more likely (for example, if each bubble had a 1/2 chance of not causing a lot of lag, then this would make it take about 1028 trials to find the ideal lag pattern, as opposed to taking 4 billion tries to find the ideal lag pattern). Additionally, I redesigned my script so that it would end a trial immediately if the number of lag frames that had happened was more than the current best, which also sped things up a bit. Lastly, I let my script run for hours at a time on each section, and I often broke each red face up into more than 3 pieces to reduce lag as much as possible. Using all of this, I was able to make the 4 red face sections take up 8, 5, 9, and 5 lag frames respectively!
To really see how much time this all saves, I have created a comparison encode below, which shows the red faces from my new TAS on the left, and the red face sections from feos and MESSHUGAH's old 2P Warps TAS on the right (which didn't try to reduce lag on the red faces). This video also shows player 1's inputs on the bottom of the screen, with non-lag inputs appearing in green boxes, and the input display turning red on lag frames. The current total number of lag frames for the current red face is also displayed above each input display as well. Note that the downswing by my toads to get off the poles also generates 2 frames of lag on most faces, so the total number of lag frames that occurs in most red face sections is 2 frames higher than the number generated as a result of lag frames from the bubbles blowing. This video is a great example of how a TAS can take a disordered and chaotic section of a game and convert it into something improbably well-ordered and fast!
I have also included links to my scripts for making these lag and input displays in both BizHawk and FCEUX down below. Note that two small changes to the code (which are described in a comment at the start of the scripts) could be made to make these into general purpose scripts that could be used for any NES game.
1. BizHawk Script: https://github.com/Lobsterzelda/TAS/blob/master/Battletoads/Scripts_Folder/Display_And_Lag_BizHawk.lua
2. FCEUX Script: https://github.com/Lobsterzelda/TAS/blob/master/Battletoads/Scripts_Folder/Display_And_Lag_FCEUX.lua
And now for the comparison encode!
Red Face Optimal Script:
Any improvements to the red face sections will probably require some sort of script similar to the one that I wrote. To help out whatever TASers want to try their hand at Battletoads next, I have included below the script I used to reduce lag as much as possible on the red faces. I hope that this helps!
Ending
Whenever I got near a red face, I held L+R to make the camera scroll up so that the red faces would spawn a few frames earlier (your y-position gets reset when you grab the pole, so your sprite goes back to normal once you grab the pole). As a result of all of this, After the 4th face stops blowing bubbles, I can just barely make it onto the spring that goes around the tower a cycle earlier than I could otherwise (if you don’t land on the spring, then you will void out and die when you hit the bottom of the screen). The spring takes 128 frames to go in a complete circle around the tower, so this in turn lets me saves me two seconds over the alternative.
After this, we enter the final climb up the tower. This is one of the most annoying sections to TAS in the entire game, since there's an enemy blowing bubbles which generates a lot of lag while you're climbing. This enemy can also randomly decide to perform a move that pushes you off the platforms every time, which you have to avoid with RNG manipulation. The lag generated by this enemy seems to not be very controllable with RNG manipulation, so I mainly just controlled the frame that I spawned the enemy on to reduce lag, since that does seem to slightly effect lag. I also landed on each of the springs a little faster than I did in my old TAS by using faster jumps and jumping through the sides of the springs, which pushes you up onto the top of the springs a little sooner.
Lastly, I hold L+R at the same time at the end of the level to force the camera to scroll up high enough that it triggers the level-end object to spawn (which you normally only trigger when you reach the top platform of the level, as opposed to just shifting your sprite up to the top of the level), which ends the level and takes us to the final showdown with the nefarious dark queen!
In order to see a full comparison of level 12 in my new TAS and in the old TAS, please see the video below, which shows level 12 of my new TAS on the left, and level 12 of the old TAS on the right:
Frames Saved: 150
Level 13: Armageddon
There is no change in this level compared to my original TAS. For a description of all the tricks used to save time in this level, see my level 13 notes from my old 2P Warps submission here: #6807: Lobsterzelda's NES Battletoads "warps, 2 players" in 10:44.74
Frames Saved: 0
The TASing Process:
Below, I’m going to briefly describe how I created the input for each level in this TAS:
- Levels 1, 3, 4, 6, 8, 9, 11, and 13 were copied directly from my old 2P Warps TAS
- Level 10 was copied from my new 2P Warpless TAS
- Level 12 was initially copied from my old 2P Warps TAS. Then, I used my lag-reduction script on the red faces section to add input that would minimize lag. Additionally, I had to redo the final climbing section of the level after the fourth red face, since this section has a variable amount of lag which is almost impossible to sync.
Potential Timesaves:
No TAS is perfect and this TAS is no exception.
- Level 4 Skip: Theoretically, it should be possible to spawn a warp portal in level 3 instead of the level-end object, which would allow us to warp directly to level 5. In level 5, there is another glitch that works the same as the level 3 jet glitch, which would let us skip to level 6 in just a few seconds. Thus, we could completely skip level 4, and would save over a minute compared to this TAS (which would easily push this TAS to sub 10 minutes)!
Unfortunately, while I believe I have come close to figuring out a way to get the warp portal to spawn and activate, there are a few things that just barely don’t work, which prevent this trick from being possible. If I were to describe all of the details of how this trick could work and what’s left that I need to discover to actually make this trick work, then this submission could easily be about 50% longer than it currently is. Fortunately for the interested reader, I have included a link to a series of forum posts I made in the Battletoads game thread which describe my findings: Level 4 Skip Information
It’s worth noting that I have set up a $50 bounty that lasts until the end of 2020 if someone can find a way to get this skip to actually work or if they can provide me with information that leads to me being able to figure this out. Some of the things I need don’t require in-depth knowledge of how the game works, and could be found by doing repeated trial and error. Will you be the one to discover the most elusive glitch in Battletoads history? Only you have the answer to this question! - In the arctic caverns, I could save between 5-7 frames by using a trick where you pause and unpause the game to maintain your speed after changing directions while falling. To see what this trick actually looks like, you can examine the video below:
The main reason why I didn’t include this trick in this TAS is that I didn’t know about it until after I finished TASing level 4, and in the section right after this trick is used (where you need to clip through the slope), there is a huge amount of lag, and the position for the optimal clip is very difficult to get. Also, the further apart your toads are, the more lag you generate, and the number of lag frames you get here is very hard to manipulate (furthermore, doing this trick seems to make one toad get slightly further ahead than the other toad compared to not doing this). In fact, it took me 2 days just to TAS these 4 seconds of gameplay the first time! As such, I am leaving this as a potential improvement for the next brave spelunker who wants to explore the world of creating Battletoads TASes. - In level 6, if entertainment value were completely ignored, it would probably be possible to save between 5-20 frames by making the snakes turn their heads slightly sooner. When the snakes turn their heads seems to be based completely on camera position, so you would have to move in a much less entertaining, more deliberate pattern in order to get this timesave.
- In level 9, it's possible that some lag caused by enemies while swimming could be eliminated, which could save 10-20 frames. However, it's oftentimes not clear what lag is caused by enemy movement patterns which are RNG based and what lag is caused by other factors such as being out-of-bounds, so this isn't quite as simple as it sounds.
Special Thanks:
This TAS would never have been possible were it not for the help of the following people:
- Koorvex: For discovering an old, long-lost TAS of Battletoads in a collection of files given to him by his friend Daniel which had a faster level 10, which showed me how to save 2 seconds in level 10.
- DyLaX: For creating the long-lost TAS which had the improvements that I used in level 10.
- Daniel: For giving his friend Koorvex the long-lost TAS with the level 10 improvements.
- feos: For discovering many of the glitches used in this TAS, and also for creating the route for several levels.
- Alyosha: For creating an optimized Battletoads WIP that helped me learn how to TAS Battletoads in the first place.
- MESSHUGAH: For helping to figure out how the level-end glitch in levels 3 and 5 works
- Koh1ds: For discovering many of the glitches and timesaves used to make this TAS as fast as possible.
Concluding Remarks:
This TAS is a continuation of the work I did on my 2 Players Warpless TAS of Battletoads, which means that this TAS is a continuation of the project that I have spent the most time on of any game that I have TASed. With this, I now feel content to retire from Battletoads TASing. If a new timesave is found or someone comes up with a new idea, then I would consider TASing this game again, but other than that, I feel that this is a good stopping point for the game. I hope that you enjoy the fruits of my labor, and I hope that you enjoy watching this TAS!
arkiandruski: Claimed.
arkiandruski: Good improvements, especially with the bubbles. I see no drop in entertainment between this movie and the last. Feedback is universally positive. Accepting to obsolete [4250] NES Battletoads "warps, 2 players" by Lobsterzelda in 10:44.74 and inherit tier.
fsvgm777: Processing.