Fantasy World Dizzy is the third core game in the Dizzy series. While Dizzy and Daisy were taking a stroll, the Evil King's trolls ambushed them. Daisy was sent to Wizard Weird's Tallest Tower, while Dizzy was dragged away and thrown into the deepest, darkest, dankest of the King's Dungeons in the bowels of Fantasy World. 25 years later, the game was remade by The Oliver Twins for the NES as Mystery World Dizzy.
Game objectives
- Emulator used: BizHawk 2.9.1
- Model used: 48K
- Aims to beat the game as quickly as possible.
- Uses death to save time.
- Heavy glitch abuse.
Comments
This is a tool-assisted speedrun of Fantasy World Dizzy for the ZX Spectrum. It completes the any% category, freeing Daisy and giving her 30 coins as quickly as possible. Using the in-game cheat is prohibited.
TAS timing (power on until last input): 51126 frames, 17:00.887
RTA timing (press SPACE to start the game until "WOW! YOU'VE GOT THEM!" appears): 36487 frames, 12:08.574
Model
The run is performed on the Sinclair ZX Spectrum 48K. Fantasy World Dizzy synchronises its game engine to the screen's refresh rate, and therefore generally runs marginally (~0.1%) faster on 48K than on 128K versions. However, 128K versions of the Spectrum run their Z80 processor at a slightly higher clock rate, and the +2A and +3 also have some improvements in memory access speeds; this means that menuing and room transitions should be faster on these models.
But for some reason this isn't the case - 128K versions of the game actually lose a frame with each room transition, each time the menu is opened or closed, and each time a dialogue option appears or disappears. In addition, the death jingle must finish playing before continuing after a death; as the 48K version does not have music, this makes deathwarps much faster on 48K models. In total, using the 48K Spectrum saves approximately 20 seconds over other models, so this run uses the 48K Spectrum.
General information
The game runs at a relatively constant 12.5fps (one in-game frame every four screen refreshes). Menuing and screen transitions take longer than this and are simply processed as quickly as possible ignoring framerate. For the rest of this section, "frame" refers to in-game frame.
Dizzy moves horizontally at four pixels per frame, whether on the ground or in the air. While standing or walking on ground, he can stop and turn around instantly, but he cannot be controlled in the air. A jump can only be performed while standing or walking on ground; this pushes Dizzy upwards at a fixed velocity and sends him into a roll. He cannot be controlled while rolling and will continue rolling until he is both on the ground and on his feet.
Dizzy can pick up and drop items, and the game revolves around his using this ability to solve puzzles. By pressing the menu button, the inventory will open. If an item is within Dizzy's reach, he will also pick it up. Dizzy can initially hold two items at a time, and picking up a third item will cause Dizzy to automatically drop the first. Selecting an item in the inventory will make Dizzy use or drop it. The menu can only be opened while standing still, and items do not act under physics; once dropped, they are stationary and do not move until picked up again.
If an item is dropped within its designated use area, the item will (usually) disappear and some interaction will occur (e.g. opening a bridge). In addition, some items have no purpose and exist as red herrings. There are three special items in the game that are used differently:
1. The bag permanently increases the number of items Dizzy can hold to four. It's possible to complete the game without picking it up, but being able to carry more items saves a lot of time revisiting areas.
2. The large round hole. If you have the bag and pick up the hole, you then have a hole in your bag, so everything falls out of it. This is a joke item that nevertheless can be useful to quickly remove junk items from your inventory, but we don't need it in the route we take.
3. The bottle of whiskey is used whenever you select it; it causes Dizzy to occasionally jump or roll in a random direction for a short period of time. Naturally this isn't useful in a speedrun.
All rooms start in a fixed state, but maintain their state between visits. Enemies move in fixed patterns and cannot be manipulated. Dizzy starts with three lives; any contact with an enemy of any kind results in a loss of life.
Intended route
The only requirement for beating the game is talking to Daisy in her hut while holding 30 coins. Of course, you can't do that immediately from the start of the game:

Death warp
On death, your position is reset to that in which you entered the room. There are a few places where this could be used to save time, but both places we use it are done in combination with other glitches to save even more time.
Item embedding
If we drop an item such that any part of it overlaps a solid tile, the item collision takes priority and "erases" the collision of the solid tile. We don't need to do this on any fixed terrain, but we do use this to skip waiting for a lift by falling through it.
Up zip
Dizzy has two hitboxes; the internal hitbox is smaller to allow small slopes and steps to be climbed without jumping; he can walk "into" the terrain by a small amount and then he will be pushed upwards when the external hitbox finds him colliding with it. If we get ourselves into a position where we are standing inside terrain, we will be continually pushed upwards until we escape.
Dialogue skip
In most cases, the trigger to talk to characters is smaller than the trigger to use items on characters. As such, you can use items on characters without triggering their dialogue first. In Fantasy World Dizzy, there's only one "character" that has "dialogue" and needs to have an item used on them, and as we want to keep our hands clean we avoid "talking" to the manure.
Dragon skip
The wide-eyed dragon blocks access to the right side of the map by breathing fire at us until we give it some sleeping potion. However, it's possible to walk under the dragon when it breathes fire at its highest point, and this will always happen the first time the room is entered after loading the game. This means we can get access to the right side of the map immediately, grabbing the bag to increase our item limit, saving a lot of backtracking. This could be done every time we need to cross this screen, but waiting for the cycles to line up again is slower than getting some sleeping potion.
Lift skip (torch jump)
Normally to access the top level of the treehouses, you need to activate the lift in KEEP OUT! DOZY'S HUT. A torch prevents climbing using a regular jump, but it's placed slightly too high and it's possible to squeeze underneath it, allowing us to skip activating this lift. This means we can visit the top level much earlier than we normally would be able to and save even more backtracking.
Animation reset
The hawk in THE GUARD HOUSE will swoop at Dizzy if there's a line of sight between the two. Clouds block the hawk's visit, but waiting for the hawk to get behind clouds takes too long. Fortunately, whenever you open the menu the hawk ends its swoop and resets back to where it swooped from, so we do this to get through instead. The same is true for the wide-eyed dragon's fire breath.
Boulder skip
In order to cross the broken bridge, we need to drop heavy boulders into the water to raise the water level, so we can use the plank floating on the surface. It's intended that three boulders are necessary, but after two are dropped there is one frame of the floating animation that allows you to cross without needing the third boulder, saving us a few seconds.
Bean "skip"
The beanstalk is supposed to grow after swapping the pygmy cow for the magic bean, planting the magic bean in the manure, and watering it. You'll notice neither the pygmy cow nor the magic bean appear in the above flowchart - that's because the dependency on the magic bean is completely absent from the game! Watering the manure is enough to make the beanstalk grow without doing any of that.
Lift collision weirdness
Depending on the frame on which you enter a lift, collision can sometimes behave strangely, and it allows you to pass through a single solid tile. We use this in both THE LIFT CONTROL HUT and THE DRAGON'S LAIR to exit the lift faster than we would otherwise be able to.
Dragon's lair deathwarp
Exiting the lift early on the way up in THE DRAGON'S LAIR allows us to jump on top of it as reaches the top, pushing us into THE LIFT CONTROL HUT above. This causes us to lose a life, but we respawn embedded in a wall, causing us to zip to the top of the room, saving us walking two screens to the right and then two screens back to the left to get here otherwise.
Daisy's prison deathwarp
To rescue Daisy we're expected to lower the lift she's in using the switch. Instead we clip through the lift to get to her without lowering it, which counts as saving her even though it leaves us as trapped as Daisy was. To get out, we throw ourselves into the flame, warping us back to the entrance of the room which also saves us the walk back.
Actual route
With the above glitches in mind, some of the "necessary" items can be skipped:
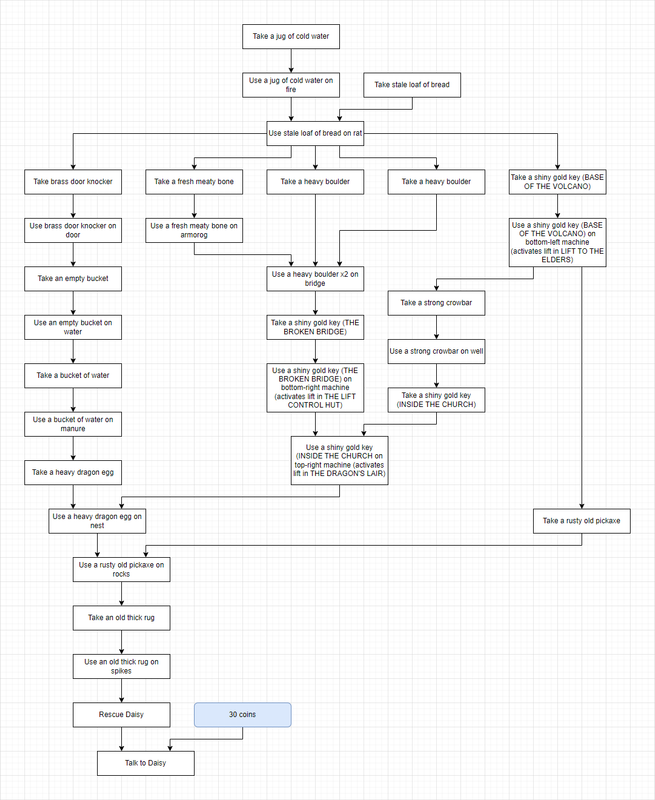
We start by taking a jug of cold water and stale loaf of bread, throwing the water on the fire and feeding the bread to the rat. Skipping the wide-eyed dragon, we take the bag and enjoy four inventory slots, which we immediately fill with junk we rip up to get access to coins. After closing the menu there's a delay before we can open it again, so occasionally we leave coins behind to pick them up another time to avoid this delay.
We take a shiny gold key in BASE OF THE VOLCANO and use it to activate the lift in LIFT TO THE ELDERS. After doing the torch jump to skip the other lift, and take the brass door knocker. On the way up the lift, we embed a junk item in the lift's path and fall through it after talking to Grand Dizzy and taking a rusty old pickaxe and a strong crowbar.
Dropping back down the other side of the dragon, we swap the pickaxe and crowbar as we need them later for a heavy boulder we need now. After some more coin collecting and flipping a switch to open the portcullis, we take a fresh meaty bone, use the knocker to open the door and take an empty bucket.
Heading to the armorog's den, we swap the bone for another heavy boulder to get the armorog out of the way, and reset the hawk to get across quickly. We drop two boulders in the water and cross skipping the third boulder. We take another shiny gold key from THE BROKEN BRIDGE and talk to Dozy to get some sleeping potion.
One of the coins we need to get is in THE AMAZING ILLUSION. This room looks more complicated than it really is - some tiles are solid and some are not, and there's a portion where you have to jump at a specific point to fit through a gap. You need to make a similar jump to access the room in the first place.
We deliver the sleeping potion to the dragon and take the pickaxe and crowbar again, doing a bit of juggling to reset the dragon to save a few frames. We open the well with the crowbar and fall into Australia, where we take a shiny gold key in INSIDE THE CHURCH and clear the area of coins before leaving again.
We fill the bucket with water and throw it over the manure to grow the beanstalk, making sure we don't try to pick up the manure first because that's disgusting. We climb through the clouds and take a heavy dragon egg before heading back to THE LIFT CONTROL HUT. We activate the lift there to access the upper level and activate the lift in THE DRAGON'S LAIR, abusing the lift weirdness to allow us to drop down into the lair much more quickly.
We deliver the egg to the other dragon, and use the pickaxe to destroy some rocks and pick up an old thick rug. Trying to explore the mines causes the troll to block our exit, which means he's no longer guarding the dungeon and gives us access to another coin. We head directly to this coin, taking a shortcut by throwing ourselves into the lift gears and deathwarping/upzipping away.
With rug in hand, we head to Daisy's prison and throw it over the spikes so we can save Daisy and deathwarp our way out of her cell before heading to her hut, destroying her window to get the last coin she needs to buy a new place.
Other comments
Dizzy is one of my favourite 80s/90s videogame series, and Fantasy World Dizzy is the game that set the standard future games would follow, with the introduction of the Yolkfolk, more emphasis on dialogue, and a menu and inventory system that would go practically unchanged for the next few games. The series is reaching peak Dizzy at this point, with many claiming this as the best Dizzy game; personally I think Magicland Dizzy improved on this even more, but it's a great game regardless.
Special thanks to Faddy and TwoSpacesSG for finding most of these skips and pointing out areas of improvement in each iteration of the run. Further special thanks go to The Oliver Twins for making the game, Sir Clive Sinclair for making the Spectrum, and everyone in the Speedtrum Specrunning community for keeping da speccy alive.
Darkman425: Claiming for judging.
Darkman425: The routing seems solid with the skips to ignore some intended progression steps and the techniques to get through quickly are well utilized. Looks good to me.
Accepting to Standard.
despoa: Processing...