Spellbound Dizzy is the fifth core game in the Dizzy series. Dizzy goes to visit his local friendy Wizard, Theo, and decides to read his book of Really Powerful Spells, particularly the page headed A Really, Really, Powerful Spell (That Shouldn't Be Read Out Loud), which traps himself, his friends and family, his pet, and Wizard Theo in the underworld. Dizzy has to find five stars and a special object for each person to rescue them.
Game objectives
- Emulator used: BizHawk 2.10
- Model used: +2A
- Aims to beat the game as quickly as possible.
- Uses death to save time.
Comments
This is a tool-assisted speedrun of Spellbound Dizzy for the ZX Spectrum. It completes the any% category, escaping from the underworld as quickly as possible. Using the in-game cheat is prohibited.
TAS timing (power on until last input): 145015 frames, 48:19.140
RTA timing (press SPACE to start the game until "WELL DONE!" appears): 117089 frames, 39:00.844
Model
The run is performed on the Sinclair ZX Spectrum +2A. Spellbound Dizzy synchronises its game engine to the screen's refresh rate, and therefore generally runs marginally (~0.1%) faster on 48K than on 128K versions. However, 128K versions of the Spectrum run their Z80 processor at a slightly higher clock rate, and the +2A and +3 also have some improvements in memory access speeds; this means that menuing and room transitions are faster on these models. The +3 is a disk-based system, and Spellbound Dizzy has never been officially released on disk, so the +2A would be better. On the other hand, Spellbound Dizzy has additional enhancements for 128K versions, the most relevant being additional dialog to skip.
Working out exactly which model is fastest for this game is non-trivial, and the difference is negligible, so I based my choice of model on an entirely different metric. Spellbound Dizzy has AY music when playing in 128K mode, but not in 48K mode. As a result, the run uses the +2A and loads the game from tape.
General information
The game runs at a relatively constant 12.5fps (one in-game frame every four screen refreshes). Menuing and screen transitions take longer than this and are simply processed as quickly as possible ignoring framerate. For the rest of this section, "frame" refers to in-game frame.
Dizzy moves horizontally at four pixels per frame, whether on the ground or in the air. While standing or walking on ground, he can stop and turn around instantly, but he cannot be controlled in the air. A jump can only be performed while standing or walking on ground; this pushes Dizzy upwards at a fixed velocity and sends him into a roll. He cannot be controlled while rolling and will continue rolling until he is both on the ground and on his feet.
Dizzy can pick up and drop items, and the game revolves around his using this ability to solve puzzles. By pressing the menu button, the inventory will open. If an item is within Dizzy's reach, he will also pick it up. Dizzy can initially hold two items at a time, and attempting to pick up a third item will simply tell the player it can't be done. Selecting an item in the inventory will make Dizzy use or drop it. The menu can only be opened while standing still, and items do not act under physics; once dropped, they are stationary and do not move until picked up again.
If an item is dropped within its designated use area, the item will (usually) disappear and some interaction will occur (e.g. opening a bridge). There are also items that are used simply by holding them; for example, holding the umbrella will both protect your items from rain as well as increase your buoyancy in the windy shaft. In addition, some items have no purpose and exist as red herrings. The bag permanently increases the number of items Dizzy can hold to four. The trampette can be placed so you can bounce on it repeatedly to gain height.
All rooms start in a fixed state, but maintain their state between visits. Enemies move in fixed patterns and cannot be manipulated. Dizzy starts with three lives and a full health bar; contact with enemies results in a draining of health, with a life lost when health is fully drained. Dizzy can also lose health by falling too far, or staying underwater too long without breathing apparatus. Health can be restored by eating food.
On death, your position is usually reset to the last dry solid ground you stood on. In some cases, this can be fairly far away, especially when traversing clouds or underwater areas. We use this to speed up some backtracking.
The Windy Shaft and the Deep Pit
The main feature of Spellbound Dizzy is the windy shaft. Some objects have a weight or buoyancy associated with them, and the items you hold determine how low or high in the shaft you float. Rocks add one to your weight, whereas the umbrella subtracts one (or adds one to your buoyancy), and the kite subtracts two.
In order to collect rocks, we must cross the deep pit. The only way to avoid fall damage (and fall stun) is to land on the trampette and wait until the bounces are low enough where jumping off is harmless. The sloped edges of the pit allow you to dismount a little earlier, at the cost of it usually being away from your destination. As a result, depending on items and method of entering the deep pit, sometimes it's faster to avoid fall damage and sometimes it isn't.
The deep pit must be crossed at least twice for each trip into the windy shaft; rocks are stored on the left side of the pit, and respawn when dropped. In addition, the inventory cannot be full of rocks when crossing the pit, as the trampette must be moved each time. To enter the windy shaft with an inventory full of rocks, a rock must be kept in cloud storage, but this requires two more pit crossings to restock the inventory again.
Route
Unlike all other core Dizzy games, there are no known skips in this game, and everything is done as intended. In order to beat the game, you must collect all 40 stars and collect a special item from each of the Yolkfolk in order to be able to escape from the underworld. Of course, you can't do that immediately from the start of the game:
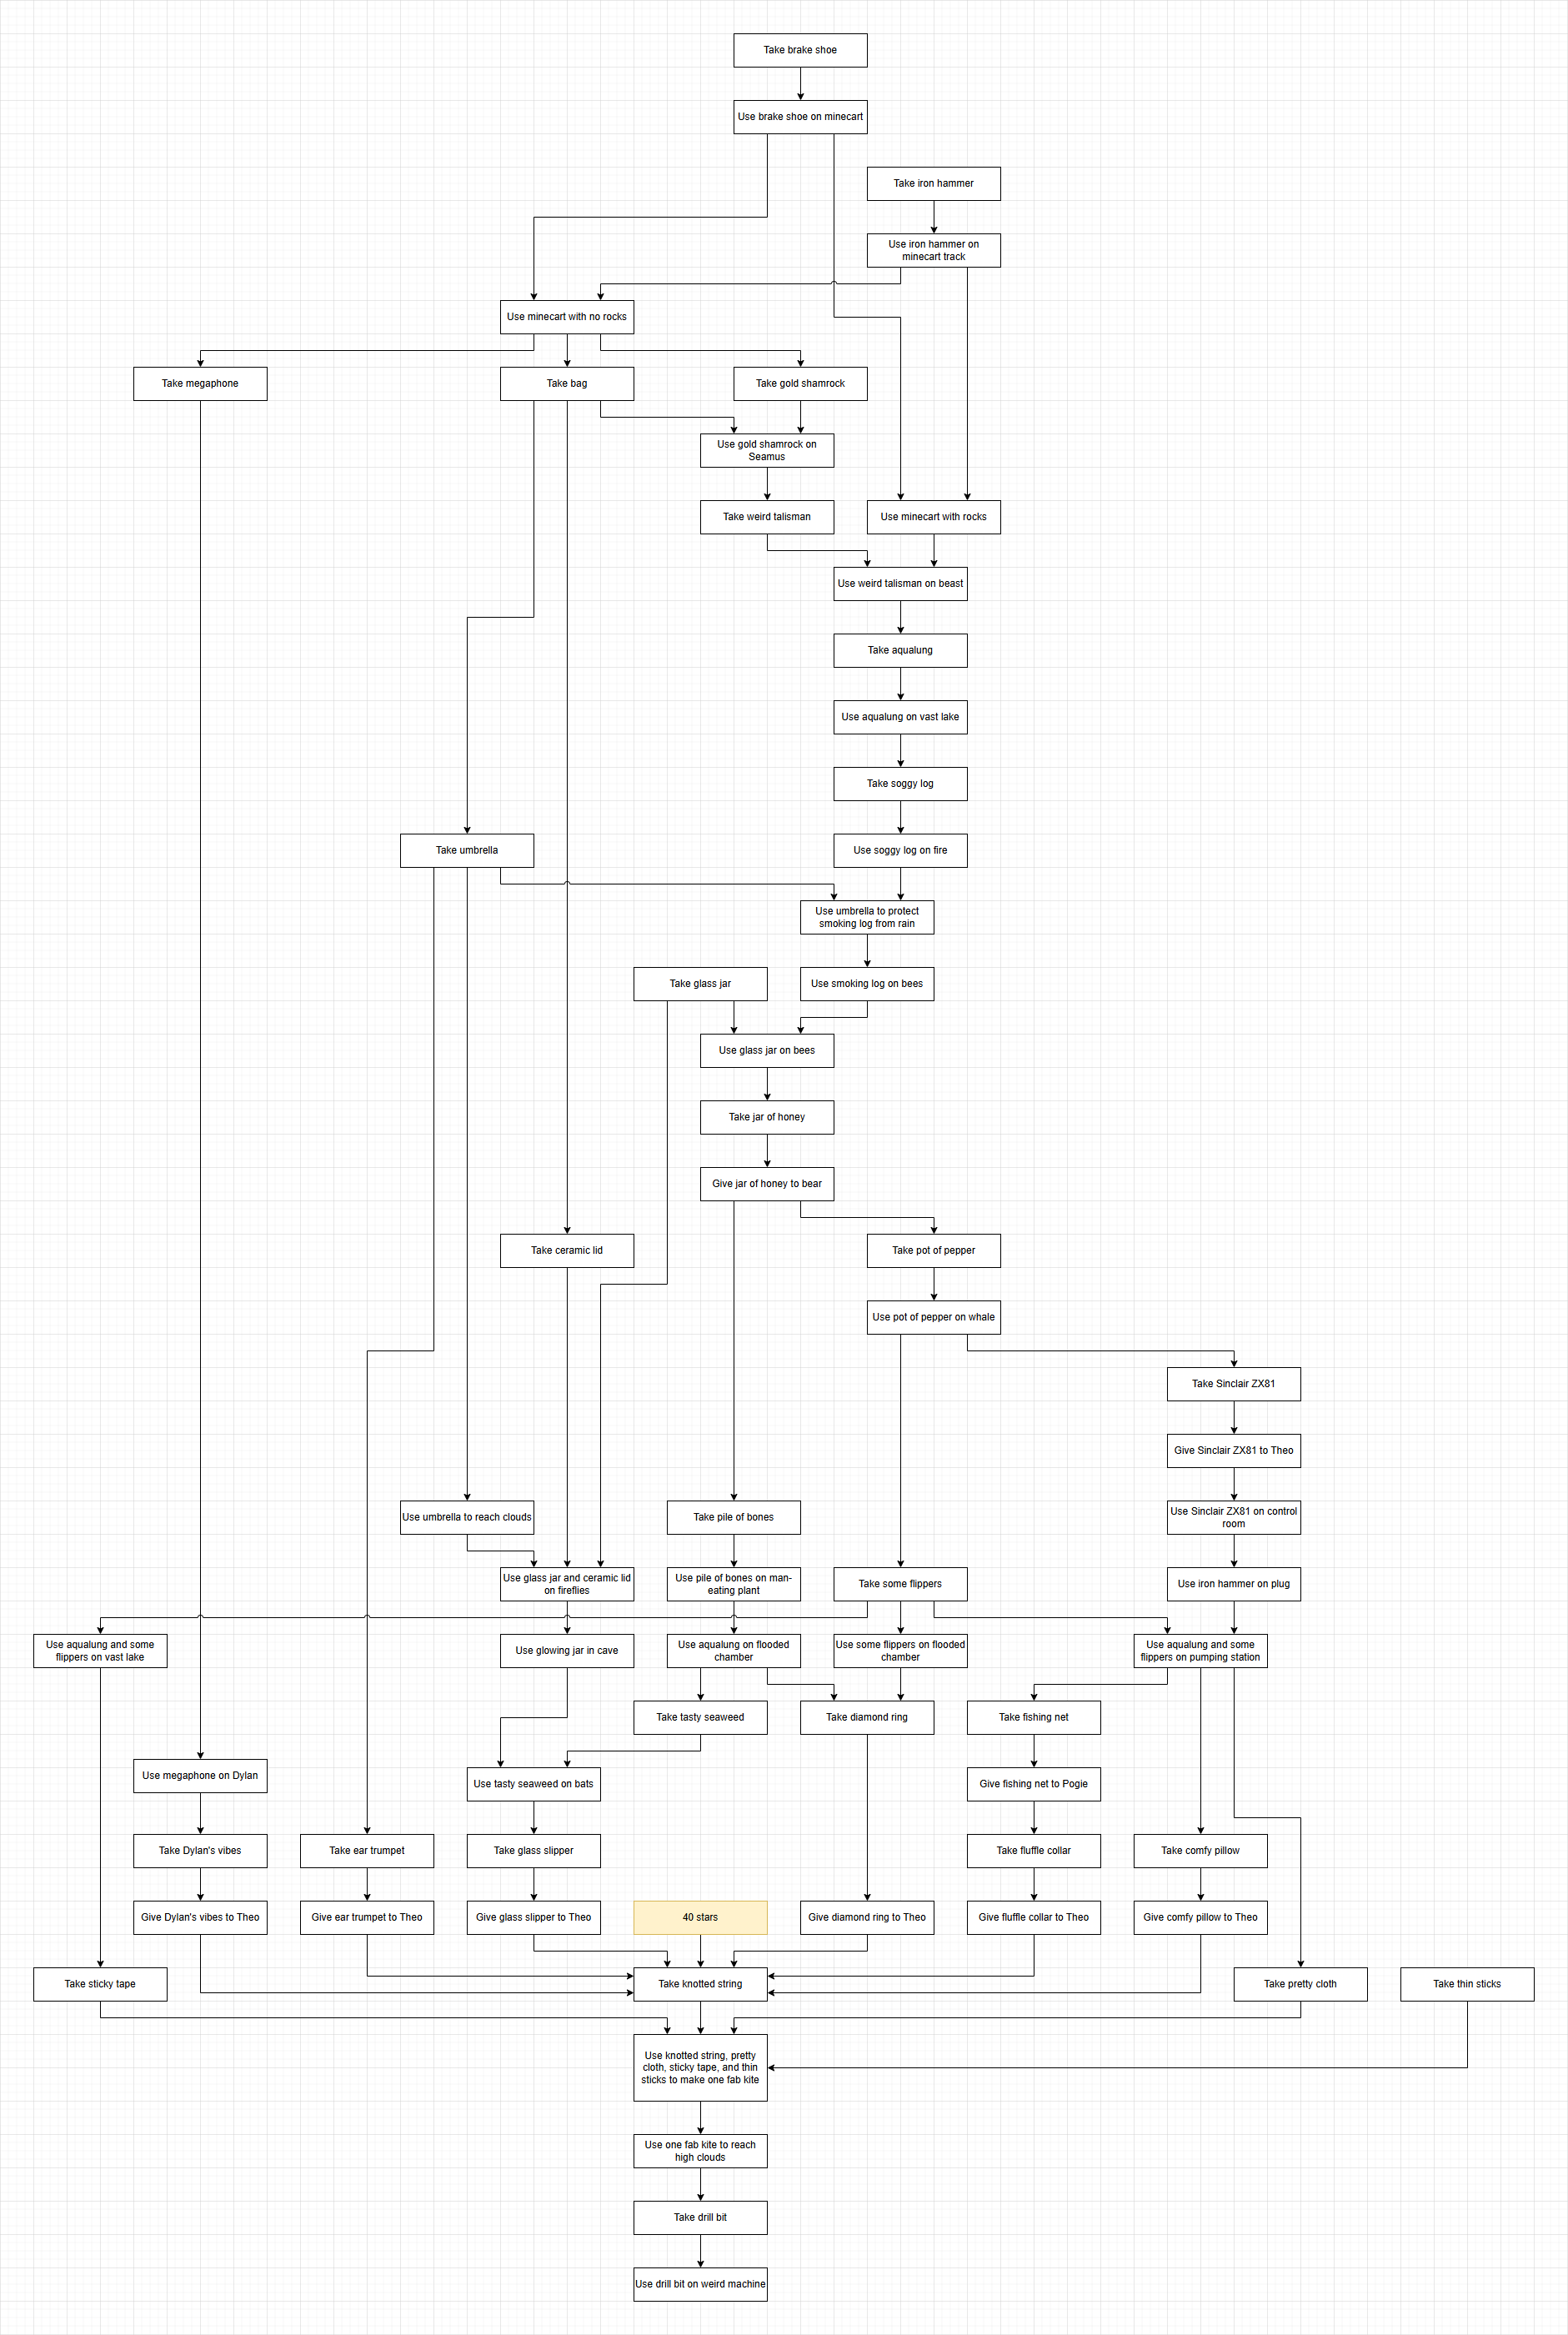
We start with two deep pit crossings to get a rock and put it in cloud storage, and then another two to get a second rock and retrieve our first. We reach Theo's Grotto and smash a rock to make room for the iron hammer, which we use the fix the minecart tracks, before smashing the second rock and leaving the iron hammer on the one-rock level to pick up later.
We cross the deep pit again and pick up a rock and a brake shoe, doing some inventory shuffling to cross again, smashing the rock when we reach the minecart and attaching the brake shoe so we can cross the gap and pick up the bag, the megaphone, and the gold shamrock. We leave the megaphone on the one-rock level and the gold shamrock at the surface.
Two more deep pit crossings for three more rocks, we pick up the gold shamrock again to give to Seamus in exchange for the weird talisman. We leave it on the left side of the three-rock level before going back to pick up the umbrella, deathwarping to skip the climb back out. The umbrella makes us lighter, so we leave it at the two-rock level and drop a rock on the scales to speak to Grand Dizzy and collect his ear trumpet. A lot of item shuffling later, we leave the umbrella at the one-rock level, the megaphone and the ear trumpet outside Theo's Grotto, and the iron hammer at the two-rock level, while holding the weird talisman and a rock to reach the beast's lair and pick up the aqualung. We drop the weird talisman as it's no longer needed, and pick up the umbrella to take it back to the surface, putting our rock in cloud storage while we still have it.
We cross the deep pit again and pick up two more rocks before using the aqualung to take a long water walk to fetch the soggy log. We leave the aqualung there for later and cross the pit again, picking up the ear trumpet and the megaphone. We use the megaphone to collect Dylan's vibes before swapping it for the thin sticks and drying the soggy log on the fire. We give Dylan's vibes and the ear trumpet to Theo, along with 10 stars, to rescue Dylan and Grand Dizzy, dumping them after use. We then pick up a glass jar on our way back up to the surface, where we swap the thin sticks for the umbrella and the smoking log. With the umbrella to stop the smoking log becoming a soggy log again, and the smoking log stopping the bees from attacking, we can fill the glass jar with honey, leaving the smoking log behind as we no longer need it, and the umbrella near the windy shaft for later. We give the jar of honey to the bear so he lets us pass to pick up the pile of bones and the pot of pepper. By the time we get back he's finished eating the honey, so we retrieve the empty jar and leave it at the surface with the pile of bones.
We cross the deep pit again and pick up the aqualung before using the pot of pepper on the whale and doing some cloudjumping to talk to Denzil and collect his Sinclair ZX81. We use the pot of pepper on the whale in a different spot and swap it for some flippers which allow us to swim freely in water and pick up some sticky tape, before dumping all of our items in the deep pit for later.
We take three rocks and cross the deep pit again, taking some flippers as we cross and leaving them on the three-rock level. We take the rock we left on the scales previously to descend to the four-rock level, smashing all of our rocks and picking up the ceramic lid to take to the surface. (WHEEEEEEEE!) Two more deep pit crossings for three more rocks and the chance to take the aqualung down to the three-rock level.
Two items down, one to go, so two more deep pit crossings for three more rocks before we take the pile of bones down the shaft to join the aqualung and some flippers in our inventory so we can be eaten by the man-eating plant to go to another underwater area before swapping the pile of bones for the tasty seaweed and talking to Daisy to collect her diamond ring. We leave the aqualung and some flippers on the two-rock level and the tasty seaweed on the one-rock level before swapping the diamond ring for the empty jar, the ceramic lid, and the umbrella, using all three of them to catch a firefly.
Two more deep pit crossings for two more rocks and the Sinclair ZX81, dumping the umbrella as we no longer need it and swapping the Sinclair ZX81 for the tasty seaweed, which we use with the glowing jar to enter and cross the cave to get to Dora and collect her glass slipper. We dump the firefly, the empty jar, and the ceramic lid as we no longer need it, before picking up the Sinclair ZX81 and taking it and the glass slipper to Theo, along with 10 stars, to rescue Denzil and Dora, dumping the glass slipper after use, but keeping the Sinclair ZX81 to gain access to the pumping station, picking up the aqualung, some flippers, and the iron hammer on the way. The iron hammer opens the pipe to flood the pumping station, allowing us to swim up to Dozy to collect his comfy pillow, and the reserve tank to pick up the fishing net. Leaving them by the entrance pipe for inventory management, we go back to pick up the pretty cloth, swap the aqualung and some flippers for the comfy pillow and the fishing net, leaving the comfy pillow on the two-rock level and the pretty cloth at the surface.
Back in the deep pit, we throw the fishing net at Pogie to get his collar, along with our final two crossings, our final two rocks, and the sticky tape, swapping it for the diamond ring. We give the comfy pillow, the diamond ring, and the fluffle collar to Theo, along with 15 stars, to rescue Dozy, Daisy, and Pogie, before Theo uses our final five stars to rescue himself, leaving us only with knotted string to remember him by. We combine the pretty cloth, the sticky tape, the thin sticks, and the knotted string to produce one fab kite, allowing us to float much higher in the windy shaft to pick up the drill bit, fitting it to the drill to finally escape the underworld.
Other comments
Dizzy is one of my favourite 80s/90s videogame series. On paper, Spellbound Dizzy is the best of the classic Spectrum Dizzy games; it has the biggest map, tons of unique gimmicks and animations, a wide-open structure allowing for progress to be made towards multiple subgoals at the same time, and structurally is the most robust and well-programmed. The windy shaft is a fantastic idea and would probably not be nearly as hated were it not for the fact that every time you wish to descend into the shaft you first have to do a blind jump into the deep pit and hope you land on the trampette, pick up the trampette, drop it on the other side, build up height to get out, pick up however many rocks you need, do a blind jump into the deep pit and hope you land on the trampette, pick up the trampette, drop it on the other side, and build up height to get out again, only to realise that you've got one rock too many and you've missed your entrance. A great game ruined by forced busywork.
Special thanks to Faddy for routing basically the entire run - any changes to his original route here are so minor that they contribute less than ten seconds in total, so they're not worth mentioning. Further special thanks go to Big Red Software for making the game, Sir Clive Sinclair for making the Spectrum, and everyone in the Speedtrum Specrunning community for keeping da speccy alive.
nymx: Claiming for judging.
nymx: Once again, you have out did yourself! Another fine edition to your collection of the Dizzy series. It is very clear, that you struggle in some spots during your speedrun...but your TAS cleans them up very nicely with about 6 minutes advantage (Hope I calculated that right). Once again...excellent work!
Accepting to Standard.
inconsistent: Processing...