Table of contents
If you need a DOS boot disk (not necessary for the pre-made configurations), you can use this boot floppy disk or boot directly from a FreeDOS installation CD.
Configuring PCem
When you first boot up PCem, you will see a configuration manager. Click on New to set up your system. Each of these sections is in relation to the tabs on the Configure PCem window. Config files are saved into
~/.pcem/configs/ by default.
Important: Configurations can be made in Windows, but in order for them to work on Linux, the .cfg file has to have its line endings converted by using
dos2unix file.cfg in the terminal.
This tab sets up basic system specs such as the chipset, the CPU, and the RAM.
Machine + CPU
The machine will decide which BIOS you'll be using, and each machine is only compatible with a certain range of CPUs. When selecting the CPU, keep in mind our rules on the PC game environment. If the CPU affects the speed of the gameplay, such as in One Must Fall 2097, you must pick a processor that the game was intended to be played on. Refer to the game's official documentation for guidance on which system specs are recommended. If the CPU speed only shortens loading times and improves the framerate, feel free to use the fastest one you can.
Memory
Refer to the game's documentation for how much RAM you'll need. Each machine has a certain cap on how much RAM you can use. Keep in mind that the more RAM you use, the longer it will take to count it on the POST screen.
This is where you choose which GPU you're going to use. Only some of these are single-threaded, you should avoid the following choices: ATI Graphics Pro Turbo, Diamond Stealth 32, Number Nine 9FX, Paradise Bahamas 64, Phoenix S3, Tseng ET4000AX, and Trident TGUI9440.
If you're unsure, pick S3 ViRGE/DX, as it's the best one and will be compatible with almost everything.
Voodoo has been modified to be single-threaded on the TASVideos PCem branch, so feel free to use it if your game supports it. Note that savestates won't work in libTAS versions 1.3.4 or older if you have this checked.
You should look at your game's documentation to see what sound cards it's compatible with. If the game is compatible with Sound Blaster, then pick Sound Blaster AWE32. If it only uses Adlib, then pick Adlib Gold. If it only uses PC Speaker, then pick None.
You can see the Sound Blaster configuration by clicking on the button next to the device dropdown menu. They are not displayed, but by default the IRQ is 7 and the DMA channel is 1. You should only change things in this window if you really know what you're doing.
This is where you set up which drives are connected. You will probably only need one floppy disk, so set FDD1 to 3.5" 2.88M. If you want to install your game from 5.25" disk images, set FDD2 accordingly, otherwise leave it at None. If you're using the CD drive, pick the fastest speed.
Make drive C: a hard drive and click on New. This is where you decide how big you want the hard drive to be. Refer to the game's documentation for how much space it needs. Don't just pick the bare minimum that the game files will fit into; most games create temporary files while they're running, and the game will crash if there isn't enough room for them. Also be careful not to create a drive massively larger than what you need. The time it takes to load and save states in libTAS is proportional to the size of the hard drive image. Don't worry about sectors, heads, and cylinders; type in the size you want and it will figure out the rest for you. Pick a filename and path and click OK. This will create the hard drive image, but it's not ready to use just yet. Preparing the hard drive will be covered in a later section.
Set one of the other drives to a CD-ROM. Even if your game doesn't use a CD, it could be used to move files later. Leave the rest blank.
Anything is fine here. You will need mouse drivers to make this functional, most boot disks come with ctmouse.
Feel free to set up a joystick if your game supports it. No additional drivers or setup is required. You can bind the joystick buttons to any USB game controller.
Network connections could cause determinism issues, so leave this at None.
Setting up the BIOS
When you have the configuration done, you're ready to boot up PCem. If this is your first time running a chipset, you might get a CMOS error, this is normal. Either way, you will want to enter BIOS setup, usually this is done by pressing the Del key during the POST screen. All of the BIOS screens will look different, but all the functions referenced here will be there, although you might have to look for them. The most common chipset will be Socket 7 Shuttle HOT-557, so the screenshots and instructions will be for that.
You will see this screen:
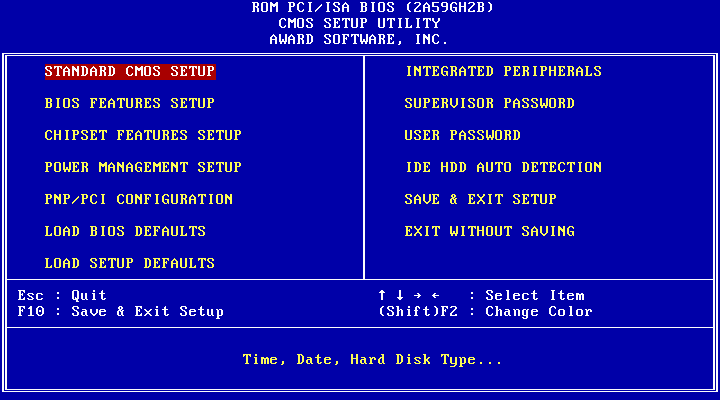
The only menu options we really care about are the first two, Standard CMOS Setup and BIOS Features Setup.
Standard CMOS Setup
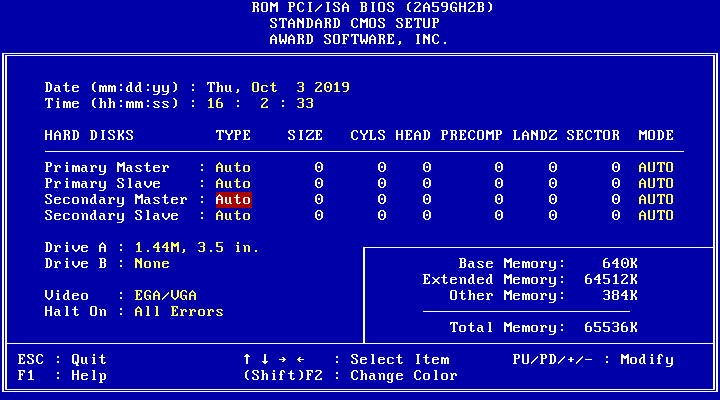
Remember what you put into the Drives tab during configuration? You'll have to make sure this matches that. Generally with this chipset, you can set the type to Auto for any drive you installed and it will auto-detect the specs of the drive. If you set one of the drives to be a CD, make sure that's Auto as well. In some BIOS setups, you will either have to use a function to detect each drive or you'll have to manually enter the cylinders, heads, and sectors of the drive. Set unused drives to None so it doesn't try to look for them during POST.
Make sure Drive A and Drive B match what you set for FDD1 and FDD2, respectively. Don't worry about the clock, the time set by libTAS will override it.
Back out of this menu and go to BIOS Features Setup.
BIOS Features Setup
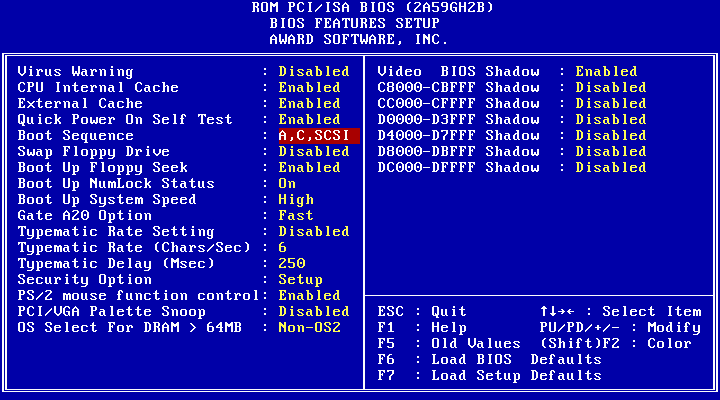
The only thing you want to touch on this screen is the Boot Sequence. If you're booting from a floppy disk, make the it boot from "A" first, and if you want to boot from a CD, make it boot from "CDROM" first.
Back out of this menu and do Save & Exit Setup. You should now be able to set up the hard drive.
Setting up the hard drive
Reset PCem and it should get past the POST screen this time. You should see something similar to this:
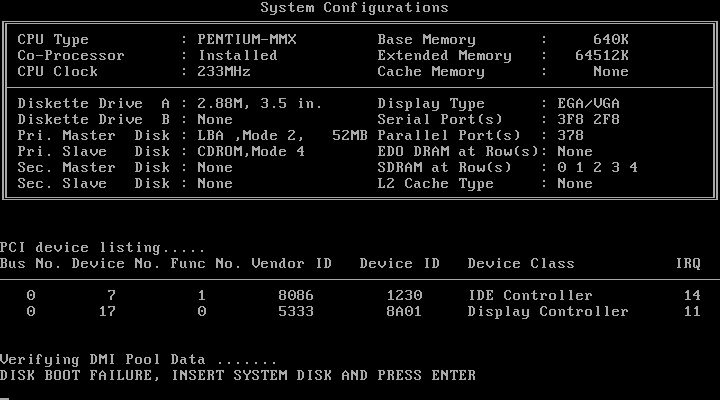
Right-click on the PCem window (while the mouse is released) and load up your boot floppy or CD. If you're using a floppy go to Disc -> Change drive A:, and if you're using a CD go to CD-ROM -> Load image. Hit Enter to continue.
Partitioning and formatting
You will need to partition and format the hard drive using tools on the boot disk. How you do this will depend on the boot disk you're using, refer to the subsections for instructions on specific platforms.
Moving files onto the hard drive
It's time to put your game/OS on the hard drive. If you have floppy images you'd like to install from, it's ok to unmount a boot floppy and insert a new one. If you have an ISO, the boot disk should have already loaded CD drivers and you can load the CD image from the right-click menu. When you are installing, document your installation steps so we can properly replicate your hard drive!
If you have some files already prepared in a folder, it's surprisingly easy to move files into your drive with the built-in Disk Image Mounter. Use the following command in the terminal:
gnome-disk-image-mounter --writable /path/to/harddrive.img
Where
harddrive.img is the hard drive image you have for your configuration. This will mount it as a drive on your system. You can then copy + paste the game files using whatever file manager you prefer. Be sure to unmount it when you're done.
If you want to transfer the files within PCem, you can use the following terminal command in Linux to make a quick ISO file out of a folder:
mkisofs -o name.iso /path/to/folder
Substitute the filename and the folder path accordingly. Mount the ISO in PCem and copy the files from the CD drive to the hard drive.
Some older chipsets won't support a CD drive; in this case, your files may be small enough to fit on a floppy. To create a floppy image with your files on it, use the following series of commands:
mkfs.msdos -C /path/to/floppy.img 1440
sudo mkdir /media/floppy1/
sudo mount -o loop /path/to/floppy.img /media/floppy1/
sudo cp -R /path/to/files/ /media/floppy1/
sudo umount /media/floppy1/
Do not use this method for TASes: this can create different file structures on different PCs and cause desyncs!
Substitute the paths and floppy image name as needed here. The
mkdir command may not be necessary if you have already done this before. With this, you should have a floppy image that you can mount to PCem and copy the files to your hard drive.