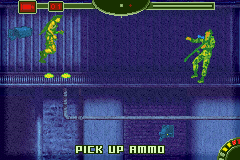
FractalFusion's Splinter Cell: Pandora Tomorrow GBA in 53:17. Unlike the previous Splinter Cell GBA, this game is better at implementing stealth elements, but is nothing compared to console versions.
Watch at least to the third level. The real action starts then.
This run uses VBA v19.2, but should work on v20.
Aims
- Uses no predefined saves
- No death (i.e. mission failure)
- Uses speed/entertainment tradeoffs
- Aims for fastest time
- Abuses programming errors in the game
- Takes damage to save time
- Manipulates luck
I chose no death for esthetic reasons. Dying refills health and ammo.
Programming errors abused
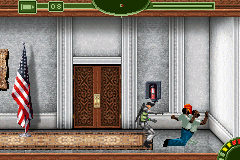
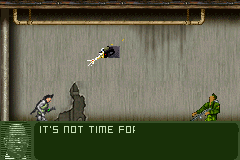
- The "It's not time for this now" glitch. If, when you enter a new area in front of a door, you press up when scripted dialogs are supposed to take place, instead the dialogs are replaced with the "It's not time for this now" dialog, but you can move around. Nothing moves except you; enemies do not move, ground turrets do not shoot, and cameras do not move and cannot see you. However, wall turrets can shoot and do not move. Guards fall in one melee to the front, which is strange since it normally takes two or more. The A button (jump) cancels this dialog, returning action to normal, unless you subsequently press up at another door which triggers a "Hide the body, Fisher!" or "This door is locked..." event, in which case the dialog is stuck until you enter a new area. Note that elevators may go within the same area.
- Grabbing something (pole or ledge) while falling, or falling on an enemy, will cancel fall damage. In one place it is even possible to take no damage from a fall without doing the above.
- If the ceiling is low enough, bumping Sam's head will cause him to run in midair and be able to jump again while in midair. By repeatedly jumping, it is possible to float over mines that would otherwise have to be bypassed by shimmying on the ledge, which is slow.
- Whenever Sam lowers from a tucked position while on a horizontal pole, his legs cannot be seen or trip any lasers. This does not apply when going to a tucked position.
- There are other little glitches but they are not so important.
Luck manipulation
- Pressing down and up on the spot manipulates locks, safes, binary codes, turret wires, and other stuff.
No death
- "MISSION FAILED"
- Death restores health to 10HP and ammo to 10 if less than 10. I believe there are parts which would be made faster using death.
About the game and the run
Unlike the previous GBA installment, this one is more polished and incorporates stealth better. It even has some of the trial-and-error feel of the console versions. This game has a habit of slapping you with "MISSION FAILED" if you run around killing enemies mindlessly. Strangely, enemies have slow reaction so it is easy to run up and grab someone from behind, and there still are ways to hide from SWAT guards if you set off an alarm (but not fail).
Things that are different about this game compared to the previous:
- The biggest change is that you can't just run by enemies now. You have to terminate them or bypass them using an overhead pole or the back wall.
- You can now do a barrel roll (slower than running though). You can also do a jump while rappelling.
- You can use back-to-wall. Advantage: You can bypass some enemies and hide in the shadows. Disadvantage: The game forces you to use back-to-wall sometimes.
- You cannot OHKO directly from behind anymore. Instead, you end up grabbing them. It is usually faster to shoot them or punch them in front.
- There is no alarm bar anymore. In levels 1, 2, 5, and 6, setting off an alarm will result in mission failure. In others, SWAT guards run around. They are the hardest enemies to kill (3 head shots), although falling from a height onto them works well.
- In those same levels above (in at least part of the level), killing anyone will result in mission failure. You can still shoot them if it doesn't kill, but there is a glitch where if you shoot but not kill someone and grab them from behind, then when you knock them out, you get "MISSION FAILED".
- Some enemies (or a group of enemies) are VIPs. They either hold "important" information or can (and usually must) be used for retinal scanners. If you terminate (kill or KO) them before you obtain the information or make them use the scanner, you are hit with "MISSION FAILED". It does not matter how useless this information actually is.Fortunately, it is not necessary to obtain the information.
- You can shoot upwards at an angle from the ground, and you can shoot out cameras. You can also shoot downwards from a horizontal pole.
- Ground turrets no longer take half-health; instead they now do continuous damage with no recovery. By jumping correctly, the worst you can suffer is 2 damage. They are also much faster to disarm. Damage checks only occur every 8 frames.
- Wall turrets are like cameras, except that they run off a rectangular detection box that suddenly activates at a critical point, unlike camera detection triangles which gradually grow and shrink. They also fire, doing 3 damage. Damage checks only occur every 8 frames.
- Night vision and thermal vision can be used anytime. Thermal vision is much more beautiful now and hidden ammo on the back wall shows up (as well as lasers and mines) in this view. It is necessary to use thermal vision for one part of the first level. Any other usage of thermal or night vision is for esthetic (or bizarre) reasons.
- The flash grenade now replaces the smoke grenade. What it does is stun guards (that aren't masked). Useful for VIPs.
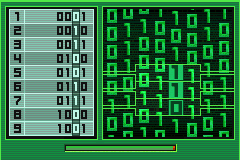
- There are now three computer-hacking minigames.
- File Link-up: Tile-turning puzzle game. Can be done fast.
- Binary codes: There are sequences of 0s and 1s and you have to align them correctly. Comes in 1, 2, or 3 rows. Can be done fast depending on where the 0s and 1s are. The codes are either given by allies or enemy VIPs (but it is only necessary to know what the codes are).
- Falling sequences: It's like DDR, but 25 times easier. And it fails. 2 or 3 rows (10 or 15 symbols). Takes at least half a minute, and cannot be sped up (apart from getting them right).
- There is a grip-vertical-pole animation, which slows down the process of jumping up vertical poles.
- Enemies (except SWATs) now have an intermediate stage of alertness, a level between "nothing wrong" and "seen you".
Strategies
The fastest way to terminate an enemy is to drop from a height onto him. Next fastest is to shoot him. Unlike the previous, some enemies take more than one head shot to kill. When firing, wobbling cancels gun animations. It is possible to use friendly fire to take down enemies. Failing that (or when not allowed), it is possible to melee some enemies, or grab them from behind and knock them out, but it takes a long time.
Although guards may detect something is behind them, their reaction is so bad that you can usually grab them anyway, so it doesn't matter if you run behind them.
There are a few ways to set off alarms in this game:
- Let any enemy run to an alarm panel and use it.
- Walk in view of a camera (the sticky cam view shows the camera's view).
- Touch any infrared lasers (the base of the lasers is visible; the thermal vision shows the lasers).
- Let any spotlight see you.
- Let any "window guards" see you.
- Let any camera see a body.
- Let any enemy see a body and run to an alarm panel and use it.
- Exit a room with a conscious enemy around which saw you (except special event).
- Exit a room when a camera can see a body (except special event).
- Exit a room when any enemy can see a body (except special event).
There is also a scripted alarm late in the game.
When an alarm goes off, either the mission fails or SWAT guys run around. These guys are hard to terminate and spawn every time I enter a new room so I don't just go around setting off alarms.
Health is very important. Sam has 10HP maximum. There are some health refills, and they do not take as long to use as in the first game. Here is a list of what causes damage to Sam:
- Weak embassy guards: 1 damage
- Ground turrets: 1 damage (ignores recovery)
- Guards during sniper minigame: 1 damage (ignores recovery)
- Blue guards: 1 damage
- Yellow guards: 2 damage
- Mini SWAT guards: 2 damage
- Jerusalem police: 2 damage (melee does 1 damage)
- Firebombers: 3 damage (kick does 2 damage)
- Flamethrowers: 3 damage
- Assault rifle guards: 3 damage
- Alarm SWAT guards: 3 damage
- Wall turrets: 3 damage
- Mine explosions: 3 damage
- Damaging fall: 3 damage
- Falling off the bottom of the screen: instakill
If a damaging fall occurs, a landing animation is forced where Sam cannot move, wasting time. I never use damaging falls in this run.
Here is what damage Sam can cause to enemies:
| Enemy (6HP) | Head shot | Low shot | Melee | Kill | KO |
| Civilians | 6 | 6 | 6 | - | 1 melee |
| Embassy guards | 6 | 6 | 3 | 1 head shot | 2 melees |
| Blue guards | 6 | 3 | 3 | 1 head shot | 2 melees |
| Yellow guards | 6 | 3 | 2 | 1 head shot | 3 melees |
| Jerusalem police | 3 | 2 | 1 | 2 head shots | 1 head shot, 1 low shot, 1 melee |
| Firebombers | 6 | 2 | 2 | 1 head shot | 2 low shots, 1 melee |
| Mini SWAT guards | 3 | 0 | 2 | 2 head shots | 3 melees |
| Assault guards | 3 | 0 | 2 | 2 head shots | 3 melees |
| SWAT guards | 2 | 0 | 0 | 3 head shots | - |
For those who care, here are the stats given by the game at the end of each level:
| level | time | bullets | alarms | KOs | kills |
|---|---|---|---|---|---|
| Embassy 1 | 5:44 | 7 | 0 | 37 | 0 |
| Embassy 2 | 4:15 | 17 | 0 | 26 | 9 |
| Subway | 3:06 | 33 | 1 | 1 | 21 |
| Saulnier | 6:08 | 31 | 7 | 17 | 35 |
| Jerusalem | 1:38 | 14 | 0 | 8 | 3 |
| Warehouse | 7:24 | 37 | 0 | 14 | 1 |
| Shipyard | 8:36 | 70 | 6 | 10 | 62 |
| Submarine | 1:33 | 19 | 3 | 11 | 8 |
| TV Station | 3:48 | 52 | 6 | 6 | 30 |
Bold means that alarm = mission failure.
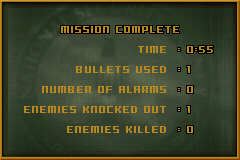
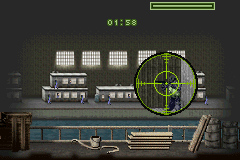
Note that the times do not count when dialogs and "It's not time for this now" glitches are active. For example, by careful use of the glitch, one can obtain "impossible" stats for the Jerusalem level as in the image on the right like I did once (unassisted). The actual time was significantly longer than the actual time in the TAS.
Run notes
Embassy 1 (no alarms, no kills)
- If the guards are facing away, beating them up takes about the same time as grabbing and knocking them out.
- The civilians always run to an alarm panel if they can. It is possible (although requires pixel accuracy) to knock them out just before they run off. You can't melee anyone who is running away from you. It is also possible to knock them out from behind without grabbing them right when they reach the alarm panel.
- I have to take one damage every time I melee a guard from the front.
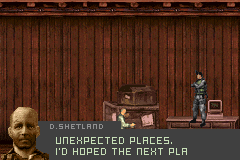
- Some animations are messed up like running right after smacking the head of the scanner guard, and picking up Shetland's laptop from this... ...far away.
- The "It's not time for this glitch" in action. Notice how they just stay there after being hit, and when I deactivate the glitch, they all react with sound.
- I had to avoid the swing from the last guard since I had 1 HP left.
Embassy 2 (no alarms, no kills until last part)
- The spotlights are very sensitive to your presence.
- Entering doors resets enemy and camera positions.
- The jump button cancels the "It's not time for this now" glitch, but if I press up on a door (other than the one I used to trigger the glitch) which I can't enter, the glitch lasts until I leave the area.
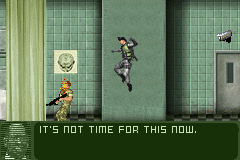
- I did a sudden run behind a civilian VIP (binary code guy) which made him move forward enough so I could use the computer. It is faster than grabbing him and being forced to listen to info. Had he seen me, there is no way to avoid "MISSION FAILED".
- Yay, I finally get to kill guards now.
Subway
- Time for a killfest. Since I need to harvest ammo, I gather most of the ammo boxes, even the hidden ones.
- Because the turret was on the platform, I managed to take just 1 damage.
- I can't set off alarms because of the inconvenient places where the SWAT guards spawn.
- It is possible to set off mines but not take any damage, even when not blinking.
- I deactivate one turret because otherwise I don't have enough health.
- The rest of the level is straightforward.
Saulnier
- Friendly fire is useful for this level.
- q2938tbv 8n7rt8ho24pawyw8h stupid minigames.
- I enter the computer room on the 3rd floor when the alarm times out, because it is painful otherwise (there is a code VIP in the room, not to mention the scanner VIPs outside). I also manage to position bodies so the camera cannot see them.
- Same with another computer room later on. This computer unlocks a door and also shuts off the lasers outside.
- I intentionally set off an alarm because I have to run past vertical lasers anyway.
- After the computer with the stupid minigame and the dialog, I jump as far right as I can but then the game controls me to walk to the door. In fact, I needed the alarm to turn off so that the SWAT guard disappears. Otherwise, he blocks and then kills you while Sam tries to walk to the door.
- The high laser mounts must be barrel-rolled under and the low laser mounts must be jumped over to avoid an alarm.
- In the place where F. Coldeboeuf (the phone guy) is, I need to grab him from behind or it is mission failure. I can't even try to grab him when he goes for the "mission failure alarm panel" because I punch him instead (i.e. mission failure). That's why I can't enter when the alarm is going. It is possible to grab him from the right so Sam misses the phone entirely on the way out (but it's slower and not worth it). At least you see an unexpected event during the walk-out scene.
- Lasers do trigger alarms even during the "It's not time for this now" glitch. I press up to climb a pole because jump clears the glitch, and I need to avoid a SWAT guard (he doesn't spawn if you reach the spawn area fast enough).
- I used the flash grenade I picked up at the beginning just for show, because I can. :|
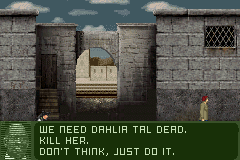
Jerusalem (no alarms, no kills except the beginning)
- The first three guys are turret info VIPs (like the info is in any way critical), so I skip the first one and kill the others.
- After the first objective, I cannot kill anyone. The blue enemies can be KOed with a head shot, low shot, and melee.
- After the Dahlia Tal part, I have to shoot the cameras or else they see the body and an alarm goes off. Also, the last one since otherwise there is the "Hide the body, Fisher!" dialog.
- I take pictures as soon as possible. I can take them as bad as possible, but for sanity value, I only did it on the last one.
Warehouse (no alarms, no kills except the "kill Dahlia" part)
- It is possible to pass Dahlia Tal, but only by using the back wall, and when there is enough room.
- Somehow, there is a part where, if you don't look back to the left and continue after passing Dahlia, you magically fail the mission.
- The firebombers are not permitted to be killed, so I must use two low shots and a melee (if I can't fall on them or grab them from behind).
- Sam's legs can pass through the lasers without setting off an alarm when he lowers them from a tucked position on the horizontal pole.
- I use the drop shortcut where the turret is underneath. I must grab the ledge or I die.
- In fact, in the "kill Dahlia" part, it is possible to beat this part just by running to the end door before she does. Of course, it is slower.
Shipyard
- No, not that Shipyard.
- This is the longest level in the game.
- I need an insane amount of ammo. Also a flash grenade for the scanner VIPs near where Shetland is waiting. I don't enter the first health room in this section because it means deactivating "the glitch".
- In the narrow space up top, I can repeatedly jump to float over the mines.
- While TASing the game, I stumbled across the most unexpected death ever (AVI: [1]).Basically, if a flamethrower is firing on you while you use the door which is supposed to lead you to victory, you end up with defeat instead, despite what the dialog says. It is one of the few times that a game has owned me while I was TASing it. It's supposed to be the other way around.
- Now this part is the classic "run back and forth getting items" that plagues many games.
- Health is very important, especially for this part. There are a few fixed wall turrets and cameras that takes too long to pass (shimmying on the ledge takes too long). Also, every time I drop, I try to drop on an enemy (one reason why I set off an alarm after getting the first card) so I don't take fall damage.
- The going in and out of tuck position on the horizontal poles was so that the SWAT guards don't see me in a bad position.
- Time for sniping. Too bad it's the only one in the game. It's hard enough to snipe all those guys in 2:00, but with TAS power, I do it in 15 seconds.
- The guys near the freezer door (with the turret nearby) are turret info VIPs. I don't even take one out because that means an alarm later on which makes life too difficult.
Submarine
- Surprisingly short TAS level. In a couple of places, there are two routes: one which is short and you are forced to set off alarms, and the other which is long and requires you to go through an area with mines and turrets, and you still set off alarms unless you use a computer with who knows what on it, or a retinal scanner.
- I wanted to use thermal vision here but the lag was too bad (extra laser sprites caused lag).
- After the visible ammo box and grenade box is a code VIP, so I used the newly-obtained flash grenade to prevent him from shooting me while I pass on the back wall.
TV Station
- One really hard level done fast.
- The guys near the beginning that look like SWAT guards are mini-SWAT guards. They only take 2 head shots to kill.
- After the elevator, the three guards are code VIPs. I leave the first one.
- OK, Ingrid (as an ally) is a shooter whom no enemy wants to kill. That makes absolutely no sense. Anyway, if she turns around and shoots, that shot is worth two normal shots. In other words, it does twice as much damage.
- In the room where Ingrid leaves, the three guards in the bottom are code VIPs. I only shoot one and knock out the others since I need a lot of ammo (and health) for later.
- That part, with three SWAT guards and a code VIP. I kill the one SWAT guard I cannot avoid, and avoid all the rest, taking damage.
- Where I can plant the wall mines on the machine for a scene, I skip it instead. The scene is funny, though (AVI: [2]).
- I can't get Sadono right away (the game won't let me), but I kill all the mini-SWATs, enter the door, and get him then.
That's it for the comments!
FractalFusion: Hi! I am a TASer. I took a few screenshots of this movie and placed them here. Here goes! Feel free to clean up the list.


NesVideoAgent: Hi! I am a robot. I took a few screenshots
of this movie and placed them here.
Oh! I also corrected the ROM name.
- You indicated
Tom Clancy's Splinter Cell - Pandora Tomorrow (U) (M3).gba - I updated it to
Tom Clancy's Splinter Cell - Pandora Tomorrow (U) (M3) [f_5].gba
FractalFusion: Looks like you have the wrong ROM. Try again.
NesVideoAgent: Not going to. The one I found had a matching checksum. The VBM file format should be fixed to allow for robust ROM matching.
NesVideoAgent: Not going to. The one I found had a matching checksum. The VBM file format should be fixed to allow for robust ROM matching.
Truncated: This submission is so long it took me 3 months to watch it.
... seriously, I feel a bit guilty that it has taken this long, no submission should take this long to judge (unless there is some technical problem). Sorry.
That being said, I have decided to reject this submission. The viewer response hasn't been overly positive, and for me this was a meh/no. There were already concerns that the previous game in this series was too long for publication, and this game is worse in that area.
mmbossman: This submission has been given another chance at publication. If you feel it should be published, instead of returning to the grue, please post WHY in the thread. Similarly, if you do NOT think this movie should be published, post WHY.
mmbossman: Only three people chose to support this run after another month in the queue. These happen to be the same three people who vocally supported this run during the first three months it spent on the workbench. If the general audience wanted this published, it would have garnered at least a little more response. Rejecting again.
natt: processing