1 2 3 4
7 8
Active player (277)
Joined: 5/29/2004
Posts: 5712
Great, I found out more about how the 10-chip trader sets its probabilities! Here are some more rules that seem to be in place: 1. No 1-star chips you don't already have. 2. No "post-game" chips you don't already have. This means LifeAura, MagicMan series, PharoMan series, ShadoMan series, and Bass are excluded--but not Anubis and Muramasa, strangely enough. 3. 3-star chips you already have turn up more frequently. 4. 2-star chips you already have turn up A LOT more frequently. Yup, the sequence definitely depends on your library, since I was getting FireTowrs like crazy, even though I had already traded my only FireTowr for a DynaWave. So which kinds of chips you elect to grab along the way will affect what you can get out of the trade machines. I'm not totally sure if they'll take effect until you reset, though. I'll test the 3-chip traders next.
put yourself in my rocketpack if that poochie is one outrageous dude
Former player
Joined: 8/1/2004
Posts: 2687
Location: Seattle, WA
So what you're saying is that we should be avoiding any chips that we don't want to mass produce, thereby a) increasing the rate of reproduction and b) stabilizing the rate of producing newer, better chips?
hi nitrodon streamline: cyn-chine
Active player (277)
Joined: 5/29/2004
Posts: 5712
I'm not sure I follow what you're asking. I don't know why you would ever mass-produce anything when you're trying to make the 60-kinds-of-chips requirement in time. And I still need to figure out what the game starts giving you less of when it starts giving you more of a kind you have. (Does someone know of cheat codes that edit the library? They might help.) --------------------------------- Hey, I did some more testing, and I figured out the rules to the 3-chip trader: No 4-star chips you don't already have, no Navi chips you don't already have, and no 5-star chips ever (which means no V3 or secret Navis, even if you already won some). So 3-chip has the Navi restriction, but 10-chip doesn't, except for those Continue* bosses I mentioned. I'm seeing that for both machines, every chip in your library is much more likely to show up than chips that aren't in the library; the effect is simply more pronounced for 1-star chips in the 3-chip trader and 2-star chips in the 10-chip trader. I think each new chip increases the chance of finding chips in its star rating a little, but mostly boosts the likelihood of finding that chip out of all the chips in its star rating. I decided this was probably the case when I got 16 FireMan2s out of 1638 trials while that was the only 4-star chip I had, but only 2 FireMan2s and 19 KngtSwrds after I grabbed the KngtSwrd G. Speaking of the KngtSwrd G, I may have to take back what I said: That is one case where producing extras of one chip could save time in getting another one. Remember the old man who trades you that KngtSwrd G for Escape in all 5 codes? Well, if Escape is likely to appear in the trader machine, then you could get the other Escapes quickly enough that way rather than finding all of them throughout the world, and if you only use the machine to get 1 or 2 of the Escapes, that still sacrifices fewer chips than finding KngtSwrd in the 10-chip trader would. It would be nice not to use the 10-chip trader very often, since even an item that's directly in your path costs about 90 frames to pick up, meaning you would spend at least 15 seconds just gathering enough to make the trade. But that ElecMan3 is pretty tempting... --------------------------------- Uh oh, I noticed some more chips missing from my list of random chip trade results when I tried the 3-chip machine with the bare minimum in the library. It looks as if these 2-star chips are also restricted from being given out by the 3-chip trader until you obtain them elsewhere: HiCannon, CrosBomb, LongSwrd, TriSpear, Thunder2, Huricane, Snakegg2, Candle1, SloGauge, and IronBody. That's right, you can win the first and third chips for the first time in some of those 3-chip families, but not the second. Additionally, most other chips that aren't in your library yet seem to be restricted to only certain letter codes when you first win them from the 3-chip trader, rather than being able to get any of the 5. Most of them I found in just 2 codes on the list, and they appear to be selected based on their rarity, such as codes that can't be found by beating viruses; or on their usefulness, such as codes that form a Program Advance; but I don't think there's a clear-cut rule to it. I think it's the programmers wanting players to try to win battle chips the normal way before they get extras from the trader in more letter codes; but when the player gets lucky and receives an all-new chip from the trader, then the programmers make it more special by setting it to a rare letter code. The 10-chip trader doesn't appear to have any of these restrictions, though.
put yourself in my rocketpack if that poochie is one outrageous dude
Active player (277)
Joined: 5/29/2004
Posts: 5712
Kirkq wanted me to post what the planned route is right now to clear up any confusion about what you have to do, so here goes. Day 1 Get the PET and go to school. Talk to Dex to make the tutorial start. Manipulate 3 Cannons for the third tutorial. I know it can be done, we just need to figure out good timing for it. Go home and jack into Lan's computer. Talk to Glyde, talk to the lost program, bump into the door to sector 2, talk to Glyde again in Yai's computer and receive SpreaderGun I. While you're doing all that, you could collect 2000z from random mystery data and buy a PowerUp now, depending on how useful a level 2 attack is in the next two dungeons. Jack out, talk to Mom, jack into the oven. You fight 1 Mettool here no matter what, so get the MetGuard G for GutsShoot from it. (ShockWave can be found as an item pickup to fill your library later.) Get the IceBlock, which will make you have to get and use the WaterGun. Fight FireMan with 4 swords. Go to bed. Day 2 Run all the way to the last door of the school. Talk to every student once to make the class/attack start. Talk to Dex. (GutsMan has to fail before MegaMan can try.) Talk to Mayl and receive Roll R. Yai forces you to do this before you can jack in. Jack in and journey through the school network, unlocking some doors as Lan with predefined answers, and others with numbers based on the frame count. One door is optional to open; beyond it is another HPMemory if you find it's worth the time. MegaMan gets zapped, so go to the corner desk of the AV room to free him. Also get the RepairPanelReturn A on the teacher's desk, because it's right there! The last door makes you go free Mari for an ID card. Get the HPMemory while you're doing that. After you use the ID, entering the last password makes you fight NumberMan. You get warped back to 5A, so run all the way out of the school and to Mayl's house. Jack into the piano and collect the Recovery-50 L, but not @Mayl. Visit the Metroline station, talk to the worker in the corner, and ask "What caused it?" Go fight Dex's upgraded GutsMan with 5 swords to receive /Dex and GutsMan G. You could also jack in to get @Dex from the computer or get a CrossGun K and fight for a HighCannon G in the GameCube if they turn out to save time. (My tests show that the @Dex shortcut is about 3 seconds slower, actually, but I'd like someone else to try to confirm it.) Jack into Lan's computer again and go toward StoneMan. If you haven't already, fight for DashAttack G. If you're using @Dex, bookmark that along the way too. You probably won't be able to get all 4 random crystals to appear in the closest places to your path in sector 2, though. I would focus on getting the 2 1000 zennies in sector 1 again so you can buy a second PowerUp and do 3 per shot. Oh, and fight a Swordy for a LongSword on the way to StoneMan if you want to form Beta-Sword or Sigma-Sword sometime. After beating StoneMan with GutsShoot and whatever else you have, jack out and run to the Metroline. Go to Government Complex, and grab a ticket to ACDC Town on the way outside, since I found it was a little faster. The TV has one of the Escapes you need for that KnightSword trade, and the SciLab vending machine has 5000z if you have time for an extra jack-in. Talk to the receptionist in the SciLab lobby to be able to use the elevator. Jack into the computer and talk to the program. Grab @Dad here, not because it's necessary, but because it sets up that great shortcut I thought up. Run all the way back home, and Dad will send an e-mail with an HPMemory and a PowerUp. You have to open this e-mail before you can go to bed, so get @Mayl from the previous e-mail and CrossGun C from that old one (if you need more chips to trade) at the same time. Now go to bed. Day 3 Run to school again--this time you can use the first door to 5A. Talk to Yai to make class begin and end. This is the point when you can fight GutsMan's final form for more GutsMan or GutsPunch chips. This is also when the chip shop opens and you can do the old-man trades. The game really starts to open up now! (However, the last Escape you need isn't until the DenTown mission, so that's where the chip trader could come in handy.) Go to the Government Complex again and get through the Chaud scene. Go to Dr. Hikari's office and snip the ID. Go up to the WaterWorks control room, grab the HPMemory, and talk to Dr. Froid (his control panel might be worth jacking into as well), then go down and to Dr. Hikari's office again. Now go back to the WaterWorks and jack into the water cooler. This would be another place to fight for AquaTower G or HiCannon G, but I haven't tested this far yet, so now I'm continuing based on some online guides and what I can remember having to do. The water net is split into two branches, with one being inaccessible because of a broken handle. So take the first branch and end up fighting two of those ice-making polar bears (couldn't find the virus names for this game). Electric attacks would come in handy if you could find any, or you could just use Beta-Sword. Now you'll automatically go back to ACDC Town and find that the school fountain water is tainted. I think you have to go back to the Metroline station, only to receive an e-mail that finally lets you open the car, but I have to double-check this. Tory Froid gives you the Handle when you free him, so go all the way back to that water cooler and take the other path, grabbing the HPMemory nearby. There's also a PowerUp right along the way, but it's hard to see. There's a sequence break in that area where you can skip turning on the first faucet by sliding just past two holes on either side of you, but the PowerUp is on the way to the second faucet, so no problem there. Fight IceMan with ElecSword or whatever. And then the day just ends with a bunch of cutscenes? Yeah, I think so. Day 4 This time you start out as MegaMan in Lan's computer. Use your e-mail to accept Mayl's invitation, then take the response into Mayl's computer using @Mayl because her house is locked now. Once again, you could luck-manipulate a random item right on the path there. You have to enter and exit the Metroline station once to start the scene that sends Mayl on her way to DenTown, despite MegaMan admonishing you for checking inside the station if you hit L there. Once in Dentown, there's a couple more things to do before the big emergency mission. You could get the PowerUp from the summer school blackboard now, but at this point it's a detour, whereas later you'll be forced to visit there. Open Mayl's message to receive RollV2 R and set up the meeting place. Talk to Miyu once, so they "know" where to find antiques. You should fight SkullMan now, since you're forced to talk to Miyu, and /Miyu is required to reach the Undernet. However, you could put off the battle until you come back to this town later, which I think would let you fight a more powerful SkullMan for a battle chip. Haven't really tested yet. Once you've read that e-mail that had Roll2 and talked to Miyu, standing at the bus stop of Block 1 will begin the traffic accident sequence. I recall there's one more e-mail you're forced to read, either before or after you jack-in to the first light, I'm not sure, but it'll be obvious anyway. Talk to the three people trying to buy the WWW program, then to Maddy, and then that starts the big chase around town where you jack into three more regular lights and then a round-the-block light. You'll get to revisit the antique shop during this mission, but not the summer school, sorry. Maybe win a DynaWave S in the color dungeons? It would go well with all those swords you start with. At the end you fight ColorMan with GutsShoot and AquaTower or whatever. Then some more cutscenes... Day 5 I recall this day starts you off in the park. Anyway, go tell Mom about the party. Before you go to the Government Complex, visit Yai for 10000 zenny! That's got to be one of the quickest sources of money in the game. If you talked to Mom, then Chaud will be at the SciLab. If you talk to him, then nothing interesting will happen, and MegaMan will suggest talking to everyone again. But actually, you just need to talk to the one guy standing right outside that TV lounge area, who tells you about the restaurant and power plant. Then when you go back to the middle of the lounge, the parents will arrive and you'll get to go to the restaurant. If you talk to that guy first, then when you talk to Chaud, Dad will appear immediately after... so do that. In the restaurant, you need to talk to every single person once to start the next scene. This includes Lan's dad, who has another skippable custscene, but not people outside the restaurant, or inanimate objects. Go down the dust chute. Talk to the person outside the control room door, then talk to the person outside the generator room door, and this will make the first one open the control room door offscreen. Jack in and do the power planet net, blah blah... Batteries are always used in the same location every game, so you can still use maps to spoil the solutions. Fight ElecMan, but he'll heal whenever his HP reaches 550, so make him heal 3 times with 3 MiniBombs or whatever to end the battle and get Lan to turn the power off. Fight ElecMan for real now. Fight ProtoMan. Another boss that can be finished off with only GutsShoot! Since I don't think you get a chance to arrange your folder again between ElecMan and ProtoMan, Kirkq recommends picking a wholly different set of chips for the other fight, so you can set up some chips to fit into the first random arrangement the game picks, then set up the others to fit into the random arrangement that'll be chosen by the time the second fight starts. Sounds tricky, but doable. Then I think all you have to do is talk to Mom, and you go home. Day 6 You're looking for Chaud now, although you don't have to read the e-mail that tells you so in order to start this quest. You do have to talk to the guy at the SciLab who says that Chaud went to DenTown. If you go to DenTown before you talk to that guy, Chaud won't be there. Talk to Chaud in Central DenTown, and if you want, make a detour for SkullManV3. Now you know you need to find an ex-WWW-member. That's Higsby, so go to his shop and talk to him behind the counter to get his HigsMemo. There are 3 other memos to find, but Lan doesn't know that yet, so you can't get them yet. Log onto the Internet one more time, from Lan's computer or from Dex's computer if that route works out. Get a few HPMemories from the shop if you need them to reach the 30-level goal. Now you're going all the way to sector 5, collecting any random items that contain battle chips you don't already have for your library, or extra money if you still need that. In sector 2, take the opposite path from last time to use /Miyu and enter sector 4. At the entrance to sector 5, you'll fight 2 Hardheads and 1 of those metal shield things, I think I read they were called Froshello somewhere or something like that, or maybe I just dreamed it. Why'd they wait 'til the second game to display the enemy names, anyway? Er, so yeah, that's two enemies in opposite corners with 90 HP that are only vulnerable when they're spitting cannonballs (Howitzers?), and one in the middle with 250 HP with a shield in front that only raises for a little while when you do a lot of damage to it, it's probably 100 or so, so figure out a combination of chips that will make short work of all of them and don't lose your footing. This might call for a level 3 Navi chip. Now you'll get an e-mail from Higsby explaining the other three memos. You need to read it sometime, but don't jack out yet! Continue to the end of sector 5, then go through the one-way door into sector 9, then down into sector 3, where you can bookmark @Dad. You could also fight StoneMan and visit the shop in sector 3. You'll probably want the WoodArmor just to raise yourself 6 levels, and StoneMan MIGHT come in handy because even the first-level chip can do 300 damage, but it is very slow. Now make sure you have 60 chips in your library. If you don't, I guess that's one last stop at Higsby's, but let's try to plan ahead and minimize the number of side-trips to there. Go back to the SciLab. Talk to the guy who wanders around going "Hmm..." for the first memo. Now go to DenTown's summer school to get Yuri's memo. She's the one who checks to see that you've gotten 60 kinds of chips. There's a Barrier in the locker you can grab fast, so if you didn't have time to stop here earlier, then that may end up being your 60th chip. Also, there's a PowerUp in the blackboard, so that's probably worth the jack-in time, too. Now you can go back to ACDC Town and talk to the old man now standing in front of the empty house. No, you don't have to talk to the old men in the other towns; all they do is tell you that you've got the wrong guy. And the other old men in ACDC Town won't tell you anything new, because characters in trading sequences never comment on the main story. If you got all the other memos and MegaMan is at level 30 or higher, the old man will give you Pa'sMemo. So if you have some extra PowerUps sitting around, make sure to equip them so they actually raise your level. (In general, try to combine trips to the Folder, E-Mail, and MegaMan's Status so you save a little time opening the menu, though it's not a huge deal if you can't.) Now I recommend you go back to Dr. Hikari's office at the SciLab and jack into his computer. This will allow you to start out at sector 3, where you can travel back to sector 9, then back to sector 5 through the now-two-way door, which puts you right at the entrance to sector 6! Continue on to sector 8. At this point, you don't need to fill your library anymore, so only pick up things that actually help you from now on. Fight BombMan. The guide says he's Fire-elemented, so AquaTower might come in handy again, though he loves to hide behind his bombs. Jack out and talk to Dr. Hikari, who will be standing right there if you jacked in from his office computer. I noticed that at this point, ProtoMan and SharkMan are now powered up to their final levels, if that makes any difference to anyone. Now you can finally go home to bed. Day 7 Leave your house, go to Higsby's, and you should find the WWW pass on the counter. I think you talk to the Metroline worker in the back to find out you're looking for a secret subway line. Then you find it in the school statue, but you find out you have to get the pass updated. So you go to Dr. Hikari again, and you can finally get to the secret mountain fortress. Should be pretty obvious from there on, except you have to check the Wily picture twice before you can jack in. Next boss is MagicMan. Uh, luck-manipulate for easy enemies or something? Then some cutscenes, spoilers, blah blah blah, and a short dungeon later, you get the final boss, LifeVirus. He has 1000 HP as well as a 100 aura that you can either spend a high-powered chip to break early, or you can wait for him to drop the aura on his own when he attacks, but you wouldn't have as much time to counterattack. I don't know what strategy might end the battle in one turn, but I did calculate that with maximum attack and speed, the Mega Buster could do 72 points of damage per second! Well, I'll try to find out how Hub.bat affects lower values too. And then the first half of the ending is all skippable with Start. Our viewers aren't going to see very much story, you realize? It'll look like Lan has the power to blink and make people vanish. Oh well.
put yourself in my rocketpack if that poochie is one outrageous dude
Former player
Joined: 8/1/2004
Posts: 2687
Location: Seattle, WA
Where are you getting all of those swords early on? I'm fairly sure you won't be able to manipulate chipsets that well for each fight.
hi nitrodon streamline: cyn-chine
Active player (277)
Joined: 5/29/2004
Posts: 5712
Um, you start the game with 4 Sword Ss and a WideSword S, as well as a Steal S. LongSword S is an easy virus fight. And did you read with Kirk said about chip stacking? We are able to see what order the chip slots come up in when the battle starts, letting us move the desired chips into those slots so that they'll be the ones chosen at that same battle start time.
put yourself in my rocketpack if that poochie is one outrageous dude
Player (208)
Joined: 7/7/2006
Posts: 798
Location: US
You must have missed the bit where I found out we can stack our folder in a certain order before every fight in order to manipulate chips.
Kirkq wrote:
If getting chips in battle is dependent on the particular frame the battle is accessed, and the folder positions are directly assigned to this battle, this will allow us to move chips around in the folder to get EXACTLY the chips we want. EDIT: Confirmed. Ensue folder stacking. This run is going to be quite broken.
Bag of Magic Food wrote:
Hey, I just got an in-game Delete Time of 18.00 seconds on NumberMan!
Roughly explained again: See what positions in folder come up in battle 2 seconds from savestate, reload savestate, stack chips in those folder positions, get everything you wanted. This can be accurately measured to the frame because the RNG doesn't increment in the menu.
Active player (277)
Joined: 5/29/2004
Posts: 5712
Right. One snag with NumberMan is that the passcode does increment while viewing your folder, so that can complicate the timing a little bit when the amount of swapping you do changes how many times you have to flick the numbers up or down, but it shouldn't be too hard to figure out.
put yourself in my rocketpack if that poochie is one outrageous dude
Former player
Joined: 8/1/2004
Posts: 2687
Location: Seattle, WA
Well then... seems like finishing the test run seems pretty silly in light of the fact that each battle can be manipulated like this.
hi nitrodon streamline: cyn-chine
Active player (277)
Joined: 5/29/2004
Posts: 5712
Sure, so now we should be testing little individual sections and battles to evaluate what items will save time overall. I'm mainly thinking about grabbing G and S code chips that can be grouped together with the swords and program advance we know we're going to use, but be on the lookout for any other chips that can be obtained fast and save a lot of time on any bosses, perhaps forming a new code group. I'll find out in a few days how much random battling, trading, shopping, or scavenging should be necessary to make Ms. Yuri's 60-chip minimum by that point. Also, I haven't really looked into how to manipulate the game into giving you the random battles you want. It will be helpful to be able to control both the enemy type and the time it starts so you can have the right battle chips ready to beat it right away. Fortunately, random battles should only be needed a few times, but that means you need to be good at avoiding them without slowing down a lot. I just reviewed the "ice bears" part. After you beat them, you jack out automatically, but you have to run back to ACDC manually. However, once you reach the town, Lan automagically reaches the school pond for you. Then you manually run back to the Metroline station, only to get the e-mail (pre-read in a cutscene) that lets you manually run back to the car to open it. So that is two more tickets you want to grab on your way out of the stations, because it appears to always be faster to grab tickets on your way out when the game doesn't remove them at the end of the mission, due to the exit turnstile being a little closer to the ticket dispenser. Also, remember that faucets turn themselves back on when you jack in again, so don't bother turning off the next faucet on the second path early during your first trip. Now I found out that my plan to wait for SkullMan to power up won't work. Not only do you have to be at the right point in the story, but you also have to have beaten the less powerful forms of a Navi before it'll be replaced by the stronger one. So you could end up burning through 2 or 3 different versions of a friendly Navi in a row if you saved them for later. SkullManV2 would be a whole extra second battle, and SkullManV3 would be a third. So I think we'll just beat SkullManV1 at the first opportunity.
put yourself in my rocketpack if that poochie is one outrageous dude
Active player (277)
Joined: 5/29/2004
Posts: 5712
Hey guys, did you see this? http://s6.zetaboards.com/The_Rockman_EXE_Zone/topic/8550108/2/#post8051745 That's where I started discussing the ProtoMan glitch again. I got it to happen once with Quake1, but I don't know how to do it again, so help me out so I can try it with Quake3! If you press opposite directions, MegaMan switches between facing north and facing northeast every frame. If you left go of both of them at the same time, he walks in place facing left. Silly. Opening your folder when you've stepped on a cutscene trigger may save time when closing the menu, maybe. In the power plant, the number of bars left is the fraction out of 10 of your maximum HP that you regain after the next battle you win.
put yourself in my rocketpack if that poochie is one outrageous dude
Active player (277)
Joined: 5/29/2004
Posts: 5712
Here are a few battles I recorded to help me analyze some things. They show off a lot of the battle chips we're considering other than the ones for GutsShoot. http://dehacked.2y.net/microstorage.php/info/1764044193/SigSElec.vbm http://dehacked.2y.net/microstorage.php/info/1028842351/CBombMan.vbm http://dehacked.2y.net/microstorage.php/info/203320218/CVirus.vbm Now it looks as if the time spent collecting Quake3 C and DynaWave C may be worth it. (The DynaWave + Quake3 + AquaTowr strategy also works very well on the guard viruses at the beginning of the Undernet, but I didn't record that battle.) That strategy on BombMan required a fifth PowerUp, though, which I'm still not sure on. Soon we should put together some kind of spreadsheet to organize the times to reach each item and decide which collection of items is fastest overall.
put yourself in my rocketpack if that poochie is one outrageous dude
Joined: 9/12/2009
Posts: 42
Hey guys, I have some information that might help (read all the posts in this thread). This was in one of the FAQs on gamefaq's:
At Higsby's store, you will find two machines. If you put some Battle Chips of your choice, you can obtain another one, sometimes very rare! As you can see, the type of chip you put as nothing to do with the one you get. 3-chips machine: 3/4 probability of having... 202/256 probability to get a 1-star chip 32/256 probability to get a 2-stars chip 16/256 probability to get a 3-stars chip 5/256 probability to get a 4-stars chip 1/256 probability to get a 5-stars chip 1/4 probability of having... 13/16 probability to get a 1-star chip 2/16 probability to get a 2-stars chip 1/16 probability to get a 3-stars chip 10-chips machine: 3/4 probability of having... 16/256 probability to get a 1-star chip 176/256 probability to get a 2-stars chip 32/256 probability to get a 3-stars chip 16/256 probability to get a 4-stars chip 16/256 probability to get a 5-stars chip 1/4 probability of having... 1/16 probability to get a 1-star chip 11/16 probability to get a 2-stars chip 2/16 probability to get a 3-stars chip 1/16 probability to get a 4-stars chip 1/16 probability to get a 5-stars chip
I suppose the probabilities don't matter because its TAS, but at least you know you can get 4/5 star chips depending on the situation. Unfortunately, it doesn't have Navi star chips listed so you can't tell if it's only normal, Navi, both. I remember using save states to brute force these machines so I didn't have to run around battling viruses to get my full chip set. Fun times, haha. 2. I don't recall if StoneMan flinches or not. I think it's not? You can get a TimeBomb G code from school area 4/5 fight which would satisfy a chip requirement. If you also grab the HiCannon G that's another chip there, and you can insta-bust him with the GutsShoot combo+bomb+HiCan..... although that might be slower than HiCan + buster + GutsShoot. IF there's no flinch then TimeBomb lay first, then HiCan then GutsShoot MIGHT probably be faster than shooting the buster. 3. Is the Blaster Power/speed/Charge DPS optimized yet? Putting points into charge depends A LOT if you're using chips that are making the Navis you're going to fight flinch. Has this been calculated out? I think it's probably a lot quicker to just drop charge altogether in favor of pow/spd, but I'm not sure if you've optimized the DPS output for that. I think if optimized correct as see in the LifeAura fight the DPS of the buster just weighs what chips can provide. I would count on that being the main form of damage + chips that don't cause flinching. Unfortunately, I don't think any of the guides list which chips cause a lot of flinching. :( Notes: 1a. Unfortunately, the GameFAQs aren't as well developed for MMBN1 as they are for the games MMBN2 and I think 3/4 as well. With the 60 chip limit you need to hit, the fastest way to get them is to manipulate GMDs to give you the chips that you want alongside random battles. Without a good GMD it's like a crapshoot unless you want to brute force test them all to see what you can get. I know there's a GMD guide for MMBN2 which would be vastly useful in right away determining customizing how to obtain certain chips or possibly obtain some for PAs if necessary. But I don't think (IIRC) that there's a minimum chip limit for MMBN2. Unfortunately, it looks like money might be a limiter here because you need to buy powerups as well as possibly HPMem. Manipulating GMD for money is probably the best solution, but problematically you would also need to get enough chips and the fastest way to do that is a combo of battle + grabbing GMDs for chips. 1b. If we could find out what is in each and every GMD (and their different spawn locations) we solve out how many to get VS. how many random encounter battles we need to do. Depending on how many GMDs you can encounter along the way you can shell money out of them or chips that you need. Probably don't need to do many more than ~15 random battles to get unique chips I would guess. Once you get 15 or so it may be faster to chip trade them for ~5-6 that you want for your folder. You can probably get the rest of them from GMD/BMD pickups, and buying chips. This would then allow optimization of how many powerups we need to get when and where to speed up boss battles (although it would require a lot of trial and error unless we can write a script to calculate that out -- I don't have that ability). This is the unfortunate consequence of playing one of the only MMBN games that doesn't have GMD FAQ... lol. edit: optimizing this will be hard because chip battles take about 10-15 seconds, and GMDs while fast (only a couple seconds) are few and far between to get. The question is when you get to the 60 chip limit to get further in the story... IF you got minimal chips, how many chips do you have? If we can work backwards from there you can probably optimize a path and random encounters to get enough. 2. Gambling. I can't recall if it's 2 or 3 again that has one of those gambling things. That's an easy way to manipulate money. (edit: nevermind that's #3 -- too bad, the 8k investment yields like 256k zenny or something absurd like that). 3. Also, there's a GMD in undernet 5 in MMBN2 that gives 50k zenny each time you grab it. I personally would've chosen to do the TAS for MMBN2 just because of the 50k zenny GMD. Just abuse that a couple times for the money to buy everything you need to buy massive amounts of cheap chips to trade if you need certain PAs or chip limits. Oh, and the fact that you can't run from battles is *facepalm* annoying especially since you can in later games. Makes for a pain in the butt trying to map out routes and such ------------------------------------ If you guys need help tell me what to do. I'm "new" to TAS, so I don't have any experience with these programs other than running VBA and playing on it (have experimented a bit with frame advance). Thus, I'm nowhere near your level probably. I should be able to help optimize some sections if you need some brainstorming. I'd have to play the game through again to remember what's going on though, hah.
Active player (277)
Joined: 5/29/2004
Posts: 5712
braindx wrote:
This was in one of the FAQs on gamefaq's:
At Higsby's store, you will find two machines. If you put some Battle Chips of your choice, you can obtain another one, sometimes very rare! As you can see, the type of chip you put as nothing to do with the one you get. 3-chips machine: 3/4 probability of having... 202/256 probability to get a 1-star chip 32/256 probability to get a 2-stars chip 16/256 probability to get a 3-stars chip 5/256 probability to get a 4-stars chip 1/256 probability to get a 5-stars chip 1/4 probability of having... 13/16 probability to get a 1-star chip 2/16 probability to get a 2-stars chip 1/16 probability to get a 3-stars chip 10-chips machine: 3/4 probability of having... 16/256 probability to get a 1-star chip 176/256 probability to get a 2-stars chip 32/256 probability to get a 3-stars chip 16/256 probability to get a 4-stars chip 16/256 probability to get a 5-stars chip 1/4 probability of having... 1/16 probability to get a 1-star chip 11/16 probability to get a 2-stars chip 2/16 probability to get a 3-stars chip 1/16 probability to get a 4-stars chip 1/16 probability to get a 5-stars chip
I suppose the probabilities don't matter because its TAS, but at least you know you can get 4/5 star chips depending on the situation. Unfortunately, it doesn't have Navi star chips listed so you can't tell if it's only normal, Navi, both. I remember using save states to brute force these machines so I didn't have to run around battling viruses to get my full chip set. Fun times, haha.
I brute-forced the machines the same way, but I used a Lua script that KirkQ made to do it tens of thousands of times. I learned that the probabilities seen in that guide don't match up to the actual results; in fact, the 3-chip trader never even dispenses any 5-star chips, even if you have them all already! Didn't you read my post about the rules for the trader machines? What the machines dispense is based on your Data Library, that is, what battle chips you have ever legitimately owned. The 10-chip trader can dispense any chip you don't already have in the library except LifeAura, MagicManV1/V2/V3, PharaohManV1/V2/V3, ShadowManV1/V2/V3, and Bass. The 3-chip trader is much more restricted. It will gives out copies of any 1-star, 2-star, 3-star, or 4-star chips already in your library, but the only chips it will give out for the first time are 1-star chips, 2-star chips minus a certain ten kinds, and 3-star chips minus all the Navis, and then only in certain letter codes, usually whichever codes you don't get from fighting the virus that drops it. A couple of experiments shed some light on how that works. I tried running the "Try the chip trader lots of times" script both before and after getting a new battle chip (which would be added to the Library). The After list was almost identical to the Before list; the only chips affected were the ones with the same star value as the new chip, but otherwise the same star value came up at the same times, and the chips of other star values were all the same. A few chips of the same star value weren't changed, though, and all new chips were also the same, which leads me and Kirk to believe that the trader picks a list of possible chips out of a few possible lists before picking the chip itself. In the case of the 3-chip trader, the lists would be "1-star chips already in the library", "2-star chips already in the library", "3-star chips already in the library", "4-star chips already in the library", and "1-star chips in certain codes, 2-star chips minus those ten in certain codes, and 3-star chips minus the Navis in certain codes". As far as I know the only way to change the sequence of that final "master" list of chips you could win for the first time would be to reset the system and reload your save file. The 10-chip trader is probably like this too, only it would add a "5-star chips already in the library" list, and its "master list" would be much more broader. (Now you may be wondering, "Where does the 4-star list pull from if you don't already have any 4-star chips?" Well, I did a before-and-after test with Roll2, and it turned out to replace a few 1-star chips while not disrupting anything else, so I think the 4-star list starts out as a second 1-star list.)
braindx wrote:
I don't recall if StoneMan flinches or not. I think it's not?
braindx wrote:
Unfortunately, I don't think any of the guides list which chips cause a lot of flinching. :(
StoneMan does flinch, whenever you hit him for 100 points or more at a time. His flinch animation is kinda subtle, though. Here's my list of which Navis flinch at which levels of damage: GutsMan: 60 HP FireMan: 30 HP NumberMan: 30 HP StoneMan: 100 HP IceMan: 100 HP SkullMan: 100 HP ColorMan: 100 HP ElecMan: 90 HP ProtoMan: 60 HP BombMan: 100 HP I didn't test the secret bosses yet. WoodMan, SharkMan, MagicMan, and non-Navi enemies such as LifeVirus don't seem to ever flinch. By the way, I found out that BombMan isn't fire-elemented, as aqua chips didn't do any extra damage to him. I think his bombs are, though, as they still did full damage against WoodArmor. But if you use a fire chip against BombMan's own bombs, they'll explode on him, doing massive damage. It seemed that they randomly did either 140, 210, or 280 points to him, decided with the bomb placement and which bomb you hit, and the 280 damage seemed to be rarer than the 140 and 210.
braindx wrote:
You can get a TimeBomb G code from school area 4/5 fight which would satisfy a chip requirement. If you also grab the HiCannon G that's another chip there, and you can insta-bust him with the GutsShoot combo+bomb+HiCan..... although that might be slower than HiCan + buster + GutsShoot. IF there's no flinch then TimeBomb lay first, then HiCan then GutsShoot MIGHT probably be faster than shooting the buster.
I didn't think Handies dropped TimeBom1 in G code. I don't think you can even get TimeBom1 G from the chip trader until you already have TimeBom1 in your library. I also don't think you can fight blue Canodumbs for HiCannon in the school, but correct me if I'm wrong. I know you can collect HiCannon I as an item sitting there, but I found it takes 11 seconds to go there and back, so I may as well fight an easy battle for HiCannon G (power plant maybe?) if it turns out to save more time than the battle takes. I doubt I'll get to use HiCannon on StoneMan though, and TimeBombs waste time just to set. And they take so long to go off, I'll probably have defeated the boss before then! I considered TimeBom3 P for LifeVirus once, since it would destroy the helper virus, do a lot of damage, and maybe even help me win before the aura goes up the second time. But it's also several seconds to jog over to that item, and at that point I would have already passed the 60-chip requirement and wouldn't need to fill the library anymore. And StoneMan only has 600 HP, so you wouldn't need GutsShoot, HighCannon, AND TimeBomb all together to win fast anyway.
braindx wrote:
Is the Blaster Power/speed/Charge DPS optimized yet? Putting points into charge depends A LOT if you're using chips that are making the Navis you're going to fight flinch. Has this been calculated out?
You're right that whether to increase Charge depends on if you use high-power chips and have to wait for a Navi's invulnerability time to end. A couple of strategies I tried on ElecMan and BombMan used that. But I definitely want to increase Attack to 5 as soon as possible, as that helps out the most in every situation, and I'm not sure about getting a fifth PowerUp to use for Charge at all. If it doesn't save enough time in boss battles, I may buy three extra HPMemories instead to meet the Level 30 requirement, as a fifth PowerUp would require either 8000z more than the 3 HPMemories or an extra jack-in to the summer school blackboard. (I'm pretty sure the WWW PIN is out of the question.)
braindx wrote:
I think it's probably a lot quicker to just drop charge altogether in favor of pow/spd, but I'm not sure if you've optimized the DPS output for that.
I hope you're not referring to the Rapid stat with "spd". It barely helps at all. Even at Rapid 1, with the boss sitting in the back, you can shoot once every 14 frames by moving back and forth between squares to skip the time that MegaMan stands still after firing. At Rapid 2, you can fire across two squares every 13 frames instead. Not a huge difference, huh? But if you're just talking about fast battle chips, then yeah, I'm going only for fast ones except for Program Advances like GutsShoot that would make up for it with power.
braindx wrote:
With the 60 chip limit you need to hit, the fastest way to get them is to manipulate GMDs to give you the chips that you want alongside random battles. Without a good GMD it's like a crapshoot unless you want to brute force test them all to see what you can get.
braindx wrote:
Unfortunately, it looks like money might be a limiter here because you need to buy powerups as well as possibly HPMem. Manipulating GMD for money is probably the best solution, but problematically you would also need to get enough chips and the fastest way to do that is a combo of battle + grabbing GMDs for chips. If we could find out what is in each and every GMD (and their different spawn locations) we solve out how many to get VS. how many random encounter battles we need to do. Depending on how many GMDs you can encounter along the way you can shell money out of them or chips that you need.
Um... Doesn't that same guide that listed the trade probabilities you quoted also tell what items are available in every area, even the random ones? I have a guide that does, and the only error in that section I've found so far is that there doesn't seem to be a Howitzer A in Area 15. Now, assuming you're only referring to the random mystery data in the Internet, there are a few battle chips I could grab from them to add to the Library. The only problem is that a lot of their contents are chips I'd already have, and a lot of others are too far off the path to be worth the trip. Here are the random chips I'm thinking of grabbing on the path that goes through Area 1, Area 2, Area 4, Area 5, Area 9, and Area 3: Recov30 G IcePunch B/M IceCube M Recov150 E and LongSwrd O if I decide that I don't need to use Beta-Sword or Sigma-Sword and therefore don't need to fight for LongSwrd S. Oh and ShokWave P, if I don't need ShokWave L or random money there instead! It's not that many, see? I also plan to get the non-random AquaSwrd A item in Area 4. Thunder1 H and RingZap1 H are too far off the path to the point where it would be faster to fight viruses for them, and to get RockCube would require either fighting StoneManV2 or re-entering the Net an extra time after acquiring the Lab Memo to reach Area 6 early. It is true you can manipulate random mystery data to contain more money. In Area 1, the maximum is 1000z. In Area 2, it's 1500z. And in the other four areas I plan to visit before Ms. Yuri, it's 2000z. The highest amount of money always seems to be the rarest, though. There's also a snag in that the first two areas have random locations for their random items too. I found out a long time ago that Area 1 has 2 items in 8 possible locations, and Area 2 has 4 items in 16 possible locations. Recently I also learned that each item chooses 1 of 4 locations, so there are some combinations of locations that aren't possible because they're shared by the same item. Every time you enter the Internet from anyone's PC, the random items are replenished everywhere, and the random locations for areas 1 and 2 are chosen again and set until you jack out. That means you're getting 1 out of 4^6 = 4096 possible configurations of random item locations when you enter. Could take a while to luck-manipulate, huh? Now, for Area 2, I see there are only going to be 2 locations very close to the path each trip, so I would only be manipulating for 4 items, or a 1 out of 256 chance. Might have to settle for 3, and try something else. But I do want to get two 1000 zennies on both of the first two trips through Area 1 so I can afford 2 PowerUps before StoneMan.
braindx wrote:
Probably don't need to do many more than ~15 random battles to get unique chips I would guess. Once you get 15 or so it may be faster to chip trade them for ~5-6 that you want for your folder. You can probably get the rest of them from GMD/BMD pickups, and buying chips. This would then allow optimization of how many powerups we need to get when and where to speed up boss battles (although it would require a lot of trial and error unless we can write a script to calculate that out -- I don't have that ability).
Actually, I don't think we'll need more than about 5 random battles. The one I'm totally sure of is the one to get Dash G, so you can use GutsShoot. I'm also seriously considering going for TriSpear G, as although it requires an extra jack-in, we can also get Recov200 for the library and 3000z along the way, and it helps a lot in boss battles. (It's 3 shots worth 50 each, so you do 150 damage without causing a flinch!) I also mentioned the possibility of LongSwrd S and HiCannon G, and DynaWave is helpful in a few situations too.
braindx wrote:
optimizing this will be hard because chip battles take about 10-15 seconds, and GMDs while fast (only a couple seconds) are few and far between to get. The question is when you get to the 60 chip limit to get further in the story... IF you got minimal chips, how many chips do you have? If we can work backwards from there you can probably optimize a path and random encounters to get enough.
That's what I'm working on right now. I think we can get pretty close to 60 just by collecting any chip near the path not already in the library and trading them in at the 3-chip exchanger, and we can supplement it by trading a few quick repeat chips and buying a few cheap chips. As you know, we can luck-manipulate the trader machine to give an all-new chip very quickly, so at some point there will be a trip to Higsby's to dump in all the extra chips collected so far to get new chips to fill the library. The quickest time to do that would be while obtaining Higsby's Memo, but that means we wouldn't have the chips collected from the run through the Internet to use the Hig Memo yet. There's also the possibility of getting a few chips that would actually help in battle from these trades, which would be easier done while dumping in a lot of chips as you would be spending the time waiting for the desired chip by getting just any chip, but some of these you would need to make an extra stop for earlier. For example, you could get Snakegg1 N and WoodTowr N to seriously exploit ElecMan's wood weakness, or a FireSwrd G to hit BombMan's bombs before using GutsShoot. Quake3 C and DynaWave C also help out on some of the last few bosses and would be quicker to trade for than to find normally, but they don't come up in the trader as often, and how the timing would work out for any of this is still just guesswork at this point until someone makes an optimized run. The way I see 3-chip trading is that each trade results in a net loss of 2 chips, so each additional chip in your sack is worth one-half of a new chip, and if that chip is also new, then it's like one and a half chips, making it about three times as good as a repeat chip. The one time this idea breaks down is when you get to 2 chips--can't go negative to end up at 0! Basically, for whatever number of chips you dump in, you're getting either half that number rounded down, or half that number minus one if it's already whole. 30 chips would net you 14, 31 would get you 15, 32 would also get 15, 33 would get 16, and so on. Does this make sense? So whatever chips you plan to get after The Great Dumping wouldn't be "worth" as much as they would be beforehand, such as that Barrier R I plan to grab from the summer school locker, and possibly Ratton1 E from the kid beside it. I recorded that getting 1 chip from the trader while you're stopping at Higsby's takes about 254 frames, and each additional chip adds 213 frames plus whatever luck manipulation time. So the average will be about 220 frames per chip, I think. (And I like to think that each new chip you pick up elsewhere already "saves" 4 seconds you would have spent trading in other chips, plus the time spent grabbing the chips to trade.) If you're manipulating it to get chips you'll use later, though, you may have to stop trading for a moment and swap them into the folder, or at least use the Sort function to move them out of the way, so you don't trade them.
braindx wrote:
Oh, and the fact that you can't run from battles is *facepalm* annoying especially since you can in later games. Makes for a pain in the butt trying to map out routes and such
Well, you won't be running from battles at all in a TAS when you can just manipulate luck to not get into any battles in the first place. So the pain in the butt is really trying to figure out how little time you can waste affecting the time to the next battle. :) I figure running against walls will help, as you lose 1 frame every time you change speed or direction, but running into a wall at an angle causes you to run parallel to the wall, with no speed penalty, until you clear the edge. So instead of changing direction twice or letting go of B, you might be able to switch between running against the wall and running with the wall, with only a 1 frame penalty each time. I haven't tested this much, so I don't know if 1 frame of stopping is always enough, but I think so. As for mapping routes, Kirk also came up with a cheat to avoid getting into any random battles at all. What's a good way to post Lua scripts for this stuff?
braindx wrote:
I personally would've chosen to do the TAS for MMBN2 just because of the 50k zenny GMD.
Well, why don't you? I don't think anyone's working on MMBN2 right now, and you seem to know that game better anyway. Take a look at Soulrivers's run to get an idea of how the AirMan scenario would go.
put yourself in my rocketpack if that poochie is one outrageous dude
Active player (277)
Joined: 5/29/2004
Posts: 5712
I'm thinking of making a set of savestates throughout the planned route through the game so that it will become easier for everyone to test things. In the meantime, check out this movie I made of just the tutorial. http://dehacked.2y.net/microstorage.php/info/136573249/Begins.vbm At first I was just going to shoot the last Mettool of the second lesson ten times and finish it off with a Shotgun, since that starts off a bit faster than a Cannon, but then I discovered that I could MegaBuster it to death before I would have even gotten into the battle chip menu. It's a shame to have to waste a second to get 3 Cannons into place for the third lesson, though that may mean that grabbing the Recov10 A at the beginning for chip trade fodder would be wasting even less time. And why does this page say you can skip the tutorial in this game?
put yourself in my rocketpack if that poochie is one outrageous dude
Joined: 9/12/2009
Posts: 42
1. For the Bombman battle, is it currently faster to use the C chips? The only reason I could see it being a problem is because the program advance takes a couple seconds to load which is wasted charge bar time. However, even considering that time: Fireswrd G (maniped for 280 dmg) + Charge buster (20?) + GutsShoot (500) should kill him in less than ~5 seconds game time (although probably about 10s real time). Peh, looks like most of the other bosses would get owned by TriSpear G + GutsShoot or just by solely GutsShoot. 2. Re: protoman glitch I found this thread as well which may be useful: http://exehq.com/forum/index.php?PHPSESSID=9cb5df92834cd27961818d3e435b46c4&topic=6473.msg133367#msg133367 I also got the glitch to work once with Quake3, but I don't remember how as I was too quick with the save state reloads but I saw it happen. I'm pretty sure it was with the charge sequence as well. 3. Like I said, I'd like to help out if I can. I probably won't take up any projects myself because I don't have THAT much time, but if you guys need an extra hand to optimize anything or brainstorm you can bounce ideas off me. Also, getting those lua scripts up would be mucho helpful.
Active player (277)
Joined: 5/29/2004
Posts: 5712
Wow, nice find! So somebody already discovered that glitch a year ago and did some analysis on it. And now 4 different attacks have been reported to cause the glitch, so it probably works with anything that makes ProtoMan flinch. We just need to find the right moment in his attack pattern then. I'm not sure Shotoman really understood the differences in ProtoMan's attacks; whether he takes a wide swing or a long swing depends on where MegaMan is in relation to him, just as with the Swordy viruses. Charging up lets ProtoMan teleport directly in front of MegaMan instead of just to his own front column, and he'll do so up to three times if MegaMan dodges his sword. But sometimes he'll also attempt do his regular, front-column attack three times in a row, without even teleporting to the back again between tries, only stopping when MegaMan's been hit or ProtoMan's missed three times. So if you got hit by the first swipe of that attack, you couldn't tell it apart from the regular attack, I think. As for BombMan, I was probably just going to shoot him a few times at the very beginning to get the 20 points or so in, as it takes a second for the bombs to get set up anyway. Then I may not even need the Charge attribute at all, depending on what I use on ElecMan. So I think the only annoying thing would be manipulating the 280 damage to happen. And you're right that several of the bosses will only require TriSpear + GutsShoot, and in MagicMan's case maybe a HiCannon for a finisher. Other weaker bosses can be taken out faster with a row of Swords. I recall that even IceMan can be finished more quickly with 5 swords and then just shooting him 20 times to take off the remaining 100 HP than with waiting for GutsShoot to form, so it probably doesn't help to gamble for electric chips to use on him either. The thing about ElecMan is that you're thrown into ProtoMan's battle immediately afterward with no time to re-arrange the folder, so unless you want to try to wait for the chips you need to randomly swap themselves into place, you'll have to set up the chips for ProtoMan's battle before ElecMan's main battle. And unless the game just happens to pick the same folder slots for the first 5 chips then, you won't be able to use the same chips in both battles. So my plan was to use GutsShoot on ProtoMan, since his battle would be very slow with all that shielding, and find something else to use on ElecMan. But if you can figure out that multiple hit glitch on ProtoMan, we may be able to use Quake3 to finish him off fairly quickly (likely starting with a MiniBomb so he doesn't have to flinch again), which would free up TriSpear + GutsShoot for ElecMan. ElecMan's first fight is the one where you have to hit him for at least 50 HP 3 times, and I found that ShokWave + MiniBomb + MiniBomb was the fastest way to do that out of what I had, because it's slower to make ElecMan flinch, and it's slower to start off with an attack as slow as MiniBomb that lets him start to move to another square. So that would be one of the drawbacks to getting ShokWave P next to the area 3 vendor later instead of the ShokWave L early on. HiCannon, Dash, and TriSpear would work just as well I believe, but we'll want at least the Dash for GutsShoot later, and I think setting up the folder for 3 battles in a row would be the most efficient when there's hardly any time in between the two forms of ElecMan anyway. Do you remember the viruses you fight after when using the Hig Memo to get into Area 5 (the Undernet)? That's another battle where the DynaWave + Quake3 + AquaTowr strategy really helps. GutsShoot does bypass the shield, as it does with most objects belonging to the enemy, but that's a very inefficient way to beat something with 250 HP. So it's quite valuable to have Quake3 C and DynaWave C, but I hate the time sink required in jacking into Miyu's vase and then trying to get a perfect battle against a blue Mettool + one, and that's why I'm hoping they'll show up quickly enough in the chip trader. Hmm, what else was I gonna say... KirkQ said I could just post Lua scripts with code tags, so here are a few that we made:
local AD1 = 0x020003f4    -- good
local AD3 = 0x02006448  -- good
local AD1Value
local AD3Value
AD1Value = 7
AD3Value = 7
while true do
memory.writebyte(AD1, AD1Value)
memory.writebyte(AD3, AD3Value)
    vba.frameadvance();
end
Here's a simple one. It's just a cheat that prevents you from ever getting into any random encounter battles. Now you can roam the cyberworld without fear! Keep in mind that it doesn't affect non-random battles, so stay away from boss triggers until you're ready. And be careful not to leave a cheat like this on when you open another ROM, because there's no telling what might happen!
local tempstate = {}
local iterations
local value
local i
local j
local keys

local ChipID = 0x02019009
local ChipCode = 0x0201900a
local ChipIDValue
local ChipCodeValue

moviefile = "MemDump.vbm"
-- output file. contains ingame frame, scroll, position and hitbox information
dumpfile = moviefile..".dump"
io.output(dumpfile)

value = 0
tempstate[value] = savestate.create()
savestate.save(tempstate[value])

--iterations = 32768
iterations = 2000
for j = 1,iterations do	
    vba.frameadvance()
    savestate.save(tempstate[value])

    joypad.set(1,{["A"]=true})

    for i=1,60 do
	vba.frameadvance()
    end
    
    joypad.set(1,{["A"]=true})
    vba.frameadvance()
    vba.frameadvance()
    vba.frameadvance()
    
    joypad.set(1,{["A"]=true})
    vba.frameadvance()
    vba.frameadvance()
    vba.frameadvance()

--Insert 7 more here for special
    
    --joypad.set(1,{["A"]=true})

    --for i=1,3 do
        --vba.frameadvance()
    --end    
    
--------------------------


    joypad.set(1,{["A"]=true})

    for i=1,41 do
        vba.frameadvance()
    end
    
    joypad.set(1,{["B"]=true})
    
    for i=1,13 do
        vba.frameadvance()
    end
    
    joypad.set(1,{["A"]=true})
    
    for i=1,41 do
        vba.frameadvance()
    end
    
    joypad.set(1,{["B"]=true})
    
    for i=1,8 do
        vba.frameadvance()
    end
    
    joypad.set(1,{["A"]=true})
    
    for i=1,9 do
        vba.frameadvance()
    end
    
    joypad.set(1,{["B"]=true})
    
    for i=1,55 do
        vba.frameadvance()
    end
    
    joypad.set(1,{["A"]=true})
    
    for i=1,9 do
        vba.frameadvance()
    end
    
    joypad.set(1,{["B"]=true})
 
    for i=1,15 do
        vba.frameadvance()
    end
 
--    joypad.set(1,{["B"]=true})
 
--    for i=1,25 do
--        vba.frameadvance()
--    end

--    joypad.set(1,{["start"]=true})
 
--    for i=1,20 do
--        vba.frameadvance()
--    end

    joypad.set(1,{["A"]=true})
 
--    for i=1,30 do
    for i=1,44 do
	vba.frameadvance()
	gui.text(0,0,"ID: " .. memory.readbyte(ChipID))
	gui.text(0,10,"Code: " .. memory.readbyte(ChipCode))
    end

    ChipIDValue = memory.readbyte(ChipID)
    ChipCodeValue = memory.readbyte(ChipCode)    
    
    io.write(ChipIDValue, "\n")
    io.write(ChipCodeValue, "\n")
    
    savestate.load(tempstate[value])
end
An old classic from KirkQ, which I modified a bit to streamline the timing. I learned most of what I know about Lua by studying this. This is the script that retries the chip trading machine on each successive frame and records what you would have gotten. To run this, you need to be in the dialog box that asks whether you would like to trade, because the first thing this does it choose Yes. In the output file, each odd-numbered line contains the chip's ID as seen in the library, and the line immediately following contains the chip's letter code, where 0 through 25 correspond to A through Z. Some of that commented-out code was in case you had fewer than 5 chips left, so it couldn't start to trade again to see what was at the top of the folder. You can also make a variation of this to use the 10-chip trader, as Kirk's comment shows. You may have noticed I let the script wait a couple more frames than necessary for each action, but that was because I don't want it to fail when a bit of random lag sets in. Accessing the Folder takes longer the more kinds of chips you have. Oh, and that it outputs to the screen at the end isn't really necessary, but it shows that it's working and doesn't harm anything.
local tempstate = {}
local iterations
local value
local i
local j
local addressvalue

local AD1 = 0x02004910
local AD2 = 0x02004911
local AD3 = 0x02004912
local AD4 = 0x02004913
local AD5 = 0x02004914
local AD6 = 0x02004915
local AD7 = 0x02004916
local AD8 = 0x02004917
local AD9 = 0x02004918
local AD10 = 0x02004919
local AD11 = 0x0200491A
local AD12 = 0x0200491B
local AD13 = 0x0200491C
local AD14 = 0x0200491D
local AD15 = 0x0200491E
local AD16 = 0x0200491F
local AD17 = 0x02004920
local AD18 = 0x02004921
local AD19 = 0x02004922
local AD20 = 0x02004923
local AD21 = 0x02004924
local AD22 = 0x02004925
local AD23 = 0x02004926
local AD24 = 0x02004927
local AD25 = 0x02004928
local AD26 = 0x02004929
local AD27 = 0x0200492A
local AD28 = 0x0200492B
local AD29 = 0x0200492C
local AD30 = 0x0200492D

moviefile = "BattleMemDump.vbm"
dumpfile = moviefile..".dump"
io.output(dumpfile)

value = 1
tempstate[value] = savestate.create()
savestate.save(tempstate[value])

iterations = 1000
for j = 1,iterations do	
    vba.frameadvance()
    savestate.save(tempstate[value])

    joypad.set(1,{["left"]=true})
    vba.frameadvance()
    joypad.set(1,{["left"]=true})
    vba.frameadvance()

    for i=1,75 do
	vba.frameadvance()
    end
    
    joypad.set(1,{["start"]=true})

    for i=1,120 do
        vba.frameadvance()
    end
    

    io.write(memory.readbyte(AD1)," ")
    io.write(memory.readbyte(AD2)," ")
    io.write(memory.readbyte(AD3)," ")
    io.write(memory.readbyte(AD4)," ")
    io.write(memory.readbyte(AD5)," ")
    io.write(memory.readbyte(AD6)," ")
    io.write(memory.readbyte(AD7)," ")
    io.write(memory.readbyte(AD8)," ")
    io.write(memory.readbyte(AD9)," ")
    io.write(memory.readbyte(AD10)," ")
    io.write(memory.readbyte(AD11)," ")
    io.write(memory.readbyte(AD12)," ")
    io.write(memory.readbyte(AD13)," ")
    io.write(memory.readbyte(AD14)," ")
    io.write(memory.readbyte(AD15)," ")
    io.write(memory.readbyte(AD16)," ")
    io.write(memory.readbyte(AD17)," ")
    io.write(memory.readbyte(AD18)," ")
    io.write(memory.readbyte(AD19)," ")
    io.write(memory.readbyte(AD20)," ")
    io.write(memory.readbyte(AD21)," ")
    io.write(memory.readbyte(AD22)," ")
    io.write(memory.readbyte(AD23)," ")
    io.write(memory.readbyte(AD24)," ")
    io.write(memory.readbyte(AD25)," ")
    io.write(memory.readbyte(AD26)," ")
    io.write(memory.readbyte(AD27)," ")
    io.write(memory.readbyte(AD28)," ")
    io.write(memory.readbyte(AD29)," ")
    io.write(memory.readbyte(AD30)," ")
    io.write("\n")
    
    savestate.load(tempstate[value])
end
Here's a script Kirk made to retry a boss battle (such as FireMan, which you would have to be one pixel to the right of) many times and record the sequence of folder slots chosen to form the chip order in battle. Now that's what you'll need to optimize the final TAS, but if I'm just testing from the start of a battle, I use this script I made:
local tempstate = {}
local iterations
local value
local i
local j
local addressvalue

local AD1 = 0x02004910
local AD2 = 0x02004911
local AD3 = 0x02004912
local AD4 = 0x02004913
local AD5 = 0x02004914
local AD6 = 0x02004915
local AD7 = 0x02004916
local AD8 = 0x02004917
local AD9 = 0x02004918
local AD10 = 0x02004919
local AD11 = 0x0200491A
local AD12 = 0x0200491B
local AD13 = 0x0200491C
local AD14 = 0x0200491D
local AD15 = 0x0200491E
local AD16 = 0x0200491F
local AD17 = 0x02004920
local AD18 = 0x02004921
local AD19 = 0x02004922
local AD20 = 0x02004923
local AD21 = 0x02004924
local AD22 = 0x02004925
local AD23 = 0x02004926
local AD24 = 0x02004927
local AD25 = 0x02004928
local AD26 = 0x02004929
local AD27 = 0x0200492A
local AD28 = 0x0200492B
local AD29 = 0x0200492C
local AD30 = 0x0200492D

while true do	
    gui.text(0,0, memory.readbyte(AD1) .. " " .. memory.readbyte(AD2) .. " " .. memory.readbyte(AD3) .. " " .. memory.readbyte(AD4) .. " " .. memory.readbyte(AD5))
    gui.text(0,10, memory.readbyte(AD6) .. " " .. memory.readbyte(AD7) .. " " .. memory.readbyte(AD8) .. " " .. memory.readbyte(AD9) .. " " .. memory.readbyte(AD10))
    gui.text(0,20, memory.readbyte(AD11) .. " " .. memory.readbyte(AD12) .. " " .. memory.readbyte(AD13) .. " " .. memory.readbyte(AD14) .. " " .. memory.readbyte(AD15))
    gui.text(0,30, memory.readbyte(AD16) .. " " .. memory.readbyte(AD17) .. " " .. memory.readbyte(AD18) .. " " .. memory.readbyte(AD19) .. " " .. memory.readbyte(AD20))
    gui.text(0,40, memory.readbyte(AD21) .. " " .. memory.readbyte(AD22) .. " " .. memory.readbyte(AD23) .. " " .. memory.readbyte(AD24) .. " " .. memory.readbyte(AD25))
    gui.text(0,50, memory.readbyte(AD26) .. " " .. memory.readbyte(AD27) .. " " .. memory.readbyte(AD28) .. " " .. memory.readbyte(AD29) .. " " .. memory.readbyte(AD30))
    vba.frameadvance()
end
Okay, I'm not sure if any of those variables are necessary, as this started out as a commented-out version of KirkQ's script. Anyway, this just displays the order of chips in the latest battle in a clump in the corner of the screen. We don't yet know how to find this sequence before a battle begins, but what you can do is save-state while viewing the folder, close out and enter the battle in an optimized way, and record the sequence you get; you'll probably only need the top row. Then you can reload that state and move the chips you want into those slots where 0 is top and 29 is bottom and it's 7 per page. You can take your time doing this, because the sequence doesn't change while viewing the folder. Then close out of the menu and enter the battle with the same timing as before, and you should have exactly what you need.
local tempstate = {}
local i
local j

dumpfile="places.dump"
io.output(dumpfile)

value = 0
tempstate[value] = savestate.create()

for j = 0,80000 do
    savestate.save(tempstate[value])
    for i=1,100 do
        joypad.set(1,{["right"]=true,["up"]=true,["B"]=true})
        vba.frameadvance()
    end

    io.write(j, ": ")
    if(memory.readdword(0x020034CC) == 0x00BEFF0E) then
        io.write(0)
    end
    if(memory.readdword(0x020034CC) == 0x0194FEB6) then
        io.write(1)
    end
    if(memory.readdword(0x020034B8) == 0x001400A4) then
        io.write(2)
    end
    if(memory.readdword(0x020034B8) == 0x011A00DC) then
        io.write(3)
    end
    if(memory.readdword(0x020034B8) == 0xFF540110) then
        io.write(4)
    end
    if(memory.readdword(0x020034B8) == 0xFE9E011C) then
        io.write(5)
    end
    if(memory.readdword(0x020034CC) == 0xFEECFFA4) then
        io.write(6)
    end
    if(memory.readdword(0x020034CC) == 0x01A8FFFC) then
        io.write(7)
    end
    io.write(", ")

    for i=1,200 do
        joypad.set(1,{["right"]=true,["B"]=true})
        vba.frameadvance()
    end

    if(memory.readdword(0x020034CC) == 0xFE74FF64) then
        io.write(0)
    end
    if(memory.readdword(0x020034E0) == 0x00C8FF24) then
        io.write(1)
    end
    if(memory.readdword(0x020034F4) == 0x0022018E) then
        io.write(2)
    end
    if(memory.readdword(0x020034E0) == 0x0164FF8A) then
        io.write(3)
    end
    if(memory.readdword(0x020034B8) == 0x00F0FEB8) then
        io.write(4)
    end
    if(memory.readdword(0x020034B8) == 0x0158FDC6) then
        io.write(5)
    end
    if(memory.readdword(0x020034B8) == 0xFF78FE54) then
        io.write(6)
    end
    if(memory.readdword(0x020034F4) == 0x00F600DA) then
        io.write(7)
    end
    if(memory.readdword(0x020034E0) == 0xFFEC00CC) then
        io.write(8)
    end
    if(memory.readdword(0x020034E0) == 0x004CFFD0) then
        io.write(9)
    end
    if(memory.readdword(0x020034F4) == 0xFFD80164) then
        io.write("A")
    end
    if(memory.readdword(0x020034F4) == 0x00C400FA) then
        io.write("B")
    end
    if(memory.readdword(0x020034B8) == 0x01DCFEF2) then
        io.write("C")
    end
    if(memory.readdword(0x020034CC) == 0x0032FFA8) then
        io.write("D")
    end
    if(memory.readdword(0x020034CC) == 0xFE3E0040) then
        io.write("E")
    end
    if(memory.readdword(0x020034CC) == 0xFF9AFFF6) then
        io.write("F")
    end
    io.write("\n")

    savestate.load(tempstate[value])
    vba.frameadvance()
end
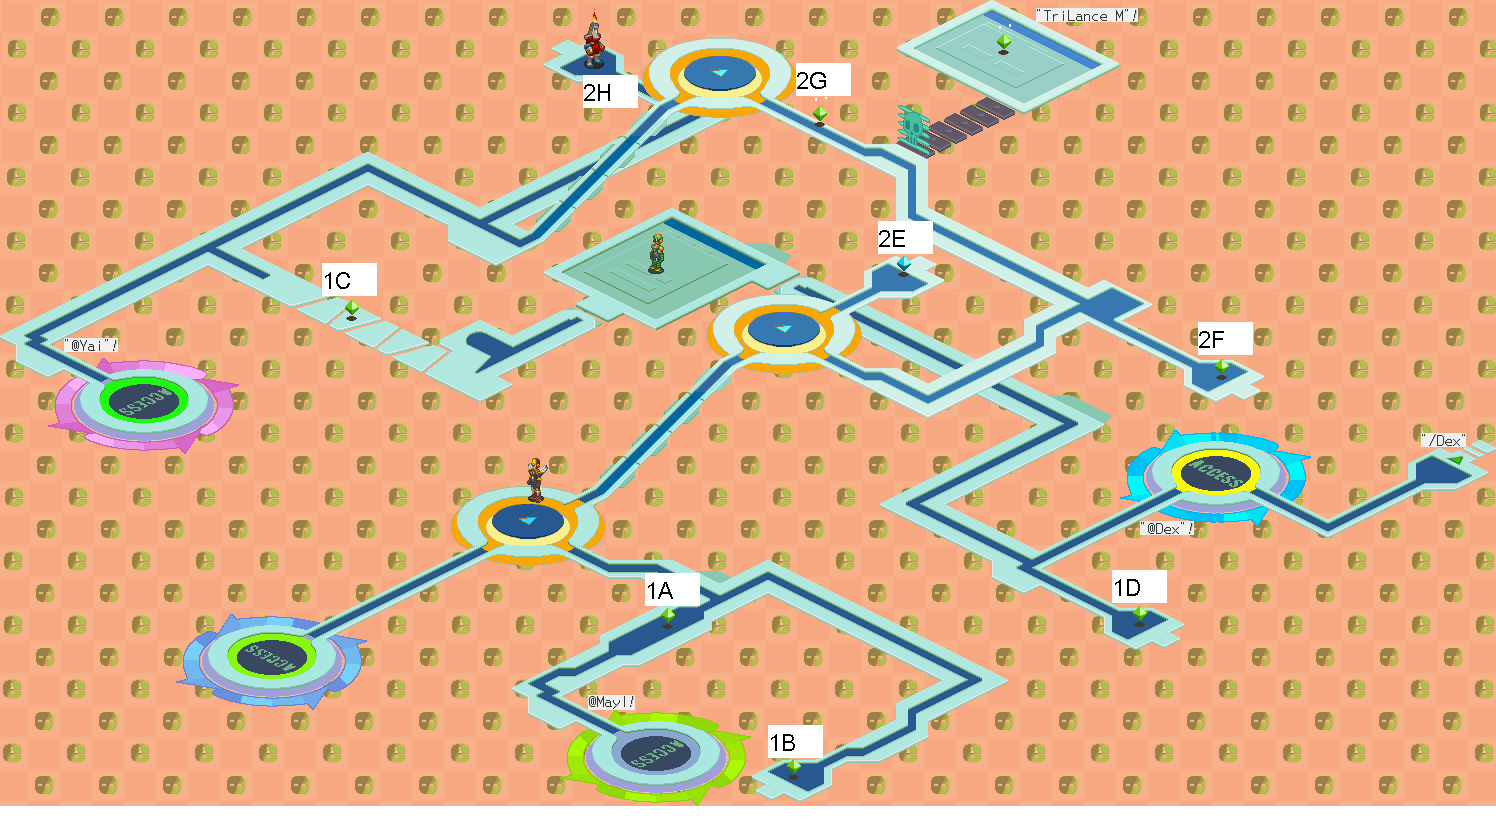
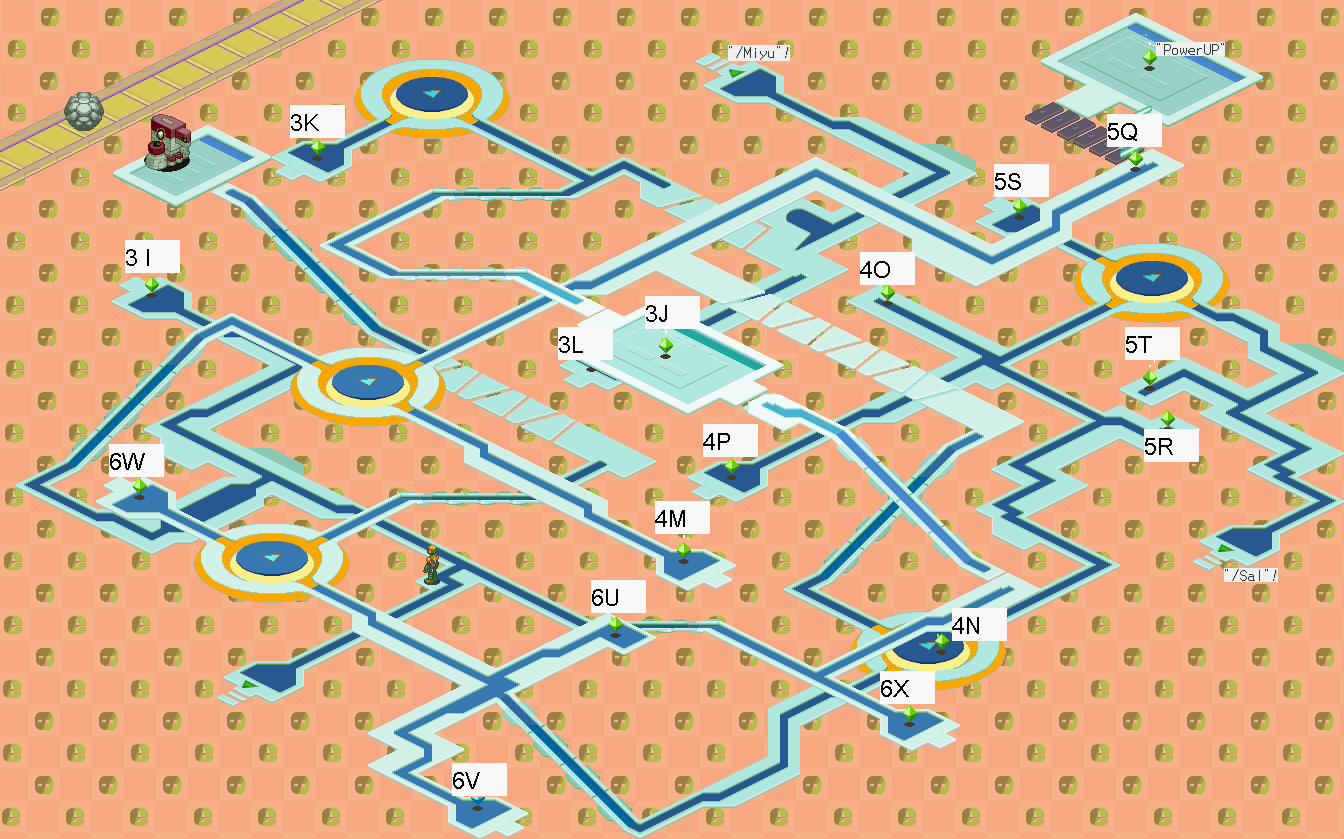
This one I made on my own to test the random item locations in areas 1 and 2 in a similar way to the chip trade tester. It requires that you start out a little below and to the left of the portal from Dex's computer to the Internet (as in where you end up when you enter Dex's PC from the Net) to function fully, as the memory addresses correspond to the actual positions of sprites on the map, so the script needs to visit both areas to see where they are. Since both areas' random item locations are decided when you enter the Internet anywhere, it should be possible to find another place in memory that has all 6 locations so the script wouldn't have to run around, but I'm not very good at address-hunting. Uh, and those numbers it outputs? That was a system I came up with to label each location. I ought to make a map of those soon so everyone can see what the output means.
put yourself in my rocketpack if that poochie is one outrageous dude
Joined: 9/12/2009
Posts: 42
I'm going to work on brute forcing the Protoman glitch. I got it to work again AFTER I used a skullman (and had a skullman in reserve). But when I tried it again on the same frame, it didn't work. The only thing I did afterwards was fire multiple buster rounds with no charge. HOWEVER, I noticed that right after he warped I hit with the buster at what looked like a "perfect" time and he flinched with a regular buster shot. Everytime he went to the front top square after that he took skullman damage. I forgot to check whether he was taking damage from the chip I already used or the chip I had in reserve. Gah. This is a big point though.
Player (208)
Joined: 7/7/2006
Posts: 798
Location: US
Please run a movie while you're doing testing, so if you get a successful result we can study the conditions that led up to it.
Joined: 9/12/2009
Posts: 42
No luck tonight fellas. :\ I'll try to hit it up again within the next few days. Also, continuing to scour google for glitches. Also, if you haven't done so already, it's probably a good idea to download the maps from gameFAQs and start mapping out a route on them. Will be good because if we name the areas by how many times we enter them we should be able to see any redundacies that may be in there to optimize buying from shops. Unless there's a better alternative that I am not aware of.
Active player (277)
Joined: 5/29/2004
Posts: 5712
Hey, so, when I labeled the maps I stole from vgmaps.com, I decided to change the labeling system to make it easier to understand. Now I've assigned each item a number from 1 to 6 and each location a letter from A to X. And now the script spits out a jumble of letters.
local tempstate = {}
local i
local j

dumpfile="places.dump"
io.output(dumpfile)

value = 0
tempstate[value] = savestate.create()

for j = 0,300 do
    savestate.save(tempstate[value])
    for i=1,100 do
        joypad.set(1,{["right"]=true,["up"]=true,["B"]=true})
        vba.frameadvance()
    end

    io.write(j, ": ")
    if(memory.readdword(0x020034CC) == 0x00BEFF0E) then
        io.write("A")
    end
    if(memory.readdword(0x020034CC) == 0x0194FEB6) then
        io.write("B")
    end
    if(memory.readdword(0x020034CC) == 0xFEECFFA4) then
        io.write("C")
    end
    if(memory.readdword(0x020034CC) == 0x01A8FFFC) then
        io.write("D")
    end
    if(memory.readdword(0x020034B8) == 0x001400A4) then
        io.write("E")
    end
    if(memory.readdword(0x020034B8) == 0x011A00DC) then
        io.write("F")
    end
    if(memory.readdword(0x020034B8) == 0xFF540110) then
        io.write("G")
    end
    if(memory.readdword(0x020034B8) == 0xFE9E011C) then
        io.write("H")
    end

    for i=1,200 do
        joypad.set(1,{["right"]=true,["B"]=true})
        vba.frameadvance()
    end

    if(memory.readdword(0x020034CC) == 0xFE74FF64) then
        io.write("I")
    end
    if(memory.readdword(0x020034CC) == 0x0032FFA8) then
        io.write("J")
    end
    if(memory.readdword(0x020034CC) == 0xFE3E0040) then
        io.write("K")
    end
    if(memory.readdword(0x020034CC) == 0xFF9AFFF6) then
        io.write("L")
    end
    if(memory.readdword(0x020034E0) == 0x00C8FF24) then
        io.write("M")
    end
    if(memory.readdword(0x020034E0) == 0x0164FF8A) then
        io.write("N")
    end
    if(memory.readdword(0x020034E0) == 0xFFEC00CC) then
        io.write("O")
    end
    if(memory.readdword(0x020034E0) == 0x004CFFD0) then
        io.write("P")
    end
    if(memory.readdword(0x020034F4) == 0x0022018E) then
        io.write("Q")
    end
    if(memory.readdword(0x020034F4) == 0x00F600DA) then
        io.write("R")
    end
    if(memory.readdword(0x020034F4) == 0xFFD80164) then
        io.write("S")
    end
    if(memory.readdword(0x020034F4) == 0x00C400FA) then
        io.write("T")
    end
    if(memory.readdword(0x020034B8) == 0x00F0FEB8) then
        io.write("U")
    end
    if(memory.readdword(0x020034B8) == 0x0158FDC6) then
        io.write("V")
    end
    if(memory.readdword(0x020034B8) == 0xFF78FE54) then
        io.write("W")
    end
    if(memory.readdword(0x020034B8) == 0x01DCFEF2) then
        io.write("X")
    end
    io.write("\n")

    savestate.load(tempstate[value])
    vba.frameadvance()
end
Here are the maps to refer to. http://img.photobucket.com/albums/v299/RyanFerneau/Sector1powerupslabeled.png http://img.photobucket.com/albums/v299/RyanFerneau/Sector2powerupslabeled.png MS Paint makes some nice labels, huh? And the blue mystery data is the wrong shade of blue because it steadfastly refuses to add colors to the palette. Simply look for the letters the script gives to see where the items will be on that frame. Take a look at where the numbers are. For all locations that share a number, there will be mystery data in only one of them. Hmmm, didn't I give the general route earlier? Well, I'll describe the trips through the Internet again. The first trip involves retrieving a Prog for Glyde. You have to do this before the oven emergency will start. This trip is all Area 1. Along the way, we should bump into the entrance to Area 2, because that's necessary to get Dex to challenge you later. The second trip is to beat StoneMan, so you'll go from Area 1 into Area 2 and take the branch to the northwest, stopping at StoneMan. If you want to try to use Dex's PC as a shortcut, you should bookmark the access portal with @Dex on this trip. The third trip is the shortest, as all you do is go from Lan's computer into Mayl's to deliver a message. But you can still get one random mystery data on that path. The fourth trip comes after you receive the Hig Memo. Start from Area 1 again. This is your last chance to shop there! If you bookmarked Dex's PC, you can use that computer for the shortcut now. Take the southeast-pointing branch of the fork in Area 2 this time, which will take you to a door that requires /Miyu. (Though you started out going southeast, you end up at a door that's northwest of the door that requires /Sal. Don't get confused now!) /Miyu takes you into Area 4, so proceed to the end where you use Mr. Higsby's memo and fight three strong viruses. Once you win, you'll finally enter Area 5, or what's considered the first zone of the Undernet. At this point Higsby sends you an e-mail that allows you to ask for the memo at the SciLab, but with my plan we're not done here yet. Proceed to where there are two doors. The door above is locked, but the door to the right will take you to Area 9. From there it's a quick trip down to Area 3, where you can bookmark Dad's PC for a great shortcut. That's right, you can get into Area 3 without /Sal by using this back entrance! Before jacking out, we'll probably have to continue on to the vendor to buy the cheapest armor for an easy 6 levels. Once you have all four memos, you can begin the fifth and final trip into the Internet. This time, start at Dad's PC and go back the way you came in, up through Area 9, where you can now get back into Area 5 with the Lab Memo, and straight up to Area 6 with the same memo. Follow the path to Area 7, then to Area 8, then to BombMan at the end. Once you defeat BombMan, that's it! Jack out and talk to Dr. Hikari, and you're done for the day and with this game's Internet. The only other digital area you would visit twice is the Waterworks net. It branches in the second area, and you're forced onto one branch first because the other's blocked. Once you beat the mini-boss, you go back to ACDC Town and eventually acquire a Handle that allows you to take the other path to IceMan after you re-enter the water cooler. Does that answer all your questions? If you wanted to know more about the route through the real-world story, well, I could explain that too, but it's easier to understand if you try a minimalist run yourself once or twice.
put yourself in my rocketpack if that poochie is one outrageous dude
Joined: 9/12/2009
Posts: 42
Yeah, you posted it on the previous page. What I meant was... if you've watched the Pokemon (er, green?) TAS speed run (or really any of the RPG runs) the guys collects enough money near the beginning and buys ALL of the items he needs at once for the whole game at the same time. Optimally, it would save us the most time (since trips to certain vendors take excessive detours) to have us collect enough money at a certain time to go there and buy everything we need to buy at once. Each "talk" at a vendor is essentially like another random battle which we want to avoid, as is minimizing the times we go use the chip traders. I know the first powerups from the vendor in ACDC/area 1 might be shorter to buy them each one at a time (well, the second with the HPmems) because the time saved in battles by getting an extra blaster in the beginning is fairly minimal (since it will just be a boss battle or two). I am not sure about this though. Unfortunately, since we need to visit multiple shops to collect HPmem (though not all) as a requirement for the 30, if some are going to be out of the way we have to plan in advance to buy them earlier so we don't have to waste time backtracking. I don't know how much you've thought this out already, but physically mapping it out seems like a good idea to me (instead of relying on paper instructions). It's easier to analyze visual data for faults that can be improved. edit: well, here's a possibly scenario. If we can manipulate the GMDs to spawn at 2G and 1C and get 1000z from each we can make a quick detour to the vender to get a powerup early... should allow less chips to kill both fireman and numberman during battle (one less flinch + potentially not entering the battle screen again would be good). I am not sure how much time this would save over getting the powerup much later, but it's certainly a viable option until I can do a run through it. edit2: yeah you noted that on page 3. Good. I'll probably try to run through the scenario and see how it works.
Active player (277)
Joined: 5/29/2004
Posts: 5712
Right, I've been comparing the times to collect each source of money to see what would be the fastest combination for whatever set of items is desired. I think we can agree that fighting random battles for money is grossly inefficient. Don't forget that every boss battle except GutsMan rewards you with money, too. FireMan: 1000z NumberMan: 1500z StoneMan: 2000z Ice Cube Bears: 2000z IceMan: 2500z SkullMan: 2500z ColorMan: 3000z ElecMan: 3500z ProtoMan: 3000z Blue Shielded Cannons: 3000z BombMan: 4000z MagicMan: 5000z Now, the money from BombMan and MagicMan wouldn't matter since they're past the chip collection and level checkpoints, but that still gives you 24000 zenny before then. That should cover most of the level-up items I want to buy, and then a few more large, quick money pick-ups like the 5000z in the power plant net could be used to get the last few chips for the library or HPMemories. Don't forget that if we do buy more than 4 HPMemories, then we should add the 4000z one from Area 3 first, which is cheaper than Area 1's last HPMemory and can be bought at the same time as WoodArmor. As for the other shops... Higsby's counter is a good stop, as you could buy a few cheap chips on your way to collect the Hig Memo and dump them in the trader on the way out if you wanted. The vendor in Area 4 has Cloudier for a decent price, but the only other items of interest are IceCube, which you can get as a random item, and a more expensive armor, so it may not be worth the trip over there. Area 5's shop is directly on the path and has several new chips, though most of them expensive, as well as the next cheapest PowerUp at 20000z if you really wanted to buy another one. You're on the same track as I am about the Area 1 vendor. Get the first PowerUp early if it helps enough on NumberMan, and definitely get the second PowerUp before StoneMan. Each stop at a vendor on the path does add about three and a half seconds just to visit, so I definitely want to minimize them, but they're still a much better deal than random battles in that regard!
braindx wrote:
If we can manipulate the GMDs to spawn at 2G and 1C and get 1000z from each we can make a quick detour to the vender to get a powerup early... should allow less chips to kill both fireman and numberman during battle (one less flinch + potentially not entering the battle screen again would be good).
Extra Attack probably wouldn't save time on FireMan because you can just use four swords to win. I think substituting 30 buster shots for one of the swords would take a lot longer than just waiting for the flinch time to end. For that cool double-AreaSteal strategy on NumberMan, I still need to take off 10 HP with the buster and destroy the number balls, so Attack level 2 would help a little there. I ought to try some other strategies, though, since that Steal A adds almost 6 seconds to grab, a bit much for an otherwise useless repeat chip. And that sounds just like my plan for collecting 2000 zenny in the first two passes through Area 1. Whether or not we buy the first PowerUp then, we'd need to start saving up 5000 for the second PowerUp. FireMan and NumberMan will give 2500z altogether as prize money, and another 2 1000s before the vendor will bring it to 4500z. So then we could just plan on grabbing 500z from the oven before then, and it should all work out. Some other things I remembered about ProtoMan: You may have noticed he moves 5 spaces before attacking. If you use AreaSteal at all, then instead of attacking, he'll just Steal the area right back after his 5 moves. What's funny is to keep blocking one of the panels so he'll keep using Steal and never attack. If you time it so that you're in transit between panels when ProtoMan uses the AreaSteal, you won't even take damage from it in the process. Obviously, destroying panels changes ProtoMan's definitions of "front" and "back" columns, which can eventually make it hard to determine when he's ready for an attack. Who knows if any of this information is helpful in figuring out the glitch?
put yourself in my rocketpack if that poochie is one outrageous dude
Joined: 9/12/2009
Posts: 42
Alright. I'm gonna head to bed after this. This is what I got so far (I'm modifying your stuff above). I want to keep track of library, money, etc. as we go along so we can go back and modify stuff as necessary once we get closer to the Lvl30 + 60 chip requirements. Bold = money or important points Underlined = required random battles ------------------------------------------------------------------ Day 1
    *Get the PET and go to school. *Talk to Dex to make the tutorial start. *Manipulate 3 Cannons for the third tutorial. *Go home and jack into Lan's computer. *Talk to Glyde, talk to the lost program, bump into the door to sector 2, talk to Glyde again in Yai's computer and receive SpreaderGun I. *While you're doing all that, you could collect 2000z from random mystery data and buy a PowerUp now-- GMD 2G, 1C; Total = 2k http://img.photobucket.com/albums/v299/RyanFerneau/Sector1powerupslabeled.png *Jack out, talk to Mom, jack into the oven. Oven 1 = 400z PMD, 200z BMD – Oven 2 possibly detour for 500z GMD. Total = 2.6k *You fight 1 Mettool here no matter what, so get the MetGuard G for GutsShoot from it. (ShockWave later) *Get the IceBlock, then get WaterGun. *Fight FireMan with 4 swords. +1000z; Total = 3.6k *Go to bed.
Day 2
    *Run all the way to the last door of the school. *Talk to every student once to make the class/attack start. *Talk to Dex. (GutsMan has to fail first) *Talk to Mayl and receive Roll R. Yai forces you. *Jack in and journey through the school network, unlocking some doors as Lan with predefined answers, and others with numbers based on the frame count. School4 – BMD 400Z (School5 – smalldetour for Can C? School2 -- ~10s detour for 800z); Total = 4k *One door is optional to open; beyond it is another HPMemory if you find it's worth the time. (will probably lose ~15-20s probably not worth it; will eval later to see) *MegaMan gets zapped, so go to the corner desk of the AV room to free him. RepairPanelReturn A on the teacher's desk. *The last door makes you go free Mari for an ID card. Get the HPMemory while you're doing that. *After you use the ID, entering the last password makes you fight NumberMan. +1500z; Total = 5.5k
1 HP Mem, maybe 1 power up (Lvl2/5) 14/175 library 40 chips (not counting the one in e-mail from dad that never checked- already have crossgun though)
    *You get warped back to 5A, so run all the way out of the school and to Mayl's house. *Jack into the piano and collect the Recovery-50 L, but not @Mayl. (is this necessary? -- not including for right now; how much extra time is it?) *Visit the Metroline station, talk to the worker in the corner, and ask "What caused it?" *Go fight Dex's upgraded GutsMan with 5 swords to receive /Dex and GutsMan G.
    *You could also jack in to get @Dex from the computer or get a CrossGun K and fight for a HighCannon G in the GameCube if they turn out to save time. (My tests show that the @Dex shortcut is about 3 seconds slower, actually, but I'd like someone else to try to confirm it.) -- have not confirmed -- am not including for the moment *Jack into Lan's computer again and go toward StoneMan. If you haven't already, fight for DashAttack G. If you're using @Dex, bookmark that along the way too. *You probably won't be able to get all 4 random crystals to appear in the closest places to your path in sector 2, though. I would focus on getting the 2 1000 zennies in sector 1 again so you can buy a second PowerUp and do 3 per shot. Area1 GMD: 2G, 1C; Area2: 4n, 6u spawn 2*1000 = Total 7.5k (7k needed for 2 powerups @ vendor) + 2*1500 Area2 zenny; New total = 3.5k http://img.photobucket.com/albums/v299/RyanFerneau/Sector2powerupslabeled.png *Oh, and fight a Swordy for a LongSword on the way to StoneMan if you want to form Beta-Sword or Sigma-Sword sometime. I would say no *Fight StoneMan
1 HP Mem, 2 power up (Lvl8) 16/175 library 42 chips (not counting the one in e-mail from dad that never checked- already have crossgun though); 13 extra chips = 4 new + 2 more new so 22/175 library (assuming we can 3chip new ones every time) 3 bosses down, 9 to go. It's about to get complicated, haha. If were not going to use Beta/Sigma sword to defeat anyone there's no point in getting it. It's only to get an extra chip. IF we end up having enough money we should be able to manipulate later GMD for chips + chip trade our way to the rest. I'll have to see about this because GMD it may be better to just get money and mass buy chips from the vendors to use for traders. Chip trading + GMD collection is MUCH faster than random encounters anyway. For right now I'd leave any unnecessary random encounters out that we're not using to build a folder for later. --------------------------------------------- Here's what I'm thinking initially for getting adequate level: HPmem = 1; Powerups = 3; Armor = 6 Bold = must Underline = not sure Most of the jack-ins will take too long. WWW is out of the question. 1. Jack-in to Mayl's Servbot doll in her room. 2. Mystery Data inside the third area in the school's network. 3. Inside the cabinet in the school's storage room, where you rescue Ms. Mari. (very slight detour couple seconds) 4. Jack-in to the yellow car parked near the school statue. 5. Email from dad, after leaving a message with his caretaker program. (email very fast) 6. Check the lockers in the main control room of the Water Works. (very slight detour couple seconds) 7. Mystery data inside the second area of the Water Works' network, after running into ProtoMan. (very slight detour couple seconds) 8. Inside the fourth traffic light Lan and MegaMan jack-in to stop the runaway bus in Dentown. 9. After defeating Masa and SharkMan for the first time. 10. Jack-in to the Recycled PETs at the Restaurant. 11. Internet Area 4 using the WWW-pin. 12. Internet Area 5 using the WWW-pin. 13. Internet Area 10, using the WWW-pin. 14. In WWW Lab Network Area 4, the ColorMan Lair. 15. Net Merchant in Internet Area 1, buy for 500z. 16. Net Merchant in Internet Area 1, buy for 1000z. 17. Net Merchant in Internet Area 1, buy for 2000z. 18. Net Merchant in Internet Area 1, buy for 3000z. 19. Net Merchant in Internet Area 1, buy for 5000z. 20. Net Merchant in Internet Area 3, buy for 4000z. 21. Net Merchant in Internet Area 3, buy for 6000z. 22. Net Merchant in Internet Area 3, buy for 9000z. 23. Net Merchant in Internet Area 3, buy for 12000z. 24. Net Merchant in Internet Area 3, buy for 15000z. 25. Net Merchant in Internet Area 4, buy for 6000z. 26. Net Merchant in Internet Area 4, buy for 8000z. 27. Net Merchant in Internet Area 4, buy for 10000z. 28. Net Merchant in Internet Area 4, buy for 12000z. 29. Net Merchant in Internet Area 4, buy for 15000z. 30. Net Merchant in Internet Area 5, buy for 8000z. 31. Net Merchant in Internet Area 5, buy for 10000z. 32. Net Merchant in Internet Area 5, buy for 12000z. 33. Net Merchant in Internet Area 5, buy for 15000z. 34. Net Merchant in Internet Area 10, buy for 12000z. 35. Net Merchant in Internet Area 10, buy for 15000z. 36. Net Merchant in Internet Area 10, buy for 20000z. 37. Net Merchant in Internet Area 10, buy for 25000z. 38. Net Merchant in Internet Area 12, buy for 12000z. 39. Net Merchant in Internet Area 12, buy for 15000z. 40. Net Merchant in Internet Area 12, buy for 20000z. 41. Net Merchant in Internet Area 12, buy for 25000z. 42. Net Merchant in Internet Area 15, buy for 15000z. 43. Net Merchant in Internet Area 15, buy for 20000z. 44. Net Merchant in Internet Area 15, buy for 25000z. 45. Net Merchant in Internet Area 15, buy for 40000z. 1. From Dad's email after leaving a message with the caretaker program. (e-mail very fast) 2. Inside the Water Works' Main Network, in the area where you must fall through the ice to the paths below. (decent size detour -- 10-20s) 3. Jack-in to the Summer School's blackboard in Dentown. (gotta come here anyway for 60 chips memo; can also get barrier so probably worth it) 4. Internet Area 2, using the WWW-pin. 5. Internet Area 14, using the WWW-pin. 6. Net Merchant in Internet Area 1, buy for 2000z. 7. Net Merchant in Internet Area 1, buy for 5000z. 8. Net Merchant in Internet Area 5, buy for 20000z. (diversion worth it?) 9. Net Merchant in Internet Area 10, buy for 25000z. 10. Net Merchant in Internet Area 12, buy for 25000z. 11. Net Merchant in Internet Area 12, buy for 50000z. 12. Net Merchant in Internet Area 12, buy for 100000z. Wood Armor - Net Merchant in Internet Area 3, buy for 15000z. Heat Armor - Net Merchant in Internet Area 4, buy for 20000z. Aqua Armor - Net Merchant in Internet Area 10, buy for 30000z. Lvl1 (1) + 1*8 (8) HPMem + 5*3 (15) Powerups + 1*6 (6) armor = Level 30 Okay, we definitely need +4 ups for the blaster power (for +5 power). I can't see us having enough money for extra charge though for the latter bosses. It's probably going to be a tradeoff of extra time to get the one in WaterWorks or if we have enough money we can just buy the extra one; however, the extra up is at an out of the way shop. We could just ditch both; how does this affect latter chip battles though like LifeVirus with +4 instead of +5 blaster (well, HubBatch would make it +5 vs. +6)? For the HP Mem we have a dilemma here. IF we grab them in Area1 (which we may not be coming back to after the first couple bosses), is the time tradeoff enough for getting the other HPMems in real life. If we drop one of the powerups, we need 3 more HPMems. If we have the money it may be faster just to grab HPMems at Area 3 merchant where we are going to get the WoodArmor anyway. Woodarmor is a MUST because any combination of the cheapest powerups, and HP mems are more expensive than buying WoodArmor. I think this will become a bit more clear once we progress in the story and see how much money we can accumulate from the GMD/BMD/PMDs + Boss Navis + Yai. Anyway, just getting the ball rolling here. Good night! P.S. Megaman fires blaster faster when closer to the enemy (at least it seemed like it from the frame advances I was doing with Protoman) so getting in front row vs. LifeVirus may be faster? I noticed you did the run mostly in the middle square.
Sir_VG
He/Him
Player (39)
Joined: 10/9/2004
Posts: 1911
Location: Floating Tower
P.S. Megaman fires blaster faster when closer to the enemy (at least it seemed like it from the frame advances I was doing with Protoman) so getting in front row vs. LifeVirus may be faster? I noticed you did the run mostly in the middle square.
The thing you have to remember about LifeVirus is that you have take the aura off with a high enough attack, but the rapid fire from up close may help once it's down. But yes, it's faster. I noticed that even when I played unassisted.
Taking over the world, one game at a time. Currently TASing: Nothing
1 2 3 4
7 8