Shaman King: Aria of Shaman Master of Spirits is a game about a dude collecting souls spirits.
Game objectives
- Emulator used: Bizhawk 2.2.1
- Fastest completion
- Takes damage to save time
- Abuses programming errors
- Heavily manipulates luck
- Genre: Castlevania
Description
Shaman King: Master of Spirits is a Metroidvania style platform-adventure video game developed by Konami Computer Entertainment Japan and published by Konami. On his quest to advance in the Shaman Tournament and defeat Zeke, Yoh and his friends run into a man named Magister, who plans on resurrecting the demon king Mephias. With the help of his friends and their Guardian Ghosts, Yoh must stop Magister at all costs.
I've found this game to be a good game, well worthy of a TAS despite its licensed status. The game manages to rise above its license and give really fun gameplay, with beautiful sprite work and backgrounds. The gameplay is fluid and fair, although a little on the hard side. After seeing a WIP of this game, I wondered what a full TAS would look like, and here we are!
This TAS finishes the game in record time. I've included subtitles in the run which give a broad overview on the run. In this submission text I'll give a more technical analysis of the game and the glitches used in the TAS.
Movement
Yoh can move with the D-pad. At the start, walking speed is 416 subpixels per frame. Jumping moves at 448sp/f, but has a 4 frame startup.
You can attack by pressing B. Up to a three-hit combo can be done by pressing B again before the end of an attack. The first hit deals 10/20/40 (based on the sword level) damage without any damage spirits. The second hit and third hit deal 20% and 50% extra damage respectively.
When jumping, you can control your speed in several ways.
- holding the right direction, which increases speed by 32sp/f if it is not capped yet
- pressing nothing, which reduces speed by 16sp/f
- holding the opposite direction, reducing speed by 32sp/f
Attacking while in mid-air locks your speed. Each attacking animation has two phases: the actual attack and the "sword out" animation. The former can be only cancelled by spirits or backdashing, but the latter can be cancelled by landing or walking. This table describes the frame data of attacks:
| Type of attack | Attack animation | Sword out animation
|
|---|
| First slash | 14 | 11 |
| Second slash | 20 | 11 |
| Third slash | 40 | 0 |
You can create a delay between attacks by pressing the B button during the sword out animation rather than during the attack. This gives a 11 frame window to start the second or third slash.
Every enemy has a 16 frame invincibility timer on getting hit, and Yoh has 60 frames whenever getting hit. The first 48 frames are uncontrollable and launch you at 512sp/f left or right. The last 16 frames are controllable, but Yoh is still invincible. Certain enemies have special properties, like giving poison or freezing on hit: you can tell by their color (blue is freeze, green is poison, yellow is lightning, and red is fire)
When jumping and landing on ground, there is a single frame landing animation. Cancelling out of a "sword out" animation does not have this landing animation. No actions can be taken during this one frame, including backdashes and spirit usage.
You can backdash by pressing Down twice within 14 frames of each other. The first Down press can be done anywhere, even in a menu or somewhere unrelated. This is the speed evolution of backdashing:
| Frame | 1 | 2 | 3 | 4 | 5 | 6 | 7 | 8 | 9 | 10 | 11 | 12 | 13 | 14 | 15 | 16 | 17 | 18 | 19 | 20 | 21 | 22 | 23 | 24 | 25 | 26 | 27 | 28 | 29 | 30
|
|---|
| Speed | 0 or 1024 | 984 | 947 | 912 | 880 | 848 | 816 | 784 | 752 | 720 | 688 | 656 | 624 | 592 | 560 | 528 | 496 | 464 | 432 | 400 | 368 | 336 | 304 | 272 | 240 | 208 | 176 | 144 | 112 | 80
|
|---|
Backdashing will cancel attacks. A backdash cannot cancel a spirit and a spirit cannot cancel a backdash: they are mutually exclusive. If you are on the ground during the first frame of your backdash, then the speed will be 0. If you get into the air on that first frame, the speed will be 1024.
Crouching can be done by pressing Down. A minimal crouch, without cancelling, lasts 28 frames, but it also leads into the "standing up" animation which takes 4 frames, taking 32 frames in total.
If you press B during the crouch, you'll do a crouch attack, which deals 80% of your normal damage. Crouch attacks are convenient because they make your hitbox small in 2 frames, compared to the normal crouch which takes 4 frames. Crouches can be cancelled by backdashing or triggering a spirit.
Speed preservation
If you walk and then stop, you will be carried forward a bit, as long as you do nothing. This applies in the air: as long as you do nothing, your speed will decrease slightly. It also applies to backdashing: Yoh's speed is set to 1024 and then is decreased.
When you do nothing (neutral), speed decreases at a rate of 32sp/f. Past 912 speed, the speed decrease rate is much sharper. In the air, the speed decrease rate is the same if you hold the opposite direction to your speed (left if going right) and is otherwise halved. In the air, if you hold right (when going right) then your speed does not get reduced at all.
Using an air spirit or attacking has the same effect as neutral (doing nothing).
Dashing
The Mic spirit gives the Jaguar Dash ability, allowing dashing. A dash lasts 30 frames, and increases Yoh's speed to 832, the top speed, over a few frames, depending on starting speed, then fluctuates, losing 32sp every frame for 4 frames: 832 > 800 > 768 > 736 > 832.
If you jump during the dash, Yoh does a dashjump that goes slightly lower than a normal jump. This jump is instant and sets the speed to the speed Yoh would have gotten on this frame, plus 32 subpixels. The top speed I can get from a dashjump is 864.
Damage boosting
Damage boosting is fast especially in the early game, where there's no faster method of movement. However, at the end of each level, there's a health refill giving you back some health. Every point of damage I take is one frame wasted on that refill. Decisions about whether to damage boost are done on a case-by-case basis, where I would test if it saves time or not.
Spirits
Spirits are the main mechanic of the game. You start with one spirit and 4 spirit slots. Each slot is a different set of spirits. You can equip up to five spirits later on by collecting the equipment items (Headphones, Left Glove, Left Sandal and Right Sandal). Left Glove gives an extra spirit on the L button, and the other three give a passive spirit each.
You can switch between the four slots by pressing select. Switching is done in order, 1 > 2 > 3 > 4 > 1 and so on. Each slot can hold a different set of 5 spirits. You can also switch through the slots in the Start menu. As such, the menuing is important so that I'm able to switch fast between spirits.
There are two types of spirits: active and passive. Passive spirit give stat boost or certain properties. Active spirits cost SP (Shaman Points) and activate by pressing L/R. You start with 80 max SP and get an extra 40 SP every four bosses defeated.
Whenever you use a spirit, a timer counts down before SP starts recovering. This timer is set to 300 frames (or to 225 frames with the +2 SP recovery spirit), any time that a spirit is triggered. Once the timer has fully counted down, Yoh recovers SP at a rate of 1 SP per 8 frames (4 frames with the +2 SP recovery).
Using a spirit can cancel most animations, as detailed above. Most notably, it can cancel attacks.
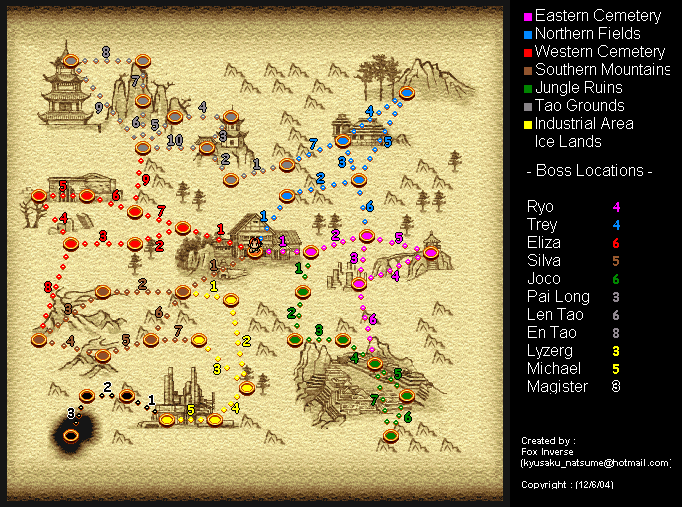
There are a few spirits that are required to beat the game. Navigation is done on an open world, but levels are effectively blocked off by boss abilities. The map on the right describes the areas and bosses. The spirits we get in the run are:
Amidamaru
Active, Ground/Air. You start the game with it. Never used. SP cost is far too high and damage is too low for it to ever be useful. This spirit is the only spirit that evolves, but the first two evolutions are too slow and the final one, Into The Antiquity, is outclassed by Michael.
Magnescope
Active, Ground, 1SP. Gotten in Eastern Cemetary. In normal play, this is a toggle spirit, that will scroll the camera around while active. But in TAS, we can trigger it for a frame. Because of this, it becomes one of the best spirits in the game for TAS play, allowing, among other things, to chain attacks much quicker than intended, and cancel early off many animations. Its only drawback is that it will stop Yoh when used.
Tokageroh
Active, Ground, 1SP. Gotten after beating Ryu. Big Thumb can push boxes. There's a 10 frame delay between activation and the apparition of Tokageroh. This can be used to trigger the spirit from above a box, then fall and the box gets pushed.
Ian
Passive. Gives +1 attack. Gotten in Northern Fields. Since it's directly on the way, I pick it up to speed up boss battles a bit.
Corey
Active, Ground/Air, 20SP. Gotten after beating Trey. Nipopo Punch can freeze flame walls, and enemies. It's useful to backdash through enemies that would be impossible to go through otherwise. The punch can also be used in the air, where it can stop movement.
Shikigami
Active, Ground/Air, 6SP. Gotten in a cutscene in Northern Fields. Shoots a projectile spirit that deals 14 damage. Convenient in the early game for canceling attacks in the air, since Magnescope only works on the ground. The animation is 24 frames and the SP cost is pretty high, so I prefer Magnescope whenever possible.
Frankensteiny
Passive. +1 movement. The movement boost makes Yoh walk faster: 464sp/f instead of 416. Moving platforms give a speed boost, so walking is now faster on moving platforms.
Eliza
Passive. Gotten after beating Eliza. Gives immunity to poison and poison clouds. It also gives immunity to the poison from green enemies.
Silver Spirits
Passive. The five silver spirits give +2 stat boosts to different stats. The most useful is Silver Tail, giving +2 movement and making Yoh's walking speed 512sp/f, outclassing backdashing. +2 attack makes bosses go faster, +2 defense allows taking less damage, and +2 SP recovery allows less downtime, starting in the midgame once I get the dash.
The only useless one in TAS is +2 health. This is impractical because the extra health will vanish permanently if I switch to a slot without the +2 health equipped. To be effective, it would have to take a valuable place in each slot. In practice, I can use health refill items instead of relying on this extra health.
Combining all five in a single slot allows to do the Totem Attack, costing 120 SP and shooting a laser that can destroy totems. It only deals 110 damage and is very, very slow. When I get it in midgame, it's the most damaging spirit, but it's not worth the cost. In late game it's outclassed by Michael.
Mic
Active, Ground, 6SP. Gotten after beating Joco. By far the best spirit for TAS. With the Jaguar Swipe ability, its dash allows much faster movement, some level shortcuts, and dodging enemies much easier. Most of my SP after getting Mic is solely focused on dashing as much as I can.
Lee Pai Long
Active, Ground, 4SP. Gotten after beating Lee Pai Long. Daodondo lets Yoh slide. It's 2 frames faster than backdashing in some cases where I can't setup a backdash easily, and has the same speed, but gives a smaller hitbox. The small hitbox is useful for fitting through small gaps, but otherwise, the small frame gain is not worth the 4 SP: most times I could dash instead of sliding, which is a much larger time save.
Mosuke
Passive. Gives +3 attack. Gotten after Tao Grounds. It's in the way and makes me deal more damage, so it stays equipped for the rest of the game.
Chloe
Active, Ground/Air, 1SP. Gotten after beating Lyzerg. Homing Pendulum shoots the pendulum in a direction, and it can damage enemies and attack to hooks. Dealing only 1 damage, it's useless in combat. It becomes another central TAS spirit thanks to the pendulum glitch, that allows to go fast and skip a lot out of levels.
Michael
Active, Ground/Air, 50SP. Gotten after beating Marco. Shoots an angel across the screen dealing 100 damage. Very fast, lasting only 35 frames, very high damage and long-range. Overall the best damage spirit in the game.
Mama
Active, Ground/Air, 8SP. Gotten in Ice Lands, transforms Yoh into a sheep. Although it has a long activation, it saves a lot of time, allowing some sequence breaks on the last levels. It's also useful to dodge enemies because of the small hitbox. The speed is decent at 736sp/f, although a bit slower than dashing.
Small tricks and glitches
RNG manipulation
RNG cannot be manipulated by player actions. Only enemies can change RNG. This makes manipulation hard to plan. Many times, my best plan is staying for longer in a room where RNG switches often. Because of its tricky nature, extensive RNG manipulation ranges from impractical to impossible.
Deceleration trick
Let's say we are going right. In the air, Yoh accelerates at 32sp/f by holding right, and decelerates at a rate of 32sp/f by holding left. The top speed is supposed to be 448 in the air. When this top speed is reached, you cannot accelerate any further.
However, there's a second way to decelerate: by holding nothing, or neutral input. When neutral, Yoh decelerates at half the rate, here 16sp/f. I can abuse this by holding neutral for one frame and accelerating again, I can get speed that's higher than the intended max speed.
| Frame | Input | Speed | Comments |
|---|
| 1 | > | 448 | Usual top speed. |
| 2 | | 432 | Decelerate with neutral. Speed is reduced by 16. |
| 3 | > | 464 | Accelerate, speed is increased by 32. Because max speed was not reached in the last frame, this is fine. |
|---|
| 4 | > | 464 | Speed is greater than top speed, so you cannot accelerate any further. |
This trick works in the same way with the dash, allowing it to reach 880 instead of the max 864 speed. Note that you need to get in the air first, so the first dash from a standstill cannot reach this top speed.
I use the deceleration trick everywhere to go fast. In certain places, the extra speed from this trick let me reach places that I couldn't otherwise.
Landing cancel
When landing, there is a one frame landing animation where Yoh can't do anything. However, if you instead land on the sword out part of an attack and cancel it by walking for a frame, you skip this animation and can effectively act a frame earlier. This is done on every jump where it matters, saving one frame on each. However, it requires attacking beforehand.
The same application can be done to use the dash instantly. I can do this by attacking and canceling out of the attack with a dash, saving a frame. However, this trick is not useful if I'm not jumping out of the dash directly, so I avoid it where I can for entertainment.
Instant backdash
To backdash, I need to chain two Down presses within 14 frames. Down normally makes Yoh crouch down. The first down press, however, can be done anywhere; it doesn't have to be on the ground, or even in the game. I can abuse this in several ways:
- Press down before the start of a level to start with an instant backdash.
- If I'm backdashing right after a jump, press Down while in the air.
- With no prior setup, do an attack and press Down during an attack. Since you can't crouch while attacking, but you can backdash while attacking, the second Down press will backdash.
Ledge backdash
By backdashing so that Yoh is on the air on the first frame of the backdash, you gain 1024 speed directly. Since speed is preserved in the air, I can keep the 1024 speed for as long as I'm in the air. Before getting the dash, I plan movement around getting in the air as long as possible with the backdash, which is my fastest movement option.
Even after getting the dash, the ledge backdash is still faster compared to the dash 880 top speed with the deceleration trick. Furthermore, this speed can be conserved with dashes.
Neutral turn-around
If you are neutral on the ground and press a direction for a frame, then Yoh turns around without losing speed. Among other things, this can be used to dash facing the reverse direction.
Fast backdash trick
By combining the two above tricks, it's possible to prepare a backdash without any setup on the ground. Normally, when walking, you would have both to turn around, since you backdash away from where you face. But with the neutral turn-around and some ingenuity, we can get around it. The easiest way to explain is with the input:
| Frame | Input | Speed | Comments |
|---|
| 1 | > | 416 | Walking on the ground |
| 2 | | 384 | Neutral to prepare to turn around. |
| 3 | < | 352 | Turn around, facing the opposite way. I'm only pressing Left for a frame, so there's no speed loss and I preserve speed. |
| 4 | V B | 320 | Facing the opposite direction, I can attack. I also prepare the first Down input. Since we're attacking there's no crouching. |
| 5 | | 288 | Wait for the second Down. |
| 6 | V | 0 | Backdash initiated. |
| 7 | | 984 | Backdash. |
Dashjump speed preservation
When getting a large amount of speed, such as after a ledge backdash or a pendulum trick, I usually want to conserve it as long as possible. However, a normal jump will lose this speed. Dashjumps trigger instantly and can be used to conserve the speed a bit longer, though the speed decrease still applies for a frame.
Attack bonus trick
Some spirits I collect give an attack bonus. The attack bonus applies if the set with the attack bonus was equipped on the frame I make the attack. I can prepare an attack having a set with the attack bonus, then switch after I start the attack, and the bonus is still active. This saves some frames over having to switch back after the attack.
When a spirit is active, it's impossible to switch slots. However, it is possible to open the Start menu and switch soul slots there. The behavior of each spirit varies when this trick is applied, but most do not save time. It saves time on Big Thumb, where the lengthy pulling out animation is skipped.
Celling zips
With a well placed jump or dashjump, it's possible to enter ceilings and zip through them. The usage is a bit limited, because zipping sets horizontal speed to 0. In practice it saves time in only a few places and wastes time in the other levels. Worse, often you will enter the ceiling without zipping at all, and get stuck for a bit. If you don't see me dashjump sometimes later in the games, it's to avoid an undesirable ceiling zip.
Large glitches
Magnescope cancel
Magnescope lasts 1 frame and costs 1 SP: it also cancels attacks. As thus, I can very quickly chain attacks by attacking, using Magnescope, then attacking again. All enemies have a 16 frame invincibility timer, but this still allows me to deal damage much faster than intended.
When walking becomes the fastest movement in the midgame, I also use these cancels extensively to kill enemies on ground without losing any speed.
Pendulum glitch
When you get the pendulum, you can attack to the blue hooks in the levels. Normally, these hooks allow you to swing around them in a circle. However, if you attack the pendulum outside of that maximum-range circle, then the game snaps you back to the circle. To do so, it sets your speed to be equal to the distance needed for 1 frame of movement to snap you back.
If I switch off the pendulum during this frame, or if I jump, then I get to keep all that speed and go very fast. The glitch allows to reach speeds of upwards 10 000 subpixels per frame, which is around ten times as fast as dashing. The vertical speed is enough to scale vertical levels very quickly.
Although the speed is just a little too low to clip through levels, you can do some minor clips as well as skip end of levels triggers if not careful. The speed given is based on where you attach, and you get launched the opposite way.
My route follows the usual stage order, with a few differences.
At the start of the game, backdashing is the fastest way to move. The general strategy here is to get high on platforms, and do ledge backdashes from as high up as I can, to last longer. All enemies here can be backdashed through with invincibility.
Water slows you down, so I make sure to stay out of it. Damage boosting off the fishes is worth it, as they deal only 1 damage. The boxer's attacks are RNG. The one I want is the straight punch to backdash through, and it's the one I try to manipulate. However, the luck manipulation I can do is very limited and I end up not getting this attack sometimes on subsequent visits.
More backdashing. The wooden platforms in this stage limit the backdashes a bit, so I route around them to do as many as I can.
Get Magnescope, which is directly in the way, off the bird. Souls don't become grabbable until around half a second after they appear, so the jump I take is a bit delayed to address that. The Headphones gives an extra passive spirit. Start killing enemies fast with Magnescope.
Boss: Ryu
His sword slash is the best attack I can get because it's his only stationary attack. I'm forced to take damage, which I use to do further attack cancels.
A level to exit the area, it's faster to pass by here than to do the two levels in reverse. The little wisps that pop up spawn randomly, but they rarely get in the way usually.
Backtrack to the next area.
Another backtrack. The level is a bit slower in reverse thanks to the stairs, which I have to climb coming from the right side.
Northern Fields 1
Enter Northern Fields. Its main gimmick is block-pushing and ice. Deciding how far to push the box is surprisingly difficult. In many places you can push it less far than I did, but if I do so I have to manipulate subpixels to get a more precise jump. This manipulation sometimes costs more than pushing the box all the way, but not always. It's a difficult balancing and I do it through trial and error.
Northern Fields 2
Boxes and autoscrollers. At the start of the stage, I clip through the box slightly with a jump. I zip through the wall and save a few frames, pushing me inside the box. However, the gains are nullified by the moving platforms I have to wait for. anyways.
Northern Fields 3
It's a mountain, but there's no ice physics yet. Just some standard jumping. When backdashing off ledges, make sure to land on another ledge if I can to get more air time. Get Vodianoi for much later on. The final box push can be skipped with a precise jump.
Northern Fields 4
Ice physics! It's fast, and also allows some cool attacking techniques. Speed decreases much slower on ice and you have more inertia. The entire level is waiting on a platform, so instead of damage boosting on enemies, I take the time to kill them, saving time on the health refill at the end. Pick up Ian for extra damage on Corey and the next few bosses.
Boss: Trey
Manipulate the Nipopo Punch. I damage boost through it by getting hit by Trey himself instead of the punch, which deals less damage and doesn't freeze you.
Northern Fields 5
Now that we have Nipopo Punch, we can freeze the fire leading to Western Cemetary. But I have to make it back first. The viking guy follows my movement so damage boosting off him is needed.
Northern Fields 6
We get to meet Yoh's grandpa and he gives us Shikigami and three leaves. The rest is pretty straightforward.
Same as above with different RNG.
More backtracking. Same as previous since there's no new movement.
On the box, I can activate Big Thumb while still on the box, and fall with the momentum from walking. This lets me push the box earlier. I need to get the key to unlock the door and finish the level. On door levels, once the door is unlocked, it stays so, even on future visits to the level.
The backdash invincibility lasts long enough to survive the crusher celling in this level, which otherwise kill you instantly. After avoiding it, I get stuck in the crusher until it rises up again.
Shikigami cancel to kill the skeleton next to the dog. The dog gives Frankensteiny, and I equip it immediately. It makes me faster on moving platforms. From this point on, the equipment order of the souls starts to matter. The +1 movement bonus from Frankensteiny is only active whenever I have Frankensteiny in the set. Right now it's not a major point, but it will become one later on in the run.
I use the waiting time from waiting on the platforms to get some extra healing items for later on.
Jump up and hit the switches. To hit the switches, I try to get a second sword slash, since it reaches just a bit farther than the first sword slash. Right Sandal gives +1 passive spirit. Afterward, boxes get pushed.
The red skeletons that appear at this level cannot be backdashed through, so I have to jump over them. For some reason, colored skeletons have a much larger hitbox, which makes them impossible to backdash through. The yellow-colored skeletons deal only 2 damage, so it's okay to get hit by them.
This level is very RNG dependent. I need to kill all skeletons in this area to progress, but their spawn position is random. After a while I managed to find this pattern, which deals with them nicely.
Manipulate the grab attack on the giant skeleton, but kill him before he has a chance to execute it. Thanks to Shikigami that cancels my attack in midair, I finish with only two frames to spare for his grab attack.
Boss: Eliza
This boss is very hard to optimise. Her only attack that leaves her on the ground, in her first phase, is a lengthy dash across the screen. However, it still remains her most favorable attack. Avoid knockups by not attacking her in midair a lot.
Once half her health is gone, she can jump into the air doing a cleave attack. This is the attack we want for this phase. Thanks to Magnescope health goes by quickly and I can finish her before she has time to do anything else.
Another "return trip" level. At the end of the level, jump completely over the skeleton to reach the falling platforms. I need to get on top to jump over the door at the end of the level.
Now that the door is open, I can take the bottom route and finish the level quicker. Jump in midair in the spike pits. Since they are close enough to the nearest ground, you're still considered "on ground" above the pits. You can also walk on the fire wall.
Inn
Get the sword upgrade. I can't skip it. It's in the way and allows to deal double damage compared to the wooden sword.
Southern Moutains 1
Eliza makes you immune to the poison here.
Southern Mountains 6
Normally, this level is a one way-level intended for you to return once you've completed the area. But with a precise jump, we can make it. Afterwards, we walk entering backwards into the boss room.
Boss: Silva (Southern Mountains 5)
Tornado attack is the best here, and keeps him stationary.
Southern Mountains 5
Defeating Silva ends the level, but puts us on the point behind the level on the map, as if we had completed it. So to progress back, I have to play the level again. Our main goal now is to get the five silver spirits to do the Totem Attack and progress. We also need all five equipment items to be able to equip them. Since I'm missing one, the Left Sandal, that's the first thing to collect.
Southern Mountains 7
First, collect the Silver Tail that's directly in the way. This is the most important of them all, granting +2 movement speed. With the Tail equipped, walking becomes the fastest way to move.
Southern Mountains 6 (second visit)
Backtrack through this level, in the correct order this time.
Southern Mountains 2
Unfortunately, to make it to the left sandal, we have to play through most of the area. Thankfully the movement spirit makes this much faster. Overall, skipping is faster than not skipping and playing through normally.
I use the two health items collected much earlier to survive some damage boosts here.
Southern Mountains 3
Make it to the Left Sandal, then backtrack. We now have the five soul spots and can equip all the silver spirits. All that's left is to collect them, which is not an easy task.
Southern Mountains 2 (second visit)
Backtrack. To make it back, we have to collect the four other spirits, which are in Western Cemetary, Northern Fields and Eastern Cemetary. It pretty much requires replaying half the game up to this point. Unfortunately there's no real way around it, so the next ~9 minutes are dedicated to collecting those spirits, all whilst moving a bit faster.
Southern Mountains 1 (second visit)
Backtracking.
The major backtrack begins. Here the door is already open, so no need to take the key again.
Use the same backdash trick. We can make it a bit more ahead of the crusher thanks to the extra speed.
Unfortunately, I forgot to pick up the health items again. This would save half a second if done correctly.
The second silver spirit is in plain sight at the start. Three to go!
Doing this level backwards is much faster because you don't have to wait for the platforms. Because I don't have to wait, it's not possible to pick up the health items without losing too much time.
The level backward gives another different route at the crusher section. Most notably, I can backdash into the box here on the second crusher descent, letting me move freely afterwards, since I'm only stuck partially on the ceiling.
No significant difference in doing the level backward here. As usual, use Magnescope to kill enemies fast.
Northern Fields 1 (second visit)
Here enemies are significantly weaker now due to our stronger sword. This lets me spend longer time on the ground.
Northern Fields 2 (second visit)
On the moving platforms, I can use Nipopo Punch to wait in the air while the platforms rotate. This saves a little bit of time over having to wait for the cycle. We get another spirit in this level.
Northern Fields 6 (second visit)
A very short level with some walking action.
Another short transition level.
Get the final silver spirit here. I equip Totem Attack by equipping all five silver spirits at once. We're ready to go to the new area!
More walking and backtracking.
For the last time in the run, get the boxer guy to attack.
Jungle Ruins 1
The major backtrack is done! With all five spirits, I Totem Attack the totem and am on my way. At this point, Totem Attack uses up all my SP, and I need to have it recovered by the end of the level because there's another totem to take down. However, backdashing temporarily stops SP recovery. I also can't use any spirits during this time because I'll stop recovering SP here. As we advance through the levels, SP recovery is going to become a critical aspect.
Jungle Ruins 2
A huge vertical level. Even though my sword powered up, the enemies are powered up as well, which means I can't one-hit them like before with my sword. But two hits are enough and I can do that by jumping to keep speed.
Jungle Ruins 3
This level has a few enemies that I need to either damage boost through or kill them, but I don't have enough health to damage through them all. I'm forced to use Nipopo Punch to freeze one of the enemies and backdash through it. Now that it's frozen, backdashing becomes possible, since it's not moving away from me anymore.
Jungle Ruins 4
This level looks really beautiful. Stay on the top path to backdash and avoid enemies.
Jungle Ruins 5
A lot of colored enemies that I can't backdash through. I settle for jumping and killing the enemies in my way whenever I can.
Boss: Joco
The fight takes place on these floating platforms. Going down is fast, but up is slower. The best attack is his spindash here that makes him move up and down. Unfortunately, the rest make him move around too much.
Jungle Ruins 7
Joco's spirit, Mic, allows doing a sort of dash with the Jaguar Swipe. Dashing significantly changes the TAS gameplay, because it is very fast. A lot of the gameplay now relies on dashing as much as possible. On the Mic slot, I equip Vodianoi as well on this menu for later, as well as the +2 movement and +2 SP recovery. The last spot stays empty for now.
Lots of spirits stand in the way now that I jump around, but they are quickly disposed of with fast attacks. Near the end I get offscreen and become invincible to them anyway.
This level is the first long enough to force us to recover SP. The most optimal strategy is to use up all my SP on dashes and wait for it to recover.
Northern Fields 6 (third visit)
Short level made even shorter.
Northern Fields 3 (second visit)
In the cave, I jump normally instead of dashjumping because it would clip me into the ceiling otherwise. I plan the SP recovery at the vertical jumping section because that's where jumping normally is much faster. It's short but gives me enough SP for one more dash.
Northern Fields 7
Slow down before the first fall to make it all the way. The rest goes by very fast.
Tao Grounds 1
Keep the recovery for the middle of the level where I have to damage boost. As usual, I keep recoveries in places where using the dash wouldn't give much of an advantage over not dashing.
Tao Grounds 2
A very long level where I stretch out every dash. There's no good place to recover so just use up the dashes as early as I can.
Tao Grounds 3
An extremely long level where multiple recoveries are planned. Thanks to equipping the Vodianoi soul earlier, my water movement is unrestricted. However, sometimes I need restricted movement to make my jump go higher and reach the upper levels.
The goal of this level is to hit all the switches and rise the water level, which also rises up the logs. Switches need to be scrolled into view before they are active, so going too fast with the dashes means a required wait.
The route here was found after much trial and error. On the third switch, I need to kill the red skeleton, otherwise, I can't make it back because I don't have the space to jump back. The guitar guy at the end of the level needs to be dashjumped over. This creates a couple of hard requirements to route around. Overall it's one of the more complex levels in the game.
Boss: Lee Pai Long
The punch flurry is the best attack, however, I couldn't get it directly no matter the RNG. I worked around it in a roundabout way.
Tao Grounds 4
Stretch the dashes to the max in the first part of the level. The second part is some vertical scaling, aided by the dash to reach a few frames earlier.
Tao Grounds 5
Another very technical level. Daodondo from Lee Pai Long lets me slide. It's used predominantly here to dash out of the moving down platforms a few frames earlier. With a frame-perfect slide, the slide remains after getting off the platform.
Because of the moving platforms on which I have to wait, there are lots of opportunities to recover SP. I make sure to abuse that to spend less time not dashing.
The switches that make the moving platform rise or lower can be hit through the wall if you're next to them. This saves some time over having to fight the enemies that "guard" the switch most of the time. At the end of the level, you don't need to ride on the platform fully and can just jump, and the platform will re-appear on the screen transition.
Get Mosuke here for +3 attack. Very straightforward.
This last visit is much faster thanks to the dash. On the holes at the end of the level, I backdash to fall then dash when I hit the ground. The backdash is early so that I fall with less speed and can dash immediately out of the hole.
Southern Mountains 1 (second visit)
The only ceiling zip in the run that saves time is done here. Otherwise, ceiling zips are unfortunately too impractical to use.
Industrial Area 1
The level is very cramped, so dashing is awkward here. Use Corey at the start to freeze the enemy moving towards me. Avoid taking damage because everything hits really hard here.
Industrial Area 2
Longest level in this TAS. Jump on the backward conveyor belts and stay on the forward ones. I go out of my way to get the Battle Armor (40 defense) to survive getting hit by anything, otherwise, enemies will do half my health at the end of the game. It's a significant deviation but it still saves a lot of time over having to kill enemies manually. Strangely enough, the electrical fences at the end of the level do less damage with less defense so I make sure not to have the +2 defense spirit active when I damage boost off them.
Boss: Lyzerg (Industrial Area 3)
Get the pendulum attack and stand behind him.
Southern Caves 7
Go out of my way and play this level to get the Antiquity, the last sword. It deals double damage again, 40 instead of the previous 20. Make sure to go slow enough on the first pendulum glitch or else I'll clip through the loading zone trigger. The rest is pretty fast anyway with the pendulum glitch.
Industrial Area 4
Pendulum glitch at the start. Backdash into the crushers to stop them early while invincible. The turrets fire bullets that I can backdash into to make them vanish. Start menu cancel the box push. Finally, skip the end of the level with a vertical pendulum glitch.
Boss: Marco
The fight is scripted and there's only one attack per phase. You can't damage him in the first phase so wait for the second. Dodge the sword and the ground shockwave which hurts as well. I kill him so fast he doesn't go into his third phase.
Ice Lands 1
The Mama soul is right there at the start, and would let me skip pushing the box. It requires killing the sheep that has 250 health. The problem is that there's enemies in the way. I want to use the Michael soul I just obtained, but using it would knock me back into enemies. As such, I have to kill the three starting enemies first.
Once done, I shoot Michael twice while the sheep is out of sword distance, then finish him with two sword slashes. This also kills the enemy in front of him, giving me enough space to dashjump. Once I'm above the second enemy, I transform to cancel the dash speed, and finally walk to the hole and skip the box pushing.
Using Michael twice here ended up costing 100 SP, but it's not all bad. I have to take some time to recover, but pendulum glitching saves some time and SP over having to dash, since the pendulum costs only 1 SP and covers a much larger distance.
Once SP is recovered a bit, in the third room, I use the pendulum to climb up the hook. Since you can jump out of the hook I can jump again, use the pendulum, and jump to the key. Afterward I pendulum glitch.
In the next room, two vertical pendulum glitches allow me to scale rapidly while moving horizontally and save some dashes. In the final room I can thus dash and backdash with the remaining SP I have.
Ice Lands 2
Transform and skip the box pushing. Then transform again to skip enemies in this difficult selection. The second transform also allows me to fall down easily while I'm transforming, saving some time.
The transform to get the key ends up skipping the majority of the level. Once it's gotten, I recover SP and dash to the exit.
Boss: Magister
The final two fights are in sequence and you don't get the recover SP. Magister is the easiest fight. Prepare the third sword slash while he's invincible.
Boss: Mephias
In the first phase, Mephias dashes around in a black and red cape, which sounds familiar. He's on the ground during this phase so Magnescope cancel to finish him quickly.
On the second phase, he's in the air, which is much more complex. I manipulate the dragon bite twice which keeps him in place instead of floating, then the dragon fire. While he stays in place I use my first Michael to deal damage but also get knocked back. The knock back gives me enough height for one more sword attack on this jump. The second Michael is done at the very end to finish him off, marking the end of the game!
Suggested screenshot
Frame 193820
There are a few possible improvements that would save some frames.
- The biggest improvement would be applying the start menu cancel on every Big Thumb. This would save ~5 seconds.
- Pick up the two health items in the second visit to Western Cemetary 3. This would save around half a second.
- Some time could be saved thanks to better menuing and spirit layout, to spend less time switching. This would save a second overall.
There's also more theoretical improvements:
- Some alternates routes could be explored. Taking the Grand Tao Dragon to avoid revisiting done levels would be the biggest change. It could open up taking other spirits that are out of the way without wasting too much time. I explored the possibility and deemed it would take too much time, but I may be wrong.
- You can zip, but it sees very limited usage. If the above route is taken, maybe some spirits like the one that creates walkable platforms could be used to zip and save more time.
Overall I feel that this is good enough for the first TAS of this game, and I hope it was an enjoyable watch for you!
Thanks to Samsara for inspiring me to take on the game with her WIPs. And thanks to you as well, for reading and watching the TAS!!!
Samsara: Might as well call me Shamsara now! Judging!!!
Samsara: And thank you right back for taking on this game because of me! I knew this game had great potential when I stumbled across it, and even after having worked with it myself, this run surpassed my already high expectations.
I already went into detail about my thoughts, so all I can really add here is that I'm accepting it to Moons!