AGI games are programmed, not in native code, but in an
interpreted bytecode known as "logic". The random item assignment of
Mixed-Up Mother Goose is implemented in this logic bytecode, using repeated calls to the
random command.
The core random number generation function is found at offset 0x72e5 in the "AGI" executable file. You can also find it among
leaked fragments of AGI source code; see RANDOM.ASM in
AGISRC.ZIP. Translated to C, the function looks like this:
Language: c
uint8_t Random(void)
{
static uint16_t randSeed = 0;
if (randSeed == 0)
randSeed = BIOS(0x1a, 0x00); // re-seed with timer count
randSeed = randSeed * 0x7c4d + 1;
return (uint8_t) (randSeed >> 8) ^ (uint8_t) (randSeed >> 0);
}
The function is built on a
linear congruential generator with
a = 0x7c4d,
c = 1, and
m = 0x10000. A call to
Random advances the 16-bit
randSeed state variable, then returns the xor of its high and low bytes. The sequence of values produced by the linear congruential generator repeats itself with period 65536, but there's a twist: when
Random is called with
randSeed equal to 0, it re-seeds itself from the current time (
a count of 18.2 Hz timer ticks since midnight). The first time the function is called (and whenever the sequence wraps around to 0), the generator, in effect, jumps over a bunch of values to another point in the RNG sequence, the number of values skipped depending on the current time of day. A visual depiction of a full cycle of output:
 A full cycle of 65536 Random outputs as a 256×256 bitmap, with each output byte represented as a grayscale pixel.
AGI logic does not expose the above
Random function directly. The
random command wraps it in an interface that restricts random numbers to a range. This function is called
GetRandom in ETC.C in the AGISRC.ZIP archive linked above. Ported from the AGI virtual machine to take its arguments in the usual way, it works like this:
Language: c
uint8_t GetRandom(uint8_t minValue, uint8_t maxValue)
{
return Random() % (maxVal - minVal + 1) + minVal;
}
There are tools to decompile logic bytecode into readable source code. I ran
agikit like this:
$ npm install @agikit/cli
$ node_modules/.bin/agikit extract mumg/ extracted/
...
[INFO]  Extracting LOGIC 0 from volume 1
[INFO]  Extracting LOGIC 1 from volume 2
[INFO]  Extracting LOGIC 2 from volume 2
...
The extracted/src/logic directory contains a bunch of logic files.
Logic resource 0 in the file 0.agilogic is the body of the main game loop; the interpreter runs this code runs once per
interpreter cycle (conditionally calling other logic resources). Logic resource 0 is where the item randomization code is found. This is what it looks like straight from the decompiler:
if (f133) {
  reset(f133);

Address112:
  v141 = 0;
  v209 = 51;

Address118:
  *v209 = 255;
  v209++;

  if (v209 < 95) {
    goto(Address118);
  } else {
    v51 = 0;
    v53 = 0;
    v57 = 0;
    v59 = 0;
    v60 = 0;
    v62 = 0;
    v63 = 0;
    v65 = 0;
    v71 = 0;
    v73 = 0;
    v74 = 0;
    v76 = 0;
    v77 = 0;
    v81 = 0;
    v82 = 0;
    v88 = 0;
    v92 = 0;
    v84 = 27;
    v54 = 0;
    v55 = 0;
    v68 = 0;
    v75 = 0;
    v83 = 0;
    v129 = 170;
    v139 = 1;

  Address208:
    random(1, 35, v136);
    v137 = v136;
    v137 += 50;
    v138 = *v137;

    if (v138 == 255) {
      *v137 = 0;
      *v129 = v136;
      v129++;
      v128++;
      v139++;
    }

    if (v139 < 3) {
      goto(Address208);
    } else {
      *v129 = 4;
      v129++;
      *v129 = 25;
      v129++;
      *v129 = 18;
      v129++;
      *v129 = 5;
      v129++;
      *v129 = 33;
      v129++;
      v135 = 11;

    Address278:
      random(1, 44, v136);
      v137 = v136;
      v137 += 50;
      v138 = *v137;

      if (v138 != 255) {
        goto(Address278);
      } else {
        v141++;

        if (v141 > 250) {
          goto(Address112);
        } else {
          if ((v135 < 18) && (v136 > 35)) {
            goto(Address278);
          } else {
            if ((v135 == 19) && (v136 == 43)) {
              goto(Address278);
            } else {
              if ((v135 == 21) && (v136 == 36)) {
                goto(Address278);
              } else {
                if (((v135 == 22) || (v135 == 23)) && (v136 == 37)) {
                  goto(Address278);
                } else {
                  if ((v135 == 24) && (v136 == 44)) {
                    goto(Address278);
                  } else {
                    if ((v135 == 28) && (v136 == 40)) {
                      goto(Address278);
                    } else {
                      if ((v135 == 30) && ((v136 == 37) || (v136 == 11))) {
                        goto(Address278);
                      } else {
                        if ((v135 == 11) && (v136 == 11)) {
                          goto(Address278);
                        } else {
                          v141 = 0;
                          *v137 = v135;

                          if (v135 < 17) {
                            v140 = v135;
                            v140++;
                          }

                          if (v135 == 17) {
                            v140 = 30;
                          }

                          if (v135 == 30) {
                            v140 = 22;
                          }

                          if (v135 == 22) {
                            v140 = 23;
                          }

                          if (v135 == 23) {
                            v140 = 24;
                          }

                          if (v135 == 24) {
                            v140 = 28;
                          }

                          if (v135 == 28) {
                            v140 = 19;
                          }

                          if (v135 == 19) {
                            v140 = 21;
                          }

                          if (v135 == 21) {
                            v140 = 20;
                          }

                          if (v135 == 20) {
                            v140 = 25;
                          }

                          if (v135 == 25) {
                            v140 = 26;
                          }

                          if (v135 == 26) {
                            v140 = 29;
                          }

                          if (v135 == 29) {
                            v140 = 18;
                          }

                          if (v135 == 18) {
                            v140 = 0;
                          }
                          v135 = v140;

                          if (v135 != 0) {
                            goto(Address278);
                          }
                        }
                      }
                    }
                  }
                }
              }
            }
          }
        }
      }
    }
  }
}
Giving names to some constants and variables, and elaborating control structures, we arrive at the following pseudocode:
if (need_item_assignment) { // f133
  reset(need_item_assignment);

startover:
  // The item assignment is stored in an array of variables at indices
  // 51 through 94, one element for each room. The code 255 means the
  // room has not yet been assigned an item. The code 0 means the room
  // is empty and will not be assigned an item. Codes 11 to 30 represent
  // that the room contains the item with that number.

  // Initially mark all 44 rooms unassigned.
  for (room = 1; room <= 44; room++) {
    VARS[50 + room] = 255;
  }

  // 22 rooms are always empty.
  for (room in [1, 3, 4, 5, 7, 9, 10, 12, 13, 15, 18, 21, 23, 24, 25, 26, 27, 31, 32, 33, 38, 42]) {
    VARS[50 + room] = 0;
  }

  // Place the watering can in room 34. The location of this item is not
  // randomized.
  VARS[50 + 34] = ITEM_WATERING_CAN; // 27

  // The warps stack is stored in an array of variables at indices
  // 170 through 177. Choose 2 random overworld rooms that will not be
  // assigned an item, but will be at the top of the warps stack.
  warp_index = 0; // v129
  while (warp_index < 2) {
    room = random(1, 35); // Choose a random overworld room.
    // Keep looping until we find an available room.
    if (VARS[50 + room] == 255) {
      VARS[50 + room] = 0; // This room will remain empty.
      VARS[170 + warp_index] = room; // Add it to the warp stack.
      warp_index++;
    }
  }
  // Add 5 more static rooms to the warps stack (these rooms have
  // already been made ineligible for assignment above).
  VARS[170 + warp_index] = 4;
  VARS[170 + warp_index] = 25;
  VARS[170 + warp_index] = 18;
  VARS[170 + warp_index] = 5;
  VARS[170 + warp_index] = 33;

  // Now assign the 19 remaining items in a certain order.
  for (item in [
    ITEM_WIFE,           // 11
    ITEM_MISS_MUFFET,    // 12
    ITEM_MOUSE,          // 13
    ITEM_FIDDLERS_THREE, // 14
    ITEM_SHEEP,          // 15
    ITEM_LITTLE_DOG,     // 16
    ITEM_LITTLE_LAMB,    // 17
    ITEM_HOBBY_HORSE,    // 30
    ITEM_PIPE,           // 22
    ITEM_BOWL,           // 23
    ITEM_BROTH,          // 24
    ITEM_SIXPENCE,       // 28
    ITEM_PIE,            // 19
    ITEM_STEAK,          // 21
    ITEM_KNIFE,          // 20
    ITEM_CANDLESTICK,    // 25
    ITEM_PAIL,           // 26
    ITEM_LADDER,         // 29
    ITEM_FIDDLE,         // 18
  ]) {
    attempts_counter = 0; // v141

  tryagain:
    // Choose a random room (overworld rooms and interior rooms are possible).
    room = random(1, 44);

    // If the room is not available, try again.
    if (VARS[50 + room] != 255) {
      goto tryagain;
    }

    attempts_counter++;
    if (attempts_counter > 250) {
      // If we have tried more than 250 times to place a single item, we
      // may have painted ourselves into a corner with no place to put
      // it. Start over from the very beginning.
      goto startover;
    }

    // Item codes < 18 are walking items. Room codes > 35 are interior
    // rooms. Walking items cannot be placed in interior rooms.
    if (item < 18 && room > 35) {
      goto tryagain;
    }

    // Exclude some specific assignments that would be illogical.

    // Do not put Jack Horner's pie inside his own house.
    if (item == ITEM_PIE /*19*/ && room == 43) {
      goto tryagain;
    }
    // Do not put the Sprats' steak inside their own house.
    if (item == ITEM_STEAK /*21*/ && room == 36) {
      goto tryagain;
    }
    // Do not put Old King Cole's pipe and bowl inside his own throne room.
    if ((item == ITEM_PIPE /*22*/ || item == ITEM_BOWL /*23*/) && room == 36) {
      goto tryagain;
    }
    // Do not put the old woman's broth inside her own house/shoe.
    if (item == ITEM_BROTH /*24*/ && room == 44) {
      goto tryagain;
    }
    // Do not put the crooked man's sixpence inside his own house.
    if (item == ITEM_SIXPENCE /*28*/ && room == 40) {
      goto tryagain;
    }
    // Do not put the hobby horse too close to Banbury Cross (?).
    if (item == ITEM_HOBBY_HORSE /*38*/ && (room == 37 || room == 11)) {
      goto tryagain;
    }
    // Do not put Peter Peter Pumpkin Eater's wife where he would be
    // able to see her over the fence.
    if (item == ITEM_WIFE /*11*/ && room == 11) {
      goto tryagain;
    }

    // Everything is fine, place the item in the room.
    attempts_counter = 0;
    VARS[50 + room] = item;
  }
}
The algorithm can be summarized thus:
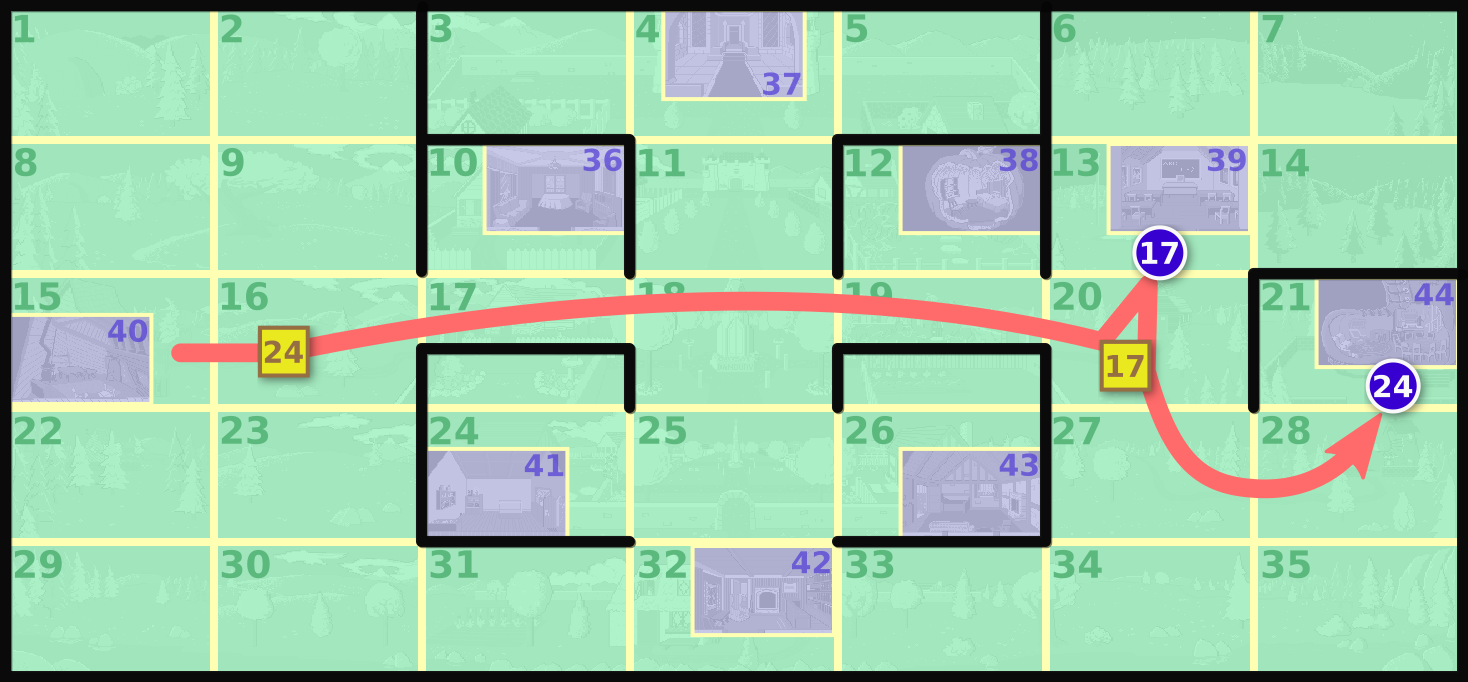
- Place the watering can in room 34.
- Mark the following rooms empty: 1, 3, 4, 5, 7, 9, 10, 12, 13, 15, 18, 21, 23, 24, 25, 26, 27, 31, 32, 33, 38, 42.
- Choose 2 random overworld rooms, mark them empty, and add them to the warps stack.
- Add the following rooms to the warps stack: 4, 25, 18, 5, 33.
- For each remaining item, place the item in a random unassigned room, subject to some compatibility constraints.
It is intentional that the watering can is always in the same place. Delivering the watering can to Mary Quite Contrary is a
tutorial in the manual.
Item randomization is done once and for all at the start of a new game. Though there are other random elements in the game (the movement of the goose in room 32, for example), they cannot affect item assignment after the game has begun. The only means of manipulating item assignment is choosing the time of day at which to start the game, thereby choosing the initial seed of the random number generator.
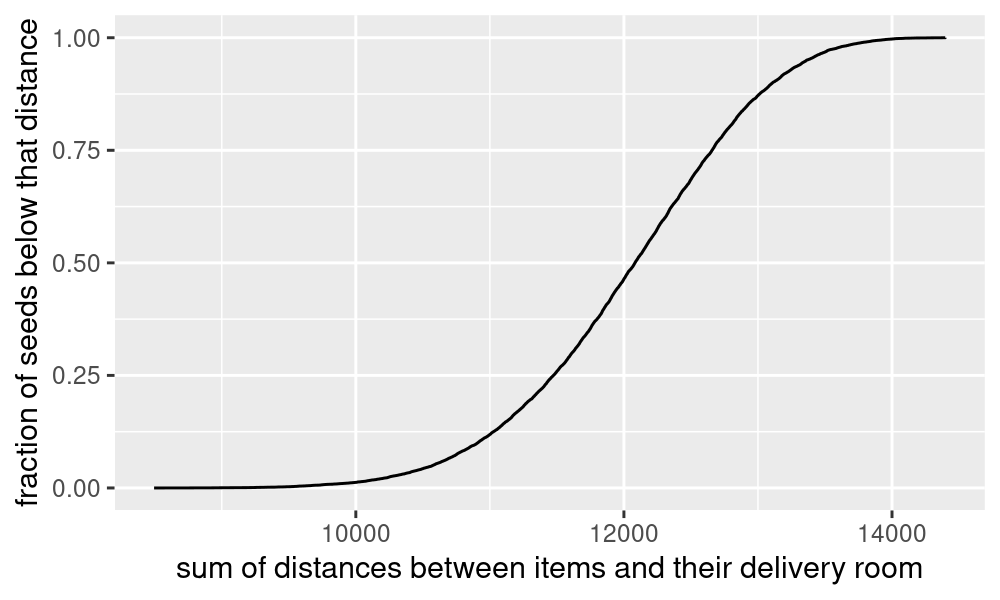
I wrote a simulator for the item assignment algorithm and used it to investigate the assignments that result from all 65536 possible seeds.
Download mumg-assign.pyLanguage: py
#!/usr/bin/env python3
import csv
import itertools
import sys
# Exception raised after a random number generator, as returned by new_random,
# reaches zero and would have to be re-seeded.
class RandomExhaustedError(Exception):
pass
# Return a function that, when called, returns the sequence of random numbers
# seeded by seed, as defined by the AGI Random algorithm.
#
# The seed is used as if it were the first time calling the Random function and
# the seed is what was returned by the BIOS call 0x1a.
#
# If the sequence of random numbers reaches zero, then the next call to the
# returned function will raise RandomExhaustedError.
#
# https://sciprogramming.com/community/index.php?topic=1418.msg10264#msg10264
# https://sciprogramming.com/community/index.php?action=dlattach;topic=1418.0;attach=1080 (RANDOM.ASM)
# The algorithm at AGI Wiki is incorrect:
# http://agiwiki.sierrahelp.com/index.php?title=Random&oldid=13022#Remarks
def new_random(seed):
def g(seed):
while True:
# No check for a zero seed on the first iteration. Zero is one of
# the values that the BIOS clock tick count call may return.
seed = (seed * 0x7c4d + 1) & 0xffff
yield ((seed >> 8) & 0xff) ^ ((seed >> 0) & 0xff)
# But, if this generator is re-entered on a zero seed, the AGI
# Random function would call the BIOS to re-seed the generator. In
# that case, we raise RandomExhaustedError instead.
if seed == 0:
raise RandomExhaustedError()
return g(seed).__next__
# Exception raised when assign_sub determines that it is failing to make forward
# progress.
class NoProgressError(Exception):
pass
def assign_sub(rooms, get_random):
# Certain rooms are ineligible for assignment.
for i in (1, 3, 4, 5, 7, 9, 10, 12, 13, 15, 18, 21, 23, 24, 25, 26, 27, 31, 32, 33, 38, 42):
rooms[i] = None
# Fixed assignments.
rooms[34] = "item.27"
# Choose 2 random overworld rooms to remain empty; these will become the
# entries at the top of the warps stack.
for warp in (1, 2):
while True:
i = get_random(1, 35)
if i not in rooms:
break
rooms[i] = f"warp.{warp}"
# Assign remaining items in a certain order.
for item in (11, 12, 13, 14, 15, 16, 17, 30, 22, 23, 24, 28, 19, 21, 20, 25, 26, 29, 18):
attempts = 0
while True:
i = get_random(1, 44)
if i in rooms:
# This room is already spoken for.
continue
attempts += 1
if attempts > 250:
# Backed into a corner, need to start over.
raise NoProgressError()
if item < 18 and i > 35:
continue
if item == 19 and i == 43:
continue
if item == 21 and i == 36:
continue
if (item == 22 or item == 23) and i == 37:
continue
if item == 24 and i == 44:
continue
if item == 28 and i == 40:
continue
if item == 30 and (i == 37 or i == 11):
continue
if item == 11 and i == 11:
continue
rooms[i] = f"item.{item}"
break
return rooms
def assign(get_random):
while True:
# All rooms are available initially.
rooms = {}
try:
assign_sub(rooms, get_random)
except NoProgressError:
# Assignment failed, start over from the beginning.
# This never actually occurs.
continue
except RandomExhaustedError:
# Return the partial assignment.
pass
# rooms is a room:item dict; invert it to become an item:room dict.
return dict((item, room) for (room, item) in rooms.items() if item is not None)
w = csv.DictWriter(sys.stdout, lineterminator = "\n", fieldnames = list(itertools.chain(
("seed",),
("item.27",),
(f"warp.{warp}" for warp in (1, 2)),
(f"item.{item}" for item in (11, 12, 13, 14, 15, 16, 17, 30, 22, 23, 24, 28, 19, 21, 20, 25, 26, 29, 18)),
)))
w.writeheader()
for seed in range(0x0000, 0xffff + 1):
random = new_random(seed)
def get_random(low, high):
return random() % (high - low + 1) + low
w.writerow(dict(assign(get_random), seed = seed))
There are 22 rooms that are eligible for item assignment. Into these 22 rooms we assign 20 items and 2 distinguished warp locations; therefore every assignment can be seen as a permutation of the available room numbers [2, 6, 8, 11, 14, 16, 17, 19, 20, 22, 28, 29, 30, 34, 35, 36, 37, 39, 40, 41, 43, 44]. The simulator outputs a CSV file (
mumg-assign.csv) that shows the permutation for each seed; i.e., for each item (and warp), what room it is assigned to. Notice, in this excerpt, that
item.27 (watering can) is always in room 34, and the walking items
item.11–
item.17 are never placed in interior rooms 36–44, consistent with the algorithm.
seed,item.27,warp.1,warp.2,item.11,item.12,item.13,item.14,item.15,item.16,item.17,item.30,item.22,item.23,item.24,item.28,item.19,item.21,item.20,item.25,item.26,item.29,item.18
0,34,2,16,35,19,29,17,6,28,22,44,30,8,11,36,41,14,43,37,40,39,20
1,34,16,11,29,17,35,6,28,2,19,36,39,22,30,8,41,14,43,37,44,40,20
2,34,30,19,16,14,11,20,35,29,2,41,22,8,28,36,37,44,17,6,39,40,43
3,34,17,30,8,14,6,11,19,16,2,28,35,22,29,39,36,41,37,20,40,43,44
4,34,22,28,16,2,8,14,30,11,29,19,39,43,41,37,20,17,40,44,35,6,36
There are only
24024 distinct possible item assignments [EDIT 2022-08-02: actually there are 24110, see
Post #515942]. (Not counting 131 "exceptional" seeds, covered below.) There are many seeds that result in identical assignments. These two, for example:
seed,item.27,warp.1,warp.2,item.11,item.12,item.13,item.14,item.15,item.16,item.17,item.30,item.22,item.23,item.24,item.28,item.19,item.21,item.20,item.25,item.26,item.29,item.18
31337,34,19,6,22,11,8,28,14,29,20,16,41,36,39,17,2,40,43,30,44,37,35
44438,34,19,6,22,11,8,28,14,29,20,16,41,36,39,17,2,40,43,30,44,37,35
What happens when the random number generator re-seeds itself during the item assignment algorithm? It can happen: the initial timer-based seeding may place the generator at any point in the RNG sequence, including near the end, where it will wrap back around to 0. But this event happens rarely: only 131 seeds out of 65536 require re-seeding before the algorithm is finished. I call these seeds "exceptional" and have chosen to ignore them as possibilities. They are not deterministic like the other seeds, because the timer value at re-seeding will depend on how much time has elapsed since the algorithm began, which depends on the speed of the computer.
The CSV rows for exceptional seeds show the point at which the RNG runs out:
seed,item.27,warp.1,warp.2,item.11,item.12,item.13,item.14,item.15,item.16,item.17,item.30,item.22,item.23,item.24,item.28,item.19,item.21,item.20,item.25,item.26,item.29,item.18
13340,34,16,20,8,28,,,,,,,,,,,,,,,,,
38783,34,19,28,6,30,11,14,8,29,17,16,44,2,36,41,,,,,,,
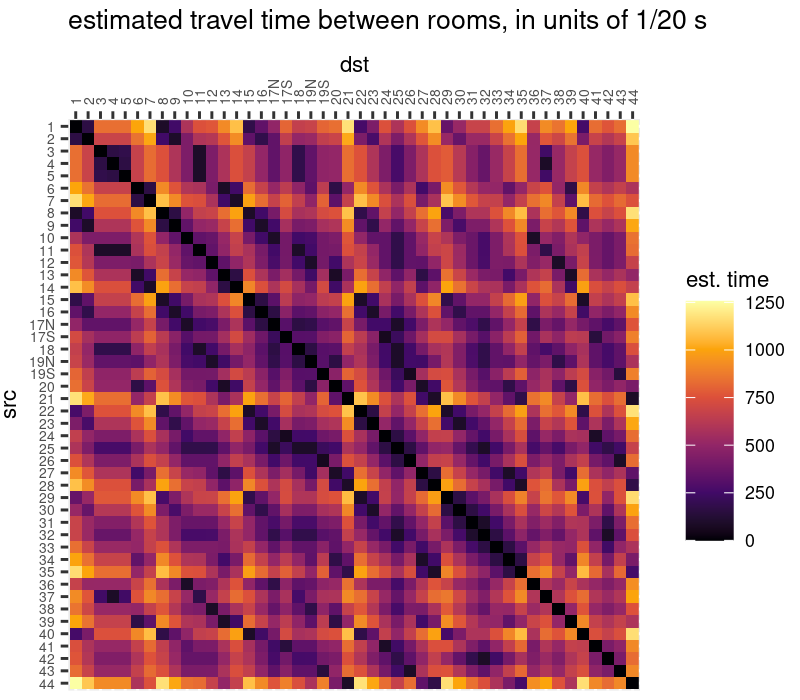
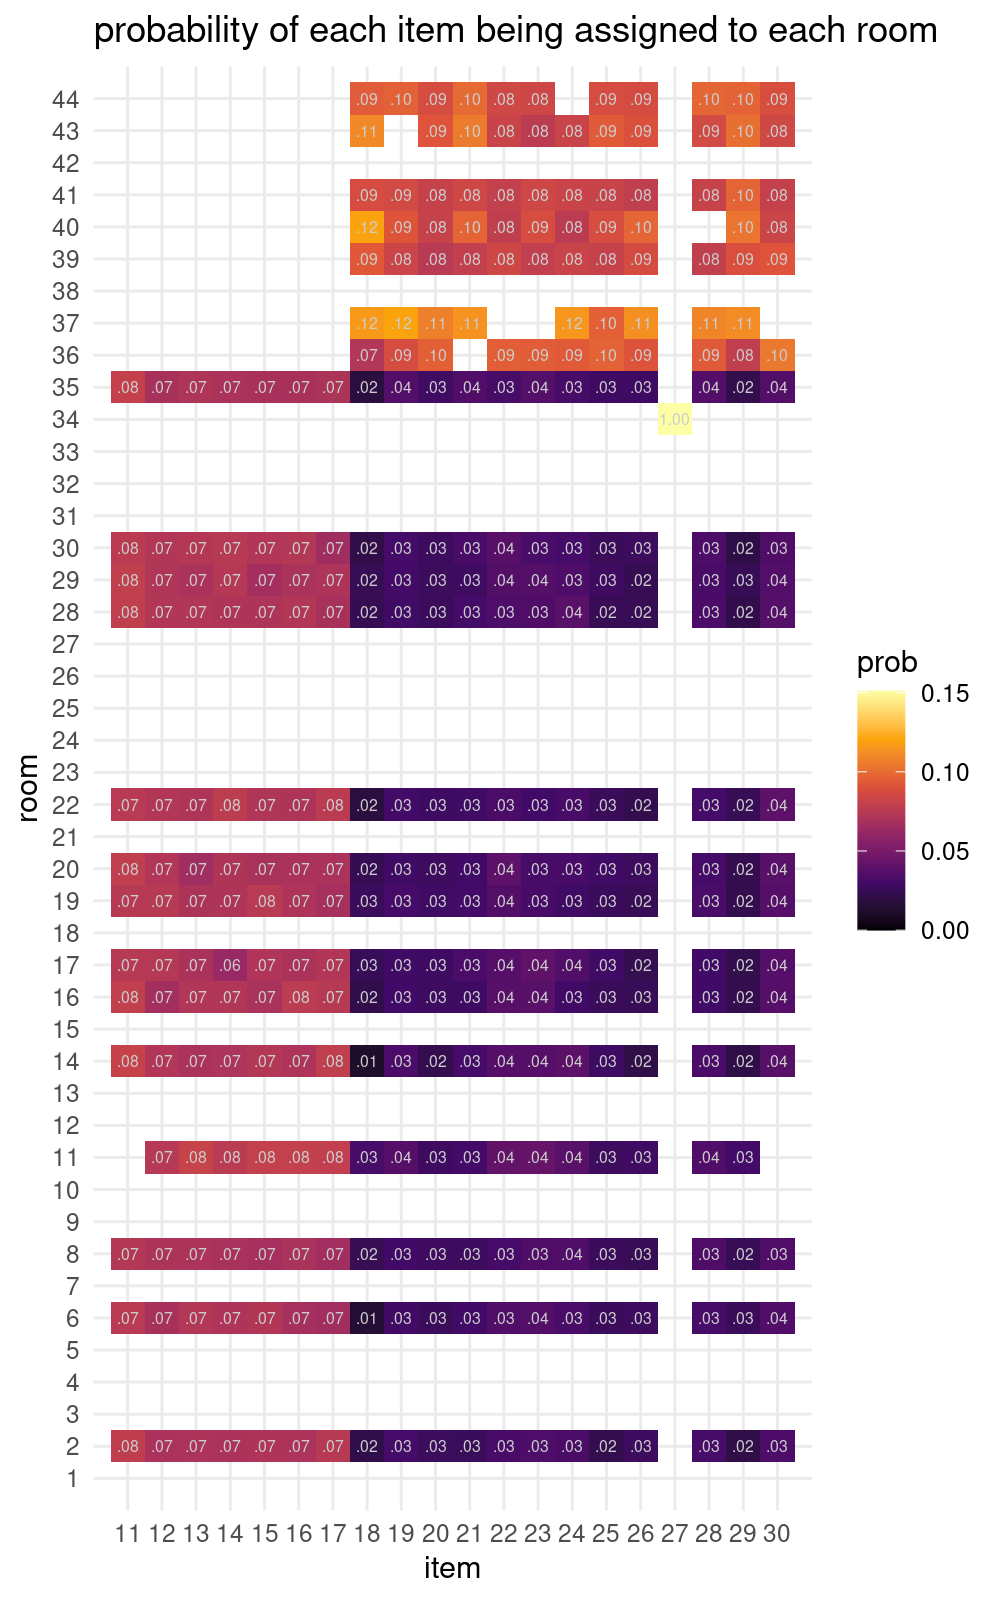
Considering all assignments in aggregate, here is a heat map of what items are likely to be found in which rooms. Walking items can only appear in overworld rooms, and consequently pocket items tend to be concentrated into interior rooms.
While a game is running, you can read the item assignment out of memory in the 50 bytes following address 0cb5:003c. The warps stack starts at 0cb5:00b3. You can also read the item assignment and warps stack out of a
saved game file starting at offsets 0x5b and 0xd2. The
randSeed random number generator state variable is at 0cb5:1707 in memory, which corresponds to offset 0x1707 in the file AGIDATA.OVL.