Posts for Spoony_Bard

1 2
14 15 16
Experienced Forum User, Published Author, Former player
Joined: 8/17/2004
Posts: 377
Ok, I've begun work on the second version. You can download the first part of it here, it goes up to leaving Route 17... Start to Route 17, 4:48 In my original movie, my time upon finishing Route 17 was 5:37. The new version is that much faster for a couple of reasons. First of all I made one slight Route alteration. After I meet Michael on Route 3 I keep on going and exit, and then enter Route 9 from the other end, go on to Route 11, beat Gahz, and then continue normally. Doing that is a bit faster than backtracking through Route 3, going through Route 2, and most of Route 11. Though at the same time, I don't get to kill as many enemies, and thus don't pick up as much cash as I did the first time through. I did some testing, and while my new way is faster, I lose out on about $4000 or so... The battle with Gahz is improved a bit, mostly due to shooting him earlier. I summon the shop, now, immediately after defeating Gahz, and pick up three Boots and three Shop Calls. There is one thing I neglected to mention when I was giving my tally of the game's physics before, and that was that every Governor's Medallion you recieve gives you $20000 on the spot. A few times in Route 9 (second trip) and Route 12 I either pause, or back up just for a moment, this is due to needing to put myself in a better position to shoot an enemy. Since I am now moving faster in these levels than I was the previous time due to the boots, it was needed, but at the same time they are faster even with these brief pauses. I remove the boots before I start crawling through the narrow gap in Route 17, because they don't let you crawl any faster, but they STILL drain energy while they are equipped despite that. So I have to conserve them, afterall. I made one more change to the planning of this movie, and that was that I bought one Scuba Suit. While I didn't need its underwater life-preserving properties, it DOES let you swim faster. And during a test battle with Shark, he died much faster while using the Scuba Suit. So far he's the only boss to my knowledge who dies faster using a different weapon. Though I'll have to make sure to keep trying different weapons on the others, and see.
Experienced Forum User, Published Author, Former player
Joined: 8/17/2004
Posts: 377
You can finish the game quickly just by beating the Four Studios then going straight to the editing room. Though if you don't spend time getting the scripts then you'll get the bad ending. I think this game could warrent two time attacks, one for as fast as possible, and one collecting all the scripts as fast as possible to get the best ending. Overall the game isn't very long, and it's very entertaining.
Experienced Forum User, Published Author, Former player
Joined: 8/17/2004
Posts: 377
So it looks like this will not be published, though Bisqwit has yet to comment on it at all. But this is fine, I know there are flaws, but this is my first attempt ever at a full time attack. I plan on making a second version once my finals are over next week. Even if this movie is not published I want to thank everyone for their support and criticisms, and the more advice I get before beginning the second version the better. As I said before it was my first time attack attempt, so there's probably still a number of subtle tricks that I never used or aren't familiar with yet. My plans for the second version are as follows: Play through the game a couple of times to get a good idea of the maximum amount of cash I can gather in the playthrough, at which points I have just enough cash to buy what I need, then plan out the earliest and best times to summon the shop along my route. (ie: the best FIRST time to summon the shop will be when I get $17000, so I can buy three boots and one shop call) And of course strive for 100% shooting accuracy, no matter how many times it takes, and avoid taking damage unnecessarily, though I will still take it to save time. In the end it is simply a matter of replaying the game again more carefully, since there likely won't be any changes to my route. If there is any more comments or advice, it is welcome.
Experienced Forum User, Published Author, Former player
Joined: 8/17/2004
Posts: 377
Alright folks, I've made one change to the end of the movie. Right before I summon the Shop for the final time, I spend maybe 20 seconds building up enough cash to buy one extra Jet Pack. With that, and a few extra revisions (beating Bopper the first time a bit faster) the completion time is now 23:43! Start to Finish! 23:43 This time this version is done for really real. Now, all things considered I may be able to start working on a second version over the Christmas Holidays, hopefully. Though with the Route I have planned, there isn't much room for a LOT of improvement, just some aesthetic things and perhaps I could shave some more seconds off. Anyway, I'm going to submit this now, but I have one final question before I do. Should I or shouldn't I use the category 'Uses Warps'? Because I remembered the Legend of Zelda runs and realized that using the Recorder doesn't count as 'Uses Warps'. Bang's Teleportation Force is pretty much the same principle as that, when you consider the way the game is structured, there isn't an order of stages you have to progress through set in stone, the map is kidna the same idea as the Legend of Zelda overworld in principle. I don't skip any events I have to go through to finish the game, so perhaps 'Uses Warps' isn't needed for it? EDIT: The link is fixed, silly me I forgot to replaces the spaces with underscores...
Experienced Forum User, Published Author, Former player
Joined: 8/17/2004
Posts: 377
Right right, forgot that one. :> EDIT: Alright, I did some testing. As it turns out, buying one more shop call at the end and saving enough money to buy one more Jet Pack IS futile. Because the next time I summon the shop past that point, there are no Jet Packs in stock! I would have to summon the shop twice more, meaning I would have to build up yet another $2000 for one more Shop Call. All that combined with having to sit through the Chatty Shopkeeper twice at the end pretty much gaurentees that I won't save any time, and will probably lose time. I'm positive that the inventory available in the shops can't be affected, and it appears by a pattern that is identical in every playthrough, much like the enemy's item drops. Ergo there is no way to MAKE Jet Packs available when I want them.
Experienced Forum User, Published Author, Former player
Joined: 8/17/2004
Posts: 377
It's finished! Final time at movie stop is 23:56!! Start to Finish! 23:56 On a side note, taking that shortcut I mentioned early shaved about a minute off, how about that? Now then, a few final notes... The first battle with Bopper is interesting, like a David vs Goliath sorta deal... You'll notice after the first Bopper battle, I get knocked down the mountain 5 times by a horned monster. That couldn't be helped, since it has to happen 5 times before the monster knocks HIMSELF down and you can continue. I tried shooting the heck out of him, and zipping up past in the Jet Pack, didn't work. You'll also notice I refrain from using the Jet Pack in the final Route, because I needed to save as much of it as possible for the end. That Samurai Guy cannot be beaten without either a Jetpack, or a weapon that can reach the Right Sphere, such as the Thundershot. I didn't have any special weapons so I had to save enough Jet Pack to take it out. Befoer you ask why didn't I buy another one, the last time I summoned the shop I bought what I could, 2 Jetpacks, I COULD have bought another Shop Call at that point, but with the Cash I had at the end of the game, I would have had to spend quite a bit of time building up enough to buy one more Jet Pack. Perhaps if there is enough call for it, I may re-do the Run from the last Shop Call and spend just enough time building cash for one more Jet Pack at the end. Though the time spent building money (not to mention going through the chatty shop keeper again) may negate the time gained from using the Jet Pack... You'll notice that right before I enter the Demon's Door, I pause to pick up an Apple. This isn't because I needed it for Force Points, it's because that for some reason the game won't let you enter the demon's door if there's such an item on the screen. Wacky eh? I could have shot those enemies earlier on and made the item drop off screen, but that would have wasted more time than the moment I spent picking it up after the fact. On the note of jumping into narrow passageways and having to do it twice, that honestly CAN'T be done any better. It's simply a matter of the game's mechanics. Play it for yourself and see, but there is honestly no way around it. All those times I jumped twice to fit into a passageway, I had to. Could I have shopped earlier? Perhaps... I could have summoned the shop earlier and bought three pairs of boots, and summoned it more occasionally to stock up along the way. But the fact is, by the end of the game I hardly had any money left, and had I summoned the shop earlier I would have had less and less money and would have fell short at the end, and spent that length of time going slower. Which would have been bad because as I stated above, I needed the Jet Pack for That Samurai Guy. Shot a bit more often than I needed to? Sure did. That's because this is my first real attempt at a Time Attack, and I was still just getting used to playing it like that. If I were to replay it all from scratch I could likely do a much better job, however that won't be any time soon I'm afraid. I have my finals to worry about now, and next Semester I'm doing my Honors Dissertation, and probably won't have time to really do it like I did this time for a few months. Though I probably would do a revised run.. eventually. As it stands now, though, unless there's something I can fix near the end of the game, this run is complete. That's really all I have to say at the moment, any questions, fire em my way. I plan on submitting this run with the 'Uses Warps' category, since Bang's teleport ability is essentially a Warp. I won't, however, submit it under 'Loses Lives to Save Time' since that one life I 'lost' against the Demon was mandatory, and as I've said before, not a REAL life lost. Aaaaand, that's about it, I think. I'll check back tomorrow morning and see how the comments are, and I'll probably submit it then!
Experienced Forum User, Published Author, Former player
Joined: 8/17/2004
Posts: 377
Ok, the good news is I found a shortcut that can really shave some time off my run that I wasn't aware of before. The bad news is I discovered it after it would have been useful. (oy..) So I'm gonna have to re-do the run, after the battle with Mush. That's not TOO bad, at least I don't have to restart it... Anyhoo, here's the new route-plan in case you're interested with the changes italicized... 1 (you start here, don't take too long facing Guycot), 3 (meet Michael then turn around and leave), 2, 11 (beat Gahz), 9, 12, 17 (meet Faysha and turn around and leave), 14, 6 (entering Route 6 from 14 pretty much puts you on top of the shortcut to the Hermit's Den), 35 (beat Rowdy, meet Hermit, get Force), 8, 7 (beat Max) (teleport to theNode between route 12 and 20) 20, 15 (meet Michael and exit the route), 18, 19, 28 (beat Shark, then warp to the Node before Route 16), 16 (beat Mush), 27 (get Magic Stone) 37, 40 (shortcut to the cave in Route 15) 15 (open door, fight Demon, die), 15 (re-enter and take shortcut to desert), 33 (meet dying Guycot, meet Faysha, exit the level from the exit next to Faysha then warp to the node between Route 14 and 6), 6 (shortcut to Hermit's Den), 35 (talk to Hermit about Demon, then warp to the Node between route 40), 40 (get Sword of Apollo, then warp back to the node between Route 33 and 39), 39 (beat Demon and emerge on Route 38), 42, 21 (fight Bopper), 42 (fight Bopper the second time) 43 (finish game) Basically, instead of going for the Magic Stone right after beating Mush, I go after Shark first. Then I warp back to get the stone, and continue onward to Route 40, where there's a shortcut to Route 15. Since I would have normally had to go through Route 37 ANYWAY, this saves time, especially since the shortcut to Route 15 takes me right on top of the Demon's Door, rather than having to trudge through the outside part of Route 15, and most of the cave. I also have to warp one time less on this new route-plan, so that's even better still. Anyhoo, if you were interested in my work up till this point, here's my aborted run up to aquiring the Sword of Apollo (on the old route plan). And if you're wondering why I'm freaking out at the end of the run, that's cause I realized that A) I didn't have enough Force to Warp, and B) I remembered the Shortcut that was there... Sword of Apollo... 19:43 Tomorrow I'll resume work on the revised run. Redoing it from Mush is a pain but... it's better than knowing a quicker way is there. Besides which, I think I can make the Mush battle just a biiiiit faster...
Experienced Forum User, Published Author, Former player
Joined: 8/17/2004
Posts: 377
Ok, I have a new update, this one goes up to meeting Michael on Route 15 and ends after exiting the route. Route 15, First visit... 11:21 Again, a few notes. The items in the Shop do indeed seem to appear in a set pattern, which is why I summon the shop three times after defeating Max. Also, the reason why I seemingly waste time killing those few enemies on the top of Max's fortress is to A) Get some extra cash I needed, and B) Wait for the boots I'm using to run out so I can buy another pair when I summon the shop. It may look like I'm wasting time there, but I needed every bit of cash I pickde up, and I summoned the shop as soon as the boots wore off. You'll notice that the three times I summoned it at that point I was in the air and hit it as soon as it entered the screen each time. The first trip I bought three more Shop Calls and another pair of Boots to make up for what I just used, the second time I bought that one Super suit I needed, and the third time I bought three Jet Packs and three Dyna Punches. I decided to buy them at least there, as using the three of them gave me 210 Force Points, and access to Teleportation, which costs 60 points a pop. Thus I followed my original plan thus far, by warping right to Route 20. Hopefully I'll be able to pick up enough Apples to be able to use Teleportation when I need to. Otherwise calling the shop will be my alternative. The Shopkeeper may be chatty, but it IS quicker than walking back through a lot of the routes. Next up is the battle with Mush, and aquiring the Magic Stone, and the battle with Shark. After that is the 'battle' with the Demon. Though I wonder, would this run be considered 'lost lives to save time'? Because you HAVE to die during the battle with the Demon, the Game Over screen even comes up, but it's not a REAL game over, since it HAS to happen. Continuing takes you right back outside the Demon's Door as well, instead of at the start of the Route like it normally would. So it's not a real life lost... it'll make sense when you see it.... Anyway, at only 11 minutes so far, it's shaping up to be a bit faster than I thought it would. I'll probably get under half an hour if I get to use Teleportation as much as I plan to. EDIT: I fixed the link to the run, I accidentily had it pointing to an older one.
Experienced Forum User, Published Author, Former player
Joined: 8/17/2004
Posts: 377
Ok, I got an update to the run. It now goes up to after rescuing the Hermit, and stopping right before I have to use Micro Magic to fit through the exit tunnel. Seemed like as good a place as any to stop. To the Hermit... 7:37 And a few more notes... Yes I have to enter Route 3 to talk to Michael, his appearances are ordered, and necessary to view. If I don't talk to him in Route 3, he won't appear in Route 15, and if I don't talk to him there he doesn't appear on Route 27, and if I don't talk to him on Route 27 the Magic Stone won't be under the Lava until I do. It's a pain, but it needs to be done. I've actually found that Money isn't as big a problem as I had once thought. By the time I rescued the Hermit I already had almost $50000, at the rate I defeat enemies I should, presumably, be able to keep getting enough to continue buying what I need. There are a few problems, though. For starters, the first time you summon the Shop, he won't have everything in stock, the prices don't vary, actually, what varies is what is available at the time. I believe the items he has in stock are set by a pattern, by the fourth summon he'll finally have in Jet Packs, for instance. So I plan to summon the shop at the same time I use Micro Power right after meeting the Hermit, do all that menu-ing at once. At that point I'll buy three Shop Calls, and Three Boots. Super Suits, Jetpacks, or Dyna Punches won't be in stock in the first summon. I'm debating whether or not to buy Dyna Punches, actually, since they each only give you 17 Force Points, and you can only have 3 at once time. That means I can get about 51 points per shop visit once they're in. Of course I want to limit trips to the Shop as much as possible, since the shopkeeper is so darn chatty. So I'll probably wind up buying them when I can, but I won't make special Shop summons just for them. Money really isn't an issue, anymore, however Force Points are. I probably will not be able to wind up using the Warp ability as much as I'd like, not without staying in one place and fighting a lot of enemies. In some cases it might be easier to just walk. Again, I'll probably use Warp when I can, but I don't think I'll spend extra time building up Force Points just for it.
Experienced Forum User, Published Author, Former player
Joined: 8/17/2004
Posts: 377
Ok, I've decided to give this another shot and restart the movie from scratch. The first one was only a trial anyway. This new movie goes up to the same point as the last one, except it's now 20 seconds faster. Most of that improvement comes from the battle with Gahz, with a few other small improvements in Route 11. Anyway... This is the original trial...3:27 And this is the new attempt...3:06 I still haven't decided what I'm going to do yet about money and force points. Since I've determined that the enemies drop items at a set pattern and cannot be manipulated, finding a place to build up cash and force is going to be trickey. I've been thinking about doing a run that uses NO warping, and doesn't rely on Running Boots or Jet Packs for extra speed, save where they can be used for a shortcut. But I'll wait and see, if I can find a good spot somewhere on my planned route where I can take down enemies rather quickly and effeciently I may do that. I've estimated to buy what I NEED will take about 50 drops of cash from enemies, and to get enough force points I would need about 30 drops of apples. However fast I can aquire that much will depend on how fast I can fight enemies in a certain area. Since enemies reappear once their spawning point is just put offscreen, I just need to find a place where I can set up a good 'rhythm'. On my original planned route I needed either Boots or a Jetpack to get to Route 7 from Route 8 quickly, so it would probably have to be before then. I also determined that different weapons, like the Thundershot, don't appear to do any extra damage to bosses or enemies, so I won't waste money and time on them. Anyway, any comments or suggestions are welcome.
Experienced Forum User, Published Author, Former player
Joined: 8/17/2004
Posts: 377
Well if you could manage to hex it in, then perhaps. But if the only way to do this is to go back and restart from the beginning of the Donut Plains, then I wouldn't, it's not worth it. (Granted I don't know a thing about how the hexing works, so maybe it's not as hard as I think it is) And I haven't commented on this directly myself yet, but you're doing a great job! Keep it up.
Experienced Forum User, Published Author, Former player
Joined: 8/17/2004
Posts: 377
Hey, this trial is looking great so far. But do you think you could start throwing in some save-states to immediately load to the newer stuff, since even at frame-skipping at maximum it takes a bit of time to get to the end of the video... ^_^
Experienced Forum User, Published Author, Former player
Joined: 8/17/2004
Posts: 377
I just tested Vanish-Doom on AtmaWeapon on the Floating Island, and it killed him. Though as for the others, I can't say for sure, it's been too long since I last played it. I was only able to test AtmaWeapon because I had a save-state, but I don't have anything to test it on Poltergiest or Inferno. I'm pretty sure, though, that I remember the Vanish-Doom trick not working on two of the bosses in Kefka's Tower, one of the Statues, and one of the non-dragon bosses.
Experienced Forum User, Published Author, Former player
Joined: 8/17/2004
Posts: 377
Actually, Vanish-Doom DOES work on Atma Weapon (and Atma). And two of the three statues, Poltergiest is the only one immune to being vanished. So's Inferno. There might be one or two other bosses that are immune to vanish... But if the Joker Doom trick works out... well just be sure to have Setzer in the party that faces Poltergiest or Inferno... or both if you can swing it, I can't quite remember the routes in the final level.
Experienced Forum User, Published Author, Former player
Joined: 8/17/2004
Posts: 377
I don't think there'd be a huge problem with submitting under the japanese rom. From what I can gather there doesn't seem to be any differences in the game besides the title screen (and the fact that fmvs made on the JP rom desync in NA roms.) If that crash was an isolated incident then by all means continue with what you're using. However if it happens again you might want to consider switching roms, or emulators.
Experienced Forum User, Published Author, Former player
Joined: 8/17/2004
Posts: 377
I originally wasn't intending on doing the speedrun myself, but since no one else seems to be interested, and I know the route well myself, perhaps I will give it an actual shot myself. I've done some experimenting with enemy drops, and noticed something. They don't appear to be random, and thus can't be affected by me. I have, though, noticed a pattern. I've resetted the game several times and got the same results. From the start of the game the 5th enemy I kill drops some cash, the 7th drops cash, the 9th drops an apple, the 13th drops cash, the 25th drops cash, the 30th drops a heart, the 40th drops cash, the 45th drops cash, the 51st drops an apple, the 59th drops cash, the 68th drops cash, the 73rd drops a heart. It seems to go Cash Cash Apple Cash Cash Heart, and restarts. However there doesn't seem to be any immediate pattern to the drops yet. If it uses Hex code to determin enemy drops based on how many have been killed so far, it will probably go up to 255 before the pattern repeats. I would have to experiment a bit more and kill 255 enemies to see if the drop pattern does repeat itself. On another note, each bit of cash you pick up gives you 950 gold. Also, enemies re-appear rather quickly, just scroll their 'spawning' point off the screen once killing them and they'll re-appear immediately. Finding a spot somewhere in the game where there are numerous enemies that can be easily re-spawned would be the best place to build up cash and Force points, since their drops can't be manipulate it seems. Anyone have any suggestions on that? Given the time it takes to summon the shop and buy what you need, I was thinking it might only be worth it to visit the shop once in the game, buy the one Supersuit I need, and spend the rest of my cash on Boots, Jet packs, and perhaps a Thundershot or two (I'll have to do some experimenting to see if weapons like the Thundershot actually do more damage, or just make it easier to hit enemies)
Experienced Forum User, Published Author, Former player
Joined: 8/17/2004
Posts: 377
Well I've discovered the identity of the rom you provide. It's not that it's a bad or weird rom, it's the japanese rom. Actual filename should be 'takahashi meijin no boukenjima (j) [!].nes'. I'm not sure, however, if the emulator crashes just because it's the Japanese rom, or because Famtasia just doesn't like the game period. I tried the movie with the japanese rom I had and it played through and didn't desync, but still crashed at 2-4. I haven't tried playing through the North American rom up to 2-4 yet to see. Mainly because I suck at Adventure Island. :> I think your best bet, then, would be to find the actual North American ROM and restart your run. But first play through normally (without worrying about perfection) up to 2-4 to see whether or not it crashes. If it doesn't then you should then start from scratch. If it does, well, you could try the run on FCEU? I'd personally like to see an Adventure Island run, I was never able to get anywhere in the game, myself.
Experienced Forum User, Published Author, Former player
Joined: 8/17/2004
Posts: 377
Actually, I believe that she was called Peach in Yoshi's Safari, in some capacity anyway. Also in Mario RPG, the second battle with Belome, when he devours the party memebers he has a little quote for each one, and Toadstool's is appropriately enough 'Mmm, Peachy!'. Just some minor nitpicking ^_^ Of course it still can be said that the first time it was ever bluntly stated that her name is Peach (that anyone noticed, anyway) was Mario 64.
Experienced Forum User, Published Author, Former player
Joined: 8/17/2004
Posts: 377
If you want to get a Yoshi quickly in the Star World, you don't NEED to feed them five times. In the second Star World, the underwater one, you can get a Yoshi easily by feeding the baby the Star, that causes it to grow right away. It's either five enemies, or one item, to get them to grow. Since the baby and the star are right at the entrance of the level this might be your fastest way to do it.
Experienced Forum User, Published Author, Former player
Joined: 8/17/2004
Posts: 377
Just one more thing (three posts in a row in this topic eh? Heh) while I don't intend on doing a time attack myself, I really don't have the skill for it, I did record a brief movie up to defeating Gahz for people to view, just to get an idea on what to expect: Up to Gahz in about 3 minutes It follows the route I listed in my previous post. And it's an FCU file, as Famtasia seems to crash and burn horribly whenever you got to the menu screen or the map screen within a level. I know that isn't optimal playing, a few seconds could probably be shaved off, but it's close to the mark for someone who wants to do a time attack to get a good idea of what to do (and not to do).
Experienced Forum User, Published Author, Former player
Joined: 8/17/2004
Posts: 377
Alright, I've done some testing and I have some more info. I've discovered that you can finish the game without meeting Joe on Route 32, thus saving time going down that area of the map. You can't, however, get the Magic Stone without talking to Michael on Route 3 and 15, meaning you have to spend some time entering those routes and making it up to him. Making use of Teleport, the optimal route (in my opinion thus far) is: 1 (you start here, don't take too long facing Guycot), 3 (meet Michael then turn around and leave), 2, 11 (beat Gahz), 9, 12, 17 (meet Faysha and turn around and leave), 14, 6 (entering Route 6 from 14 pretty much puts you on top of the shortcut to the Hermit's Den), 35 (beat Rowdy, meet Hermit, get Force), 8, 7 (beat Max) (teleport to theNode between route 12 and 20) 20, 15 (meet Michael and exit the route), 18, 16 (beat Mush), 27 (get Magic Stone, leave the level from the second exit, not where you entered) Here either warp to the Node between Route 16 and 27, or backtrack through 27. If you have the Force to spare then warp, 19, 28 (beat Shark, then warp to the Node on Route 15), 15 (open door, fight Demon, die), 15 (re-enter and take shortcut to desert), 33 (meet dying Guycot, meet Faysha, exit the level from the exit next to Faysha then warp to the node between Route 14 and 6), 6 (shortcut to Hermit's Den), 35 (talk to Hermit about Demon, then warp to the Node between route 27 and 37), 37, 40 (get Sword of Apollo, then warp back to the node between Route 33 and 39), 39 (beat Demon and emerge on Route 38), 42, 21 (fight Bopper), 42 (fight Bopper the second time) 43 (finish game) Now a few more notes. Following that Route there are three instances where you need to dive underwater. If you want to use the Aqualung each of those times you'll need 2 of them, as you'll use up one shortly after the second dive. It may be better just to buy one then make Bang hold his breath for the remainder of the third dive. As I said in the previous post you could go without buying one entirely if you're fast enough swimming through the tunnels, and fighting Shark. You cannot, however, avoid buying at least one Super Suit. I made a change to this route compared to the one in the previous post. When you defeat the Demon and emerge on Route 38, I have this new route go up route 42 first then fight Bopper from the other side. I do this because the time spent going through Route 38 and 21 seems to be take longer than the time spent going through Route 42 and entering 21 from the north end, which plants you right on top of Bopper's room. They may be near equal in length, that's just my hypothesis. Luckily this is at the very end of the game, and retesting and re-recording it at that point would be less of a hassle then finding out something from the start, eh? On Route 42, coming up from the Route 21 exit there is this monster on the cliff which you must kill to pass. You can pass it without killing it while going down the mountain, but climing up it has to die. It's a pain to kill and it keeps sending Bang down the side of the mountain whenever he jumps. Eventually it'll die and you'll move on. Since you have to fight Bopper to enter Route 43, the time spent killing this monster is much shorter than trying to go back through Route 21, 30, and entering 42 from the other exit. You need to buy at least one Jet Pack (or use the Hermit's Levitation Force Skill) to reach the entrance to Route 43 and the second battle with Bopper. The Jet Pack flies faster than Levitation, and if you make a habit of buying a lot of items in your run, it's just as well to have one for there. So to recap, the one item you NEED to buy is a Super Suit, it's to your advantage to buy Boots, Jet Packs, and Aqualungs if you manipulate the enemies enough to get the cash you need. Aqualungs could potentially be skipped if you get through the underwater sections fast enough. You HAVE to die once in the game while fighting the Demon, there's no bugs past this that I'm aware of. In the route I gave above, you warp 4-5 times. That means you need at least 300 Force Points to use that, plus the one time you need to use Micro Power which costs 50. Thus you need to build up 350 Force Points (perhaps only 290 if you pass up the quick warp from the end of Route 27 to 16). Enemies can be manipulated to dropping Force Apples which give you 10 Froce points, and DynaPunch can be purchased from the Shop for $1000 which restores 15. But you can only carry 3 of those at a time, so it may be better to get your force points from enemies. It shouldn't be too difficult to build up what you need to teleport.
Experienced Forum User, Published Author, Former player
Joined: 8/17/2004
Posts: 377
I would personally love to see a Clash at Demonhead run. However I really don't have the skill or patience to do it myself. But having recently played through it I have come up with a few things to give someone who attempts it a headstart. 
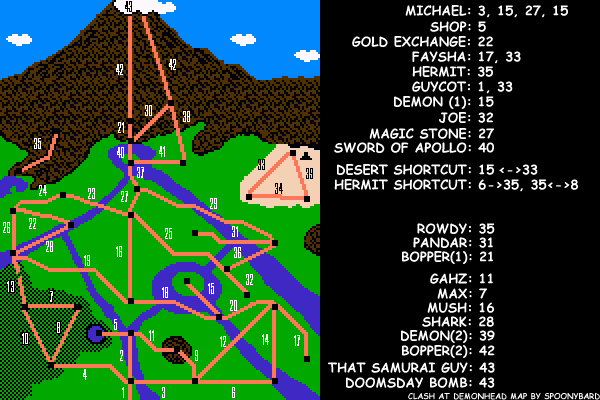
First of all an image of the map, with all the routes labeled and a key of all the significant people/items/bosses that are on certain routes: http://www.rpgclassics.com/~onlinelife/images/DemonheadMap.png Your main goal in the game is to get the Six Medallions, Four of them can be gotten from bosses without any story pre-text. Just find their fortresses and beat them. Those Bosses are Gahz on Route 11, Max on Route 7, Mush on Route 16, and Shark on Route 28. To get the Fifth Medallion you have to handle a bit of a sidequest. When you reach Route 3 you first meet Michael, then on Route 17 you meet the Fairy Faysha who opens the way to the Hermit on Route 35, from the Waterfall on Route 6. Defeat Rowdy to save the Hermit. Later you meet Michael again on Route 15 and he tells you to get the Magic Stone on Route 27, you see him again on that route. When you get the Stone and return to Route 15, enter the second well and Michael will be down there. Placing the stone in the door opens the way to the first boss fight with the Demon. You HAVE to lose this battle, it may not look good for a Time Attack to get a Game Over but it has to be done. From there re-enter Route 15 then take the Shortcut to the desert Route 33 and Enter Guycot's Fortress, and meet Faysha again who tells you to go to the Hermit. Return to Route 35 and the Hermit will tell you to get the Sword of Apollo on Route 40. Once you have that, go to Route 39 and use the sword during the second fight with the Demon to get the Fifth Medallion. One hell of a run-around for a Medallion eh? And for the sixth and final Medallion, first you must face Bopper on Route 21. After defeating him once he flees and you have to face him again on Route 42. Once all that is done the way to the final battle is open. Saying all that now, there are a few things to consider. Pandar is an optional boss, not needed to beat the game, and thus should be skipped. This saves you the trouble of going down Route 31. I don't know the game well enough to say whether or not you must talk with Joe. I've never finsihed it without talking to him. If you cna skip that, it'll save you the trouble of going to the end of Route 32 and backtracking. In fact if you don't fight Pandar or meet Joe you can skip going in that entire area of the map. You start the game with a Shop Call, so you don't actually need to go to Route 5, just make sure you have enough cash to buy another Shop Call whenever you use the first one. But going to Route 5 may be worth it for the regenerating Gold. It takes awhile to get to it, but if you spend just enough time getting gold bars you could make a fortune on Route 22. It's worth noting that Bang moves much faster using the Jet Pack and the Boots. However you can only carry three of them at once, and they each cost quite a bit. So building up enough money is advantageous, but it may be possible to manipulate luck to get the enemies to drop what you need. If you do that then you can skip Route 5 entirely. You only ever need to use the Hermit's Force Power once, to escape from Route 35 you need to use the First one. This saves some time on manipulating the menus, however the second Force Power, Teleportation would be invaluable in a Time attack. You need to get Bang's Force Level up to 200 to learn it, and it costs 60 Force Points to use. But you can warp to any Route (or rather, any Map 'Node' that the routes are connected to) you've been to. Considering that some of the objectives are so far apart, even an efficient route plan could be shortened considerably with Teleportation. One of the bosses, Shark, is fought underwater. When underwater Bang's health slowly goes down unless he has an Aqualung equipped. If you're fast enough you should be able to beat Shark without it. The other places in the game where you need an Aqualung are also fairly short, and far apart, thus if you have Bang's health up to full when he dives under and avoid the enemies underwater (in a Timeattack that shouldn't be an issue) then you may not need to buy one at all. You do, however, need at least one SuperSuit. To get the Magic Stone you must dive under the lava in Route 27. It is the only place in the game you need a Super Suit, so remove it as soon as you're finished lava-swimming. You walk much slower wearing one of those. When you come back from the Hermit on Rotue 35 you emerge on Route 8. If you have a JetPack or Boots you can take the 'upper' exit from Route 8 to get to Route 7. If you do the first part of the Hermit quest right away at the start you could then face Max on your way back. Overall, I think the best Route to take is: 1 (you start here, don't take too long facing Guycot), 3 (meet Michael then turn around and leave), 2, 11 (beat Gahz), 9, 12, 17 (meet Faysha and turn around and leave), 14, 6 (entering Route 6 from 14 pretty much puts you on top of the shortcut to the Hermit's Den), 35 (beat Rowdy, meet Hermit, get Force), 8, 7 (beat Max), 8, 4, 1, 3, 12, 20, 15 (meet Michael), 18, 16 (beat Mush), 27 (get Magic Stone, turn around and leave) 16, 19, 28 (beat Shark, turn around and leave), 19, 18, 15 (open door, fight Demon, die), 15 (re-enter and take shortcut to desert), 33 (meet dying Guycot, meet Faysha, then take shortcut back to 15), 20, 14, 6 (shortcut to Hermit's Den), 35 (talk to Hermit about Demon), 8, 4, 1, 3, 12, 20, 18, 16, 27, 37, 40 (get Sword of Apollo, turn around and leave), 37, 27, 16, 18, 15 (take Desert Shortcut to 33), 39 (beat Demon and emerge on Route 38), 30, 21 (fight Bopper), 42 (fight Bopper the second time) 43 (finish game) Now that's quite a lot, and notice it's a warpless run. Yeah it's all from one point to the other, but I believe it's the 'best' route to take. However if you use Teleportation to warp around you can shorten it significantly. While it's all going to depend on how much Force you build up (and how fast you can do it), I believe the best places to warp are after you get the Magic Stone warp back to route 15 (take the other exit, not the way you came in Rotue 27!), after you meet Guycot and Faysha on Route 33 you warp right to Route 6 to get to Route 35 (you can't warp straight there, unfortunately), and from there Warp right to Route 37 then on to 40 (If you're going to do that, the when you're in Route 27 getting the Stone, don't turn around and leave. Instead keep going and take the other exit so you can 'activate' that node for Teleportation, as I mentioned before.) Then either Warp back to Route 15, or to Route 33 (you'll have to make sure to enter Route 39 if you're going to do that, as if you just warp out of Route 33 the first time around you can't warp back unless one of the 'nodes' are activated). So that means to make the best use of Teleportation you should use it those four times to shave off quite a lot of time. That means you have to have at least 240 Force Points, 200 to get Teleportation and 60 each time you use it. You need to buy at least one Super Suit for the Lava, and that's all you HAVE to buy in the game. But as I said before, the Boots and Jet Pack make Bang move much much faster and it would be wise to make use of that. But I cant' really predict what routes those items would be best used on. And keep in mind that a bit of time is wasted summoning the Shop and buying everything (the slow text speed and chatty shopkeeper don't help matters) I hope all this info will help someone time-attack this awesome game. For more detailed info on specific parts of the game check out the walkthroughs for it at GameFAQs. (EDIT: Oh, one big thing I forgot to mention. I didn't overlook Route 13, the reason why I never included that in my Route-plan is because it's essentially one-way. You can only go from the North exit to the South exit in that route, so unfortunately you can't quickly get to Shark right after beating Max) (EDIT EDIT: I fixed the link to the image, I can't believe I misspelled head.)
Experienced Forum User, Published Author, Former player
Joined: 8/17/2004
Posts: 377
Alright, I've updated the smv. It's at the same address which you can dl here. This time it goes until the end of Area 2, just a few more notes: -I re-ran the run starting at about half-way through the first stage. This time I stay on the Fish Ride, keeping my momentum until the end of the stage. -Not much changes for the first town or second stage, once again I recieve three hits while on the Mouse Cart, but it doesn't affect Goemon's life meter, and it doesn't slow him down. -Minor changes in the first Fortress. -The first Impact Destruction Sequence and Boss Battle are done much better now. In the Destruction Sequence I recieve two Pipe Bombs instead of just one. I recieve no damage while fighting the boss this time as well (except for the natural energy loss Impact occurs, his life meter slowly drains but it's very minor) and I don't waste any Nasal Bullets this time either. -The first stage of Area 2 is a bit faster due to killing the Demon Carpenters as soon as they appear when the screen stops scrolling. Otherwise, I do a lot of unnecessary jumping around as the screen scrolls. -Again no changes to the second stage in Area 2. Like last time I choose Goofy Woods instead of Log Lake to play. -I quickly run through the second town, buying the Pass you need to get through, and anger some guards and a swordsman on the way out :> -I delay a few seconds throughout the second Fortress, in order to keep Goemon from recieving damage. I could have shaved a bit off had I opted to let him take a hit, but not only would it have lowered his life meter, but also lowered the power of his weapon. I want to keep his flaming chain pipe throughout the game, so I plan to avoid taking hits with Goemon where I can avoid it. In instances where I'm riding a Cart or some other sort of Armor, I can then afford to take damage as it doesn't hurt Goemon directly.
Experienced Forum User, Published Author, Former player
Joined: 8/17/2004
Posts: 377
Oh no, I forgot that you maintain your momentum after getting in water on those things. Well now I certainly feel stupid, but that's what these tests are for.
Experienced Forum User, Published Author, Former player
Joined: 8/17/2004
Posts: 377
Yes, it's a Japanese Rom. It doesn't matter much as I've finished the game a number of times before, and I skip all the skipable cutscenes so it's easy to watch and get into. Ganbare Goemon 3 would be much harder to make a speedrun out of though, it's a different style of game, borderline action RPG, and it's quite long with a lot of text. Ganbare Goemon 4 returns to the sidescrolling formula, though it is longer than 2.
1 2
14 15 16