Experienced Forum User, Published Author, Active player
(266)
Joined: 7/14/2014
Posts: 57
Location: Kansas City, MO
Akisto wrote:
i'm not entirely sure but i've killed the bird before it got offscreen not entirely sure if it was killed entirely by the bomb but i'm also running Solo so the boss would move diffrently
With a little further manipulation of the boss's flight pattern (moving Pocky to the right by ~10px) and a minor adjustment in bomb positioning (~1px), I was able to successfully one-shot the boss with bomb alone. This saves 16 frames. Thanks for the tip :-)
updated BK2 file
Current Project: Pocky & Rocky (SNES) improvements
Status: Stage 2 - fighting the octopus
Frames improved so far: 577
Experienced Forum User, Published Author, Active player
(266)
Joined: 7/14/2014
Posts: 57
Location: Kansas City, MO
Akisto wrote:
I have managed to 1shot the boss in RTA's a few times but most of the time i bomb and have to shoot a few shots at him already found a solid strat for it
1shot as in totally dead with bomb alone, or did you still need those 3 extra shots to take out the remaining 48 HP like I did? I thought bombs topped out at 2000, but if they can go higher, I'll definitely need to go back and see if I can do that.
Current Project: Pocky & Rocky (SNES) improvements
Status: Stage 2 - fighting the octopus
Frames improved so far: 577
Experienced Forum User, Published Author, Active player
(266)
Joined: 7/14/2014
Posts: 57
Location: Kansas City, MO
Here's the rest of Stage 4. If you saw Part 1, skip to 1:10.
Link to videoBK2 File (Bizhawk 1.7.2)
Nothing terribly technical going on with the airship section of this stage. It runs pretty light on lag and there's no additional entertainment to be gained at that cost, so I went through this one avoiding all possible lag. It wasn't particularly difficult, as all I had to do was kill most enemies fairly quick (mostly before others appeared) and delay some actions in maybe 3 or 4 spots throughout.
The large flying pirate enemy can be temporarily KO'd, but will always reappear at scripted locations throughout the level. I only killed him when necessary to manage lag and spawn the boss ASAP, since his last appearance will run all the way to the end of the stage and potentially hold things up. Also, he has some really odd behavioral patterns at times. For example, manipulating him to throw the single bomb at me from the right side of the ship required a frame-perfect shot from Pocky.
The only other interesting point I can think of is that you can squeeze in between the gun pirates and where their bullets spawn if you're really careful. I do this a few times in the video.
The boss fight here turned out WAY better than expected. It was good to see the sprite delay glitch work again after the uncooperative lich (even if the result wasn't quite as silly as the others so far). That, and I honestly wasn't expecting to be able to get another 2000 damage bomb off on this boss. I lucked out and found a workable position/timing within the first minute or two of testing, so I can't say much about the boss's attack or flight pattern. It's definitely manipulable by the position of its target, but that's about all I know.
Obviously for RTA you'll want to burn a bomb on this boss if possible since it's so mobile, but it's difficult for me to estimate how hard it would be to find the ideal position/timing. Solo would need to test many, many starting positions and timing, while co-op could potentially mimic me, hit a ~5 frame window and hope the boss is targeting the correct player.
Current Project: Pocky & Rocky (SNES) improvements
Status: Stage 2 - fighting the octopus
Frames improved so far: 577
Experienced Forum User, Published Author, Active player
(266)
Joined: 7/14/2014
Posts: 57
Location: Kansas City, MO
Akisto wrote:
t0ast could you explain to me how the sage cycling works a bit more where its cycling etc? i am running Solo RTA's of this and i got this time 21:20 now http://www.twitch.tv/se7endeadlysins/c/5420173
So basically for me to improve that time is obviously not dying stupidly in stage 5 but i also want to be able to bomb first boss and get a bombsage in stage 2(thats the sage i can _never_ get)
Nice run!
The RNG is rolled during the story cutscenes before each level and is based upon the game's main frame-based counter (7E0002). It's initial value varies from stage to stage and it stops a few increments after you press start to skip. The final counter value modulo 8 gives you the value of the sage you will get. In other words, it's stepping through this list of possible values on every frame:
0 - Knight (powerup)
1 - Fisherman (powerup)
2 - Mandolin Lady (bomb + dog)
3 - Old Man with Fan (powerup)
4 - Old Man with Cane (bomb)
5 - Reclining Fat Man (bomb)
6 - Man in Purple (powerup)
7 - Mandolin Lady (bomb + dog)
As such, you'd normally you have a 50% chance of getting a bomb from each stage with a sage. However, Stage 2 is different ...
0 - Knight (powerup)
1 - Fisherman (powerup)
2 - Mandolin Lady (bomb + dog)
3 - Old Man with Fan (powerup)
4 - Man in Purple (powerup)
5 - Man in Purple (powerup)
6 - Man in Purple (powerup)
7 - Man in Purple (powerup)
... meaning the chance is now 1 in 8 because the Man in Purple decided to be a greedy jerk.
Even though the starting value of that counter is different from stage to stage, each individual stage seems to be consistent (for example, stage 2 looks like it always starts at 43). You could potentially improve your chances by firing up BizHawk (or similar) and seeing if you can find some audio or visual cues in the cutscenes (like the appearance of a specific letter or a note in the music) that syncs up with a favorable time to press start and then trying to hit that in real-time. This does come at the cost of risking a small amount of time (compared to just mashing start), but if you can reliably use it to get bombs, it would definitely be worth it.
Current Project: Pocky & Rocky (SNES) improvements
Status: Stage 2 - fighting the octopus
Frames improved so far: 577
Experienced Forum User, Published Author, Active player
(266)
Joined: 7/14/2014
Posts: 57
Location: Kansas City, MO
"With a Little Help from my Fwends", a remake of Sgt. Pepper's Lonely Hearts Club Band by the Flaming Lips (plus several other collaborators). Yes, the entire album. Yes, it's exactly as weird as you'd expect.
[url=
http://www.npr.org/player/v2/mediaPlayer.html?action=1&t=1&islist=false&id=356125413&m=356736732
]NPR media player link since YouTube doesn't have much of it yet.[/url]
Current Project: Pocky & Rocky (SNES) improvements
Status: Stage 2 - fighting the octopus
Frames improved so far: 577
Experienced Forum User, Published Author, Active player
(266)
Joined: 7/14/2014
Posts: 57
Location: Kansas City, MO
ALAKTORN wrote:
Damn, the lag at 55 seconds is serious. Maybe killing more enemies to remove lag would be faster?
Yeah I know I’m late.
Just wait until you see the second set of bridges in Stage 4 :-)
I did test killing more skeletons while waiting for the sage to drop the bomb, but that actually resulted in more lag. Unfortunately, the game will spawn more skeletons in this area after killing some of them, and the spawning animations caused more lag than just letting most of the skeletons run around. There is still a chance that some other combination of positioning and kills could reduce lag a little more, but I couldn't find anything better at the time.
I'll probably go back and give areas like that a few more tries once I get through the rest of the stages, but some parts of this game are just stuck being really laggy no matter what you do.
Current Project: Pocky & Rocky (SNES) improvements
Status: Stage 2 - fighting the octopus
Frames improved so far: 577
Experienced Forum User, Published Author, Active player
(266)
Joined: 7/14/2014
Posts: 57
Location: Kansas City, MO
I had been gaming since the early 90s and had a penchant for breaking or messing with the games I played while trying to complete them. I also occasionally enjoyed what speedrun/superplay videos I could find online, but didn't think I had the time or interest to build the skills necessary to enter that arena. Not related to this was also a relatively recent desire to find some fun way to combine my skills as a Software Engineer and video gaming hobby.
Enter AGDQ. I got hooked on that marathon last year and eventually saw the TAS block for '14. The SMW ACE blew me away and had me dying to know more, so I found my way here and started digging. The idea of making a TAS really clicked with me, so I thought I'd get my feet wet and see where it goes from there.
Current Project: Pocky & Rocky (SNES) improvements
Status: Stage 2 - fighting the octopus
Frames improved so far: 577
Experienced Forum User, Published Author, Active player
(266)
Joined: 7/14/2014
Posts: 57
Location: Kansas City, MO
PJ wrote:
Very nice!
Mr. K and I actually toyed around with that second double dash. We found that angle, or one similar to it, but were struggling with setting it up quickly. Those bats and the tornado show up and really screw things up if you're not immediately prepared. It is fantastic to see in the TAS though! I especially like the 3rd dash! We tried a number of different setups, but it was way too inconsistent for us to handle.
The only suggestion I have is the tornado/bat fight at the end. Have you tested killing the bats offscreen with a wag/swipe? I know Mr. K and I tested the lag doing that vs killing them on screen, but I sadly do not remember the result of that test.
I could definitely see the 2 extra dashes being immensely difficult in RTA. Synchronizing as I did on the first bridge before the bats and tornadoes would likely be out of the question as well on account of the game being somewhat inconsistent on how double dashing straight into a perpendicular surface is handled. One starting positions might bounce you one way while the next pixel up might go the other. Not a fun guessing game to play with cliff edges nearby. The 3rd would likely be just as rough since there doesn't appear to be any easy landmarks to work with and you'd mostly just have to hope for the best with the jester and the cliff edges between bridges. Damage boosting through the first cloud there in your run was a very reasonable way to approach it.
From general observations while messing around in the final bat + tornado gauntlet area, earlier kills like wagging at the edges or shooting ASAP would definitely reduce lag. I caused about 95 lag frames in this area, and I'm guessing at least 80% of those would be avoidable if I made kills at the edge instead. However, it would diminish the entertainment factor significantly for the ~40 sec segment so I opted to go for a few trick shots. Still, I took care in making sure no non-attack movements contributed towards the lag and in ending the sequence as fast as possible following the last wave of bats.
Suffice it to say, with the game's various auto-scrolling and scripted wait areas lending themselves to small compromises like these, I'm going to be making use of the "Contains Speed/Entertainment Tradeoffs" classification for this run.
Current Project: Pocky & Rocky (SNES) improvements
Status: Stage 2 - fighting the octopus
Frames improved so far: 577
Experienced Forum User, Published Author, Active player
(266)
Joined: 7/14/2014
Posts: 57
Location: Kansas City, MO
PJ wrote:
Looking forward to seeing what you can do with stage 4! Really curious to see if my dashes are still optimal. :P
I'd say you pretty well nailed it as my 1st and 4th double dashes wound up being similar.
Link to video
Double dashing past the lightning clouds still seems to be the way to go. They've got too much health and their unblockable projectiles can be awful/time-consuming to dodge on the narrow bridges.
Immediately double dashing after the first was a serendipitous find, though it's gains over single dashes are likely too small with too tight of tolerances for RTA use.
I somehow managed to avoid lag up through grabbing the bomb with minimal adjustments. For some reason the first vertical and horizontal sections just seem to run really light for the amount of action and types of enemies present.
The second set of bridges, on the other hand, is super laggy and there really isn't much that can be done about it. I tried getting through them with walking, single dashes and kills, but wound up seeing just about as much lag as double dashing. As such, I opted for the dashes.
The jester here unfortunately has more health than the ones in the shifting canyon, so killing him before his projectile wasn't possible. The last double dash may appear sub-optimal since Pocky bounces down and briefly stops the screen, but it doesn't stop Rocky from continuing to move upward. Oddly enough, it actually gets him further faster than all of the other double dashes I tried, including those that let Rocky cleanly bounce upward off of one of the bridge posts. I'm guessing this is because Pocky holding up the screen inadvertently diminished lag by delaying part of the massive tornado + fireball group from spawning.
I tried to make the last area as entertaining as possible, but there really isn't a whole lot to work with there. That, and the area likes to run extremely close to the lag threshold in spite of the relatively minimal amount of action going on. Must be all of those complex bat flight patterns weighing things down or something.
Current Project: Pocky & Rocky (SNES) improvements
Status: Stage 2 - fighting the octopus
Frames improved so far: 577
Experienced Forum User, Published Author, Active player
(266)
Joined: 7/14/2014
Posts: 57
Location: Kansas City, MO
Zombie hover is totally OP.
Link to videoUpdated BK2 file (Bizhawk 1.7.2)
Unfortunately Pocky had to sacrifice herself to make this happen because there's no room at all to edge-walk past that last skull. It's definitely worth it though, because skipping that cycle saved nearly 500 frames even with the additional lag.
See also: dying but not really dying at 0:45, thanks to the crazy interrupt properties of the green slime projectiles. Here's what I think is happening:
-- Green slime shoots projectile
-- Projectile starts to transition between flying through the air and hitting. In this state, the projectile disappears for 1-2 frames but is still possible to stop with melee. At the end of this time, anything the character is doing will be interrupted regardless of whether or not the projectile sticks.
-- I melee while squeezing through a very tight spot between the slime and the wall.
-- Rocky's hitbox shifts or grows as melee occurs, causing me to take damage from coming into contact with the slime.
-- The melee still counts towards stopping the projectile from sticking.
-- As mentioned before, even though it doesn't connect, the projectile still applies its canceling properties which halts both the melee animation and the death animation.
-- With the death animation unable to complete, Rocky proceeds through the rest of the level with 0 hearts. This is confirmed by him receiving no health bonus points at the end of the stage.
-- If Rocky gets hit again, he will still die.
All this aside, there are some really weird things that occur on this stage when you separate the characters between the shifting rocks and one of them dies. At one point, I was messing around with leaving Pocky behind and she died by way of jumping off the edge. In order to bring her back for the death animation, the screen has to shift down so she could drop back onto the level outside of the moving rock formation. While this was occurring, Rocky was able to leave the top edge of the screen. As I dashed upwards repeatedly, I saw his shadow loop through the non-moving screen 2-3 times before I fell off something and he returned to one of the pathway edges on the screen. I have no idea what to do with this or if it's even helpful (since the game partially relies on screen position for several triggers and it's not moving here), but it definitely warrants further investigation at a later date.
Current Project: Pocky & Rocky (SNES) improvements
Status: Stage 2 - fighting the octopus
Frames improved so far: 577
Experienced Forum User, Published Author, Active player
(266)
Joined: 7/14/2014
Posts: 57
Location: Kansas City, MO
So, I just realized I'm a bit of a dummy and didn't think about using zombie hovers in the canyon. I gave it a quick test and it looks like skipping a cycle just past the seam is possible (if a bit messy, at worst). Time to go revise :D
Current Project: Pocky & Rocky (SNES) improvements
Status: Stage 2 - fighting the octopus
Frames improved so far: 577
Experienced Forum User, Published Author, Active player
(266)
Joined: 7/14/2014
Posts: 57
Location: Kansas City, MO
PJ wrote:
Hahaha, I remember when Mr. K and I were playing, and we were pushing that basket around when it suddenly opened and I walked into the powerup. That was a tough lesson to learn. I'm glad it made it into the TAS. :P
I agree with bombing the Genie, and I love the way you handled the bat room! You are making excellent progress. Keep up the great work!
PJ wrote:
Ughhhh I wish I remember what Mr. K and I were testing years ago. We came up with a few double dashes at the section at 1:56, but it looks like your seam walking would be even faster than those. I honestly don't think we were close to skipping any cycles with the dashes, but this was a long time ago.
I really love your lag management in this section! The playaround/dancing keeps this really entertaining too. You are doing fantastic work! Keep it up!
Thanks again for the encouragement and interesting anecdotes about some of the nuances of this game from your and Mr. K's run.
I had opened a few chests previously while experimenting with double dashes, but didn't think much of it at the time since the dash itself deals damage. Popping it open by just walking was more or less an accident while just messing around waiting for the shift. If it makes you feel any better, I walked right into the powerup the first time too :-). Once I saw it was possible, it was too amusing to not include.
If anything, that area with the seam is where I think the best chance to skip a cycle might be, but the best I could manage was getting the leading character pushed into the green slime by the moving wall and promptly falling off the edge. I found a few double dashes in the seam area that worked okay, but unfortunately the lag they caused was a bit high and they didn't sync very well with the jester. I didn't really even consider trying to walk that edge until I started trying to single dash through, and even then, I half wasn't expecting it to work, so it made for another pleasant surprise at the time.
Current Project: Pocky & Rocky (SNES) improvements
Status: Stage 2 - fighting the octopus
Frames improved so far: 577
Experienced Forum User, Published Author, Active player
(266)
Joined: 7/14/2014
Posts: 57
Location: Kansas City, MO
Stage 3 complete!
(jump to 1:30 if you've already seen the 1st and 2nd part videos)
Link to video .BK2 file (Bizhawk 1.7.2)
Even though it didn't take long to put this together, it was still an interesting area to work with due to the canyon shifting mechanics. Though try as I might, I couldn't beat the distance per shift cycle that you'd see in a RTA. Since the shifts are THE worst sources of lag in this area and I had some spare time between cycles, I optimized what I could. Some strategic pauses or 1-2 frame stops while walking during a shift saved at least 50 lag frames in this area.
On an unrelated note, there's also some wonkiness to the canyon shifting cycles, like throwing off your positioning slightly when moving that can occasionally ruin a precise shot or bump you off the path if you walk too close to the edge. That, and the characters occasionally act like they're getting hit or crushed at times when bumping up against moving canyon walls. Sometimes they'll even warp a few dozen pixels if you move at the right time. Using these could provide some minor entertainment to fill the time between cycles, but I wanted to keep moving as quickly as possible so I didn't bother this time around.
The 2nd worst lag offender is the jesters. Fortunately, they seem to follow a global timer of sorts for their move + attack pattern that applies before they even get on-screen. By carefully timing my approach to each of them, I didn't have to suffer through the lag of their attack.
I also tried to come up with a good place to burn a double dash but couldn't find one. There might be potential to do it right before the boss, but the additional lag or wait it would require would very likely be too detrimental. Instead, I just decided to take care of it while waiting for the boss to finish dying.
Not much to say about the boss itself since he easily goes down with just one bomb. The sprite delay glitch unfortunately doesn't seem to work on this encounter with him either (despite there being no forced movement beforehand).
Current Project: Pocky & Rocky (SNES) improvements
Status: Stage 2 - fighting the octopus
Frames improved so far: 577
Experienced Forum User, Published Author, Active player
(266)
Joined: 7/14/2014
Posts: 57
Location: Kansas City, MO
Decided to bomb the genie (and updated the bomb planning list above to match). After seeing how long the disappear/reappear takes and factoring the time difference in damage being done between the two bosses, it's about 175 frames faster. This number doesn't take into account the potential time lost while dodging additional attacks from the final boss, but I really don't think it will cost 175 frames. That, and the number is slightly on the pessimistic side with how I estimated the non-bomb genie kill.
So here's the next section:
Link to video
I revised how I approached the door after the first boss after I learned about the "hidden" HP loss of interrupted super/double dashing.
I originally considered just double dashing around wildly to kill the bats, but flawlessly knocking them around into each other wasn't as difficult as I thought and it felt more entertaining. I save 5 frames with the double dash at the door because it turns out it can get you past the screen transition threshold a little earlier than if you were to approach it otherwise. Regardless, both characters are needed at the door to proceed.
The genie is relatively easy to bomb to death and there are several positions it can work from, so it might be a valid RTA option if you have a bomb to spare. Even if you don't quite get the bomb right, chances are you'll still get him down to 135 HP, which can easily be dished out before he warps to another pot. Again, both characters are needed at the door to proceed, though the little dash trick from the previous transition doesn't appear to work here.
I also included what little I have so far of the canyon area so far mostly because I stumbled across an amusing (but slow) way to open chests. The rest of this level should move pretty quick.
Current Project: Pocky & Rocky (SNES) improvements
Status: Stage 2 - fighting the octopus
Frames improved so far: 577
Experienced Forum User, Published Author, Active player
(266)
Joined: 7/14/2014
Posts: 57
Location: Kansas City, MO
So, funny story about one of my earlier statements...
All of this gives you the fastest possible approach to the boss area and jumps straight into the boss intro without having to wait for the forced walk event. Even better, with the intro interrupting your double dash, you don't even have to pay the health cost.
It turns out you DO actually pay the health cost. The health counter just doesn't get updated to show this. The moment you get hit or spend another heart in a super/double dash, the health display will get updated to show the proper amount.
Akisto wrote:
i was hoping of you to find a position where i could use only 2 bombs to kill the last boss, i've managed to get the boss in red hp with 2 bombs atleast.
Unfortunately that will be a bit difficult with bombs hitting 2000 damage only under the most ideal of conditions and the boss having 4096 life. From my previous experimentation while planning this route, I've only been able to hit 1800 per bomb so far. I'll still try to improve that number, but even if it's possible, it will likely require a degree of precision that wouldn't be reliable in RTA.
That said, once I get to the genie, I may need to reevaluate whether or not it would be faster to use a bomb there or save it for the final boss. On one hand, bombing away the final boss statues takes care of 1040 damage (640 on each statue + 400 to the boss) and saves the delays from having to dodge fireballs from the statues and (likely) at least one attack from the boss himself. On the other hand, it doesn't appear possible to kill the genie (even with some manipulation) without waiting through at least one disappear/reappear cycle, so avoiding that wait and burning through all 1536 of his HP with a bomb might be a better play.
Current Project: Pocky & Rocky (SNES) improvements
Status: Stage 2 - fighting the octopus
Frames improved so far: 577
Experienced Forum User, Published Author, Active player
(266)
Joined: 7/14/2014
Posts: 57
Location: Kansas City, MO
Also, speaking of bomb planning, it probably wouldn't hurt to share it here as well.
Rocky/Pocky bomb count per event
--------------------------------------------
0/0   Hard difficulty

STAGE 1
1/0	+1 @ sage (frog)
2/0	+1 @ chest (bridge)
1/0	-1 @ boss

STAGE 2
1/0	-0 @ cyclops #1
2/0	+1 @ chest (bamboo forest corner)
1/0	-1 @ bamboo miniboss (hit with normal shots first)
1/0	-0 @ cyclops #2
1/0	-0 @ bomb thrower
2/0	+1 @ sage (bomb thrower)
2/0	-0 @ boss

STAGE 3
3/0	+1 @ sage (grave)
3/0	-0 @ boss #1
2/0	-1 @ genie miniboss
3/0	+1 @ chest (canyon)
2/0	-1 @ boss #2

STAGE 4
3/0	+1 @ sage (falcon)
3/1	+1 @ chest (ship)
2/1	-1 @ boss

STAGE 5
3/1	+1 @ sage (furnace)
2/1	-1 @ boss (Phase 1)

STAGE 6
3/1	+1 @ chest (1st set of torches, right side)
2/1	-1 @ armor miniboss
0/0	-3 @ final boss (Rocky on Phase 1 + Rocky then Pocky on Phase 2)
I double checked all of the chests in stage 5 and couldn't find a 2nd bomb. I also combed through stage 6 for a sage, shooting everything from every angle and came up empty.
Current Project: Pocky & Rocky (SNES) improvements
Status: Stage 2 - fighting the octopus
Frames improved so far: 577
Experienced Forum User, Published Author, Active player
(266)
Joined: 7/14/2014
Posts: 57
Location: Kansas City, MO
After experiencing out how difficult it is to go back and change sections of levels, I figured I'd post these videos in a more segmented manner from now on so more eyes can see it earlier and point out anything I might have missed before I get too far along. It'll also make the wall o text to go with each level a bit easier to digest.
So without further ado, here's Stage 3 up through the 1st boss.
Link to video
Level notes so far:
Zombies are far and away the main point of lag optimization in this segment. They have a moderate amount of health but also despawn the moment they come into contact with you (or sometimes just on their own if you're lucky. I go slightly out of my way on the first double dash so I can bump into those two zombies. This keeps things below the lag threshold and is roughly 75 frames faster than ignoring them with a more direct dash into the next section. The pumpkin head ghosts are also somewhat laggy but have way too much health to be worth killing.
The hidden sage on this one is slightly weird in that you have to go a little out of your way to shoot the back side of a grave. It takes some more time than usual, but bombs are still too valuable to pass up. For the RTA crowd, I don't recall which one I did it with, I did once trigger the sage from the front side of the gravestone with an upgraded weapon. It could save you a few seconds, so it's probably worth experimenting with.
Following the sage, it is possible (but difficult) to set up another viable double dash, but with the abundance of laggy zombies, it's just faster to walk and kill them. I don't send Pocky ahead while Rocky waits for the bomb because it would trigger more zombie spawns. After that, it's just setting up the double dash to skip the boss intro that I described above. Unfortunately, the sprite delay glitch doesn't appear to be possible here due to the forced jump and slide movements, though you can at least mess with the text box.
In order to have enough bombs later on in the game, I can only afford to spend one on this stage (EDIT: see next post for bomb planning). Given the low HP and low lag of this first boss along with his manipulable nature, I decided to kill him normally. While he does start out at 1280 HP, he actually retreats the moment you bring him below 256 HP. After he disappears, another forced walk is triggered towards the re-opened door. Only one character has to be moved to the door in order to minimize the walk time.
I didn't spend a whole lot of time examining his behavior since he dies so fast, but he seems to follow a pattern like this:
-- Target a player and warp left or right to attack them.
-- If they're too close or too far, do the spinning blade attack.
-- If they're somewhere in-between, do the ice attack.
-- Warp again (not sure what dictates direction)
-- Do fire attack against the other player.
-- Repeat.
Current Project: Pocky & Rocky (SNES) improvements
Status: Stage 2 - fighting the octopus
Frames improved so far: 577
Experienced Forum User, Published Author, Active player
(266)
Joined: 7/14/2014
Posts: 57
Location: Kansas City, MO
Akisto wrote:
That looks like a intresting thing, would it work to dash to either places without losing time as a Solo player? or is double dash needed? it could save me a whole second or so :)
Unfortunately this trick relies on outpacing the screen scrolling rate which single player can't do very well. Even if you solo dash at the most optimal time, you'll still land somewhere between the first and second threshold. All I can recommend is getting as long of a dash as possible as late as possible and land in line with the door to minimize the forced walking time.
Current Project: Pocky & Rocky (SNES) improvements
Status: Stage 2 - fighting the octopus
Frames improved so far: 577
Experienced Forum User, Published Author, Active player
(266)
Joined: 7/14/2014
Posts: 57
Location: Kansas City, MO
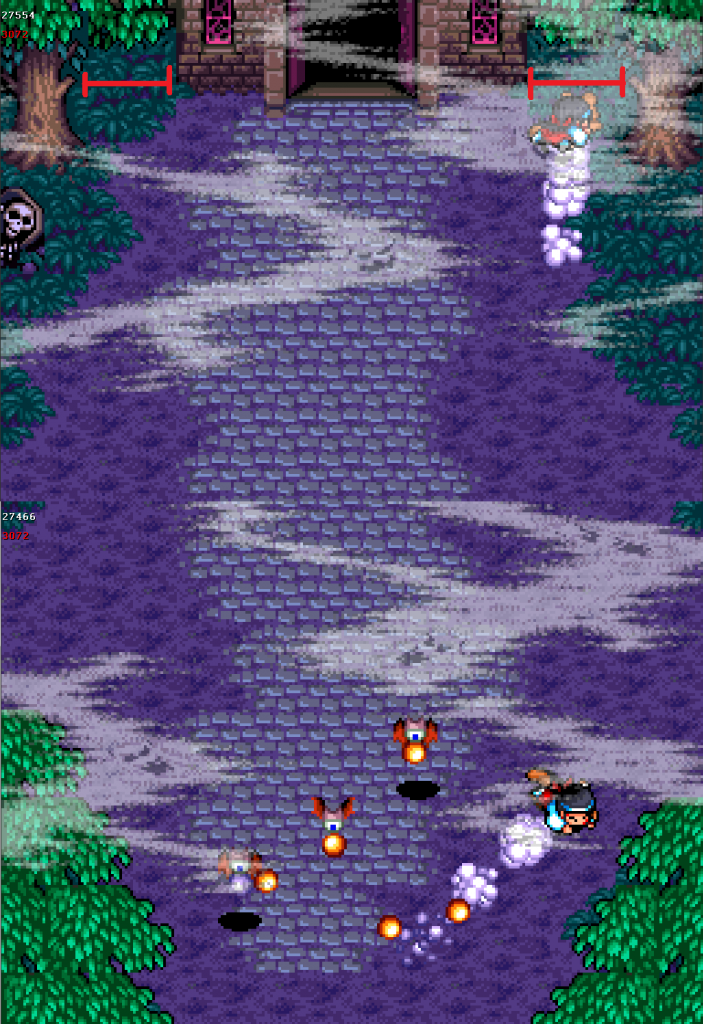
Stumbled upon an awesome way to save a little time on the approach to the 1st stage 3 boss. Should be easy to execute in RTA as well.
In the area with several bats right before the boss, execute a vertical double dash lined up with either of the areas marked in red.
This boss intro appears to operate on two distinct triggers/events. The first of which is the forced "walk towards the door" event. This only seems to trigger when both the screen has finished scrolling and the characters have passed a certain vertical threshold (roughly in line with the skeleton on the left). The second is the "door slam and boss spawn" event with its threshold being in line with the door.
With the vertical double dash moving much faster than the screen, you wind up well beyond the initial threshold before it finishes scrolling. If that double dash lands you in either of the recessed areas between the trees and the building, you get past the second threshold as well.
All of this gives you the fastest possible approach to the boss area and jumps straight into the boss intro without having to wait for the forced walk event. Even better, with the intro interrupting your double dash, you don't even have to pay the health cost.
EDIT: You actually do lose the health from the double dash, but the health display won't show it until something else updates it again.
Current Project: Pocky & Rocky (SNES) improvements
Status: Stage 2 - fighting the octopus
Frames improved so far: 577
Experienced Forum User, Published Author, Active player
(266)
Joined: 7/14/2014
Posts: 57
Location: Kansas City, MO
PJ wrote:
I'm glad the new strat is faster! Lag manipulation is immensely difficult in this game. Keep up the good work!
Thanks again.
Turns out it's not just lag manipulation that's difficult. It seems that cleanly patching in input changes in this game is nearly impossible. The moment you make a moderate change to a mid-stage routine, the game goes all chaos theory on you.
I couldn't match the subpixels perfectly (off by 1 on 3 of the 4 values D:) following the bamboo boss, so due to that and/or other RNG factors, the next set of Tengu spawns were off.
The Tengu had to be killed in a different position in a slightly different way, so that threw things off further.
Without being able to match the subpixels (off by 2-4 no matter what I do at this point) for the double dash, the end of the dash put me in a slightly different position for the boss.
Even if I was able to match it, the cyclops's behavior RNG has been rolled differently.
The raft would have to be redone as well since its RNG has changed (necessitating all new entertainment sequencing and the possible loss of the shore kappa kill), so I think I'm going to proceed without it for now to maintain my sanity. In the meantime, in case anyone is curious to see the difference up to the start of the raft, the BK2 file can be found here.
Current Project: Pocky & Rocky (SNES) improvements
Status: Stage 2 - fighting the octopus
Frames improved so far: 577
Experienced Forum User, Published Author, Active player
(266)
Joined: 7/14/2014
Posts: 57
Location: Kansas City, MO
So yeah, turns out the lower lag strat is noticeably faster. Managed to shave off 160 frames without even trying that hard.
All it took was killing two more enemies (monkey + homing seedling) and then just single dashing instead of double dashing. After damage boosting over the seedlings (cost = 1 heart) I send Pocky to grab the bomb. I figure this is viable (if need be) because she's fine to 1-shot bomb the first stage 3 boss and Rocky can then manipulate the Tengu into dropping mid-screen to be killed immediately without suicide or otherwise waiting.
Considering that this leaves me with the same amount of health as before, I'll refine this a bit further and then try to patch it in.
EDIT: Improved to 191 frames.
Current Project: Pocky & Rocky (SNES) improvements
Status: Stage 2 - fighting the octopus
Frames improved so far: 577
Experienced Forum User, Published Author, Active player
(266)
Joined: 7/14/2014
Posts: 57
Location: Kansas City, MO
Thanks, and yeah, that area is just awful to work with regardless of double dashing or not. A quick YouTube comparison puts me about 2-3 seconds ahead of the RTA on the horizontal bamboo forest, but I still want to go back and try a lower lag strategy similar to what you did. Since I'm skipping powerups and could add in more single dashes (which might not blow past the lag threshold quite as badly) there's a small chance that it could at least break even.
Damage boosting over the seedlings with both characters (so to keep the screen moving as fast as possible) would probably be fine without the double dash eating a heart. The one or two health items available afterwards (from RNGing the left chest correctly and the bamboo boss) would easily offset that as you described. The suicide to kill the Tengu could potentially be worthwhile but would somehow have to fit its 200+ frames neatly into overlapping with the requisite time spent grabbing the bomb and spawning the tengu, all the while not interrupting the screen's transition to vertical. It may require more waiting beyond those events, but then again, so did my strategy.
It's difficult to ballpark any reasonable numbers here without trying, so I'll probably give this a quick shot before moving on to the next level. If it does wind up saving time, I'll have a tough question to answer in whether or not I want to give up the health-related entertainment items (zombie hover + floating the chest behind the raft) or my plans to avoid all non-self-inflicted damage.
Current Project: Pocky & Rocky (SNES) improvements
Status: Stage 2 - fighting the octopus
Frames improved so far: 577
Experienced Forum User, Published Author, Active player
(266)
Joined: 7/14/2014
Posts: 57
Location: Kansas City, MO
Link to videoBK2 File (Bizhawk 1.7.2)
The start of this stage isn't much different than the first. The monkeys aren't required kills to clear a path, but they like to follow you around and their deaths help reduce lag slightly. The creepy pagoda geisha snake things get ignored because they blast out a wide arc of lag-inducing fireballs when hit.
The first vertical section is a little ugly. It's filled with a large number of laggy enemies, but most importantly, it introduces the Tengu. They're easily one of the biggest optimization hurdles for the first half of this level. They cause a decent amount of lag, so they should be dealt with ASAP. Unfortunately, they like to get knocked off-screen and occasionally waste time being invulnerable up in the air. To add further insult to injury, you can damage them as they're first dropping onto the level, but sometimes they will reset their health when they land. Just terrible.
The two you encounter in this section kind of stick you in a "damned if you do, damned if you don't" situation on account of their horrible spawn locations. They're right at the edges of the screen and are already planning to fly right off of it. Instead of waiting around in an area that's already laggy without them, I opt to just double dash through. Keeping them off-screen at least reduces their impact on lag.
The first cyclops is a piece of cake at 1024 hp, though juggling the Tengu to keep them off-screen makes things a little tricky. Eventually they stop getting knocked back by shots and swoop in to fire. Fortunately they waited to do this until I had both them and the boss very nearly dead.
The next horizontal section has monkeys and bamboo seedlings out in force. It's nasty laggy, but viable kills that don't keep you waiting around are scarce, so time is best spent setting up a very precise double dash past the final seedling blockade towards the bomb.
Unfortunately the stage is a little too eager to move upward on the next transition to vertical, so I'm forced to anchor Rocky near the bomb while I kill the Tengu plus the homing seedlings that just followed the dash. Of course, one Tengu plays hard to get at the very bottom edge of the screen, so I'm forced to wait briefly for him to circle around before I can finish it off. The bamboo miniboss won't spawn unless all Tengu are dead.
I'm not happy with having to briefly halt my forward momentum again for that Tengu, but try as I may, I couldn't find a good way around it. Waiting back near the bottom would have brought that Tengu back in the air (requiring more waiting) and walking further up would have put him swooping across the bottom of the screen and/or up in the air again.
Fortunately, that's the last of the difficult-to-optimize sections, so now we can have some fun. This starts with sprite delay glitching the bamboo miniboss and a quick bomb kill. He's got 1792 HP and his susceptibility to bombs is a bit odd. If you hit him with a bomb while he isn't attacking, he'll soak up nearly all of the damage with his arms. However, if you wait until he starts shooting out the seedlings, he'll take up to 1600 damage. I was hoping for more damage, but his skinny hitbox seems to be preventing that. Regardless, there's just enough time before the seedling attack for Pocky to make up the difference, so it went about as fast as it would have with a more potent bomb anyway.
EDIT: I was mistaken on this boss's damage-taking strangeness. The arms and attack animation have nothing to do with it. Instead, this boss has a one-time animation with abnormally long invincibility that occurs following the first hit. Dealing the normal shot portion of the damage first and then letting loose a 1600 damage bomb is still optimal as far as I can tell, but I figured this would be worth updating for the sake of accuracy in case anyone goes back to read this.
Right after the bamboo miniboss is a trio of Tengu who are finally kind enough to spawn in a position that lends itself to killing all three immediately. The upcoming canyon area is easily the most crowded and laggy area of the stage, so it's imperative that they all die here. Once that's done, a well placed dash (credit to Mr_K and PJ again for this one) makes short work of the canyon and brings me right up to the second cyclops. This one has the same HP and similar behaviors to the first, though the cramped area and his stronger predisposition towards movement (like occasionally charging to the bottom of the screen) add a little bit more complexity.
Next up is everybody's favorite raft auto-scroller. Not much to do here but play around and show off a bit. A small number of extraneous lag frames are spent from this point until the end of the level, but I think the entertainment routines that cause them are more than worth it. The video can generally speak for itself (especially if you watch the bk2 at 50-75% speed), but there are a handful of interesting technical points to note:
Kappas:
-- Kappas maintain the same life total from shore to raft, so if you damage them before they jump in, it will stick. However, if they grab you, they regain all of their health.
-- You can still perform any move while being grabbed, but any attacks will go directly to the kappa grabbing you.
-- The more kappas grab you, the stronger their total pull. You will overpower 1, break about even with 2, and quickly lose with 3.
-- If a kappa grabs Rocky and then Pocky walks into them, the kappa will switch over to Pocky. This doesn't work the other way around.
-- Reflected kappa crowns can do up to 32 damage.
-- It's very nearly impossible to kill a kappa before it jumps into the water. As the video shows, a well timed kappa crown can make it happen, but otherwise, with normal shots alone, you're stuck 1-2 shots away from a kill at best.
Bomb thrower:
-- 2048 HP, but not worth a bomb since you still have to ride all the way to the boss no matter how fast he dies.
-- The bomb thrower's bombs do 32 damage if reflected. Telling him to stop hitting himself repeatedly ends the fight about 20 frames earlier.
-- The targeted areas of thrown bombs does not appear to be manipulable, as the bomber has a set routine before he disappears.
-- When the bomber dies, he throws a crown at you.
Misc:
-- The laws of physics don't always apply on the raft. You can stand just outside the edges of the raft just so long as it isn't the top edge. You passively move up and down, but your Y coordinate doesn't change. Sometimes there is zero collision detection between the player characters. Packages containing food mysteriously follow in your wake.
-- No clue why some crabs just don't pop out of their bubbles. Shots, bombs, and position all appear to have no effect.
-- The Mandolin Lady was the first bomb-dropping sage in the RNG rotation for this stage. Even if she wasn't, I still would have wasted the frames to get her for that dog.
-- It turns out you don't HAVE to jump while riding the dog. If you change direction within about 7 frames, it won't jump. If you face it in a diagonal direction, it will actually slide along the ground in that direction until it jumps or you change direction.
-- I would have picked up the health in the chest at the second cyclops (to spend one less life on the boss), but it was much more entertaining to take it along for the raft ride (not to mention be able to zombie hover both characters).
-- The stage timer resets part-way through the boss. This appears to be related to one of the characters fully dying.
Finally, we're at the boss. As if the raft didn't take long enough, he's got one of the longest introductions in the game. No matter, at least the sprite delay glitch on him looks funny. He has 1280 HP and likes to go invincibile for a while after you deal 128 damage or more. As I explained in my previous post, I utilize melee and falling-off-the-raft respawns to do more than the intended 128 per cycle and cut the total number of cycles from 10 to 7. If you don't care to read that wall o' text, here's a quick breakdown:
4 cycles: 3 melee (12 dmg) -> 7 shots (124 dmg) -> 1 respawn (188 dmg)
3 cycles: 7 shots (112 dmg) -> 1 respawn (176 dmg)
(4 * 188) + (3 * 178) = 1280
Finally, in case you were wondering, killing the boss further to the left does not make the stage end faster. It's entirely determined by the time and health bonuses. Speaking of which... well, you'll see.
Current Project: Pocky & Rocky (SNES) improvements
Status: Stage 2 - fighting the octopus
Frames improved so far: 577
Experienced Forum User, Published Author, Active player
(266)
Joined: 7/14/2014
Posts: 57
Location: Kansas City, MO
Realized part-way through the stage 2 boss that I can actually cut down the total number of cycles, so that's being re-recorded now. Explanation and some maths ahead for those that are interested. If not, just wait for the video :-) I figure better to type this out now than in the already lengthy notes I have to go with the video of this stage.
The stage 2 boss has 1280 HP and goes through a 300+ frame period (longer if there's a wait between cycles) of invincibility/absence that starts immediately after you do 128 damage or more. The keyword here is "or more", so to surpass 128 damage and try to get this done in fewer than 10 cycles, you'll want to get as close as possible to that number then land one final hard hit.
In theory, this means the most damage you can do per cycle is 324:
12 melee damage (3 hits) + 112 projectile damage (7 hits) = 124 (just under threshold)
124 + 200 damage from a bomb = 324
However, considering the scarcity of bombs and their effectiveness on other bosses, this would be a massive waste.
Sticking to 3 melee + 8 projectiles alone unfortunately won't cut it. It stops just shy of saving a cycle and actually is worse off than a normal projectile-only kill. It's 140 damage per cycle and will save you 6 shots on the final one (~30 frames), but in total you're actually LOSING frames by doing all of that melee (~135 frames).
So where else can we look? As it turns out, we'll need to think outside the raft. If you run a character off of the raft and drown, they'll drop back on and do 64 damage (which ignores enemy invincibility frames) as part of respawning. This happens regardless of fully dying or just taking damage. By combining 3 melee, 7 projectiles, and 1 fall, we're up to 188 damage per cycle.
If we stick with that all the way through:
1092 -> 904 -> 716 -> 528 -> 340 -> 152 -> 0
That's 7 cycles! Compared to a projectile-only kill, it does incur some frame costs by way of melee and one character being preoccupied with drowning. If one character is handling both melee and projectile attacks, they're too close to the edge to move cancel every shot. If you have one character do melee and then jump off the edge right before the other does the projectile attacks, you will have to wait for the respawn animation (which can take ~100 to ~220 frames depending on whether or not you fully die).
I haven't yet crunched the numbers on these costs, but I'm pretty sure that the savings (3 cycles / ~1000 frames) should more than make up for them.
Beyond that, there's still a little more optimization to be found. Considering that there is only 152 HP to burn through on the last cycle as shown above, we can skip the melee hits on some cycles altogether (for 176 damage per cycle). After doing the math, the optimal combination is as follows:
4 cycles * (3 melee + 7 projectile + 1 fall) = 752 damage
3 cycles * (7 projectile + 1 fall) = 528 damage
752 + 528 = 1280 = dead boss
The only downside at this point is the cost of dying. The number of lives spent depend on how much health you have.
Both characters at full or nearly full health (4.5 - 5 hearts) = 1 life
Both characters low on life (0.5 - 2 hearts) = 3 lives
Anything in-between = 2 lives
Fortunately, I don't think there is anywhere else in the game where completely dying is beneficial, much less in a way that would save as many frames as it does here. My current route has me in the 3rd category (for various entertainment reasons), so here's hoping that leaving only one life in reserve doesn't come back to bite me later :-)
~~~~~~~~~~~~~~~~~~~~~~~~
What does this mean for RTA?
If you're running co-op, you could easily coordinate 6 cycles of 7 shot + 1 fall and save 2 cycles. Number of saved frames will be substantial but also depend on how well you can coordinate the respawn damage timing. Again, losing lives would be the only potential downside here.
If you're running solo, there are gains to be found, but they're much smaller and much more difficult. Full death respawns take too long to be beneficial, so you're basically limited to two non-death respawns (assuming full health). Unfortunately two falls will still put you 32 damage away from saving a cycle, so melee would be required. If you can pull it off (which won't be easy), the net gain would likely be ~150 frames at most.
Current Project: Pocky & Rocky (SNES) improvements
Status: Stage 2 - fighting the octopus
Frames improved so far: 577
Experienced Forum User, Published Author, Active player
(266)
Joined: 7/14/2014
Posts: 57
Location: Kansas City, MO
Very nearly done with stage 2. The raft segment has lived up to my expectations for the most part and should be a fun watch. I've finally got the bomb thrower down (which took more time and restarts to choreograph than I'd care to admit), so all that's left are a few token enemies and the main boss.
Also, while messing around during a break from the run, I tried the same sprite load delay glitch on some other bosses and, well, you can see for yourself below.
I'm guessing this will work on any boss or miniboss that has a full intro (music, text, 10+ lag frames to load, etc.) at this point. I'm tempted to do it on every boss possible in this run (excluding the first for various reasons) provided I can keep it from becoming stale. I'd like to get some thoughts on this from the stage 2 video once I'm done with it.
Akisto wrote:
I'm looking forward to this run, hope i can find some stuff i can use for future RTA's although im running Solo%. Not sure if this will help you in any way since youre probably going to kill all bosses with bombs, but the lich looking creature on stage 3 is manipulateable and does his attack based on your position.
Thanks. The guaranteed bomb availability and double dashes will keep much of what I'll be doing here irrelevant in solo RTA but hopefully I can provide some useful technical info as I go along. I'll include anything that might come to mind as I upload each level.
Current Project: Pocky & Rocky (SNES) improvements
Status: Stage 2 - fighting the octopus
Frames improved so far: 577

 This boss intro appears to operate on two distinct triggers/events. The first of which is the forced "walk towards the door" event. This only seems to trigger when both the screen has finished scrolling and the characters have passed a certain vertical threshold (roughly in line with the skeleton on the left). The second is the "door slam and boss spawn" event with its threshold being in line with the door.
With the vertical double dash moving much faster than the screen, you wind up well beyond the initial threshold before it finishes scrolling. If that double dash lands you in either of the recessed areas between the trees and the building, you get past the second threshold as well.
All of this gives you the fastest possible approach to the boss area and jumps straight into the boss intro without having to wait for the forced walk event.
This boss intro appears to operate on two distinct triggers/events. The first of which is the forced "walk towards the door" event. This only seems to trigger when both the screen has finished scrolling and the characters have passed a certain vertical threshold (roughly in line with the skeleton on the left). The second is the "door slam and boss spawn" event with its threshold being in line with the door.
With the vertical double dash moving much faster than the screen, you wind up well beyond the initial threshold before it finishes scrolling. If that double dash lands you in either of the recessed areas between the trees and the building, you get past the second threshold as well.
All of this gives you the fastest possible approach to the boss area and jumps straight into the boss intro without having to wait for the forced walk event. 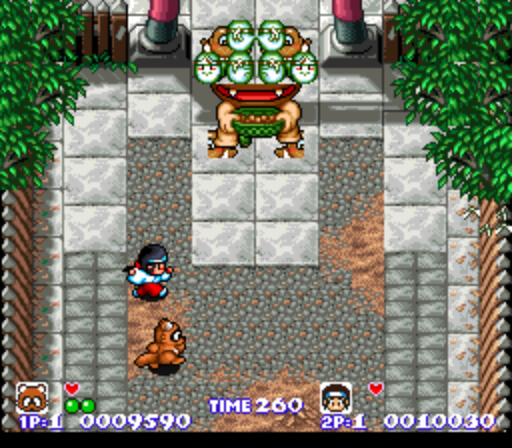
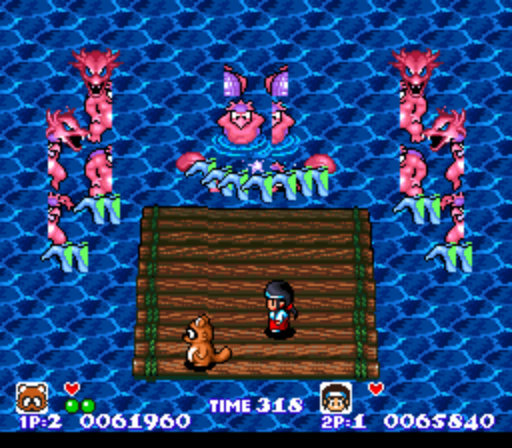 I'm guessing this will work on any boss or miniboss that has a full intro (music, text, 10+ lag frames to load, etc.) at this point. I'm tempted to do it on every boss possible in this run (excluding the first for various reasons) provided I can keep it from becoming stale. I'd like to get some thoughts on this from the stage 2 video once I'm done with it.