This page documents information about Castlevania
. Many of the tricks demonstrated here are near impossible in real time and documented for the purposes of creating Tool-assisted Speedruns.
Damage dealing tricks
Adding own damage into enemy damage
Stub explanation: In some circumstances, taking damage at the
same time an enemy takes damage may cause the own damage to be
added to the enemy's damage, greatly increasing the rate at which
the enemy approaches death.
TODO: Explain this trick.
Shortcut tricks
Bumping from enemies to reach upper platforms
A brief description of what happens when Simon takes damage:
When Simon takes damage, he is knocked up into the air and pushed either left or right of his previous position (assuming there is no ceiling immediately above him). For example, if Simon suffers a blow from his left side, he will be knocked to the right of his former position, first rising up in the air and later falling back down towards the ground. The jump peaks at 14 Y coordinates higher than his original position.
 Abusing this feature:
The above holds true when Simon is already in the air. Experienced players can use this to perform a double jump. Here is an example: Simon jumps right. While in the air, Simon is hit by a monster on his left side. Simon now launches to the right, first rising in the air followed by falling towards the ground. This can be abused to reach platforms that are out of Simon's normal horizontal jumping range. The first step is jumping towards a desired platform, hitting an enemy during the jump that causes Simon to get bumped further up and to the left or right. In many of the Castlevania movies on this site, this trick is used with the bats in stage 2 in order to avoid the scene where Simon must fight or dodge the fishmen.

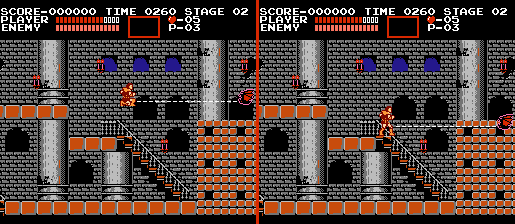
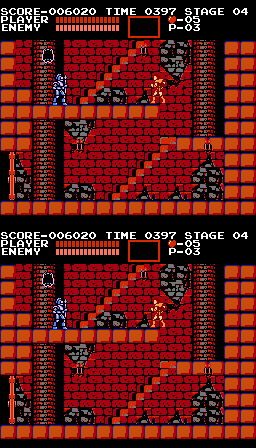
This trick can also be used to ascend to platforms that are exactly 3 "blocks" above a lower platform (example: Stage 4 after climbing stairs, Stage 7 before climbing stairs, stage 12 before Frankenstein's monster, etc). First, wait or manipulate an enemy to approach a desired platform 3 blocks above the current platform. Second, time a jump so that Simon is partially inside the platform above him when damage is taken. Simon's reaction to damage causes him to be launched high enough to pass through the horizontal threshold of the higher platform. Once a certain height is gained, the game is programmed to push Simon up and through the higher platform instead of falling back down to the first platform. With practice, this shortcut can be performed quite easily in real time.
TODO: Revise the current explanation of this trick (perhaps copy explanation from another tricks page).
Simon's speed and simple tricks to save time
Basic speed
While walking, jumping or being knocked away by damage, Simon has the same horizontal speed: one pixel per frame. But when pushed by taking damage, you will lose time at the moment you are hit and after landing, so you'd better walk or jump, obviously. Using stairs is two times slower than walking or jumping, and it is better to jump off a platform than just letting Simon fall from it, which is also slower.
An interesting note about moving platforms, found in levels such as 4, 5 and 10: when walking on them, their movement doesn't affect Simon's walking speed, even if they're moving in the opposite direction. In stage 10, you can't avoid waiting on some of these, and you'll notice that their movement speed is quite erratic.
 Landing from a high jump
If a jump causes you to land too far below your starting point, Simon will crouch and be unable to move for a short time. If you use the whip during your jump, and time it so that the attack animation ends on the same frame that you touch the ground, you will regain control immediately.
Enemy behavior and how to manipulate them
Bat and medusa head

They can appear from the left or right edge of the screen, depending on the situation. Usually, Simon's orientation seems to be the main factor in which side they come from. You can have total control of the height at which they spawn, too: it depends entirely on Simon's own Y position.
Special case: bats hanging from walls.
Only found in stages 4 and 6, they wait for you to approach before attacking. The character must be at a close enough Y position to trigger them. It is really apparent at the very beginning of stage 4, where you can walk past the bat, under it, and climb upstairs without it noticing you. These hanging bats can be manipulated to a certain extent. The player may make a well timed jump to delay or provoke (in stage 6, for example) them.
Note: these tricks tend to point at some kind of horizontal corridor with a fixed height in which the hanging bat can detect the player. Jumping to delay it would then mean going above this corridor to avoid being seen too soon, for example. This is just speculation based on observation.
Hunchback

They only have two moves: a short jump and a high jump. The short jump is their fastest way of moving; Simon can't outrun them by just walking away. If you are being chased by hunchbacks, you might want them to perform their high jumps so they can't catch you, because this move is slower than your walking speed. But how can they be manipulated?
Manipulating the hunchback:
It's one of the easiest enemies to control, if you know how it works. Simply put, they just check Simon's orientation at one specific frame to chose which kind of jump to do: they make a high jump if you look at them on the seventh frame after they land. Let's say that a hunchback is following you while you are walking and you want to continue your progression without losing time dealing with him, here is a step by step guide on how to make him do a high jump:
It's one of the easiest enemies to control, if you know how it works. Simply put, they just check Simon's orientation at one specific frame to chose which kind of jump to do: they make a high jump if you look at them on the seventh frame after they land. Let's say that a hunchback is following you while you are walking and you want to continue your progression without losing time dealing with him, here is a step by step guide on how to make him do a high jump:
- advance until the hunchback lands from his last jump
- from this frame (when his feet are on the ground), walk away from it for 6 frames
- now hold the opposite direction on the controller and advance one frame
- resume walking, and it will do a high jump.

Note that there is a limit to this trick. The hunchbacks can only be manipulated if they are close to you. When too far, they will always make small jumps. Be aware of the lag as well - don't count lag frames toward the six frames.
There is an useful technique, derived from this one. If there are more than one hunchback after you, or if you want to travel long distances while being chased, you can reduce the number of frames lost by turning back each time you want to manipulate the enemy(ies). Just jump backwards right after turning back. You can even continue jumping repeatedly that way. Not a single frame will be wasted between jumps and Simon will face the hunchback(s) all the way to his destination.
List of addresses
See below for an individual explanation on each of them.
| Address | Description |
|---|---|
| 0045 | Simon's HitPoints |
| 01A9 | Boss HitPoints |
| 058B | Left mummy's HitPoints |
| 058C | Right mummy's HitPoints |
| 0040 | Your x position in the level |
| 0354 or 003F | Your y position |
| 0568 | Whip timer |
| 0488 | Jump timer |
| 005B | Invincibility timer (after taking damage) |
HitPoints
Self explanatory. It starts at 64 and the corresponding character or boss dies when it drops to 0.
The two mummies share the "classic" boss HP meter (01A9) but they each have their own address which starts at 32.
x and y position
They indicate where you are located in the level.
There are two y addresses here. They are really similar, the only differnce is that the second one (003F) updates one frame sooner. The higher the value, the lower you are on the screen.
TODO: maybe only keep one of the two y addresses.
Timers
These addresses are particularly useful to perform some tricks and make actions at a frame perfect precision. When you'll read a hint which looks like "do this at xx", it means that you have to do the action mentioned while using frame advance when the value is exactly "xx"; the game will actually take the button press into account a frame later.
Here are the timers and what they can be used for.
-The whip timer:
When you attack with the whip, this value will count from 1 to 22; it basically covers all the frames of the attack animation. It is important because you can't do anything until the value hits 22, but when it does (it becomes exactly 22), you regain control: you can whip again, even in the air, or walk, jump, etc...
note: when you whip, the attack connects at 17
-The jump timer:
Like the whip timer, it starts to count whenever you jump, but it stops only when you land or do another action, like whipping or... Taking damage. Yes. It loses its usefulness in these cases.
Here is how to use it.
Let's start with an example: you are on a flat surface and jump. When the timer hits 40 is the earliest frame where you can make another input, be it another jump right after landing, starting walking again, or anything else. Attacking is still possible anytime in a jump, though.
Let's start with an example: you are on a flat surface and jump. When the timer hits 40 is the earliest frame where you can make another input, be it another jump right after landing, starting walking again, or anything else. Attacking is still possible anytime in a jump, though.
Now, in the game, you won't always land at the same height from where you jumped. Here comes a list of values to look for depending of where you jump to; the first part is where you land, the number is the value of the timer at which you can enter your next input:
- 2 blocks higher: 29
- 1 block higher: 36
- at the same height: 40
- 1 block lower: 42
- 2 blocks lower: 44
- 3 blocks lower: 46
- 4 blocks lower: WARNING! Special case, you may want to whip at 27 (see landing from a high jump in the Misc. tricks tab)
- 6 blocks lower (it happens in stage 17), see above but whip at 31.
Note: be careful around moving platforms with this; particularly in the end of stage 4: if you jump from the blocks below the moving platform to reach the door, the timing is not the same for some reason.
-The invincibility timer:
This timer activates when you take damage, it keeps track of your invincibility frames. In fact it doesn't start before you touch the ground after a hit, but you are already invincible when being ejected by the blow. When damaged on stairs, it starts counting immediately, giving you less actual invulnerability time.
This one counts down to 0, starting from 48, and goes down by one unit every two frames. As soon as it reaches 0, Simon is vulnerable again. You have nearly 100 frames of invincibility at your disposal.
var FrameCounter = byte at RAM[0x1A],
    CurrentStage = byte at RAM[0x28],
    SpecialItemCounter = byte at RAM[0x7B],
    CurrentSpecialWeapon = byte at RAM[0x15B],
    MultiplierSpawnCounter = byte at RAM[0x79],
    SpecialWeaponOnScreen = byte at RAM[0x72],
    WhipLength012 = RAM[0x70],
    NumberOfHearts = RAM[0x71],
    CurrentMultiplier = RAM[0x64],
    CurrentRandomBonusId = RAM[0x6F]
function SpawnItem_WhenEnemyDies: # Is at $1E09A:
  var ai_type = this->ObjectAItype

  if((ai_type < 32 AND ai_type ≠ 11) OR (ai_type ≥ 40))
  {
    if((FrameCounter MOD 16) = 2)
      return this->SpawnSpecialItem();
  }

  if(ai_type = 10 OR ai_type = 19)
  {
    return this->BecomeBonusItem(4);  # unconditionally a large heart
  }

  var default_item ≔ 0; # random bonus

  if(ai_type = 3 OR ai_type = 8 OR ai_type = 12 OR ai_type = 14 OR ai_type = 18)
  {
    default_item ≔ 4; # a large heart instead of random bonus
    # (but it can still become a multiplier instead of large heart)
  }

  if( (FrameCounter MOD 8) ≠ 0)
    ai_type ≔ 0x30 # just disappears after a while, no bonus!
  else
    ai_type ≔ 0x31 # will become a bonus item.

  this->BecomeBonusItem(default_item, ai_type);
function GetCurrentLevel:
  return floor((CurrentStage - 1) / 3)
function SpawnSpecialItem:
  var special_table ≔ Array(0..5, 0..3)
  {
    {10,15,11,0},  # level 0(boss:bat):          rosary, watch, firebomb, <none>
    {11,10,0,9},   # level 1(boss:medusa):       firebomb, rosary, <none>, boomerang
    {10,10,14,0},  # level 2(boss:mummies):      rosary, rosary, amphora, <none>
    {10,14,13,0},  # level 3(boss:frankenstein): rosary, amphora, axe, <none>
    {0,15,14,8},   # level 4(boss:death):        <none>, watch, amphora, dagger
    {9,15,10,0}    # level 5(boss:dracula):      boomerang, watch, rosary, <none>
  }

  # Note: SpecialItemCounter is a global variable that is never ever referenced
  # anywhere else but in this function. It is a 2-bit counter.

  do {
    var special_item ≔ special_table[ GetCurrentLevel ] [ (++SpecialItemCounter) MOD 4 ];
  } while(special_item = CurrentWeapon);

  this->BecomeBonusItem (special_item)
function BecomeBonusItem(bonustype, ai_type = 0x31):
  # This function does not really change the item yet.
  # It only assigns the AI to be used by this object.
  this->AItype     ≔ ai_type
  this->BonusType  ≔ bonustype
function BecomeActor(actorid):
  # This function creates the actual object from the given id.
  # implementation is omitted here, it is not relevant.
var TranslateBonusIdToActorId = Array(0..15)
  {0x0F,0x0E,0x05,0x0C,0x42,0x10,0x23,0x00,0x17,0x43,0x0A,0x44,0x2F,0x18,0x45,0x46};
function RunObjectAI_30:
  if(--this->ObjectMultiPurposeCounter) return;
  this->AItype ≔ 0x32;
function RunObjectAI_32:
  this->StopExisting();
function RunObjectAI_2F:
  # Common AI code for bonus actors. Omitted here.
function RunObjectAI_31:
  if(--this->ObjectMultiPurposeCounter) return;
  this->AItype ≔ 0x2F;

  switch(this->BonusType MOD 16)
  {
    default:
      if(SpecialWeaponOnScreen OR (CurrentWeapon = this->BonusType))
        return this->BecomeTinyRandomBonusA();
      SpecialWeaponOnScreen ≔ 0xFF;
      # fallthrough:
    case 5: # beef
    case 6: # red sphere
    case 7: # unknown (ghost?)
      # Keep this decision of "bonus type", and become the actual object.
      return this->BecomeActor(TranslateBonusIdToActorId[this->BonusType]);

    case 1: # bonus sac
      this->BecomeActor(0x0E); # become a sac
      this->PaletteIndex ≔ this->BonusType SHR 4;
      return;

    case 12: # multiplier
      # Try becoming a multiplier

      MultiplierSpawnCounter ≔ 0;
      var tmp ≔ CurrentMultiplier;
      if(tmp < 2)
      {
        this->BonusType ≔ 12;
        tmp ≔ tmp + BonusTypeToActorTypeTransTable[this->BonusType];
        return this->BecomeActor(tmp);
      }
      # passthru

    case 0: # small heart or a sac of some value
      return this->BecomeCompletelyRandomBonus();
  }
function BecomeCompletelyRandomBonus:
  # It is unclear where MultiplierSpawnCounter is incremented.
  # It happens at $E65D, but the circumstances in which that
  # code is executed are not clear. It seems to occur whenever
  # a special weapon delivers damage, though. In the case of
  # the fire bomb, for enemies that are not immediately killed
  # from damage, it can mean that the counter is incremented
  # by ~50 times at once.
  if(MultiplierSpawnCounter ≥ 10)
  {
    # Try becoming a multiplier

    MultiplierSpawnCounter = 0;
    var tmp ≔ CurrentMultiplier;
    if(tmp < 2)
    {
      this->BonusType ≔ 12;
      tmp ≔ tmp + BonusTypeToActorTypeTransTable[this->BonusType];
      return this->BecomeActor(tmp);
    }
  }
  if(NOT SpecialWeaponOnScreen)
  {
    if(NumberOfHearts < 8)
    {
      if(NumberOfHearts ≥ 4 AND WhipLength012 < 1)
        return this->BecomeWhipUpgrade();
    }
    else if(WhipLength012 < 2)
      return this->BecomeWhipUpgrade();
  }
  return this->BecomeTinyRandomBonusA();
function BecomeTinyRandomBonusA:
  this->BonusType ≔ CurrentRandomBonusId MOD 2; # 0 = heart, 1 = sac
  return this->BecomeActor(TranslateBonusIdToActorId[this->BonusType]);
function BecomeWhipUpgrade:
  SpecialWeaponOnScreen ≔ 0xFF;
  this->BonusType ≔ 3; # whip upgrade
  return this->BecomeActor(TranslateBonusIdToActorId[this->BonusType]);
# This code is executed non-stop in the main-loop of the program.
# Each time NMI resumes, it returns to this loop.
# It is responsible for permutating the CurrentRandomBonusId variable.
# If you want to influence the outcome of this loop before the next NMI,
# you need to influence the number of CPU cycles spent in the previous NMI.
function MainLoop:
  var RandomTable ≔ Array(0..15)
  {
    0x33,0xBB,0x3F,0x80,
    0x2E,0xA9,0x61,0x87,
    0xAD,0xC3,0xB2,0xC8,
    0x7C,0x25,0x48,0x7A
  };
  loop_forever:
  {
    var tmp ≔ (CurrentRandomBonusId OR FrameCounter) AND 15;
    CurrentRandomBonusId ≔ RandomTable[tmp];
  }
See also
- Game Resources - we have resource pages for other games too!
- Common Tricks - tricks common to many games
- Boss Fighting Guide - tricks specific to boss fights
GameResources/NES/Castlevania last edited by adelikat on 1/16/2022 10:36 PM