Video link: https://archive.org/details/megamanpc-tas-1_46_941 (enable captions).
Mega Man PC is a better game than people give it credit for,
and it's more fun to play fast than slow.
So let's play it fast!
This submission improves on [2247] DOS Mega Man by DarkKobold in 02:23.55 by 2565 frames (36.597 s or 25%),
chiefly thanks to a new trick that skips almost all of Volt Man's stage.
In addition,
a number of minor tricks,
improved strategies,
RNG manipulation,
and overall clean execution
have shortened the other stages by an average of 8%.
The game runs too fast (comically fast)
even on the slowest CPU settings of JPC-RR.
That's why there are alternative versions of the video.
The one marked "soundhack"
is the one I recommend to watch.
It has been slowed down to a watchable speed while preserving sound effects
(more about this in the comments below).
It's about 9 minutes long.
Game objectives
- Emulator used: JPC-RR 11.6-WIP (bf3a341ad233439e21a32f33dffc1e730668121d); also syncs on 11.2
- Aims for fastest time
- Takes damage to save time
- Manipulates luck
| 2247 | this | diff | |
|---|---|---|---|
| boot | 91 | 64 | −27 |
| configuration menu | 3 | 2 | −1 |
| title screen | 127 | 120 | −7 |
| intro stage | 386 | 375 | −11 |
| stage select SVD | 146 | 142 | −4 |
| Sonic Man stage | 2040 | 1901 | −139 |
| Sonic Man | 111 | 100 | −11 |
| stage select _VD | 352 | 344 | −8 |
| Volt Man stage | 2125 | 186 | −1939 |
| Volt Man | 109 | 98 | −11 |
| stage select __D | 305 | 295 | −10 |
| Dyna Man stage | 1988 | 1767 | −221 |
| Dyna Man | 77 | 52 | −25 |
| Wily title cards | 363 | 351 | −12 |
| Wily stage | 1734 | 1661 | −73 |
| Wily | 104 | 38 | −66 |
| total | 10061 | 7496 | −2565 |
As a secondary entertainment goal, I try to make 1-ups drop as often as possible.
They are normally a 1/64 chance.
I get nine 1-ups to drop from 32 drop-capable kills, though I can only collect five of them without slowing down.
General comments
I used a number of helper programs.
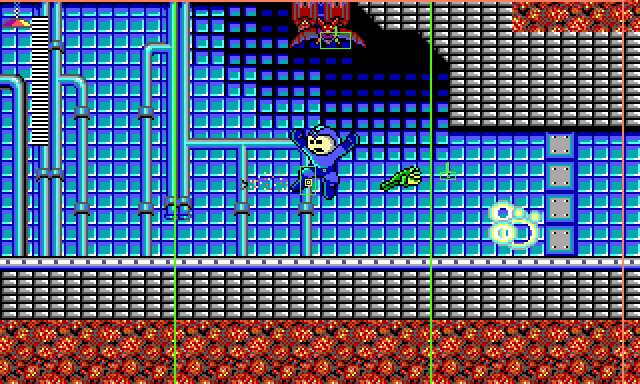
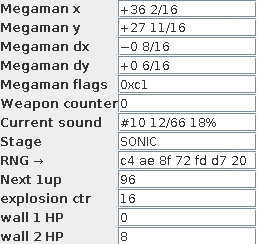
The most important of these were a HUD/memory watch script
and an optimization script.
The HUD script shows enemy HP and hitboxes, as well as other information scraped from memory.
It predicts upcoming RNG values, which is how I knew when a 1-up drop was possible.
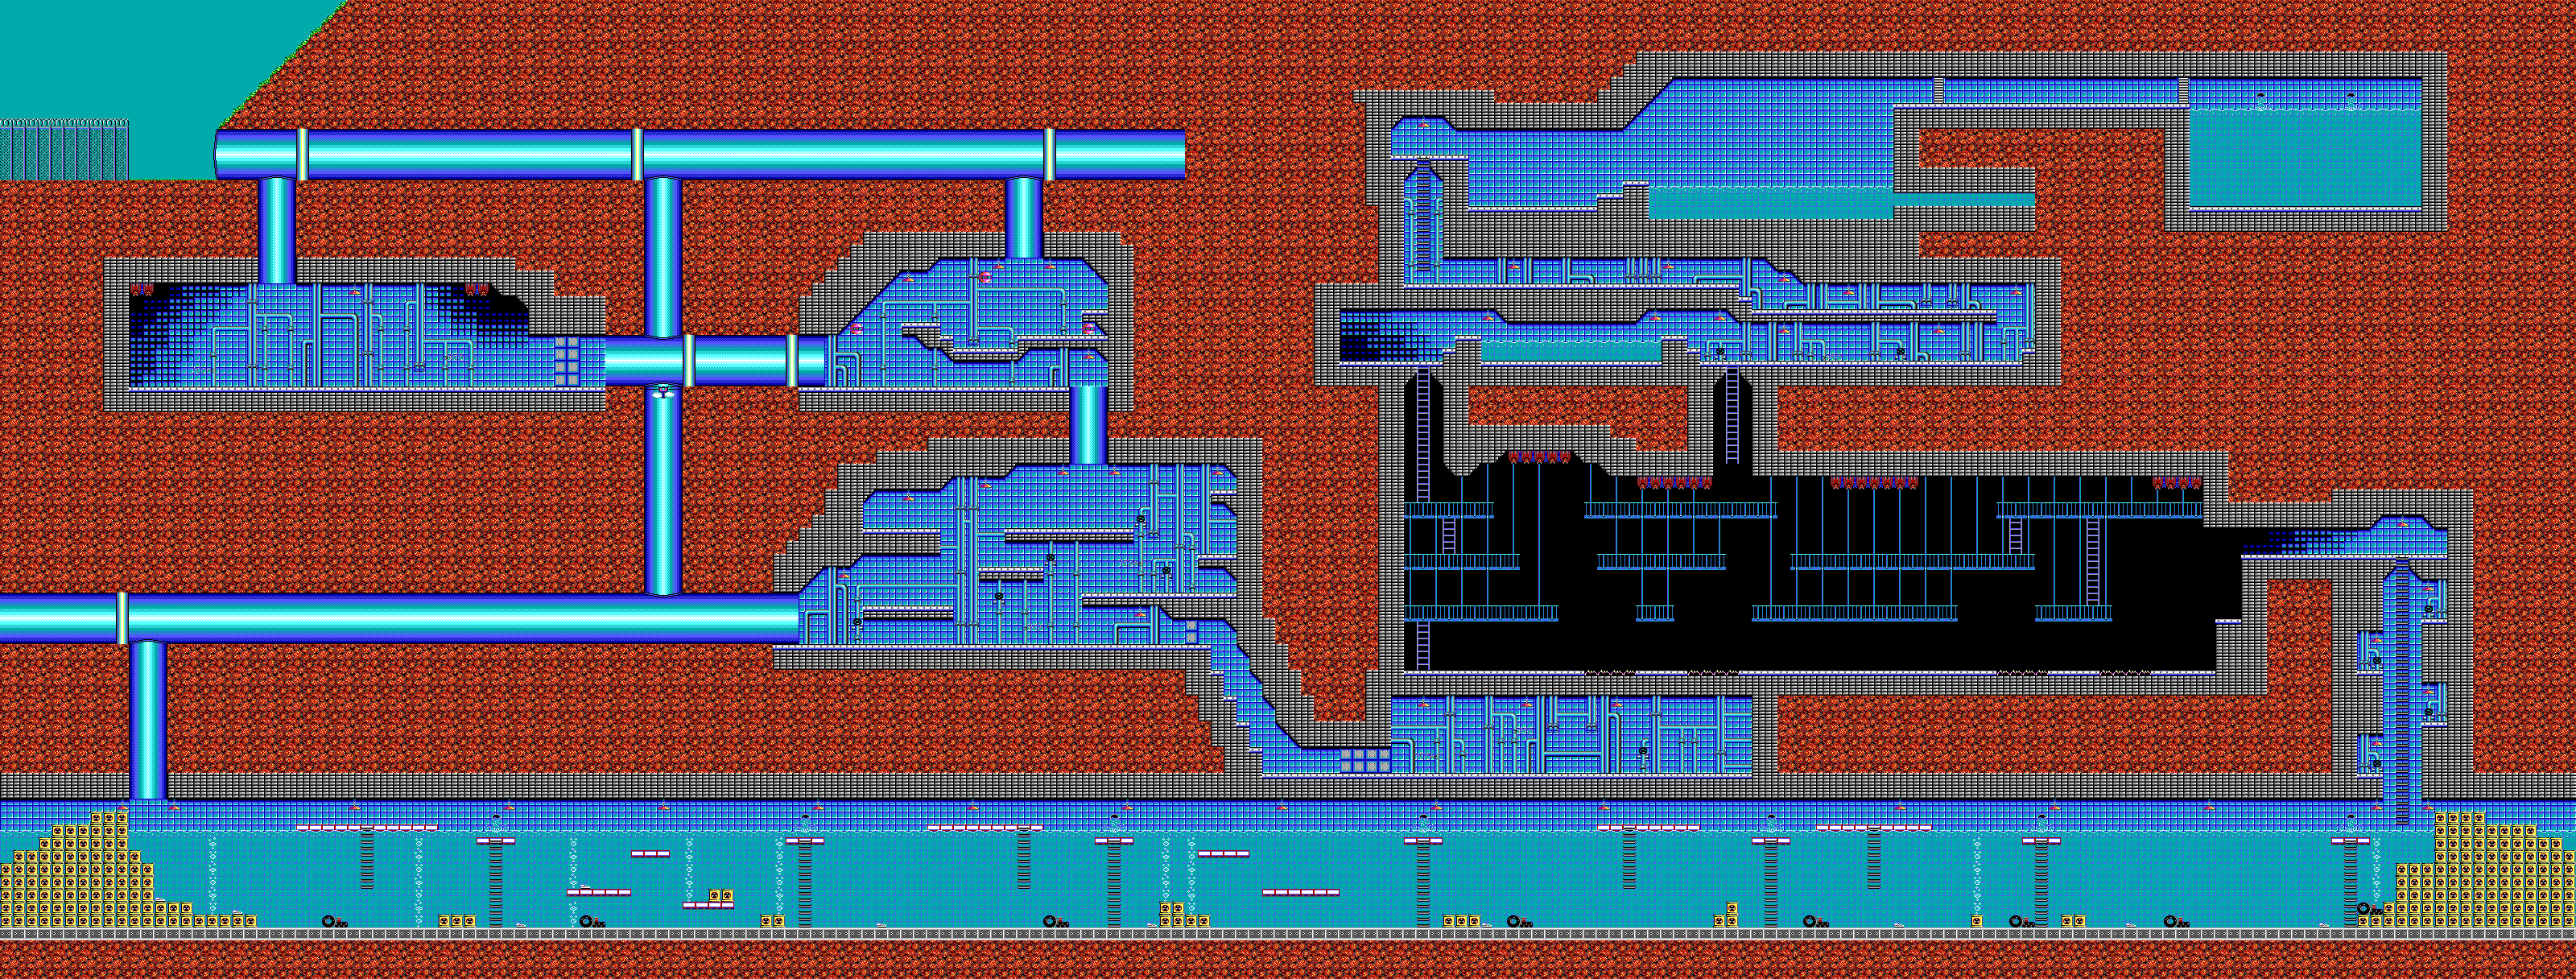
There are some stage-specific outputs; for example this screenshot
shows the HP of the two destructible walls in Sonic Man's stage.
The optimization script automates the testing
of many input sequences within a search space you define.
It loads a savestate, runs an input sequence,
and scores the outcome based on some evaluation function.
You may say, for example, "try jumping after between 2 and 5 frames,
try grabbing the ladder after between 6 and 10 frames,
and rank the outputs by Mega Man's y position."
There are more details about the script here.
I used it in 46 places, including on all the jumps around corners,
which are tricky to optimize manually.
The optimization script accounts for the large number of rerecords;
some of the runs tried thousands of candidate input sequences.
Here is what it looks like, optimizing a jump into a ladder grab:
A consideration in this game is sub-tile alignment.
Tiles are 16 pixels wide.
Mega Man accelerates in units of 2 pixels per frame,
up to a maximum speed of 8 pixels per frame. (There are no subpixels.)
Getting damaged sets your speed to −2 pixels per frame.
This all means that under normal circumstances, if you have even pixel alignment, it will stay even;
and if you have odd alignment, it will stay odd.
The only way to change your alignment is to run into a wall
(going left makes the alignment even; going right makes it odd)
or to grab a ladder (makes it even).
Alignment matters for many small optimizations;
for example, being 2 pixels behind may allow you to start moving one frame earlier,
which gives an advantage of 6 pixels overall.
Mega Man moves at 8 pixels per frame at full speed,
meaning that you'll have the same half-time alignment in every frame,
unless you slow down.
The game's RNG iterates at least once per frame.
Random item drops and enemy AI can cause it to iterate more.
Each stage has a fixed seed value to which the RNG state is reset
when the stage starts; that is,
RNG sequences do not carry across stages.
The game is frame-oriented for the most part,
running one iteration of the game loop per vertical refresh.
But input is interrupt-driven: the global variable
representing the current state of input may change in the middle of a frame.
Sub-frame inputs are occasionally useful.
Pressing and releasing Space in the same frame allows you to shoot on every frame.
Pressing or releasing two keys in the proper order is key to switching
weapons without losing time on the pause screen.
At the stage select and at the beginning of stages,
it is sometimes possible to save 1 frame by locating the first input
late in the frame before it appears that the game first accepts input.
Boot and configuration menu
This run puts the game files on hard disk HDD rather than HDA (saves 27 frames).
It then loads fdconfig.sys, which costs 5 frames here but
saves 85 frames in load times later on.
The configuration menu is not frame-oriented, unlike the game itself.
It's just a loop that polls a global variable that is set
by the keyboard interrupt handler.
This means that you can provide inputs much faster than one per frame—but you
have to go slow enough that the loop notices one of your inputs before
you provide the next one.
Input is recognized when a key is released, not when it is pressed,
so we start by pressing all the keys we will need, before the menu appears.
Then it's a matter of trying each key press/release at a certain time,
checking if it was recognized, and going back to slightly increase the delay if not.
[2247] DOS Mega Man by DarkKobold in 02:23.55 also used sub-frame inputs here,
but this submission spaces the inputs more closely,
saving 1 frame.
The stage select screen changes when you release a key, not when you press it.
We take advantage of this by pressing and holding Left and Enter
well before the stage select screen appears,
then releasing both keys at the earliest time when the input is accepted
(which will generally be a sub-frame input).
Sonic Man
The jump down to the first room illustrates a recurring theme:
pre-jumping before descents,
and managing horizontal position to clip corners
as early as possible at maximum speed.
We jump before reaching the pit so that Mega Man
is already moving at his maximum vertical velocity of 15 pixels per frame
as soon as the floor is gone.
On the way down, we adjust 6 pixels to the right so that,
3 frames later,
we can start moving to the right again at maximum speed
and just barely avoid bonking Mega Man's head (which would set his horizontal speed to 0).
It turns out that in this case an adjustment of 6 pixels is optimal.
If we had adjusted only 4 pixels, we would be 2 pixels
behind at the same frame;
whereas if we had adjusted 8 pixels,
we would have bonked, or else be forced
to wait an extra frame before starting to move,
costing even more time.
(Recall that it's not possible to change Mega Man's position by an odd number of pixels
except in special situations.)
All jumps like this were done using the optimization script
to test many combinations
of jump height, stop-moving-right time, horizontal adjustment,
and start-moving-right time.
The first room in the stage is tricky to optimize.
We must destroy two walls, each of which has 8 HP.
After a wall is destroyed, it explodes for 28 frames,
and during that time, the other wall is invulnerable.
(This is the case for all such explosions in the game.
There is only one instance of the global explosion object,
so the game takes care that no more than one explosion can occur at a time.)
During these 28 frames of downtime, we lure the Batvire
toward the left to open up some space;
then destroy the second wall.
We make the final shot land up high,
so that Mega Man can walk underneath the second explosion.
The fan shaft is one of very few places in the game with
zero or negative gravity.
In these places, you can influence Mega Man's vertical speed
by pressing the Up and Down keys.
Here, we ascend 1 frame faster by pressing Up
to instantly accelerate from a speed of −7 (from the jump)
to −15, Mega Man's terminal velocity.
Without pressing Up, Mega Man's speed goes from −7, to −11,
and then to −15.
The next room, with the wall blasters,
is the first damage-boost.
The Sewer Rat cannot be hit with the Buster except when it stands,
and it would take too much time to wait for it to stand.
Instead, we destroy one of the wall blasters
and take damage from its explosion to walk past it.
(Incidentally, this room is also the easiest place to demonstrate that there
can only be one explosion at a time.
Shoot one wall blaster, then shoot a second while the first is exploding—the
second one will not be damaged.)
In the large room, we collect the E Tank that we'll
need for the skip in Volt Man's stage.
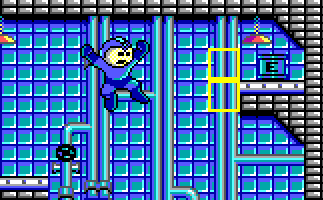
I never knew how to collect this E Tank—it's too high to jump to—until
after I had reverse engineered
the map format and uncovered one of the game's dirtiest secrets:
two of the pipe tiles are actually ladders.
The tiles are duplicates of pipe tiles used elsewhere in the stage,
but they additionally have the "climbable" bit set.
These are the only two such tiles in the game.
Here they are highlighted:
The wall in the lower right of the large room looks
just like the destructible walls in the first room,
but it is only vulnerable to Nuclear Detonator (Dyna Man's weapon).
Even if we could get through it, it wouldn't save time.
When you go that way, the game
dynamically erects an indestructible wall (not part of the
map data)
in the large chamber to prevent you from going any farther.
The underwater sections have reduced gravity (you can jump higher)
and horizontal drag, reducing Mega Man's maximum speed to 6 pixels per second.
It pays to be above the surface of the water as much as possible.
There is a cost, though, whenever Mega Man jumps from a lower to a higher platform:
he freezes in place while waiting for the camera to recenter on him vertically.
It doesn't happen when jumping down.
Camera recentering delay is a concern throughout the game.
In a couple of places here I was able to avoid it
by only touching a platform for 1 frame,
but I couldn't make the same trick work elsewhere.
The Piranhas' spawns are random.
While optimizing this section, I ran into situations where I could
not avoid a Piranha without slowing down.
When that happened, I went back and killed a Sewer Rat to tweak the RNG.
Killing a Sewer Rat affects the RNG in two ways:
the random drop iterates the RNG once; but also,
the Sewer Rats use the RNG while they are alive
to decide how long to walk and how long to stand.
The fireball ladder at the end puts a limit,
I believe, on how quickly the underwater section can be done.
Getting there a few frames earlier would just mean waiting longer to avoid a fireball,
unless early enough to hit an earlier cycle.
In the large, dark room filled with Batvires,
you'll see a mitigation against vertical camera recentering delay.
Jumping at the top of a ladder partially scrolls the camera up,
leaving it less distance to move when you touch the ground again.
This doesn't help unless Mega Man has a certain amount of headroom,
but I do it on all ladders for consistency
and because it looks cool.
It saves up to 3 frames per ladder.
There's a little bit of downtime at the disappearing blocks
at the end of the stage while we wait for the cycle to finish.
It's barely perceptible, but while waiting we adjust 2 pixels to the right—that's
as far right as we can go without bonking on the final jump.
At normal running speed, Mega Man moves at 8 pixels per frame.
Fine adjustments of 2, 4, or 6 pixels are only possible after stopping
for at least 1 frame, so we can only use them
at forced stopping points like this.
Bosses, like other enemies, have no invincibility frames.
The strategy in the Sonic Man fight is to shoot as early as possible,
get close as soon as possible, and then shoot on every frame.
If you are too far away from Sonic Man, you cannot shoot on every frame
because the Buster has a limit of 3 shots at a time.
After the battle, we jump in order to shorten the
animation of the falling code key.
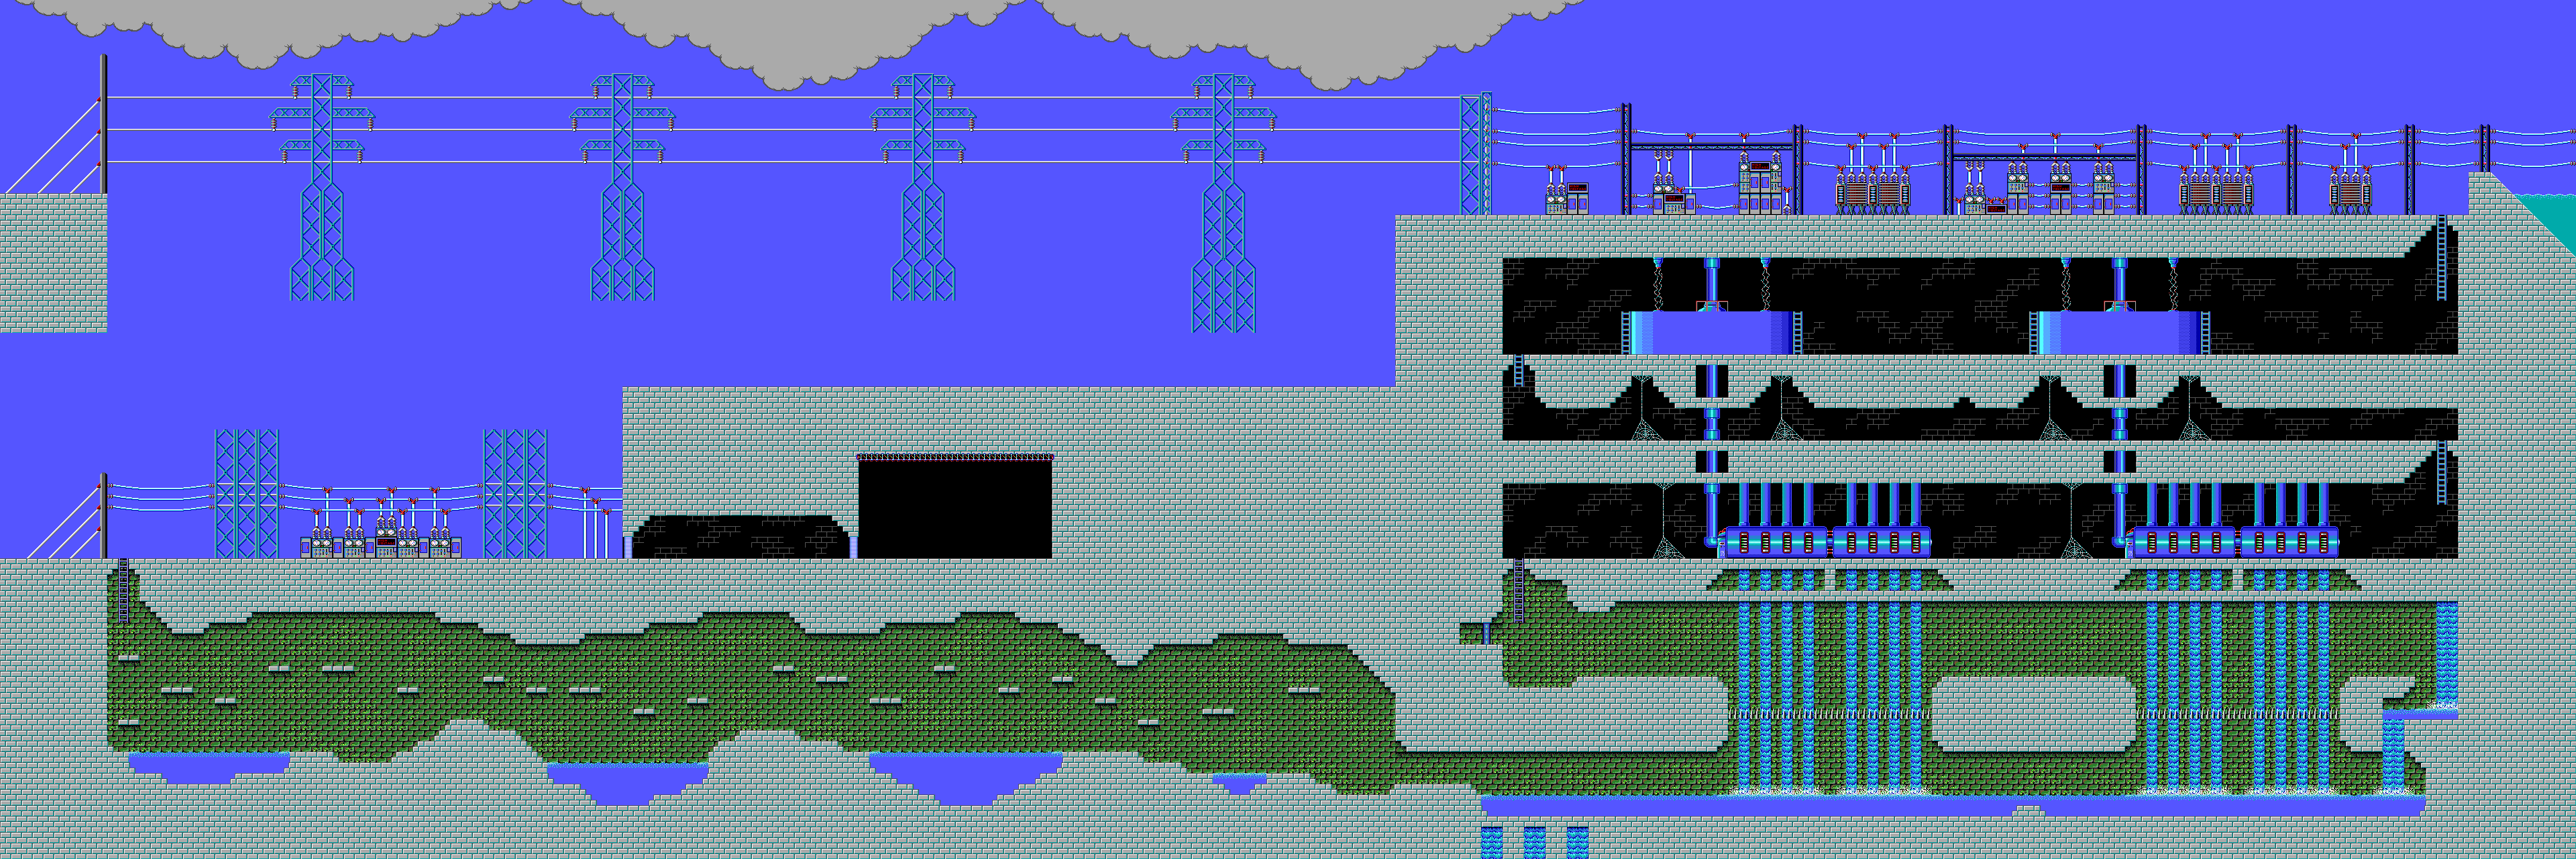
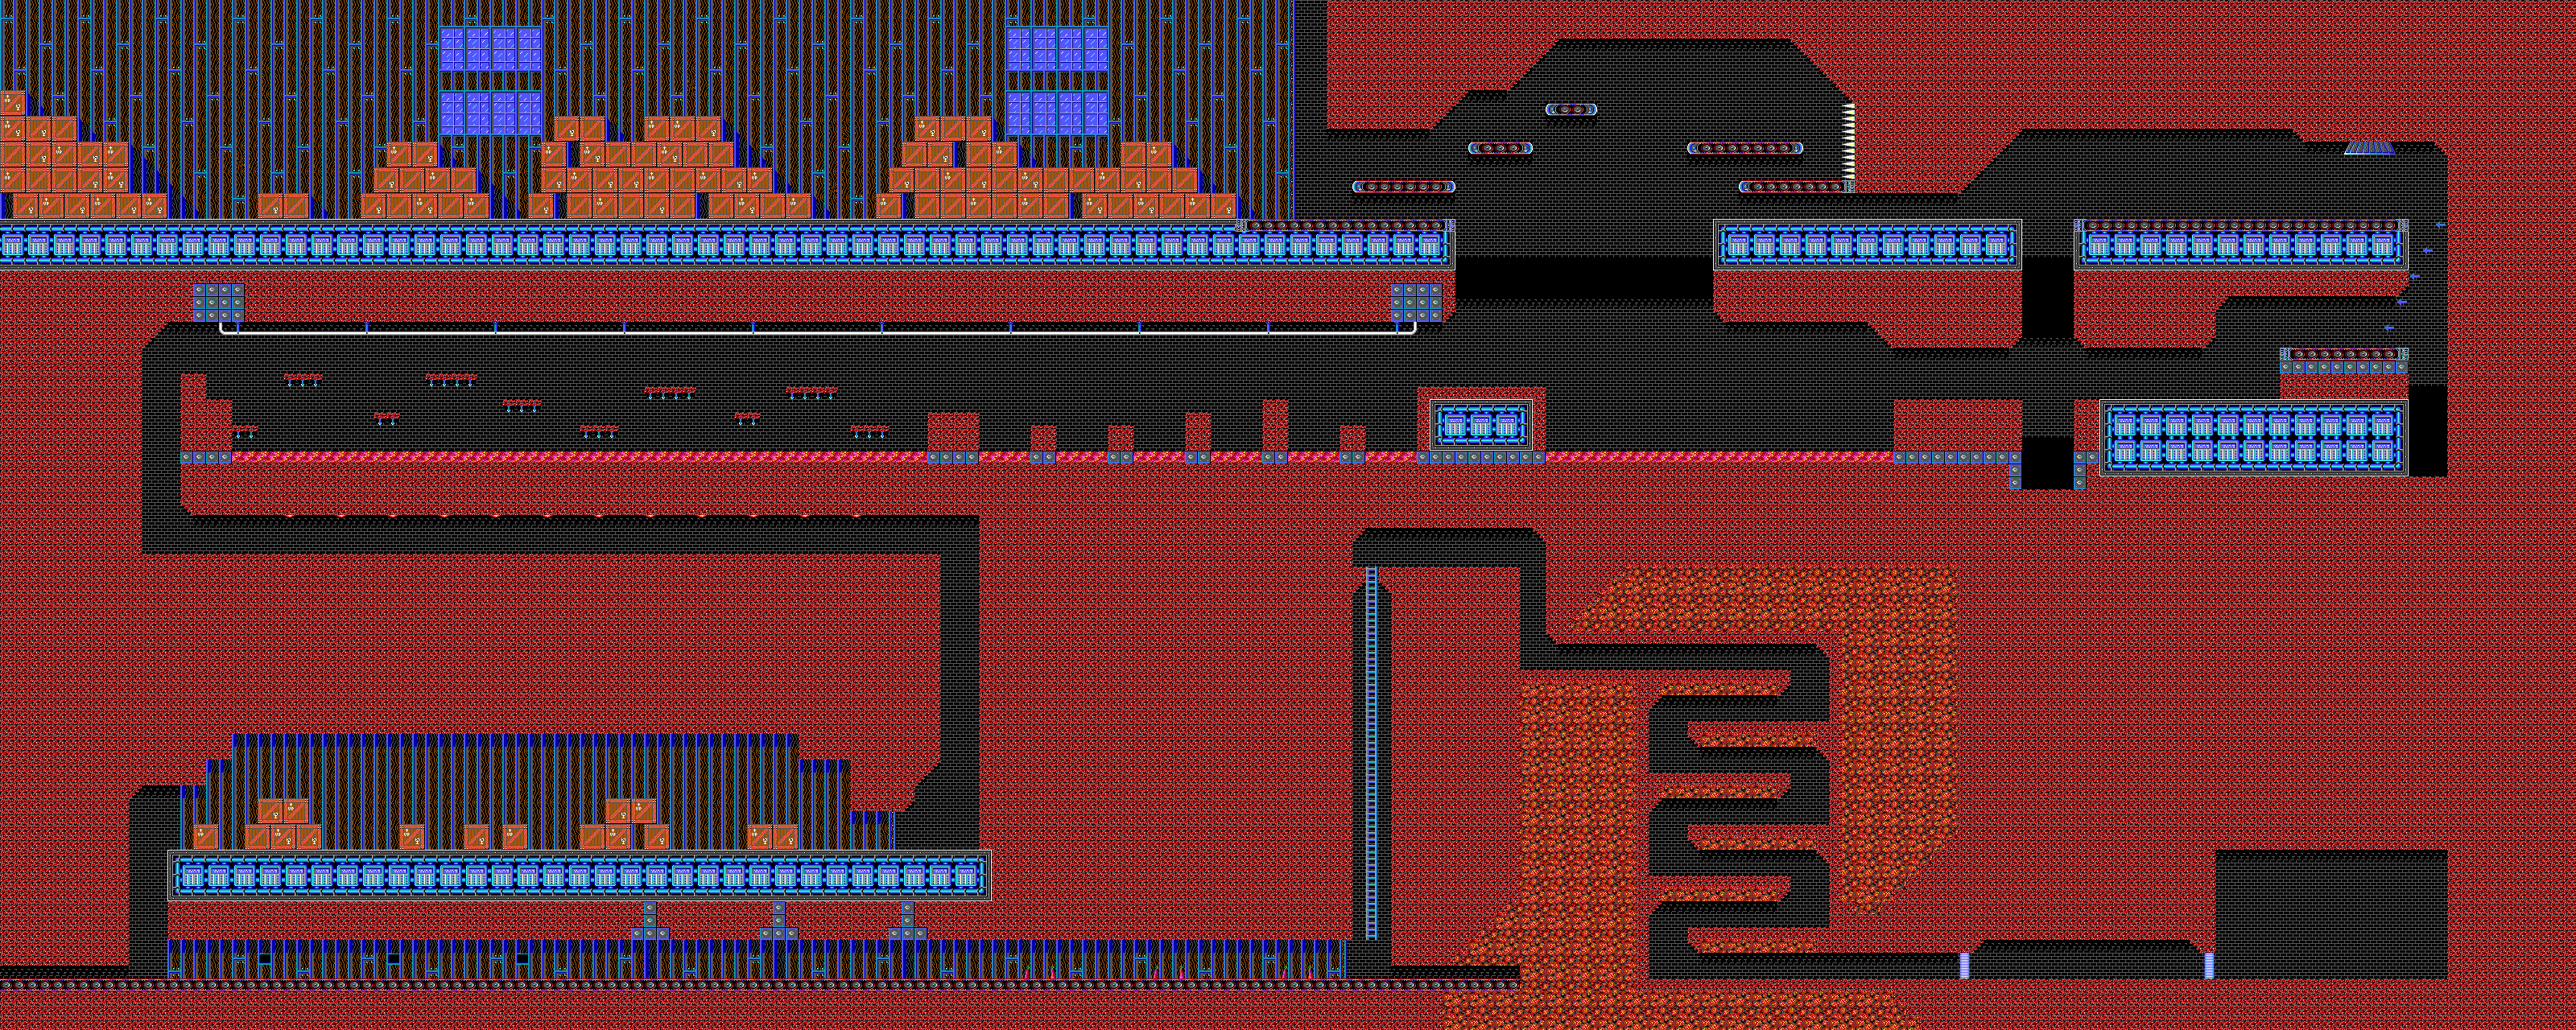
Volt Man
The skip in Volt Man's stage is possible because
the end of the stage is close to the start,
separated only by a row of instant-death tiles.
Contact with a death tile instantly reduces your health to zero.
All spikes and bottomless pits in the game work like this,
using specially marked map tiles.
Here I've highlighted them:
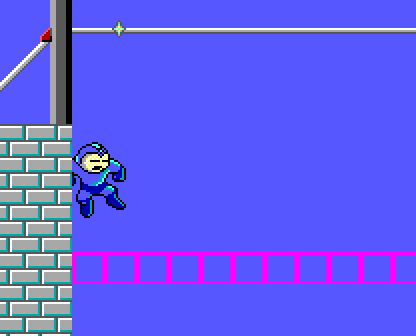
The trick is that you can pause on the same frame that your health is drained,
and use an E Tank to refill your health.
I initially thought that it would require four E Tanks,
because it takes four frames to pass completely through the barrier.
But a small refinement makes it require only one:
take damage from a spark on the way down, so that
you stagger backwards against the wall.
For some reason this means you get hurt only once.
The skip is pretty easy to do even in an RTA run.
I wrote a description of how to do it in
my run
and kavoc has done it in
his recent WR runs.
I thoroughly computer-optimized the skip for the TAS.
You want to be as far to the right as possible, but not so far that you don't reach the wall after being damaged.
You want to drop through the wire early, so
you start accelerating as soon as possible,
but not so early that the spark doesn't hit you.
The optimization script tested 1,500 different combinations
of position and timing
and settled on this as the best one.
Normally, Raptorbots don't spawn in this part of the level,
but in this case they do, because we skipped the trigger
that turns them off.
It's good for us, too, because we can use them for RNG manipulation.
Volt Man can randomly jump either high or low,
and a low jump saves 2 frames.
We kill one of the Raptorbots to advance the RNG by one step,
which is just enough to make Volt Man do a low jump.
The strategy against Volt Man is easy.
Let him damage you, and use your invulnerability to
get into position to shoot as soon as his shield is gone.
It's essential to be close enough that your shots hit on the same frame that you shoot,
because you can only have one Sonic Wave onscreen at a time.
As a small optimization, you get one free shot before the fight starts.
Dyna Man
The best weapon to use in Dyna Man's stage is Force Field.
Not only is it Dyna Man's weakness,
it's effective against most of the stage's enemies and hazards,
including the nails dropped by Sentry Bees (though not the bees themselves).
We switch to Sonic Wave a couple of times to get some 1-up drops,
because it reflects backwards after hitting a wall.
Switching weapons is free (costs zero time) if done properly,
and as long as you are only moving and not trying to do anything else.
To switch to Sonic Wave, for example:
press S, press Esc, frame advance; release S, release Esc, frame advance.
Mega Man will continue moving at full speed during both of these frames.
The jumps over crates in this stage are difficult to optimize.
The beginning section of Dyna Man's stage really exercised the optimization script.
Backwards conveyor belts push Mega Man back at 4 pixels per frame,
cutting his running speed in half.
We use lots of one-frame jumps over backwards conveyors,
to touch the ground as little as possible.
Forward conveyors do not make Mega Man run faster than his normal speed
of 8 pixels per frame,
so there's no advantage to landing on them early.
On either side of every conveyor belt there are single tiles
that you can pass through like air, but which push in the same direction
as the conveyor.
(Just like the horizontal drag under water in Sonic Man's stage.)
You have to know to avoid the extra tiles, or you'll suddenly have lost
4 pixels without knowing why.
The bottomless pits in this stage are not really bottomless.
They
connect to a later part of the level
through a death barrier,
just like in Volt Man's stage.
If we had another E Tank, we would use it at one of these pits for another major skip.
But we have only one E Tank, and it saves more time in Volt Man's stage
than it would in this stage.
We could farm a second E Tank in Sonic Man's stage
(the only other E Tank in the game is in the middle of Volt Man's stage),
but it would take more time to do that than it would save here (I think).
At the disappearing blocks over the lava pit,
we have to wait a bit for the cycle to develop.
Notice how we jump over the high block to avoid a vertical camera recentering delay.
We take advantage of the forced wait to adjust 2 pixels to the left,
so as to be as far forward as possible once out of the pit.
In the next section, the Force Field protects against
lava bubbles and acid drops,
so the only concern is to avoid bonks
and low-to-high jumps which would cause camera recentering.
The hazards on the assembly line at the bottom of the stage
are unkillable, and the Force Field does not protect against them.
Taking damage is faster than waiting for an opening,
as long as you face left before getting hit.
When hurt, Mega Man staggers backwards at 2 pixels per frame.
Combine that with the conveyor moving at 4 pixels per frame,
and you move at 6 pixels per frame while incapacitated from damage,
which is still 75% of Mega Man's running speed.
Dyna Man's AI is randomized like Volt Man's, but harder to manipulate.
His initial jump is random in both horizontal and vertical components.
He can jump toward you with a speed of 4, 5, 6, or 7 pixels per frame,
and he can jump upward with a speed of 7, 9, 11, or 13 pixels per frame.
His horizontal speed matters because Force Field only works when up close—you
want the distance between you and him
to close as quickly as possible.
His vertical speed matters for the same reason—at higher speeds
he jumps higher than you can reach, and you have to wait for him to come down.
The HUD script predicts the next few jump velocities,
so when you get there you know how many additional RNG values you need to burn
as you redo the stage in order to get a favorable jump.
In an earlier draft, I had to kill a random Sentry Bee
in the middle of the stage.
But in this submission, by a lucky coincidence, the two Sentry Bees I kill
at the beginning of the stage for 1-up drops provide the right RNG
at the end of the stage to get a good jump speed of (7, 9).
Dyna Man's weakness is Force Field, which does 6 damage per hit,
requiring 6 hits overall.
We can reduce that by shooting with the Buster until we're close enough
to use Force Field.
There's just enough time to land 4 Buster shots for 8 total damage,
which reduces the number of required Force Field shots to 4.
To fight with the Force Field, overlap your hitbox with Dyna Man's,
and toggle the shot every frame (press and release Space in the same frame).
Wily
It's just good luck that
the RNG lines up to make it possible to get three 1-ups
in a row in this opening hallway.
Because every stage including Wily's starts with its own fixed RNG seed
it's perfectly repeatable,
no matter what happened in earlier stages.
It's not as easy as it looks, though:
you have to hit enemies that are not in front of you,
which means using the Force Field, and
you have to manage the phase of the Force Field
(the size of its hitbox depends on its phase)
to avoid killing an enemy a frame too early or late.
In the refight against Sonic Man, we get to use his weakness, Nuclear Detonator.
This weapon is so slow and awkward—after shooting,
you have to wait for 16 frames before you can detonate it—that I initially dismissed it completely.
However, I learned from this let's play by Psychedelic Eyeball
that it's possible to hit Sonic Man twice with the same shot,
which makes it overall faster than the other weapons.
I computer-optimized this fight to find the earliest and highest point
at which to launch the Nuclear Detonator.
Even so, we are left with a few frames of downtime while waiting for the boss to die,
which we use to fix our sub-tile alignment to a multiple of 8.
Next, there is some tricky RNG manipulation.
Both of the next two bosses have randomized AI—we
want a low jump from Volt Man (1/2 chance),
and ideally a fast (1/4 chance) and low (1/2 chance)
jump from Dyna Man.
We are limited in the amount of manipulation we can do;
in this section the only options are to wait, or kill a different number of enemies.
There are up to 10 killable enemies in the section before Volt Man (the 3 mosquitoes respawn),
and you can kill up to 2 Sentry Bees in the section before Volt Man.
Unfortunately the RNG values don't quite line up:
any way I could find to get the fastest jump from Dyna Man
would also leave Volt Man doing a high jump.
I settled for a low jump from Volt Man
and a second-fastest jump from Dyna Man.
The Volt Man refight is the same as the first fight.
After killing the boss, your absolute horizontal position doesn't matter:
as long as you are standing on the left half of the screen,
the sum of the horizontal camera recentering delay and the time needed to run to the exit door is constant.
(The camera moves at the same speed Mega Man does.)
The only exception is sub-tile alignment.
If Mega Man's position is not a multiple of 8 pixels,
the camera will take 1 extra frame to align itself.
There's plenty of time to get our sub-tile alignment right
while waiting for Volt Man to become vulnerable.
The Dyna Man refight is unlike the Sonic Man and Volt Man refights,
in that we're not waiting for something to happen.
We can kill the boss just as soon as we can reach him.
So in this case Mega Man's absolute horizontal position does matter:
it pays to kill him as close to the center of the screen as possible,
to minimize horizontal camera recentering delay.
The Force Field makes you immune to the bullets of Sniper Joes and Mets,
so the final hallway offers no challenge.
The only noteworthy feature is the background tiles that look like yellow light bulbs.
These tiles have a zero-gravity property,
similar to the fan shaft in Sonic Man's stage in that you can control Mega Man's
vertical speed with the Up and Down keys.
Here I act like I'm going to fall into a bullet,
but then float away.
The final boss is a walking supercomputer called Crorq,
revealed in its second phase to be piloted by Dr. Wily.
The first phase takes 6 shots of Sonic Wave,
which we fire while charging toward the enemy to minimize shot travel time.
The second phase goes down 5 frames later:
1 frame to switch weapons, then 4 shots of Force Field.
The final micro-optimization is
not to release Space
after delivering the final blow
(saves 0.00067 s).
Other comments
Sound and framerate
The game runs way too fast to be watchable,
even on JPC-RR's slowest CPU settings.
This was a problem with [2247] DOS Mega Man by DarkKobold in 02:23.55 as well.
I think anyone would prefer watching its
slowed-down encode
over the full-speed video.
The only problem with the slowed-down encode is that it alters the sound effects,
making them lower-pitched and longer in duration.
To fix this problem, I made a special "soundhack" encode
(named after the camhacks in e.g. [3584] Genesis Sonic the Hedgehog 2 by Zurggriff & Aglar in 17:40.08)
that hacks the game binary to increase the pitch and decrease the duration
of sound effects, so that they sound approximately correct when slowed back down again.
You lose some of the high frequencies this way, but it sounds a lot better
than just slowing everything down.
The necessary
soundhack.py
script is in the source code repo and linked on the video encode page.
Inside of mm.exe, there is a table of sound effects,
each one an array of frequencies.
The script multiplies each frequency by a factor of 5,
and speeds up the programmable interval timer (PIT) by the same factor of 5.
The PIT controls the duration of sound effects and nothing else, so it doesn't affect sync.
Why a factor of 5?
This was to make the slowed-down encode approximately comparable to the
RTA runs at speedrun.com,
which use DOSBox with
cycles=500.
I timed 10 Mega Man blink cycles in JPC-RR and DOSBox,
and found that the ratio was very close to 5.
To do the sound hack encode, I ran these commands:
dumpconvert.exe --video-width=640 --video-height=384 --output-x264=megamanpc-soundhack_video.mp4 \
  --video-max-dedup=0 --output-timecodev2=megamanpc-soundhack_times.txt megamanpc-soundhack.jmd
dumpconvert.exe --audio-mixer-attenuate=org.jpc.emulator.peripheral.PCSpeaker-0:10 \
  --output-wav=megamanpc-soundhack_audio.wav megamanpc-soundhack.jmd
ffmpeg -r $((125875/5))/1796 -i megamanpc-soundhack_video.mp4 -i megamanpc-soundhack_audio.wav \
  -af asetrate=$((44100/5)) -ar 44100 -y megamanpc-soundhack.mp4
Or, to embed soft captions in the video,
ffmpeg -r $((125875/5))/1796 -i megamanpc-soundhack_video.mp4 -i megamanpc-soundhack_audio.wav \
  -f srt -i megamanpc-soundhack.mp4.en.srt -af asetrate=$((44100/5)) -ar 44100 -scodec mov_text \
  -metadata:s:s:0 language=eng -y megamanpc-soundhack.mp4
The JPC-RR dumping guide has additional steps to get the frame rate and resolution right for the text-mode parts, but I ignored that in my encodes.
Wall clip
I found a clip/zip, but didn't find a use for it.
While climbing a ladder, hold Right and J (jump).
At the top of the ladder, release Up, and you'll clip one tile into the solid wall on the right.
It doesn't work on the left, and I couldn't extend it past one tile.
Death warp
Trigger tiles are special map tiles that do something when Mega Man passes over them,
for example spawning the enemies for the next room or activating a checkpoint.
A minor death warp is possible with a least one checkpoint,
where the checkpoint is located a tiny bit farther ahead in the stage.
But it's such a small distance, and the death animation is so long, that it doesn't save time.
However, I didn't investigate all checkpoints
and there may be other opportunities.
Trigger tile reentrancy
I found a bug having to do with activating a trigger tile twice.
After the fan shaft in Sonic Man's stage,
there is a trigger tile in the downward tube
that spawns the Sewer Rat and makes the wall blasters start shooting.
The Sewer Rat AI is supposed to work like this:
walk for rand(32, 64) frames, stand for rand(8, 16) frames, repeat.
If you jump straight down into the room (touching the trigger tile only once),
that is the behavior you'll see.
But if you walk off the edge at an angle (touching the trigger tile twice),
you'll instead see the rat walk for about 256 frames before starting
its normal cycle.
It happens because the rat gets reinitialized after it has already started its AI cycle,
and an integer underflow occurs.
Abusing the glitch doesn't help here,
because you want the rat to stand anyway
so it's easier to damage-boost past it.
But possibly there are other such bugs in other places.
Out of bounds
After traversing the death barrier in Volt Man's stage,
if you go left rather than right
you'll end up out of bounds,
off the left edge of the stage.
There are some invisible solid platforms there.
I tried for a while,
but didn't find any way to save time
or even get back in bounds.
Joystick input
I didn't try joystick controls, only keyboard.
It's possible that different input code paths could allow
different sub-frame input opportunities.
Source and data
The HUD and optimization scripts, as well as other random code and data, are available here:
git clone https://www.bamsoftware.com/git/megamanpc.git
Thanks
- James Fifield for a walkthrough.
- LiteralGrill, whose former WR RTA run showed me how to beat Volt Man, and to use the Force Field in Dyna Man's stage.
- Psychedelic Eyeball, whose let's play showed me that Nuclear Detonator can work in the Sonic Man refight.
- c-square, Dacicus, and Patashu for comments on the Mega Man forum.
- Radare2, the tool I used for reverse engineering.
- The JPC-RR documentation, this helped a lot.
feos: Judging...
Sand 2018-12-27: Replaced the encode with one that is 55 frames faster
because of shorter load times.
The new input file is
https://archive.org/download/megamanpc-tas-1_47_298/megamanpc-tas-1_47_298.jrsr.
feos: Replaced the submission file with the above one.
feos: Fantastic movie, accepting as an improvement to [2247] DOS Mega Man by DarkKobold in 02:23.55.
Tier decision is tough. On one hand, the game runs too fast, there's no music, even the slowed down encode is hard to enjoy because this game feels like a sloppy hack. But it's a major improvement and the feedback really was good. I dare to upgrade this movie to Moons despite the fact that the old run is in Vault.
Sand 2019-01-02: Is it too late to replace the input file again? I tested the late discovery made in the forum, of loading fdconfig.sys but declining all the options, and it saves another 25 frames in load times. No gameplay changes. The new input file is https://archive.org/download/megamanpc-tas-1_46_941/megamanpc-tas-1_46_941.jrsr.
feos: Replacing and keeping as accepted.
The name question has been resolved and this movie is ready for publication, with just the real name. The site doesn't seem to support lack of nickname on some pages, so I'm unsure about that field in the submission. When the submission gets published, it won't appear on the main page, only among published submissions, where both names can be seen, so I'm removing the nickname as the author preferred initially.
Dacicus: Processing...