The Adventures of Captain Comic
is an early console-style side-scrolling platform game for the PC.
It is a kind of Metroidvania
in which you explore a world,
collecting items that increase your abilities
and open up new areas.
Game objectives
- Emulator used: JPC-RR 11.8-rc2
- Aims for fastest time
- Uses death to save time
- Abuses programming errors
Game version
There are five revisions
of the game, released between 1988 and 1991.
Revisions 1 and 2 have a glitch
that makes the route more interesting
(the hover glitch, described below).
This run uses Revision 1.
The physics, enemy spawn logic, and level layouts of this DOS version are totally different from those of the NES version of the game. As far as we know, none of the DOS tricks work on the NES version, nor the NES tricks on DOS.
The files in the disk image come from the
Internet Archive item
MicroCom_394_Captain_Comic.
The item
TheAdventuresOfCaptainComic
also has Revision 1,
but it is missing the file COMIC.DOC (which does not affect gameplay).
Items
Items collected in this run:
   | The Crown, the Gold, and the Gems are the treasures that Captain Comic has to recover. The game ends when you collect all three of these, in any order. Treasures do not affect Comic's abilities in any way, apart from granting an extra life. |
 | The Door Key lets Comic use doors. |
 | Blastola Cola lets Comic shoot fireballs. The more cans he collects, the more shots he can have on screen at once, up to a maximum of five. |
 | The Teleport Wand warps Comic a few tiles ahead, even through solid obstacles. Teleporting is slightly faster than walking, but only when moving left. |
 | A Shield refills Comic's HP. If he is already at full HP, a Shield grants an extra life. |
Items not collected:
 | The Corkscrew makes Comic's fireballs wobble up and down, so they can hit enemies on the ground. It's not helpful for the speedrun. We pass by the Corkscrew at 6:12 in this run, when entering BASE level. |
 | The Boots make Comic jump higher. They would not take much time to collect, but it is faster overall to use the hover glitch whenever we need extra vertical movement. |
 | The Lantern lights up the castle level. Because we do not collect it, we have to play the castle in the dark. Collecting the Lantern is meant to require traversing two whole levels. In Revision 1, there is a trick to collect it early using the Teleport Wand, but it still would take extra time. |
Route
The physics of this game are simple.
Optimization is mostly about routing
and only a little about player movement.
Because the three treasures may be collected in any order,
there are many viable routes.
A typical glitchless route might look like this:

It is possible, though difficult, to skip collecting the Lantern and play through the castle level in the dark,
which removes the need to enter the "shed" and "comp" levels.
That is the speedrunning route used in revisions of the game that do not have the hover glitch:

The glitched route used in this run
further eliminates most of the "space" and "base" levels
by breaking the intended sequence for getting into the "cave" level.
The route uses seven intentional deaths,
which are used as death warps or to activate the hover glitch.
See the "Route optimization" section below for details of how this route was arrived at:

Tricks
See also GameResources/DOS/CaptainComic.
Hover glitch
The most important trick in the run is the hover glitch,
which lets Captain Comic fly for a limited time.
It is done by holding the jump key while respawning.
The glitch is canceled by walking on the ground or by going through a door.
Because you can only hover after dying,
any time saved by using the glitch
must be weighed against the time needed to die.
The technical cause of the hover glitch is an integer underflow.
There is an unsigned 8-bit variable that controls how long Comic may accelerate upward during a jump.
It is normally set to 4 (or 5 when Comic has the Boots)
and decreased by 1 for every game tick that Comic is in the air.
The bug is that the variable is set to 0 when Comic respawns.
An immediate jump after respawning causes the counter to underflow to 255.
In this run, you will see the hover glitch used
in the forest at 1:25,
in the castle at 2:27,
at the lake at 4:47,
and in the cave at 5:20 and 5:37.
Hover underflow
While Comic hovers at the top of the screen, his vertical velocity, stored as a signed byte, constantly decreases. Eventually the velocity underflows, changing from a large negative to a large positive number and shooting Comic towards the bottom of the screen. When this happens, you can continue to hold the jump key to make Comic die by falling off the bottom of the screen, or release the jump key to overflow the vertical velocity again and send him back to the top (unless there was a tile right above his head, which will set his vertical velocity to zero).
The velocity underflow trick is used to escape the castle after collecting the Crown at 2:35, by death warping back to the entrance.
Left teleports
The base unit of distance in the game is 8 pixels, or half a tile.
The action of the Teleport Wand is intended to be this:
move Comic 6 units in the direction he is facing,
to the lowest vertical position where there is room to stand.
A teleport lasts 6 game ticks and moves Comic 6 units forwards,
so teleporting is nominally no faster than
Comic's walking speed of 1 unit / tick.
But the destination horizontal position is always rounded down to a multiple of 2,
which means that if Comic starts at an odd horizontal coordinate,
a left-facing teleport actually moves him 7 units
(and a right-facing teleport moves him only 5 units).
The upshot is that a left teleport can move Comic 7 units over 6 game ticks,
which is a little faster than walking:
every time you do it, it saves 1 game tick, or about 110 ms.
Each left teleport moves Comic closer to the edge of the screen,
and you can only do a small number of them
before the game won't let you teleport any farther.
In this route, the left teleport trick is used only a few times.
There is not much leftward movement required
after collecting the Teleport Wand.
You will see the trick used while moving to the exit of the cave level starting at 5:53,
and just before collecting the Gems at 6:32.
Enemy spawn manipulation
Sometimes we need to take damage from enemies for an intentional death.
When that happens, we try to manipulate enemies to appear as quickly, and as near to Comic, as possible.
The main rules for enemy spawns are:
- Enemies spawn a short distance offscreen, in the direction Comic is facing. How far offscreen is determined by a global cyclic counter that cycles through 0, 2, 4, and 6 units.
- When Comic enters a level or respawns, all enemies are scheduled to spawn after 21 ticks. When an enemy despawns, it is scheduled to respawn after 21, 41, 61, 81, or 101 game ticks, according to another global cyclic counter.
- Enemies can only spawn directly above a solid map tile, at the lowest open space that is at or above the level of Comic's feet.
- Enemies despawn when they are 30 units away or farther from Comic.
It is sometimes necessary to manipulate enemy spawns throughout a stage
in order to set up favorable conditions for the beginning of the next stage.
Manipulation is most commonly done by jumping (because enemies cannot spawn below the level of Comic's feet),
or by momentarily facing in the opposite direction.
Collision detection
For the purpose of collision with map tiles,
while Comic is moving upward, only his upper half is solid;
and when moving horizontally or downward, only his lower half is solid.
In some circumstances, this makes it possible to pass through
apparently solid walls.
This trick is used to enter the room containing the Crown at 2:32.
Level-by-level comments
The first half of the run requires a lot of backtracking.
We start directly in front of the castle that contains the Crown,
but we cannot enter it without the Door Key.
We trek across two and a half stages of the forest level, collect the Door Key,
then do an immediate death warp to cut out part of the return journey.
As a side effect, the death warp activates the hover glitch,
which we take advantage of to get over a tall tree without stopping.
Then we march across two stages, back to where we started,
meanwhile taking damage to set up a quick death inside the castle.
The castle level is designed to show you the Crown right away,
but then make you traverse three stages before you can collect it.
We skip most of the level by clipping through a wall.
Immediately after entering the castle,
we take damage from an enemy and die to initiate hover.
We abuse collision detection to clip through
the corner of the wall that surrounds the Crown,
Once inside the treasure room, however,
there is no way to clip back out,
so we continue hovering until the velocity underflow glitch
throws us off the bottom of the screen.
Comic dies and respawns at the entrance.
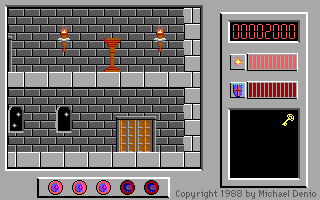
The interior of the castle is dark,
because we do not have the Lantern.
This is what the castle segment would look like with the lights on:
After exiting the castle, we cross the forest again, for the third and last time.
On the way, we grab a Shield at full HP to earn an extra life.
We have taken three intentional deaths so far, and will need to take four more.
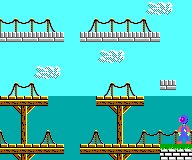
In the lake level we pick up a Blastola Cola,
which lets Comic shoot one fireball at a time.
Enemies are easy to dodge,
so shooting them is mostly for show,
though it can be used to affect spawn patterns.
 | 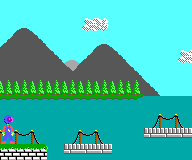 |
| 12 units to the hole. | 4 units to the hole. |
In the third lake stage, the wall next to the rocket
is meant to require the Boots or the Teleport Wand to get over.
We get over it using a hover instead.
At the transition into the third stage,
we cross the boundary, cross back, die (initiating hover), respawn, then cross the boundary a third time.
That little shuffle is because it's slightly faster to die
on the right side of the boundary than the left side,
which outweighs the cost of crossing and re-crossing the boundary.
At the beginning of the hover,
we abuse collision detection to float partway through some solid platforms,
so as not to slow down while floating upward through a gap.
Getting over the wall by the rocket is a major sequence break.
Normally you would have take the rocket door,
then go through three space stages and three base stages
to get to the cave level.
We will go to the cave first, then do the base and space stages backwards,
so that we only have to visit a small part of them.
Inside the cave, there's a door that's too high to reach.
We take a death and hover up to it.
Going through the door cancels hover, however,
and we need to hover again on the other side.
We try to take damage on the way to set up another quick death,
but the tricky part is that there's an unavoidable Shield in front of the door.
We must collect the Shield before getting hit, or else it would cancel out any damage we had taken already.
The death in the pit below the Gold is the trickiest manipulation in the run.
We need to take five points of damage,
but only four enemies can spawn at a time.
The first enemy is manipulated to have the shortest possible
respawn timer, 21 ticks.
We take damage from the first enemy—simultaneously despawning it and starting its respawn timer—then
take damage from the other three while waiting for the first to respawn.
After dying, we hover up to the Gold and escape the pit.
In the adjacent stage, we collect the Teleport Wand,
do a quick left teleport, then jump in a hole for a death warp.
We do as many left teleports as possible on the way out of the cave.
The base level is somewhat maze-like,
its stages being divided into separate regions connected by doors.
The Teleport Wand lets us skip most of it.
Going through two doors takes us to the space level, where the Gems await.
The interesting point about collecting the final treasure is ending input early.
We must jump up to the platform with the Gems. (This level has low gravity,
so the jump is possible even without Boots.)
Instead of pressing the jump key at the point we need to jump,
we start a left teleport from 7 units away,
then buffer a jump input while the teleport is in progress.
The game automatically makes Comic jump when the teleport finishes.
Route optimization
We have an unusually high degree of confidence in the route,
because it is the result of computer optimization.
See Post #495817 for a sketch of the optimization algorithm.
In brief, it finds a shortest path between the game's initial state
and a winning state,
relying on a human TASer to measure the time required for a small subset of state transitions.
A state comprises Comic's location, inventory,
and other information such as the current respawn checkpoint.
There are connections between states for, for example,
walking from one location to another,
going through a door,
or dying and respawning at checkpoint.
What transitions are possible from a given state is governed by an underlying "logic graph"
that defines what locations can reach what other locations,
using what items.
The optimizer program starts with over-optimistic lower-bound estimates of the time
required for each state transition, finds a shortest path,
then asks the human TASer to measure how long each transition in the route really takes.
Depending on the numbers entered by the TASer,
the optimizer may suggest another potential route whose estimated cost makes it more appealing.
The process continues until one complete route is measured and no better alternatives are found.
If things go well,
the algorithm finds an optimum route without
requiring explicit knowledge of the time needed
to transition between every pair of connected states.
In this instance, there are 23,278 reachable states,
and 341,742 transitions between them,
but only 289 of the transitions had to be measured manually.
The final route contains 51 state transitions.
The optimization algorithm relies on a number of assumptions.
If any assumption is invalidated, it may mean that the computed route is not really optimal.
The assumptions are:
- The estimated lower-bound times for each state transition are really lower bounds; it is not possible to do them any faster.
- The human TASer finds the true minimum time for each state transition.
- The logic graph is correct and the algorithm is implemented correctly.
- There are no other glitches that could make state transitions faster.
In addition, the algorithm makes a few simplifying approximations that don't perfectly reflect reality, such as that the timings of state transitions are independent. This is not quite true, as there are a few pairs of transitions whose timings are linked: you can shift time from one to the other, but you cannot make them both faster. If any approximations like this are too far from the truth, it could mean the computed route is not optimal.
For some neat related work in route optimization,
see JaV's video
on combinatorial optimization of a TrackMania track.
It required a human to manually time 225 track segments in advance.
Another interesting project is
collaboratively optimizing paths through recipe graphs
in Paper Mario: The Thousand-Year Door.
Source code and data
The route optimization program, Lua scripts, notes, and other files
are in a Git repository:
git clone https://www.bamsoftware.com/git/comic.git
cd comic/tas/
Some large or static files will not be cloned by default.
To download them, you need git-annex:
cd comic/tas/
git annex get
The repository contains other Comic-related goodies,
such as ripped graphics and sounds,
commented disassemblies,
and the source code of a randomizer.
The creation of this TAS is documented in a
series of live coding videos.
There are 21 videos, totaling about 83 hours.
Thanks
- Michael Denio.
- Radiant for encouragement on the forum.
- Malvineous, Ceidwad, and other editors of the Captain Comic pages at ModdingWiki.
- JPC and JPC-RR.
- Creators and players of randomizers.
slamo: As somebody who played this game as a kid and could never beat it, it's pretty satisfying to see the game picked apart like this. I've been following the progress of this run and I'm impressed by the use of your optimization algorithm; for such a non-linear game, you've made it really convincing that this is the fastest possible route. There are also a lot of useful glitches that I wasn't aware of.
It should be noted that this version uses a much different engine from the NES version that we have a movie of.
Feedback was good overall. The first half of the run was a little boring, but the hover glitches were amusing and the latter half was pretty hectic. Accepting to Moons.
Zinfidel: Processing...