Player (53)
Joined: 11/20/2013
Posts: 103
Results of the room list exploration: http://youtu.be/P3T0P23Ydvo http://www.gamefaqs.com/snes/588294-dragon-view/faqs/69686 Summary: There's a few actual rooms you can reach that aren't in the game, but they're generally empty and uninteresting. There's also a bunch of "Room numbers" that are probably not rooms at all but just other random data that happens to be there.
Player (53)
Joined: 11/20/2013
Posts: 103
Sorry for the repeat posting, by all means let me know if I should just stop. Been getting tired of the trial and error over and over for all the overworld travel and had doubts about the accuracy of the only existing map I know of in places, so I tracked down the relevant addresses again. $1C14 is your 16-bit X coordinate and $1C16 is Y. $1909 is your angle where $00 is South and $80 is North (even numbers only, an odd angle will glitch things up). On top of that, not every increment of rotation actually changes your direction of motion, it's just a graphical illusion. The most you can move in either X or Y direction in a frame is 8 and how many frames between movements depends on lag I guess, but with the way they did it you'll be moving faster or slower than 8 depending on your angle. You also walk backwards at the same speed as forwards, but I can't think of any way that could come in handy. One specific angle I'm sure is programmed wrong - try walking around with $1909 set to $E6. $E0, being halfway between being $C0 and $00 gives 45 degrees to east as expected. $E2 and $E4 start turning toward south but then $E6 goes back to 45 degrees even though you're facing further south, so you kind of slide sideways just a bit. I am hoping that this might give me some theoretically optimal combinations of angles to use, but with the scenery affecting lag seems like the only possible way to predict a good path is to have a complete map of everything, including the scenery... Which I'm convinced is possible to extract directly from the ROM, but the thought of trying to do so scares me. Anyway, if anyone's interested here's a rough comparison of the original map and the data I collected from memory. Blue dots are major points you can enter and red ones just significant landmarks like road intersections, bridges or sometimes just the far corner of a region or the wall somewhere. Parts where there's an in-game map are dead on but the rest could use adjustment. Note that the underworld is down at the bottom left there, so no wonder they were looking for it in the storehouse. I would try to explore the rest of the inaccessible areas but I can't come up with some kind of noclip cheat, it seems to take direction on whether you collide with something straight from the ROM as far as I can tell. Again, if only I could just extract the map directly... EDIT: Oh cool, you can walk around in some forbidden regions. Everywhere I've tried before you just get stuck but inside Mt. Badsel seems to be just a giant empty space. Might have something to do with your region code ($1900) too, if you don't set it right things get glitchy.
Editor
Joined: 3/31/2010
Posts: 1466
Location: Not playing Puyo Tetris
Khaz, I played this game a little for testing things with EmuHawk. I am interested in seeing a full TAS. It looks quite unique and fun.
When TAS does Quake 1, SDA will declare war. The Prince doth arrive he doth please.
Player (53)
Joined: 11/20/2013
Posts: 103
I do actually plan to do a 100% TAS at some point. That reminds me, I've been meaning to ask. Can we agree on a definition of 100% for this game? Some obvious things: -All Sword/Hauza/Armor/Ring Upgrades -All MP Upgrades -All HP Upgrades, I assume despite that it takes 100 random encounter kills (ie/ 50 encounters) -Sword and Hauza Technique lvl. 2 -Every major non-consumable item (eg/ large bag, fire boots, mirror) Things I'm not sure about: -Consumable items? None/at least one/full stock? (eg/ potions, crystals, arrows) -Opening chests that contain consumable items, because they don't respawn? -Getting all map markers? (If you ask the advice monk for advice he marks your map at certain points in the plot, and I think you get one from the statue in the Illusion Forest too.) -Maximum level? Wouldn't think so except in this game max level is about 46 and uniquely identified as "MASTER". Would be very time consuming regardless, the level progression is not a smooth curve in this game. -Optional plot-related cutscenes, like when you visit the grave in Casdra after Keire? Probably not but just asking. And generally speaking, are there any concerns I should know about with trying to create a two-part TAS that involves loading from save?
Former player
Joined: 9/1/2005
Posts: 803
Khaz wrote:
And generally speaking, are there any concerns I should know about with trying to create a two-part TAS that involves loading from save?
Can you expand on this a bit? Most emulators support power cycling or reset recording, so you'd only have to make a save and then trigger the power cycle or reset flag to reboot the game and fix the gamebreaking bug (unless you were referring to something else).
Player (53)
Joined: 11/20/2013
Posts: 103
I hadn't considered that you could record a reset into a movie, that simplifies things. Thanks!
PJ
He/Him
Joined: 2/1/2011
Posts: 181
Location: Western NY
I would define 100% as all MP/HP upgrades, all sword/armor/hauza upgrades (including both technique levels), fully leveled rings, and all other key items (fire boots, mirror, etc, though i doubt any of those are skippable with the previous definition). This sadly does include the 100 random enemies bit....which is the main reason 100% isn't quite as exciting. I have what I consider to be a pretty solid RTA route for 100% that I can gladly share if you're interested in doing down this route. Just note that it will be a NIGHTMARE to TAS because you'd need to manipulate random encounters with 2-3 enemies each....pretty constantly for the entire run.
Player (53)
Joined: 11/20/2013
Posts: 103
I'd definitely be interested in seeing that route if you don't mind, that could be helpful. Knowing the RNG source should hopefully make manipulating those random encounters really easy to TAS, actually. What are your thoughts on the map markers specifically for 100%? Most I think are a one-time chance to get a permanent marker on your map, so it sounds like something that would be included to me. Back on the subject of this map stuff... I've really been trying to find where and how it's stored in the rom, because if I can get that down we could finally have an accurate map showing all the obstacles and out of bounds regions and all, it would help a lot for TASing but mostly I'm just extremely curious to see it. Trying to decode what's going on through traces is ridiculous though... I think I've found at least part of the map in some tables in rom at $97dc08, $9796d8 and $97d118. -The program reads a value from the table in $97dc08, shifts the bits left then moves it to X -That X value is then the index to take a value from the table starting at $9796d8 -That value is used as an index to read from the table starting at $97d118, and the program takes 16 bytes starting at that address. I'm thinking it must be stored as some set of standard tiles it references but I can't track down how it's arranged yet. I did find out a lot of related stuff though: $1900 is your region code (00 to 09) and how the game renders everything around you depends on it. $1909's your orientation which must be an even number, $1907 becomes 1 when you collide with things (sometimes?), $1906 represents what direction you were trying to go when you collided. When you collide, it still moves you forward but then just moves you back the same amount on the same angle. $038B triggers the warp star effect when it's not zero. Haven't figured out how to control where you end up though. $1C14 / $1C15 is your X position and $1C16 / $1C17 is your Y position. In general, what you see on screen is coming from the area of $1A10-1E00ish, you can screw with it to make things look different but it doesn't change the map. I have the means to extract the bytes from the rom and rearrange them however is needed to form a coherent picture, but I can't make any more real progress determining the structure. Does anyone have any experience maybe how it's done in similar games, that could give me an idea?
PJ
He/Him
Joined: 2/1/2011
Posts: 181
Location: Western NY
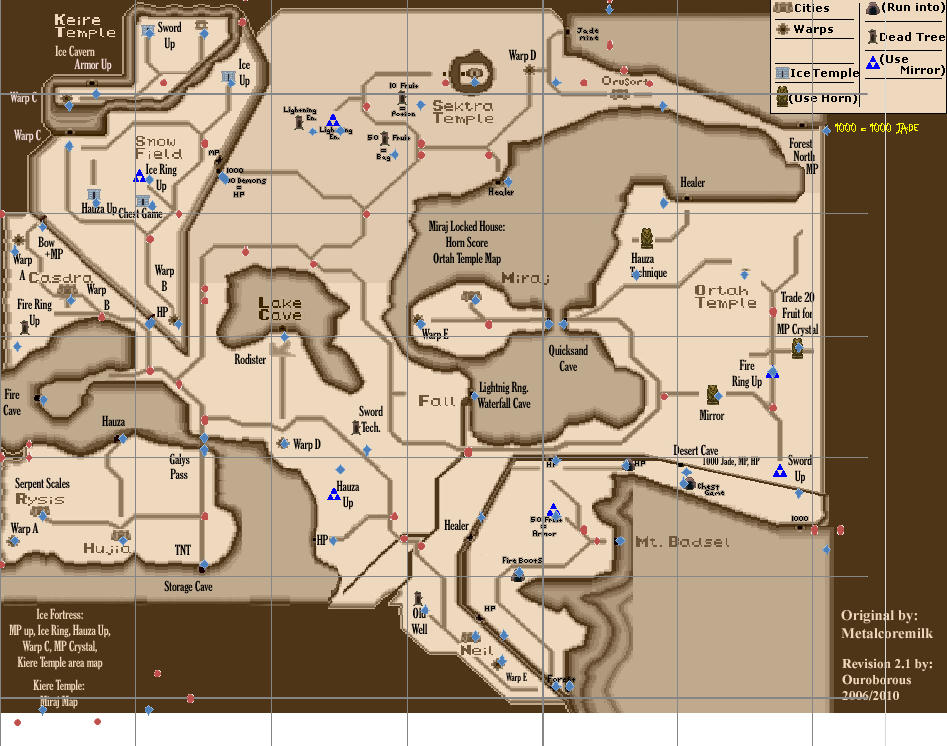
Alright, this is literally copy/pasted from my notes. I'm sure a lot of it won't be applicable to a TAS (like refilling on potions), but I really liked the route for RTA. I did the 100-enemy grind before Ortah so I could really blow through that and Sektra. I also did a bit of leveling in the Sektra temple in the room with the 4 water clone (level 3 lightning clears the entire room in one cast). I highly doubt you need to do that for the TAS, but it is a GREAT way to gather exp. This outline literally just covers the order in which I collect the powerups and which directions I run on the map. I had all the dungeon maps memorized so I never wrote them down. If you need those, I can try to remember and write something up. The desert/Miraj section has some interesting options. I collect the MP upgrade in the desert cave because I use it for the grind; a TAS will collect this after you get the gloves, when you get the HP upgrade. You can also do the ancient forest fruit grind later (after Ortah, on the way to Orusort), but I do it at that point in the RTA to gain a few levels to make the 100-enemy grind easier and to scoop up the MP upgrade. I also do the save/reload in Miraj after getting the score. You may find a better time to do it, but that has always worked out for me. Dragon View 100% route outline: Rysis: Plot. Exit. [Head SW to activate Warp A, NE to storage to get Hauza, S to Hujia] Hujia: Talk to Randy in bottom right house, then Talon. [Head S of E to Warehouse] Warehouse: Armor up, potion, 200 jade, dynamite. Hujia: HP up, talk to Talon, buy 1 arrow and 1 potion, Talon for bombs. [Head NE to Galys Pass] Galys Pass: Grab 10+ fruit, HP up. [Head NE to Lake Cave, get potion, crystal, then SE to Sword Tech and Waterfall cave (Lgtng Ring), head NW to Wet Cavern, get 1000 jade and levels, head SW to Warp A, fighting swamp encounters along the way. Take Warp A, head NE to Rysis, maybe buy potions at Hujia?>] Rysis: Talk to Qunos, get serpent scales. [Either take Galys Pass to Fire Cave (if purchasing potions in Hujia) or Warp A then SE to Fire Cave] Fire Cave: Sword up, MP up, Fire Ring. [Head NW past Casdra to Fire Ring up, Casdra for HP up & warp to snow field] Snow Field: Follow wall NE to cave. Get MP up. Head SW for chest game (MP up), then slightly N of W for Hauza up. NNW to Fortress. Fortress: Use crystal on boss, pickup new crystal after, Hauza upgrade, Ice Ring, MP up. Then warp to Keire region. [Head NW to Armor up, then follow left path to Sword up, E to Keire] Keire: Nothing to collect. Get Miraj map, exit and warp back to Fortress, exit to snow field. [Head NE to Ice Ring up, then S to landslide. HP up. SE then E to Desert Cave. Get MP up then NW to Quicksand] Quicksand: Take stairs, talk to old woman in the basement. [Large detour NE to forest. Grind 50-60 fruit, MP up, kill giants with lvl2 Ice Ring. Head into desert for 100 enemy grind. Get Horn, Hauza technique, Mirror, Sword up, then return to Quicksand. Pass through Quicksand, head due W to Warp, then NE to Miraj.] Miraj: Lord Yuna, N to HP up, get Key from Ruth, collect Score from basement. [Go back through Quicksand, play Horn, go to Ortah] Ortah: Sword up, pray the game doesn't crash. [Head NE to swamp area, follow to Orusort] Orusort: Head S and first room to activate Jade Mine quest. [Follow wall NW to Jade Mine. Crush it, hit switches (mid, left, right), leave. Follow road SW until road heads due W. Follow to stump for Large Bag, then N of W to emblem for Lgtng Ring up, then N of W again to stump for Lgtng Ring up, then N of E to Sektra] Sektra: 2x crystal, 200 jade, Gloves, Hauza up. Fire Ring lvl2 on boss. [Head WSW and follow wall to Wet Cavern. HP up. Then follow wall SW to North Cave, get Bow, MP up, and 1000 jade. Take Warp A, get stuff in Hujia, buy potions & bombs (x5), HP up, Warp A to Casdra, get HP up, then warp to snow field, get final Ice Ring up, take Landslide down. Head SW to emblem for Hauza up, then W of S To Meadow for fruit and HP up. Head E across bridges, go to Neil] Neil: Talk to Navi and Ivan. Go NW to Old Well. Old Well: Get HP up. Save Ogma. Get Blessing. [Head SE to Warp E, take to Miraj, buy HP up, give crystal to wandering magician, warp back to E, head to Forest of Illusion] Forest of Illusion: Collect all fruit. Need 50. Badsel part 1: Get HP up, make it to map. [Follow wall NW to wandering magician HP up, then NE for Fire Boots, take path NE then follow left path to Armor up emblem. Due N for another HP up, then E for yet another HP up. Head very E for Hauza tech upgrade. Follow wall back for Mt. Badsel part 2] Badsel part 2: HP up, MP up, go to underworld cave. Cave to Underworld: Go right for Armor up, then Desert Cave. Desert Cave: HP up, Sword tech up, go to desert. Head NE to Fire Ring upgrade, then return to underworld. Underworld: Finish game.
Player (53)
Joined: 11/20/2013
Posts: 103
Looks like a solid route! I plan to save at the guy in the Landslide, since I think he's the only save point that's literally directly on the way. I don't forsee many places where HP and MP will be a problem when you can manipulate drops. I'm also curious if there might be any more efficient way to handle the 100 fight grind than just doing it all at once. Since you spend time between each encounter chasing down the next one, it would make sense for TAS purposes to try to manipulate a whole bunch in a line on the way to where you're going anyway. I know it's happened to me before that I've hit a seemingly never-ending string of encounters all on the same line, maybe I can provoke it. Anyways! Still on the subject of the map. I think the game handles it in tiles that are $0200 x $0200. I've found a few key spots in memory again: $1A8A / $1A8C Current Tile Coordinates $1B0A / $1B0C Next X Tile Coordinates (Tile to East or West depending on orientation & position) $1B8A / $1B8C Next Y Tile Coordinates (Tile to North or South depending on orientation & position) $1C0A / $1C0C Next XY Tile Coordinates (Tile to NE, NW, SE, SW to complete a square with other 3) And I belieeeve, not sure, that each one of those sets of coordinates is immediately preceeded by some kind of four byte "tile number" that defines what's at that location. I haven't worked out details yet The tiles seem to only be for the landscape like walls, trees, water, etc... But the actual map entry/exit points are somewhat separate from that. So, if you freeze those "tile numbers" for all current and next tiles in a clear area, you can walk through all the normal walls and it will infinitely appear to be the same spot, but map entry/exit points will still appear at their real coordinates. If you freeze both them and the coordinate addresses I listed above, though, it appears the game will load that one four-tile block, and the rest of the world will just be blank. I think. And what I said before about reading from the ROM: In general it seems to be reading a lot of data indexed by the same "tile number" value from $9796d6, $9796d7 and $9796d8... as in offsets within the same table, but still dunno what any of it means yet. I know I should just give up and get back to TASing...... bleh... I'm so burnt out on this but it's basically the last missing piece before I have all the information I need to prevent wasting entire minutes of travel on a 100% run.
PJ
He/Him
Joined: 2/1/2011
Posts: 181
Location: Western NY
I absolutely agree @ fighting the enemies along the way. I've gotten those strings of encounters too, but I'm not really sure what causes it. In an RTA, it always just seemed best to do the entire grind (or at least 90-95 enemies) in the desert because my sustain is good there and it makes the next few dungeons decidedly easier. I'd definitely recommend getting into as many encounters as possible along the way, though. The only advantage to doing them all at once in a TAS is that you can tell viewers to fast forward/skip that entire chunk as opposed to having encounters scattered all throughout the run. :P I never said it was a good advantage, just pointing that out. Haha. I remember thinking of saving at the Landslide before I don't remember why I opted to not do that. Maybe I didn't have the money? Shouldn't be an issue honestly, and that place makes the most sense.
Player (53)
Joined: 11/20/2013
Posts: 103
AHA
80a4eb lda $1c14     [801c14] A:00a2 X:0184 Y:0000 S:1ffb D:0000 DB:80 nvmxdiZC V: 48 H: 154
80a4ee and #$fe00             A:2006 X:0184 Y:0000 S:1ffb D:0000 DB:80 nvmxdizC V: 48 H: 188
80a4f1 sta $00       [000000] A:2000 X:0184 Y:0000 S:1ffb D:0000 DB:80 nvmxdizC V: 48 H: 206
80a4f3 bpl $a4fa     [80a4fa] A:2000 X:0184 Y:0000 S:1ffb D:0000 DB:80 nvmxdizC V: 48 H: 234
80a4fa xba                    A:2000 X:0184 Y:0000 S:1ffb D:0000 DB:80 nvmxdizC V: 48 H: 252
80a4fb lsr a                  A:0020 X:0184 Y:0000 S:1ffb D:0000 DB:80 nvmxdizC V: 48 H: 270
80a4fc sta $04       [000004] A:0010 X:0184 Y:0000 S:1ffb D:0000 DB:80 nvmxdizc V: 48 H: 282
80a4fe lda $1c16     [801c16] A:0010 X:0184 Y:0000 S:1ffb D:0000 DB:80 nvmxdizc V: 48 H: 310
80a501 and #$fe00             A:2859 X:0184 Y:0000 S:1ffb D:0000 DB:80 nvmxdizc V: 48 H: 344
80a504 sta $02       [000002] A:2800 X:0184 Y:0000 S:1ffb D:0000 DB:80 nvmxdizc V: 48 H: 362
80a506 bpl $a511     [80a511] A:2800 X:0184 Y:0000 S:1ffb D:0000 DB:80 nvmxdizc V: 48 H: 390
80a511 lsr a                  A:2800 X:0184 Y:0000 S:1ffb D:0000 DB:80 nvmxdizc V: 48 H: 408
80a512 lsr a                  A:1400 X:0184 Y:0000 S:1ffb D:0000 DB:80 nvmxdizc V: 48 H: 420
80a513 lsr a                  A:0a00 X:0184 Y:0000 S:1ffb D:0000 DB:80 nvmxdizc V: 48 H: 432
80a514 lsr a                  A:0500 X:0184 Y:0000 S:1ffb D:0000 DB:80 nvmxdizc V: 48 H: 444
80a515 clc                    A:0280 X:0184 Y:0000 S:1ffb D:0000 DB:80 nvmxdizc V: 48 H: 456
80a516 adc $04       [000004] A:0280 X:0184 Y:0000 S:1ffb D:0000 DB:80 nvmxdizc V: 48 H: 468
80a518 sta $04       [000004] A:0290 X:0184 Y:0000 S:1ffb D:0000 DB:80 nvmxdizc V: 48 H: 496
80a51a and #$00ff             A:0290 X:0184 Y:0000 S:1ffb D:0000 DB:80 nvmxdizc V: 48 H: 524
80a51d sep #$20               A:0090 X:0184 Y:0000 S:1ffb D:0000 DB:80 nvmxdizc V: 48 H: 582
80a51f lda $190b     [80190b] A:0090 X:0184 Y:0000 S:1ffb D:0000 DB:80 nvMxdizc V: 48 H: 600
80a522 tax                    A:0060 X:0184 Y:0000 S:1ffb D:0000 DB:80 nvMxdizc V: 48 H: 626
80a523 lda $a6f0,x   [80a750] A:0060 X:0060 Y:0000 S:1ffb D:0000 DB:80 nvMxdizc V: 48 H: 638
80a526 sta $10       [000010] A:0002 X:0060 Y:0000 S:1ffb D:0000 DB:80 nvMxdizc V: 48 H: 668
80a528 stz $11       [000011] A:0002 X:0060 Y:0000 S:1ffb D:0000 DB:80 nvMxdizc V: 48 H: 688
80a52a lda #$00               A:0002 X:0060 Y:0000 S:1ffb D:0000 DB:80 nvMxdizc V: 48 H: 708
80a52c sta $1a88,y   [801a88] A:0000 X:0060 Y:0000 S:1ffb D:0000 DB:80 nvMxdiZc V: 48 H: 720
80a52f rep #$20               A:0000 X:0060 Y:0000 S:1ffb D:0000 DB:80 nvMxdiZc V: 48 H: 752
80a531 lda $04       [000004] A:0000 X:0060 Y:0000 S:1ffb D:0000 DB:80 nvmxdiZc V: 48 H: 770
80a533 sta $06       [000006] A:0290 X:0060 Y:0000 S:1ffb D:0000 DB:80 nvmxdizc V: 48 H: 798
80a535 lda $00       [000000] A:0290 X:0060 Y:0000 S:1ffb D:0000 DB:80 nvmxdizc V: 48 H: 826
80a537 sta $1a89,y   [801a89] A:2000 X:0060 Y:0000 S:1ffb D:0000 DB:80 nvmxdizc V: 48 H: 854
80a53a lda $02       [000002] A:2000 X:0060 Y:0000 S:1ffb D:0000 DB:80 nvmxdizc V: 48 H: 894
80a53c sta $1a8b,y   [801a8b] A:2800 X:0060 Y:0000 S:1ffb D:0000 DB:80 nvmxdizc V: 48 H: 922
80a53f and #$00ff             A:2800 X:0060 Y:0000 S:1ffb D:0000 DB:80 nvmxdizc V: 48 H: 962
80a542 sep #$20               A:0000 X:0060 Y:0000 S:1ffb D:0000 DB:80 nvmxdiZc V: 48 H: 980
80a544 lda $10       [000010] A:0000 X:0060 Y:0000 S:1ffb D:0000 DB:80 nvMxdiZc V: 48 H: 998
80a546 asl a                  A:0002 X:0060 Y:0000 S:1ffb D:0000 DB:80 nvMxdizc V: 48 H:1018
80a547 asl a                  A:0004 X:0060 Y:0000 S:1ffb D:0000 DB:80 nvMxdizc V: 48 H:1030
80a548 adc $11       [000011] A:0008 X:0060 Y:0000 S:1ffb D:0000 DB:80 nvMxdizc V: 48 H:1042
80a54a tax                    A:0008 X:0060 Y:0000 S:1ffb D:0000 DB:80 nvMxdizc V: 48 H:1062
80a54b lda $a770,x   [80a778] A:0008 X:0008 Y:0000 S:1ffb D:0000 DB:80 nvMxdizc V: 48 H:1074
80a54e sta $12       [000012] A:0000 X:0008 Y:0000 S:1ffb D:0000 DB:80 nvMxdiZc V: 48 H:1104
80a550 bit #$01               A:0000 X:0008 Y:0000 S:1ffb D:0000 DB:80 nvMxdiZc V: 48 H:1244
80a552 beq $a568     [80a568] A:0000 X:0008 Y:0000 S:1ffb D:0000 DB:80 nvMxdiZc V: 48 H:1256
80a568 bit #$02               A:0000 X:0008 Y:0000 S:1ffb D:0000 DB:80 nvMxdiZc V: 48 H:1274
80a56a beq $a580     [80a580] A:0000 X:0008 Y:0000 S:1ffb D:0000 DB:80 nvMxdiZc V: 48 H:1286
80a580 bit #$04               A:0000 X:0008 Y:0000 S:1ffb D:0000 DB:80 nvMxdiZc V: 48 H:1304
80a582 beq $a59e     [80a59e] A:0000 X:0008 Y:0000 S:1ffb D:0000 DB:80 nvMxdiZc V: 48 H:1316
80a59e bit #$08               A:0000 X:0008 Y:0000 S:1ffb D:0000 DB:80 nvMxdiZc V: 48 H:1334
80a5a0 beq $a5ba     [80a5ba] A:0000 X:0008 Y:0000 S:1ffb D:0000 DB:80 nvMxdiZc V: 48 H:1346
80a5ba lda $1a8a,y   [801a8a] A:0000 X:0008 Y:0000 S:1ffb D:0000 DB:80 nvMxdiZc V: 49 H:   0
80a5bd bmi $a5cc     [80a5cc] A:0020 X:0008 Y:0000 S:1ffb D:0000 DB:80 nvMxdizc V: 49 H:  32
80a5bf bit #$40               A:0020 X:0008 Y:0000 S:1ffb D:0000 DB:80 nvMxdizc V: 49 H:  44
80a5c1 bne $a5c3     [80a5c3] A:0020 X:0008 Y:0000 S:1ffb D:0000 DB:80 nvMxdiZc V: 49 H:  56
80a5c3 lda $1a8c,y   [801a8c] A:0020 X:0008 Y:0000 S:1ffb D:0000 DB:80 nvMxdiZc V: 49 H:  68
80a5c6 bmi $a5cc     [80a5cc] A:0028 X:0008 Y:0000 S:1ffb D:0000 DB:80 nvMxdizc V: 49 H: 100
80a5c8 bit #$40               A:0028 X:0008 Y:0000 S:1ffb D:0000 DB:80 nvMxdizc V: 49 H: 112
80a5ca beq $a5d7     [80a5d7] A:0028 X:0008 Y:0000 S:1ffb D:0000 DB:80 nvMxdiZc V: 49 H: 124
80a5d7 ldx $06       [000006] A:0028 X:0008 Y:0000 S:1ffb D:0000 DB:80 nvMxdiZc V: 49 H: 142
80a5d9 lda $9792d6,x [979566] A:0028 X:0290 Y:0000 S:1ffb D:0000 DB:80 nvMxdizc V: 49 H: 170
80a5dd rep #$20               A:00c3 X:0290 Y:0000 S:1ffb D:0000 DB:80 NvMxdizc V: 49 H: 200
80a5df asl a                  A:00c3 X:0290 Y:0000 S:1ffb D:0000 DB:80 Nvmxdizc V: 49 H: 218
80a5e0 tax                    A:0186 X:0290 Y:0000 S:1ffb D:0000 DB:80 nvmxdizc V: 49 H: 230
80a5e1 lda $97cf18,x [97d09e] A:0186 X:0186 Y:0000 S:1ffb D:0000 DB:80 nvmxdizc V: 49 H: 242
80a5e5 tax                    A:27f2 X:0186 Y:0000 S:1ffb D:0000 DB:80 nvmxdizc V: 49 H: 278
80a5e6 sta $1a86,y   [801a86] A:27f2 X:27f2 Y:0000 S:1ffb D:0000 DB:80 nvmxdizc V: 49 H: 290
80a5e9 and #$00ff             A:27f2 X:27f2 Y:0000 S:1ffb D:0000 DB:80 nvmxdizc V: 49 H: 330
80a5ec sep #$20               A:00f2 X:27f2 Y:0000 S:1ffb D:0000 DB:80 nvmxdizc V: 49 H: 348
80a5ee jsr $a87a     [80a87a] A:00f2 X:27f2 Y:0000 S:1ffb D:0000 DB:80 nvMxdizc V: 49 H: 366
80a87a lda $9796d7,x [97bec9] A:00f2 X:27f2 Y:0000 S:1ff9 D:0000 DB:80 nvMxdizc V: 49 H: 406
80a87e sta $1a88,y   [801a88] A:0007 X:27f2 Y:0000 S:1ff9 D:0000 DB:80 nvMxdizc V: 49 H: 436
This is where it loads the map tile numbers from the map in rom. $1c14 is your X position and $1c16 is your Y position. It first cuts out the right 9 bits of each to give your tile coordinates, then manipulates the X coordinate so each tile is an increment of $0001, and the Y so each tile is an increment of $0020. Then it adds them together and uses that later as an index to read a byte from $9792d6. This one byte must represent the contents of those coordinates. After that it multiplies it by two and uses it as an index to take 16 bits from $97cf18. So each one byte tile number from before corresponds to a two byte "tile number" that gets stored in $1a86 like I mentioned in my last post. Afterward that long tile number also gets used to read a byte from $9796d7, the result of which is stored in $1a88, the other half of what I called the current "tile number" before. I don't know what that's about yet. This means the world map really is only 40x40, despite that you can walk all the way out to FFxFF - it's just reading the table wrong out of bounds. Furthermore I actually can map out the grid of tile numbers now, I just have to finish tracking down what they represent. Hopefully I can at least see some obvious patterns at first glance that confirm what I've determined so far. EDIT: Map confirmed: http://www.mediafire.com/convkey/c532/h6p4662119z1tm1fg.jpg http://www.mediafire.com/convkey/c22b/xk6c02apatanl5afg.jpg
Player (53)
Joined: 11/20/2013
Posts: 103
So you get your one byte tile number from the master map, then you use that to lookup a two-byte index from $97cf18 that corresponds to the location of that tile in the actual tile list, which starts at $9796d6. The first thing it does with that two-byte index is reads the first two bytes at that offset. These seem to define the size of the data that follows because they get used to define how the rest is read: -Reads one byte from ($9796d6 + index) and adds #$02 -Adds the index to the result and stores in $0008 -Reads one byte from ($9796d7 + index) (ie/ the next one) -Adds $0008 to that and stores in $000a Then it adds (byte2 - 1) to $0008, THEN it adds (byte2 - 1) * 2 to $000a So finally: $0008 = (index from $97cf18) + 2 + byte1 + (byte2 - 1) $000a = (index from $97cf18) + 2 + byte1 + byte2 + ((byte2 - 1) * 2) (The +2's just to account for the 2 "size bytes") And then it uses those to actually start reading from the tile in $9796d6, like so: ($0013 starts as byte2) -Read One Byte from $9796d6, X where X is $0008 -Decrement $0008 -Read Two Bytes from $9796d6, X where X is $000a -Decrement $000a -Decrement $000a -Decrement $0013 and branch (repeat) if not zero This doesn't seem to cover all the data for each tile though. The tile data itself starting at $9796d6 looks like this:
TILE 00 - Index 0000
Size	0100
Data	00

TILE 01 - Index 0003
Size	0100
Data	01

TILE 02 - Index 0006
Size	01 00
Data	02

TILE 03 - Index 0009
Size	03 0a
Data	04 05 83 00 00 01 00 00 01 00 01 01 00 0a 3b 13
       49 23 3a 29 37 2c 46 4b 3a 4b 47 5d 4c 6d 46 77
       3a 00 01 01 00 00 00 01 00 00 01 29 37 23 3a 4b
       3a 77 3a 0a 3b 2c 46 6d 46 4b 47 13 49 5d 4c

TILE 04 - Index 004a
Size	06 08
Data	01 ef 71 bf cf b2 0b 0b 0b 0d 0d 0d 0d 0d 17 6e
       18 63 1f 5d 2b 31 2c 4e 2f 45 33 37 3a 4d 0d 0d
       0d 0d 0d 0b 0b 0b 2b 31 33 37 2f 45 3a 4d 2c 4e
       1f 5d 18 63 17 6e

TILE 05 - Index 0082
Size	03 00
Data	0d 22 d1

TILE 06 - Index 0087
Size	06 09
Data	d9 07 46 45 3a db 00 01 00 00 01 00 00 00 01 36
       4c 38 29 3b 11 3c 7e 46 1e 46 34 46 5e 48 07 49
       6b 00 00 01 01 00 00 00 01 00 48 07 3b 11 46 1e
       38 29 46 34 36 4c 46 5e 49 6b 3c 7e

TILE 07 - Index 00c5
My best guess is that each tile is a repeating pattern that gets extended out to $0200 by $0200. Some basic ones are uniform and so only require one byte of data. It seems a logical way to compress things I guess but I'm really not understanding how to translate it to standard X Y coordinates at the moment. I don't know what the values mean either and knowing that might help, but if I got it all plotted out on a map first it would be simple to derive what they mean... This is one piece away from solved... EDIT: Here's the full tile data formatted as above if anyone's interested. http://www.mediafire.com/view/oil53kbljctrdc3/WorldMapTileset.txt I believe the first "Size" byte corresponds to how many bytes there are at the beginning of the "Data" section that aren't part of the normal one-byte-two-byte scanning it does later. I don't know what they're for.
Player (53)
Joined: 11/20/2013
Posts: 103
I completely forgot a while back that I'd seen it reading from another important spot, $97d118. I looked into that and I understand things a bit better now. In the "Tile Set" data I posted before, the first "Size" byte defines a number of bytes at the start of the data set that are used separately. Turns out these are used to do another lookup exactly the same way as we got to the Tileset from the world map. So, -One byte taken from tile data -Multiplied by two, used to index read two bytes from $97DC08 -Those bytes get used as an index to read from $97D118 In the same way as last time I assembled this up into what I'm calling an "Object" table. You can see it here: http://www.mediafire.com/view/4iyy7ewdev2jv1i/WorldMapObjectset.txt Unlike the tile table from before, only the second "Size" byte seems to actually relate to the size of the data. The first one gets stored and used a long while later for something I haven't worked out yet. In any case, the Data in this new table is read by the program two bytes at a time in a loop, using the second "Size" byte as a counter. Since luckily there are a few tiles in the game that have only these special object bytes and none of the data I saw used in my last post, I took a look at a few in game. For example, tile 05 northwest of Galys Pass, just before the 3-way intersection to the swamp. The tile's data looks like this:
TILE 05 - Index 82 00
Size 03 00
Data 0d 22 d1

OBJ 0D - Index 92 00
Size 01 05
Data 3d 00 43 00 80 3d 80 43 57 27

OBJ 22 - Index 70 01
Size 07 03
Data 80 80 00 80 00 00

OBJ D1 - Index dc 08
Size 02 07
Data 48 2c 46 35 4c 38 57 38 5f 30 5e 26 53 24
What it looks like in-game: -A straight wall from the northwest corner to the southeast corner of the tile -A road with uneven edges from the north-center to the east-center of the tile -A small lakesouthwest of the road at approximately 0D40X, 22B0Y (ie/ 0140X, 00B0Y relative to the tile coordinates). It seems to be the same shape and size as some generic brown patches you commonly see on the ground. What's interesting to note is that there's no trees or other similar scenery. What I think this means is that major landscape features like walls and roads and water all come from a standard set of 256 represented by those single bytes at the start of the tile data. The REST of the tile data, each one-byte-two-byte pair must be a piece of scenery. I bet if I went out and picked a tile at random and counted every last bush and rock in it it would add up. I'm guessing a one-byte identity with a two-byte location? The location would have to be compressed to every two increments at least... Just keeping you all updated on the off chance someone tries to help with something I already figured out.
Joined: 8/3/2004
Posts: 325
You have my full support for this TAS even if I don't really post anymore! The recent TAS was fun but to me game end glitch TASes are not very fulfilling so I'm eager to see a 100% one if you do go through with it. Of course, I can't help you because I barely understand what you're doing, but I'll read/watch either way :D
Player (53)
Joined: 11/20/2013
Posts: 103
Thanks for the support! I'm definitely going to get started on a 100% run soon, but I'm already halfway through a vast improvement on my last one so I want to finish that first. In the meantime, forget all the map business I've been ranting about for the last page. It was pretty simple in the end - sets of compressed coordinates defining everything's location. I have a new FAQ pending on gameFAQs that explains it all a lot more concisely. The only thing I can't do is assemble a bunch of square .pngs into a larger square to make an actual world map image. I even wrote a script to do it but it seems I chose the wrong software or something, it just doesn't work. I have literally everything else down but that and after all this I am noooot doing it manually 1024 times. If anybody wants to have some fun though I can send you an excel spreadsheet that draws any map tile or "object" in the game straight from the hexadecimal ROM data.
Player (53)
Joined: 11/20/2013
Posts: 103
HERE: http://www.pictureshack.us/images/42305_WORLDMAP1.png Turns out the only real solution was to reprogram excel to draw and assemble the entire thing itself all at once. It took five hours. That's why you just get this crappy-looking preliminary for now. Things that need fixing: -roads and such that are the wrong colour for their region (mostly yellow) -region backgrounds -more visible/distinct scenery markers -tiles that cover multiple regions having a grey layer over half (eg/ snowfield) -possibly add some icons for major things like towns? -??????? If you've played this game and would like some input on how this map looks when it finally gets posted now'd be a good time! The good news is I can get back to TASing now.
PJ
He/Him
Joined: 2/1/2011
Posts: 181
Location: Western NY
WOW! That's an amazing map! Well done Khaz!!
Player (53)
Joined: 11/20/2013
Posts: 103
Thank you! I'm glad it was worth all the effort. http://www.pictureshack.us/images/54539_FINISHEDWORLDMAPHALF.png An update, much improved. The markers are more visible now but the downside is they sometimes overlap and in general are centered about one pixel southeast of where they should be maybe. I'm calling it good enough. And yes, there are two different kinds of walls in game for different kinds of regions. Dunno why they needed that. EDIT: The FAQ I mentioned is up now: http://www.gamefaqs.com/snes/588294-dragon-view/faqs/69745 I guess "FAQ" is the wrong name for it. This is like a "questions that were never asked".
Joined: 6/22/2012
Posts: 81
I am not an speedrunner (at moment, but I think to do in future) but I have played recently this game (2 or 3 times, the game freezes in some part) after go to another part from the map (after the first boss) to get Easy level up fight these lizards and frogs (I don't know what are these monsters) in Sektra region, these need a lot the attacks but your level increase fast, But I have actually think about that Giants in North Forest beside that need a lot of attacks, you enter and leave the area help from easy respawn, and in forest have 3 Giants in each section from forest. I will expect help something in speedrun
Player (146)
Joined: 5/9/2011
Posts: 25
Wow. That map is really cool! Excited for a 100% run!
PJ
He/Him
Joined: 2/1/2011
Posts: 181
Location: Western NY
Hikaruon wrote:
I am not an speedrunner (at moment, but I think to do in future) but I have played recently this game (2 or 3 times, the game freezes in some part) after go to another part from the map (after the first boss) to get Easy level up fight these lizards and frogs (I don't know what are these monsters) in Sektra region, these need a lot the attacks but your level increase fast, But I have actually think about that Giants in North Forest beside that need a lot of attacks, you enter and leave the area help from easy respawn, and in forest have 3 Giants in each section from forest. I will expect help something in speedrun
There are a lot of really good grinding spots in this game. The two you mentioned are already used (random encounters in the swamp area, and the giants in the Ancient Forest). We can't damage the swamp enemies that early, so we have to use the sword technique to damage them; since we can only carry 3 potions, this limits the amount of grinding we can do there, but it's still worth quite a bit of exp. The giants in Ancient Forest take a lot of damage from the Ice Ring so that makes for really effective and safe level grinding. There's also a really good spot in Sektra temple that I like for 100%. There's a room with 4 water clones that are killed in one use of level 3 lightning ring. That room is worth like 3k experience and takes a few seconds to clear (and usually refills your MP since each enemy has 3 drops iirc). Anyways, I doubt any of these will be used in the TAS because the sword/hauza technique are effective at all levels and the TAS can manipulate health drops everywhere. For real-time runs they're definitely good though.
Joined: 6/22/2012
Posts: 81
PJ wrote:
Hikaruon wrote:
I am not an speedrunner (at moment, but I think to do in future) but I have played recently this game (2 or 3 times, the game freezes in some part) after go to another part from the map (after the first boss) to get Easy level up fight these lizards and frogs (I don't know what are these monsters) in Sektra region, these need a lot the attacks but your level increase fast, But I have actually think about that Giants in North Forest beside that need a lot of attacks, you enter and leave the area help from easy respawn, and in forest have 3 Giants in each section from forest. I will expect help something in speedrun
There are a lot of really good grinding spots in this game. The two you mentioned are already used (random encounters in the swamp area, and the giants in the Ancient Forest). We can't damage the swamp enemies that early, so we have to use the sword technique to damage them; since we can only carry 3 potions, this limits the amount of grinding we can do there, but it's still worth quite a bit of exp. The giants in Ancient Forest take a lot of damage from the Ice Ring so that makes for really effective and safe level grinding. There's also a really good spot in Sektra temple that I like for 100%. There's a room with 4 water clones that are killed in one use of level 3 lightning ring. That room is worth like 3k experience and takes a few seconds to clear (and usually refills your MP since each enemy has 3 drops iirc). Anyways, I doubt any of these will be used in the TAS because the sword/hauza technique are effective at all levels and the TAS can manipulate health drops everywhere. For real-time runs they're definitely good though.
I have used in A.Forest the hauza weapon, he have +5 levels from damage than Sword,I think use this strategy is good until level 15 or 20.
Player (53)
Joined: 11/20/2013
Posts: 103
Soooo just asking, but does anyone know of anywhere that might be a suitable/useful place to host that map I made? I was going for GameFAQs but they don't allow anything over ~400kb and I can't possibly compress this to anything under about 1MB without it looking like absolute crap. Unless somebody is better than me at image compression and has suggestions to get it lower without it looking so miserable... I would really rather not have all that work just be for my personal reference.
Joined: 7/2/2007
Posts: 3960
Just use imgur. Free, generous size limits, doesn't mind hotlinking, doesn't require you to make an account, leaves images up pretty much indefinitely as far as I can tell (unless you explicitly delete them). I'm amazed they stay in business, but I'm glad they do!
Pyrel - an open-source rewrite of the Angband roguelike game in Python.