Posts for ktwo


Experienced Forum User, Published Author, Player (242)
Joined: 8/10/2008
Posts: 113
SpaceColonizer actually offered co-authorship before submitting, but I said I was fine with with just being credited for my findings. I hope we can all agree that he has gone through quite a bit of effort to give credit to me and others in the comments, so as far as I'm concerned that's enough. I consider my contributions (one room solution in the currently published TAS and now two more and finally finding a clip) as sharing knowledge publicly about the game. All the inputs and optimizations have been done by SpaceColonizer. The above being said, I don't want to make a big deal out of it. I don't mind being co-author if you think that would be more accurate. By the way, the new movie looks great. No more comments from my side.
Experienced Forum User, Published Author, Player (242)
Joined: 8/10/2008
Posts: 113
Routing: -------- I knew about the PR2 improvement that wasn't implemented in the previous TAS. When deciding to look at this game again, I first found the new route in PR15. With the two improvements combined, it was only a handful of frames missing to bring the TAS to sub-6. It had to be possible to find those frames somewhere... I decided to look at every single room along the route and tried TASing everything I could think of that wasn't obviously slower. I think I tried at least one alternative solution in every room of the route (and several alternatives in most of the rooms). I couldn't find any other route improvement. Unable to further optimize through better room solutions, my attention was re-directed to find some kind of clip instead. The hit detection in this game is a bit weird and not fully understood, with for example enemies sometimes clipping through solid walls and Jack also being able to clip into chests. So it seemed like something could still be out there waiting to be found. Once the totem pole clip was discovered, I tried to find other shortcuts by clipping into objects elsewhere. I can't say that I've tried clipping through every single object along the route, but at least quite a few places that looked potentially promising. Nothing that resulted in other clips though. The above was not an attempt to highlight my own contributions, but just to say that after a focused effort, I've now tried TASing everything I could think of without finding any more improvements. I can obviously not rule out the possibility that there could still be some faster route that everyone overlooked so far. But that being said, the routing in this TAS looks extremely solid to me. Optimization: ------------- From just watching, it should hopefully be clear to most viewers that the execution in this TAS is very tight. As someone with first-hand experience from this game, I can confirm that the level of optimization goes beyond "it looks fast". Every time I've TASed something in this game and compared with SpaceColonizer's solutions, SC managed to squeeze out frames in basically every action from a better understanding of how position and movement work. There is also lag management that goes well beyond what is "merely" acceptable. I haven't dug into the details of movement and lag in this game, so I can't state anything regarding the last few percent of optimization in this TAS. However, I've seen enough to know that it's very, very good. Overall: -------- Fantastic job implementing the new findings and then making the extra effort to continue squeezing out frames instead of just settling as soon as the time said sub-6.
Experienced Forum User, Published Author, Player (242)
Joined: 8/10/2008
Posts: 113
The "new" shortcut is a really cool finding! Good job going through the resources again for this game and picking up on this secret that had been overlooked until now (at least by speedrunners). The shortcut itself is one of those "impossible" secrets that I wonder if anyone managed to find legimately on their own by just playing the vanilla game and equipped with the manual, but without exploring save states or looking at the RAM or in the code. I guess we'll never know, but I'd be very interested to hear what the developers for this game and Solomon's Key had in mind with some of the overly obscure secrets. Maybe the sole purpose was to sell guide books? About the TAS itself. The new TAS looked the same as the previous one up until palace room (PR) 4 and then the same again from PR 12 until the end. PR 4 and 11 play out slightly differently this time around because of the shortcut, but the changes made sense to me. 
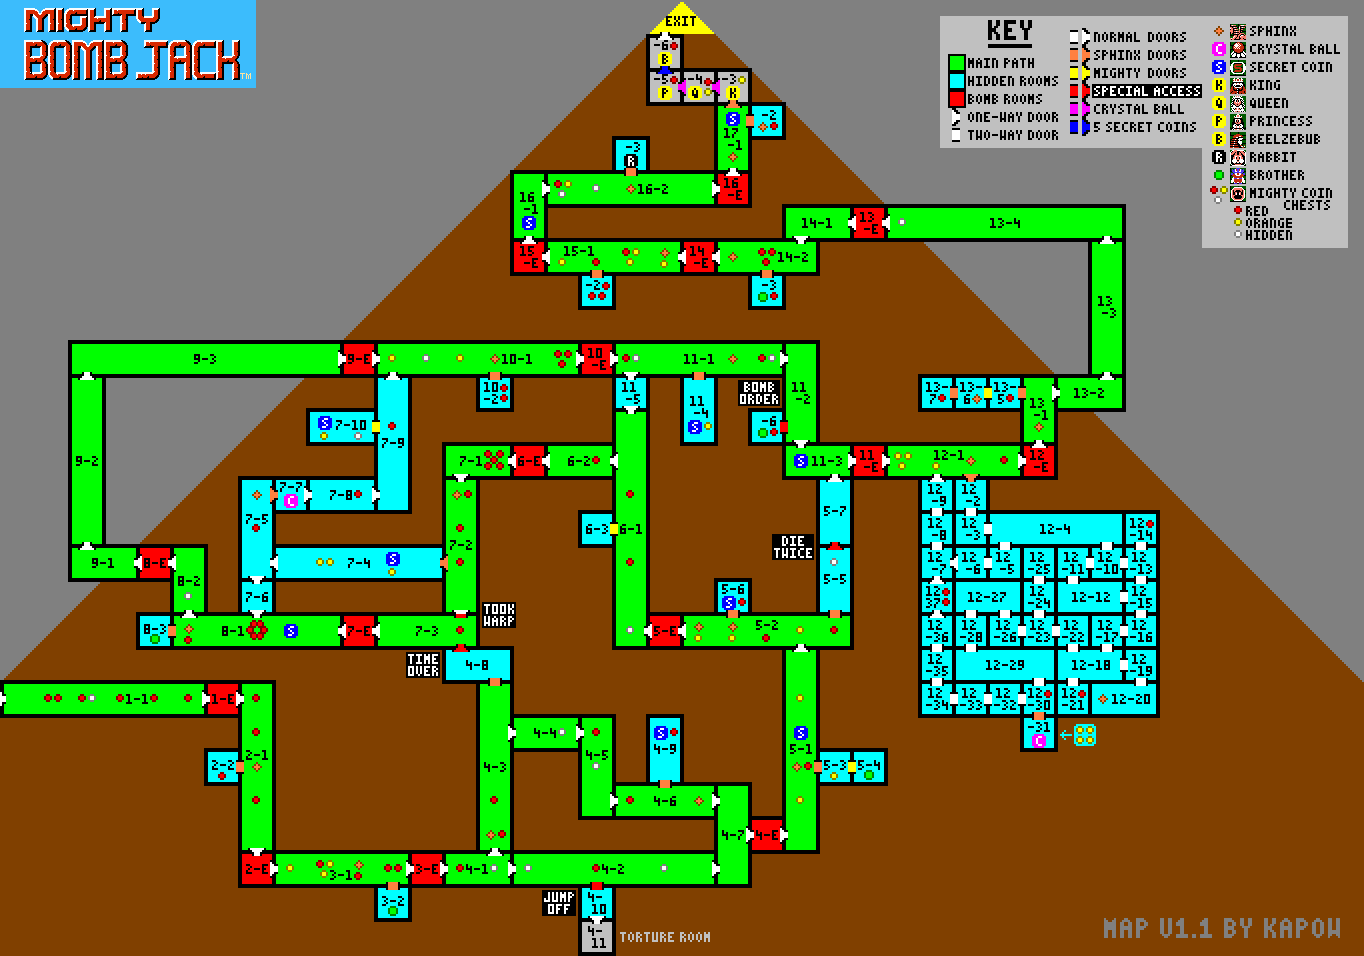
The shortcut traverses the level 5 corridors and the end of the last level 10 corridor (https://www.vgmaps.com/Atlas/NES/MightyBombJack-Pyramid.png ). There are some routing decisions when going through these corridors and which platforms to jump to (shorter jump now and then a bigger jump or bigger jump first and then a shorter jump?). I checked one of those cases, but couldn't find an improvement by taking the alternative route. The game mechanics are not trivial when testing, so I didn't check all of the alternative routes. In the end, nothing stands out to me as questionable, just noting that there are sometimes route alternatives that are not obviously slower just from watching. A question that came to mind when hearing about this shortcut was if the conditions were really exactly as described or if a different setup could be found. This sub-routine runs in corridor 5-5 (with reference to the room numbers in the link above):
A8E9  LDA $0396 = #$00
A8EC  BNE $A925
A8EE  LDA $0395 = #$00
A8F1  CMP #$02
A8F3  BNE $A907
A907  LDA $03CE = #$E9
A90A  BPL $A925
A90C  LDA $0392 = #$5D
A90F  CMP #$5D
A911  BNE $A925
A913  INC $0392 = #$5D
A916  INC $0395 = #$00
$396 - unknown purpose $395 - death counter in corridor 5-5 $3CE - MBJ status flag $392 - room-specific death event "trigger"? The first four bits in $3CE indicate whether MBJ is alive (0) or dead (0xE). The last four bits don't matter for this sub-routine, but indicate whether he's on the ground or in the air (only a quick check, so maybe there are other possibilities too?). So in the example above, MBJ just died. I didn't look into $392 in detail, but it's set when dying in corridor 5-5, which allows the check in the sub-routine to be passed. If I remember correctly, there are other secrets that require deaths in this game. Maybe this address is used for them as well? Each time you die in 5-5, $395 is increased by one and when it's counted up to 2, the sub-routine branches and $3BC changes value, which opens the (ultra-)secret passage to 5-X. So let's get back to how this fits with the setup described for this shortcut: 1. Collect the sphinx in 5-2 - This opens up the passage to 5-5. There is no other known way to open up this passage. 2. Enter 5-5 3. Die in the fire pit - There are no enemies spawning in this room, so the only way to die is in the fire pit (or maybe by letting the time run out?). Dying in 5-5 increases the value in $395 and the sub-routine that increases $395 only runs in 5-5 (at least of the rooms visited in this TAS). The only other times the value in $395 is updated during the TAS is after clearing a PR and then it's to reset its value to 0. So maybe this address is used for other secrets as well and resetting it after each PR ensures that you don't start triggering a secret in one level and then trigger a secret in another level earlier than intended? 4. Repeat 1-3 5. Repeat 1 and 2 6. Enter the passage to 5-X Without a deeper analysis, it's of course always possible that one can access the relevant code sections through different parts of the code, opening up new possibilities. But as far as I can tell and with today's knowledge, the code seems to support that the steps in the described setup are indeed required to open up the shortcut.
Experienced Forum User, Published Author, Player (242)
Joined: 8/10/2008
Posts: 113
$57C together with $57B indicate Bart's position in the level. 0 is the very left of the level. As you move to the right, $57B will increase. When it changes value (cycles/loops or whatever you like to call it) from 0xFF to 0, $57C increases by 1. In the jonk level, the very right of the level is $57C=5. The other way of looking at position is to use where the screen is located in the level and then add the player's position on top of that. That's what $54 and $56/$57 are used for. $57B is calculated as the value of $54 added to the value of $56. I can see that the game can become messy when poking these values. My guess is that the actual graphics are controlled by another mechanism. So if you want to teleport Bart around a level, you would need to make sure the graphics, the window position and Bart's own coordinates match. Or else it will look like he's outside the game's geometry. I'm not sure I can help you with this. I'm not sure where the confusion for $575 comes from. It's essentially the x sub-pixel. It's calculated by adding the x-speed ($573) to whatever is already stored in $575. When it cycles, Bart gains an additional pixel in the x-direction. If you're on the ground and release the d-pad, it's reset to 0 though. Most games I've seen keep the sub-pixels when you stop moving, but that's of course a choice entirely up to the game designers.
Experienced Forum User, Published Author, Player (242)
Joined: 8/10/2008
Posts: 113
Sorry, I'm not sure I understand what you're asking me to do. I know what a .wch is, but it's unclear to me why you would need me to make one for you instead of just making one yourself and fill it with the addresses you want? Or are you asking for help to find more RAM-addresses?
Experienced Forum User, Published Author, Player (242)
Joined: 8/10/2008
Posts: 113
My description of the wall clip to the left wasn't the best. I've uploaded a movie of it: https://tasvideos.org/UserFiles/Info/638259530905910086 Yes, by "0xF0" I was referring to the value of $57D (small y-position). It's the same for both the left and right side when clipping. I tried the same y-position in a few other places. I was able to clip into another wall at the same value of $57D, but with a different value of $57E (big y-value). I also tried in a few random spots in other levels, but couldn't get it to work. From a quick look, the level layouts are for the most part not set up for shortcuts from wall clipping. One possible candidate would have been when entering the pyramid, but I couldn't enter the wall at that y-position. I guess one would have to try all 256 possible y-values to be sure though...
Experienced Forum User, Published Author, Player (242)
Joined: 8/10/2008
Posts: 113
Thanks for the movie. I don't have any experience in hitbox analysis (other than trial-and-error), so I'm not the best to answer what's going on. But I did play around a bit just to see if anything interesting would happen. I couldn't get into the room with the two coffins either. However, looking at the positions and speeds, it's clear that it was a specific combination that was the key to clipping. I then tried that combination in other places on the wall and around. I managed to get into the left wall, at the same y-position by mirroring the inputs. So maybe there is a seam at 0xF0? I managed to get out a bit on the left side, but ended up walking in air, so it didn't work out either. To me, this looks like it has the potential to produce shortcuts and should therefore be tested in other places as well. Maybe even other levels. I should say that I don't know this game well enough, so I don't know if clipping makes sense in other levels though. Just to summarize from a pure testing perspective, you hug the wall, let the x-speed drop to 0, then give four consecutive inputs in the direction of the wall. The clipping then occurs when $575 loops and is converted into a full x-pixel. The y-position and y-speed also matter, but I haven't tried to look at the game mechanics. Given how similar the three Bart games control, might be worth checking forums and wips to see if anyone has reported/used wall clips in any of the other games? Or just any kind of abuse of the game mechanics in the other games would be worth checking out.
Experienced Forum User, Published Author, Player (242)
Joined: 8/10/2008
Posts: 113
Nice to see progress here! Is there any claim of someone skipping the snake or a theory of how one might do it? If there isn't, difficult to know what to test or look for. As for the wall clip, a good start would be to try and reproduce it in a movie. Then I would check the positions and speed values and see if there is any pattern that works when trying to do it again from a different starting position. Is there literally a hole somewhere in the wall? Or is Bart clipping through a solid barrier? To expand a bit on what the mini-guide/forum thread said about movement and position (I only quickly checked the jonk level): $54 - Bart's x-position on screen $57/$56 - Big/Small x-position of the screen (level coordinates) $57C/$57B - Big/Small x-position of Bart (level coordinates, =$54+$56) $574/$573 - Small/Sub x-speed $575 - {=$575+$573 if the speed is non-0; 0 if the speed is 0}, so sort of Bart's x sub-pixel So there is a sub-pixel calculation in the game, but with this twist of resetting when Bart is at a standstill. Looking at the above, I can't immediately come to think any abuse when it comes to regular movement. But if there is any jump in the game where an additional pixel would make a difference, then the sub-pixels could be worth looking at. It would also be interesting to see how the sub-pixels line up when Bart enters the wall.
Experienced Forum User, Published Author, Player (242)
Joined: 8/10/2008
Posts: 113
Great to see that you've kept pushing it as far as you have. I thought already version 3 looked good, so I'm obviously going to be happy about version 5 as well. Awesome that you managed to include a manipulation of a mummy falling through the platform too! It sounds like you're planning to write some more detailed comments, which I'm looking forward to read.
Experienced Forum User, Published Author, Player (242)
Joined: 8/10/2008
Posts: 113
Personally, I have a soft spot for the three Bart games. I've also thought it's a pity that two of them don't have (published) TASes. I can't contribute anything at this stage, but if you decide to start working on this (or Bartman) I can promise that I will follow the progress with interest.
Experienced Forum User, Published Author, Player (242)
Joined: 8/10/2008
Posts: 113
I've just watched the new iteration (#3) in real-time. Seriously, good job! I noticed plenty of optimizations since #2. Nothing stood out to me as questionable. It now uses known routes and strats as foundation and has added new findings to the mix. As far as I can tell, this TAS is therefore optimized (with the current knowledge) in terms of routing. I haven't done a frame-by-frame analysis to see if I could save additional frames but I'm satisfied with what I'm seeing in terms of execution too.. Overall, I think this easily deserves to be accepted. Any chance you can now be talked into updating the best ending TAS? You should be able to copy-paste quite a bit from the any% run. I added a note before in the guide regarding room 10 (under the section about the mummies). That should answer your question about why this particular room plays out differently in any% and best ending.
Experienced Forum User, Published Author, Player (242)
Joined: 8/10/2008
Posts: 113
A brief speedrun history of this game. The first notable speedrun for this game was Guybrush's any% TAS from 2006 that was rejected for "being too boring". The following year, hisatoki made a best ending (J-version) TAS that got accepted. Hisatoki's routes are better in many rooms. Some of the room solutions that today look outdated (see e.g. room 1) are however similar to Guybrush's, while there are also parts that are faster in Guybrush's TAS. It's difficult to say if hisatoki had looked at Guybrush's rejected TAS. In 2013, I picked up this game and worked on real-time speedruns in both the any% and best ending categories. There weren't (imo) any serious RTAs at the time, so my starting point was the existing TASes. I found a few improvements and made some adjustments to fit real-time play. In 2018, msm_smtn took the game a big step forward and improved the real-time routes in almost every room. So let's see how the new TAS fits in to the (rather thin) history book of Mighty Bomb Jack speedrunning. Corridor 1 - Collects two mighty coins, same as msm_smtn did in the any% RTA. This is however unnecessary in a TAS. Let's get back to this question in corridor 17. Palace Room (PR) 1 - Same bomb route as msm_smtn, but a slightly improved route for collecting the first bomb. The TASes use an outdated route. PR 2 - Follows hisatoki's route, but implements a frame-perfect jump at the start of the room for a minor route improvement PR 3 - Again roughly follows hisatoki's route, but improves the collection of the bombs in the middle. Good find! However, you should take another look at hisatoki's movie. If you jump to the left from the last platform to the floor, it's faster than dropping down on the right side. PR 4 - Basically the same route as Guybrush and hisatoki, but the left side has been improved a bit PR 5 - Basically the same route as Guybrush (hisatoki used, a bit surprisingly, a route that was clearly slower) PR 6 - Same route as msm_smtn. The any% TAS route is outdated and the best ending TAS route is not applicable in this room (doesn't need to warp to PR 7) PR 7 - The bomb order in this room makes routing quite straight-forward and the route hasn't changed since Guybrush's TAS PR 8 - Same route as msm_smtn PR 9 - Nice minor new routing in this room to avoid a jump at the end PR 10 - Same route as msm_smtn PR 11 - Same route as msm_smtn PR 12 - Same route as msm_smtn. However, hisatoki uses a different route and it's faster. PR 13 - Everyone's nightmare room. The routing in this room is complex. It's a combination of the bomb order, placement of bombs and exposure to enemies that make this room tricky, even in a TAS. The route in the submitted TAS is different from all previous speedruns and looks leaner (and is faster). PR 14 - Same route as msm_smtn. However, hisatoki's route is faster. PR 15 - Same route as msm_smtn. However, you should jump off the pillar on the right and left side (see hisatoki's TAS). You should also look at how hisatoki collected the bombs in the middle. That solution is faster. PR 16 - Same route as msm_smtn. The TASes use outdated routes. Corridor 17 - Same route as msm_smtn. However, you should take a look at Guybrush's TAS. You can clear these rooms without any mighty coins. That should lead to a nice time save in corridor 1. Other comments: - I didn't check for "pushing against an obstacle" that we already talked about above. I assume you've tested both possibilities everywhere it's possible. - I made comments about jumping instead of dropping off some platforms in some of the rooms. I didn't go through the movie again to check if there were any other possibilities for this, but it might be worth if you're anyways going to redo (same with splitting some jumps up in two). - I found this post in the forum about jumping through the floor that I thought was worth sharing, https://tasvideos.org/Forum/Posts/Create/88?quoteId=56961 . It doesn't seem like there exists any evidence for this no more, so this is just in case you want to go "glitch hunting" Overall, it looks like this mainly builds on msm_smtn's room solutions, but there are several new ideas in here as well. Good job on the new findings. And maybe not all of them are "TAS-only" either, so will be interesting to see if any of them get implemented in RTAs. Despite this being another step forward for this game, this submission needs another iteration. I know you already have a few minor improvements of your own that you're also planning to include.
Experienced Forum User, Published Author, Player (242)
Joined: 8/10/2008
Posts: 113
I think E and C are just used for storing temporary variables during a frame for their zero-page properties. If you look at E frame by frame in a RAM watch, it maps MBJ to a grid, where each quadrant is 16x16 pixels. And if you look at C, it points to either the coordinates of the last collected bomb or, if an enemy spawns, the right spawn position (regardless of if the mummy spawns to the left or right). I haven't looked into what the game uses this information for. However, earlier in the frame, E and C are used to calculate the distance to MBJ (only during the frames the game needs this information). You need to use the emu's debugger tool to study that. Good point about the metroid/jellyfish. I wrote that many years ago and didn't update the section yesterday. I agree that your description is clearly the correct one. I have now updated it. Now when you mention it, I seem to remember mummies falling through the floor. If I remember correctly, it's not even that uncommon. I took a quick look in room 14. By changing the inputs, you can make the mummy stay on the platform instead. I didn't look into it further, but if it would turn out to have any application in a speedrun, I might revisit this question. Anyways, seems a bit weird that such a mechanic depends on player inputs. If you manage to record any evidence of mummies starting to walk away from MBJ's direction, I'd be interested to know. Especially if you get it in an emu movie. I didn't spend a lot of time looking at the mummy drop timer, so not sure why it doesn't count down every frame. The spawn timer looks consistent though. I will partly take back what I said about the horizontal movement. Turns out there is no acceleration in the x-direction. The speed alternates between 1 pixel/frame and 2p/f every other frame. So from that perspective, it shouldn't matter whether you press against an obstacle or not. But still it somehow does. From very limited testing, it was faster for me when not getting stuck on the obstacle. If you run into a case where it's faster to press up against an obstacle, I'd be interested to take another look (I still haven't watched your run in detail, so apologies if this was already the case in one of the rooms). I added a section in the guide on the movements with some RAM-addresses and notes.
Experienced Forum User, Published Author, Player (242)
Joined: 8/10/2008
Posts: 113
I saw your comment about the mummies. I played this game many years ago and remember that I couldn't figure out exactly how the mummies worked either. They clearly follow some kind of pattern and depend on MBJ in some way, but I couldn't conclude back then. Anyways, I decided to take a look now and see what I could find out. I've added my findings here: https://kb.speeddemosarchive.com/Mighty_Bomb_Jack_(NES)/Game_Mechanics#Mummies If you have any questions or encounter something you don't think fits in with the description, please let me know. I plan to take a closer look at your improved movie in the next few days.
Experienced Forum User, Published Author, Player (242)
Joined: 8/10/2008
Posts: 113
After having played through this game casually not long ago, I was interested in what the TAS looked like. Unfortunately, there is none. There is only a rejected submission, which seems to have sparked the activity in this thread. The latest emu I could get Aqfaq's movie to sync on was fceu 0.98.25 (https://tasvideos.org/EmulatorResources/FCEU - thanks for the help in the tasvideos discord for finding me the link!). The movie desyncs on newer releases of FCEUX at the chapter 4 boss and early in chapter 2 in Bizhawk. I started looking into if I could build on Aqfaq's work and finally get a TAS done for this game. I will however say that I have now abandoned that idea. It looks really interesting, but it's just too much of a commitment for me. I still wanted to make a post about it and share some thoughts. The following movie syncs up to the last action scene of chapter 6: https://tasvideos.org/UserFiles/Info/638231974742825749 I basically just tried to sync a movie in a modern emu that followed Aqfaq's route as close as possible. While I didn't test much in terms of optimizing movement, my general impression is that Aqfaq did a really good job, especially considering the emu tools that were available at the time. I can see why Aqfaq got discouraged when realizing there were not enough bullets to complete the run and abandoned the project at the end of chapter 6. After finishing the syncing task, I decided to look at the inventory management and if I could come up with any ideas on how to move forward. Each shop visit costs at least ~300 frames and that assumes the shop is on the way. The only shop along the route is in chapter 2. With cash being scarce, this means there is only a limited amount of money you can grab before the shop visit without resorting to very time-consuming cash farming. There are a few ways to conserve ammo: a) Punch enemies instead of shooting them. This depends on the enemy position and is not always possible. b) Fists do 1 damage, standard bullets do 3 damage and silver bullets do 4 damage. Since silver bullets are twice as expensive, standard bullets are more economical to use. c) Some enemies in the gallery shooting scenes can be ignored d) Just tank hits or take detours Aqfaq used 'c' and a bit of 'a' and 'd' towards the end (probably when realizing there were not enough bullets to get to the end). I mapped out Aqfaq's inventory route and a new route I worked on in the following spreadsheet: https://docs.google.com/spreadsheets/d/e/2PACX-1vQsJmmfpwmkWvAdWMDyQjyHan6l4Ki3VNIRPVO9wKHHG4YiEZCVwf9JnWJMfS9kE6JlzPxtpkldQxR8/pubhtml There are plenty of assumptions in the new route. It was only meant as a concept for a first TAS draft to follow and see if things worked out in the end. The first 6 chapters are somewhat realistic, since I could test them out in my TAS. The inventory route for the last two chapters are however more of a guesswork. I just watched an RTA playthrough and made a rough estimate of where I think a TAS could clip and which enemies that had to be dealt with. I still ended up with a deficit of silver bullets, but some of the sections were difficult to estimate, so I think it should be possible to squeeze out a few more silver bullets, especially in chapter 7, even if that would mean using method 'd'. Doing a second shop visit to stock up on ammo would in comparison take forever, so that simply isn't an option. There weren't any major roadblocks that I could see. It just looked overall like a big commitment to get an optimized TAS done. Some challenges/reasons why I didn't continue: * The movement glitches are not intuitive. How they function need to be looked into in more detail to ensure optimal use. * I stopped my sync movie when getting hit by a crusher in chapter 6. I couldn't easily figure out how to avoid it (Aqfaq managed to avoid getting hit by it). * Because of the item management, I think one might have to TAS a few full iterations before finding the correct item route. It's quite possible that most of the game syncs after re-doing earlier sections though. * Quite a few comparisons will be needed in order to judge which time losses are the least severe when trying to conserve bullets. * Some of the action scenes seem to have different variants that seem to be determined by RNG (the RNG can be controlled by player input). Is this only for the "gallery shooting scenes" or can also other action scenes have different variants?
Experienced Forum User, Published Author, Player (242)
Joined: 8/10/2008
Posts: 113
There are two important game mechanics that you have overlooked: - By pressing down on the d-pad, you descend faster than freely falling. Can be used in pretty much every room. - The horizontal movement has acceleration. You should therefore avoid pressing against walls when falling and instead build up speed during the fall so you can clear the obstacle at max speed. Can be used in e.g. the right side of room 3 (and probably other rooms as well). I'm very interested in seeing a TAS of this category. However, there is in my opinion not enough complexity in this game to allow for basically even a frame of known improvement. If you decide to redo this and squeeze out the last frames, I'll try to take another look.
Experienced Forum User, Published Author, Player (242)
Joined: 8/10/2008
Posts: 113
A 47f improvement in tower 5: https://tasvideos.org/UserFiles/Info/638097610555413379 I didn't put in enough effort to consider it worthy to submit an improvement, so I'm just posting here for reference in case anyone would be interested in this game in the future.
Experienced Forum User, Published Author, Player (242)
Joined: 8/10/2008
Posts: 113
Minor improvement found: https://tasvideos.org/UserFiles/Info/638049216706166771 (corrected version needed) Before submitting, I noticed an error message popped up at the end when playing back my three recently submitted movies. I assumed this was related to the emulator (first time using bizhawk 2.8) and didn't investigate further. I can see in the decision that this was also noticed and the submitted movies have been replaced with corrected versions. Is there a setting I should change on my end to avoid getting this error message? Darkman, I agree with pretty much everything in your review. Since I worked on both the U- and J-TASes in parallel, any movie differences should be due to version differences. I'll just add a few comments below: Stage 0 If you try to turn around on crumbling floor in the U-version, you will fall. So the solution in the J-version doesn't work. Stage 1 The snake despawn doesn't work in the U-version. I haven't investigated exactly what's going on in the J-version, but I'm guessing you somehow manage to get behind the snake's despawn point (enemies are despawned as you move past them). Stage 2 The last set of pillars can be passed without stopping in the J-version. Trying the same solution in the U-version will result in Dirk getting hit and a forced wait is instead needed. It's very close though and doesn't look like Dirk is more than a pixel away from clearing the gates. Stage 4 Your comments made me think through once again why exactly the Lizard King spawns need to be different in the two movies. There are differences between the versions that can't be circumvented, but this exercise still helped me find a faster solution.
Experienced Forum User, Published Author, Player (242)
Joined: 8/10/2008
Posts: 113
Just going to mention this so it has been said. I did check if the new door trick worked on the GB-version as well. I didn't check every single door, but I couldn't get the trick to work on the doors I tried and then assumed this trick had been lost in the conversion.
Experienced Forum User, Published Author, Player (242)
Joined: 8/10/2008
Posts: 113
Thanks for the clarifications and corrections. The comments have been updated. eien86 is probably better to explain the bot's features, but picking up loot along the way will add complexity for sure. But if I understand it correctly, it's entirely possible to tell the bot what to collect. When I tried TASing it myself, I first made my own solution and then looked at yours. I couldn't really make out what it was in your method that made it faster though. Same with the bot's solutions compared with yours. It looks to me like it's more aggressive, bumping into the walls, while you're more smoothly drifting around the corners. I didn't deep-dive in a frame-by-frame analysis though, so I don't know if it's the bumping into walls or something else in the bot's solutions that make them fast. Your solutions are visually much more appealing and intuitively look faster (at least in my eyes). But the actual numbers have clearly been in favor of the bot in every comparison we made, except for when the nitro use became too complex. I know that eien86 also botted race 1 as a test before starting the actual TASing and the bot came out comfortably on top there as well.
Experienced Forum User, Published Author, Player (242)
Joined: 8/10/2008
Posts: 113
I looked into the idea of another corner deflection in the p12 maze again (around frames 32400-32600) to see if I could get a better estimate of a potential time gain. Unfortunately, I wasn't able to convert the idea to any time save. Another corner deflection would mean starting the vertical movement earlier (good) and also the opportunity to speed up the vertical movement before the corner (also good). But what counts the most is building speed in the vertical shaft after the second corner (around f32600). By deviating from the route in the submitted movie, the tethering rotation is negatively impacted, which means less speed. The reason why this worked in the published TAS was because we're tethering different objects with different tethering properties. The published TAS had an advantage here. There are quite a few options in a section like this and I'm hesitant to definitvely say that there is no time save to be found. But I can say that I've tried the ideas I had and they all lost time compared to the submitted movie.
Experienced Forum User, Published Author, Player (242)
Joined: 8/10/2008
Posts: 113
As mentioned in the comments, I took part in the making of this TAS. Initially, I thought it would be a directly contributing part by working in tandem with eien86's bot Jaffar in races 25-36. In the end, all the inputs in races 1-24 are from FatRatKnight and all the inputs in 25-36 are from the bot. I'm therefore not listed as a co-author. I speedran this game on console in 2018 and during that time had an active discussion in the forum thread with FatRatKnight. Most of what we know today of this game's mechanics is a direct result from that discussion (by far the most of the advancements were done by FatRatKnight). So while I focused on the real-time speedrun, FatRatKnight eventually TASed up to race 24. This was done through several iterations to hone the execution, the strats, test different upgrade options and use the latest findings. I thought it was a pity that the last 12 races were never completed and put it on my own to-do list. The remaining races should normally be the easiest ones to complete, because the car was already fully upgraded at that point and races 25-36 re-use tracks from previous races. However, before starting on race 25, I planned to TAS one or a few of the earlier races. This would allow me to compare with FatRatKnight's times to ensure I had the right understanding of the methods used to efficiently navigate corners etc. I started this a few times, but I had trouble matching FatRatKnight's solutions and didn't get deep enough into the logic behind how to take corners. If I couldn't match (to be more fair - not even come close to) the execution in the first races, it didn't feel right to continue from race 25. In conclusion, the above was a somewhat convoluted way of saying that the route and execution in the first 24 races seem solid (and even very impressive) to me. While it has been some time since I was into the details of this game, I can't really think of anything that looked questionable or out of place when watching it played back in real-time. When I started working with eien86 on improving Solar Jetman, I also mentioned R.C. Pro-Am II as a game that would be interesting to test the bot on. It took some convincing before eien86 decided to try it out though and I was of the understanding that this was new territory for the bot, so it was difficult to predict the results. While I was busy manually TASing Solar Jetman, eien86 fed race after race to the bot. Before I took a break to look at the bot's solutions, several races were already done. My immediate reaction was that it looked impressively fast, but also a question mark regarding the constant twitched steering, even on straights. I was even able to demonstrate short sections where a few frames could be saved simply by driving in a straighter line. However, due to desynching issues, eien86 was hesitant to redo earlier races. The question was then how the bot's execution and solutions compared to FatRatKnight's? Well, since a few of the races in the range 25-36 are directly comparable with earlier races, it was just a matter of comparing the completion times. In all four races that were possible to compare, the bot came out on top in terms of execution, was unparallelled to sniff out ways to reduce random lag and on shorter segments managed to pick up some non-obvious strats. However, it struggled when it came to nitro uses. Nitros are collected on the track and can be used at any time in the same race. It's understandable that a human has an advantage in this area over a bot that can't get the same overview of a track. The biggest mistakes were in R33, where the bot was too eager to use the nitros for short-sighted benefits, but was then penalized later on. It should be a lessons learned for the next iteration that the bot's nitro uses need to be more tightly supervised. I'm very happy to see FatRatKnight's effort be part of a submission for this game. It's also exciting to see eien86's bot adapted to racing games. The bot solutions themselves are in my opinion clearly improvable, but they are at the same time clearly one notch above a very accomplished TASer's concerted efforts. So while a human would be able to provide a smoother a visually more pleasing playthrough of races 25-36, it would take a lot of effort to match the bot's completion times. My recommendation is to accept this submission, but also that we keep reminding eien86 at regular intervals about his promise to give this game an updated TAS in the future. When work on that update begins, I'd be happy to contribute in whatever way I can to make the end result as good as possible.
Experienced Forum User, Published Author, Player (242)
Joined: 8/10/2008
Posts: 113
About the "wrong deflect" around 32400 (not 34200), looking at that section again and comparing with FatRatKnight's movie, I see what you mean. Getting a minor bump there would have allowed to take a (minor) bump also around the next corner, which would have been faster. Enough faster to actually save time, but we're talking about single frames. FatRatKnight, we didn't specifically look into why the splash screens appear for a certain amount of time. They were just pressed away on the first possible frame without attempting to manipulate them. However, the last splash screen on each planet (the one with the message saying that you have collected enough fuel cells) have two separate periods during which it can be pressed away. In your TAS, they were pressed away on the first frame of the second period (after the full text has appeared). The new TAS saved a little time by pressing them away during the first period (before the full text has appeared). You're absolutely right that part of your inputs are still found in the new TAS. The beginning of p1, p8 and p13 are your inputs (or based on them). When starting this project, I thought much of it would be a copy-paste. When I realized the TAS desynched by basically just looking at it the wrong way (even during sections that should just be about pure geometry), I wish we had started from a clean sheet. In my opinion, the sections that were based on or copy-pasted your inputs are not critical enough in nature to warrant a co-authorship. Had I had the opportunity, I would however have asked for your opinion (I wrote a pm to you, but I understand you don't often log in to the forum, so maybe you didn't see it). If you want to be listed as co-author, we'd be happy to add you.
Experienced Forum User, Published Author, Player (242)
Joined: 8/10/2008
Posts: 113
Thanks for the reply. Then I don't have any other comments. I fully agree that what's possible in one version does in no way mean that the same (or even similar) can be done in the other. Like I mentioned in my first reply, I wasn't able to find any improvements in any of the sections I checked. That combined with knowing that the improvement ideas I had have already been checked, it looks good to me from a technical point of view. Just for reference, I will post the considerations I made for the end of tower 5 in the NES-version: https://kb.speeddemosarchive.com/Castelian_(NES)/any%25(ntscj)#Tower_5 . I don't intend to do a similar analysis for the GB-version, but in case someone is interested now or later, it might serve as a starting point for how to investigate a possible improvement.
Experienced Forum User, Published Author, Player (242)
Joined: 8/10/2008
Posts: 113
I'm the TAS-author of the NES-version of this game. I was aware of there being a GB-version, but I haven't played it before (or watched any gameplay). It turns out the two versions are quite similar in terms of level layout, but with several minor differences. I also noticed some minor differences in the game mechanics. Overall, the two versions are incomparable (also due to the fact that the NES-version is very, very laggy). Small sections of the game can still be compared between the two versions. While the manipulations done in the NES TAS are documented, I don't remember the finer details of them and didn't take the time to brush up my memory either (some of them starting several screens away to set up a particular enemy pattern and require a bit of time to get up to speed with). The game was still engrained enough in my memory to give this GB TAS a critical watch. Every time I noticed something that looked odd or didn't recognize from my NES TAS, I did a (fairly quick) check to see if it was due to a routing mistake or version differences. In the end, I'm left with the following question marks: * Were you aware of the possibility shown at https://youtu.be/hx9YxoNqBfA?t=399 ? I tried to get it to work with the submitted movie file, but the enemies were not aligned properly. A manipulation of the enemy spawns would have to be set up in advance for a chance to get it to work. I'm not going to do it, but would like to know if you already considered it and tried to include it? * The rest of tower 5 didn't look optimal in my eyes. There were fairly long stops before several enemies near the end. I remember facing the same problems in the NES TAS and it required a manipulation to start further down the tower to get the enemies aligned and minimize the stops towards the end. I'm not saying there is a faster solution, just that it looks in my eyes like there should be one and I would again be interested to know how hard you tried to optimize this section? * Why do you mention "Left+Right/Up+Down - off" in the run comments? Those combinations are generally forbidden for RTA leaderboards, but they are allowed on tasvideos. Do those combinations do anything special and would it have saved any time? While it's not the purpose of this thread, I should also mention that there were a few route choices/tricks that looked like they could save time in the NES TAS. All of the ones I could identify were however due to version differences, so there are no improvements to the NES TAS that could be easily implemented (as far as I can tell). I personally don't care about the entertainment criteria here, but I appreciate this version being TASed. I still assume this is pretty obvious vault material. As for the technical aspect, I would like to get some feedback on my questions above before giving it a thumbs up.