Table of contents
- General notes
- Introduction
- Exploits
- Level comments
- Fairy Glade
- 1-1
- 1-2
- 1-3
- Marshes of Awakening
- 2-1
- 2-2
- 2-3
- Whale Bay
- 3-1
- 3-2
- 3-3
- Cave of Bad Dreams
- 4-1
- 4-2
- 4-3
- The Canopy
- 5-1
- 5-2
- 5-3
- Sanctuary of Stone & Fire
- 6-1
- 6-2
- 6-3
- Echoing Caves
- 7-1
- 7-2
- 7-3
- The Precipice
- 8-1
- 8-2
- 8-3
- 8-Boss
- Sanctuary of Rock & Lava
- 9-1
- 9-2
- 9-3
- Tomb of the Ancients
- 10-1
- 10-2
- 10-3
- 10-Boss
- Conclusion
General notes
- Played on Bizhawk 2.11
- Documented Rerecord count - 16997
- Uses glitches and exploits to save time
- Takes intentional damage to save time.
Introduction
Rayman 2/Rayman 2 Forever/Rayman 2 The Great Escape is a 2001 Game Boy Color game based on Rayman 2. Being a GBC game, this is naturally the most unique version of Rayman 2, being a 2D platformer just like the first Rayman game. This game is so much like the first Rayman on GBC that it feels more like a glorified rom hack than an actual sequel. The gameplay has barely changed from the previous game and the couple of new things it adds are very minor. In addition to this, the level design is significantly worse than the previous game and the music (the worst part of the previous game) has barely changed. Put all these things together and you have a derivative game which is not particularly good at all. You can definitely tell that this was a rush job to make some quick cash. What's even more frustrating is that there are unused animations in the game files showing Rayman doing various Rayman 2 things (riding a jet barrel, swimming, jet skiing) which would have added a nice bit of variety and new content but unfortunately, they never got used in the final game.
Got4n made a TAS for this game back in 2013 (https://tasvideos.org/2429M) which has become quite outdated. The TAS was not particularly well optimised and there have naturally been new discoveries since then. I've already put a ton of effort into TASing Rayman 1 GBC so this game was always on my radar. I held off TASing this game because... it's not very good... but I've finally decided to do it and oh wow, was I able to save a lot more time in this run than I expected. The time save comes from a mix of much better optimisation and a whole bunch of new strats, a lot of which utilising exploits which were used in the previous TAS but not to the same extent.
Exploits
Here, I will give some notes on the exploits in this run. You can read this document for a more detailed explanation. It mainly focuses on Rayman 1 GBC (so not everything applies to Rayman 2) but all of this game's exploits are carried over from its predecessor and work the same way: https://docs.google.com/document/d/1TT_IcPBEXoIgEYGoAO787wt-03QqCbMhthGFXdsY6F4/edit?tab=t.0
Glitched Double Jumps (GDJs)
This was something Got4n utilised in his old TAS but something I don't think he realised is that you can perform a full height jump when performing a GDJ. This naturally allows for even more skips and further optimisation throughout the run.
Water Jumping
This was something Got4n utilised once in his old TAS but this exploit has more uses throughout the run. This is an exploit which existed in Rayman 1 GBC but it was very limited and it had no practical uses. In Rayman 2 GBC however, it works on most pools of water/lava so it can be used in many places, including a few useful areas.
Slippery platform boosts
This is an exploit which was not used in the previous TAS (and it was found by Got4n funnily enough albeit years later). By slightly charging a backwards punch on a slippery slope, you can gain extra speed which is used quite a few times throughout the run.
Ceiling grazing
This is a technique specific to Rayman 2 GBC. If you are gaining height while hitting a corner of a ceiling, you will do a little zip along it. This was used in the old TAS and it is used here in numerous places. It especially looks fun when you graze along multiple ceilings in a row.
Level comments
Here, I will go over the main improvements throughout the run. Every single level is faster in this new TAS, ranging from 2 seconds to 25+ seconds. There are plenty of smaller optimisations to but I will focus on the more notable improvements. I will be using visual representations of the levels to show route changes (courtesy of Ray1map). It has crudely drawn lines to show the route differences so I do apologise in advance if it is hard to read at times. Blue represents the old TAS and purple represents route changes in this new TAS. I also have this video demonstrating how each level changed (although my TAS is based on an earlier draft so certain levels are slower than the final TAS):
Fairy Glade
Despite being the first world in the game, I was able to save nearly 45 seconds here overall.
1-1
- I do water jumps along the bottom of the level which ended up saving time as it lags the game less than taking the intended path. I saved nearly 2 seconds here which is the least amount of time saved on any level.
1-2
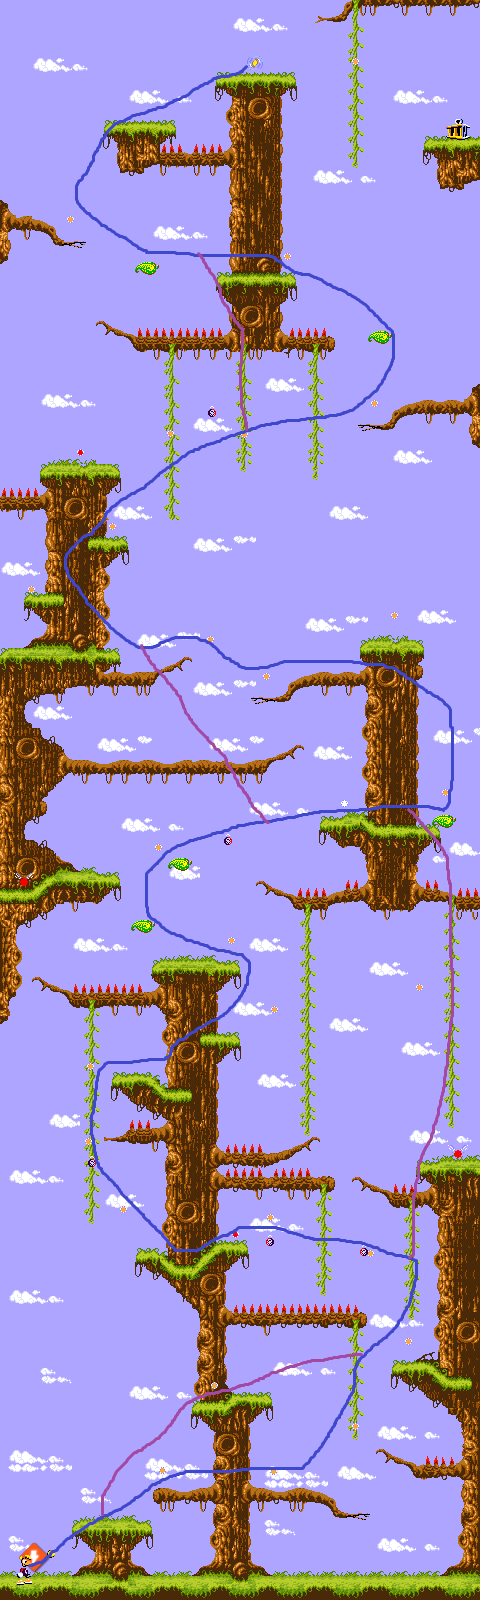
- I used a damage boost early on and various GDJs to take a much more direct path through the level, saving over 20 seconds.
1-3

- At the beginning of the level, I use a GDJ to skip a bunch of platforming.
- A bit later on, I use another GDJ to take a direct path to the end, avoiding having to go down and back around to the last leaf platform.
Marshes of Awakening
Marshes of Awakening has a few new strats but a chunk of the timesave mostly comes down to better optimisation and routing. I saved nearly 35 seconds here.
2-1
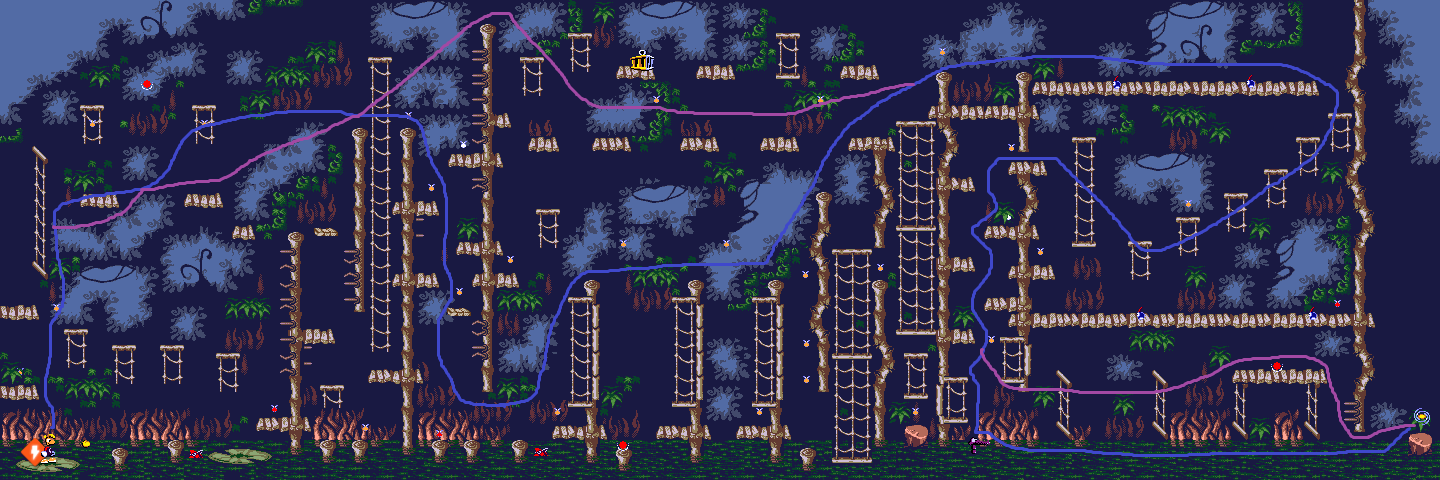
- There is a section with a big spiky wall. The old TAS goes down while the new TAS goes over the wall, taking a more direct path through the level.
- At the end of the level, you are supposed to ride Sssssam to the end. I however completely avoid him and I use a GDJ to reach the end instead (water jumping does not work here).
2-2
- After reaching the one vine in the level, I use a GDJ to take a more direct path upwards. This only saves a couple of seconds but the rest of the level has much more optimised execution, with the whole level being over 15 seconds faster overall.
2-3
- This level mainly has more optimised platforming and carefully planned GDJs.
Whale Bay
Whale Bay doesn't have a ton of new strats to offer with a majority of the time save coming from better execution. I saved around 28 seconds here.
3-1
- At the end of the level, I use a damage boost jump to reach the climbing frame faster.
3-2
- I perform a jump over a wall near the end of the level but most of the level is faster due to much better execution.
3-3
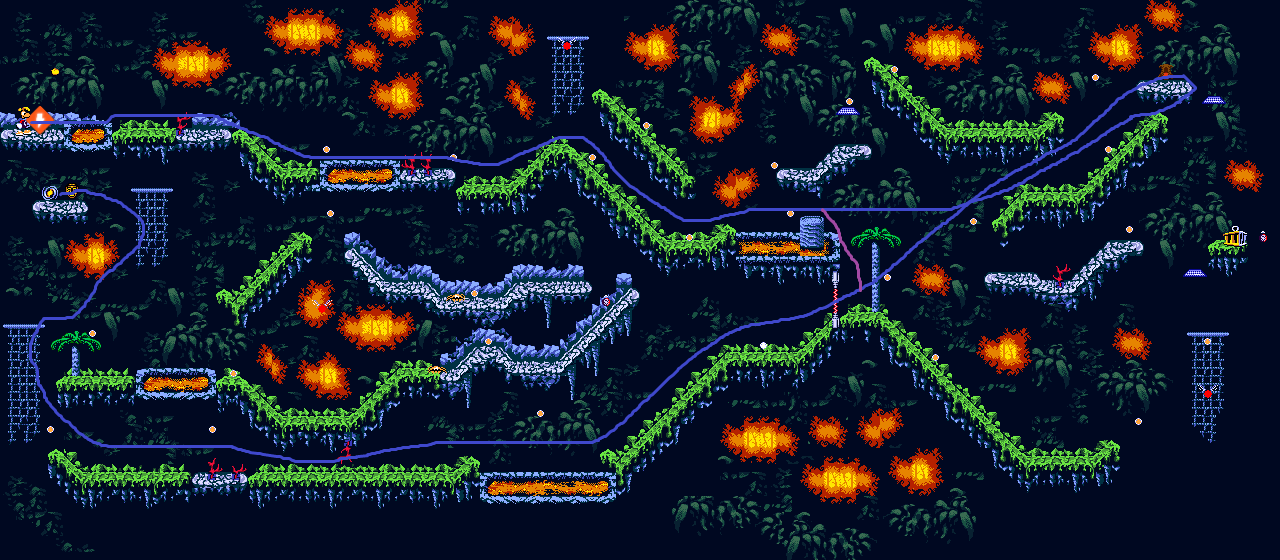
- Instead of going out of my way to deactivate the electric wall, I just walk through it. The slippery floor even allows you to bypass it without taking damage. IDK how Got4n missed this in his original TAS as you can easily go through the wall with a damage boost.
Cave of Bad Dreams
This was the world with the least amount of time save with me saving just over 26 seconds.
4-1
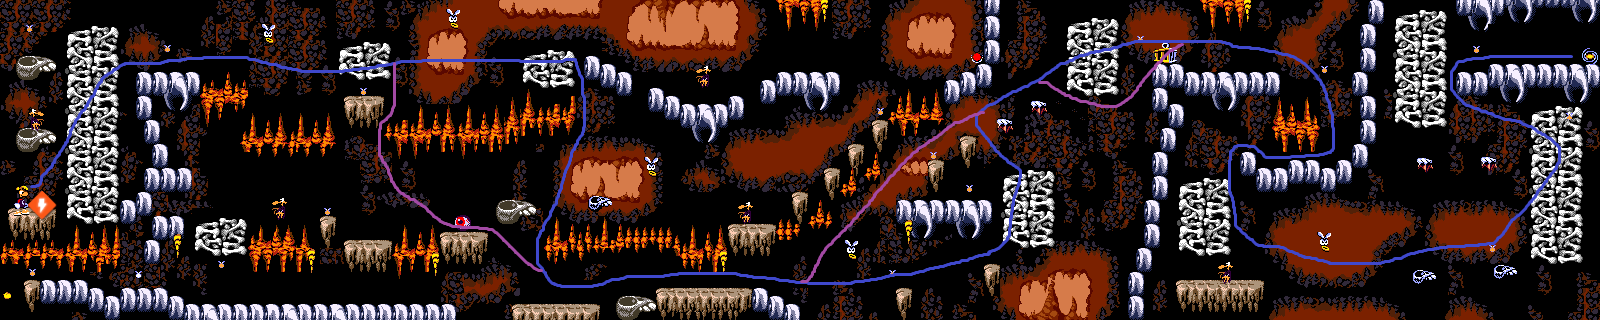
- I take a more direct path to the lower floor, squeezing through a passthrough piece of floor.
- I use GDJs after the first ring lum to take a more direct path upwards.
4-2
- This level mainly has better optimisation with the level being nearly 12 seconds faster overall.
4-3
- I use slippery platform boosts and GDJs to get through the level faster, saving nearly 3 seconds overall.
The Canopy
The Canopy is another world where I saved less than 30 seconds compared to the previous TAS with a few new strats here and there.
5-1
- I use a GDJ to take a more direct path onto a platform near the end of the level.
5-2
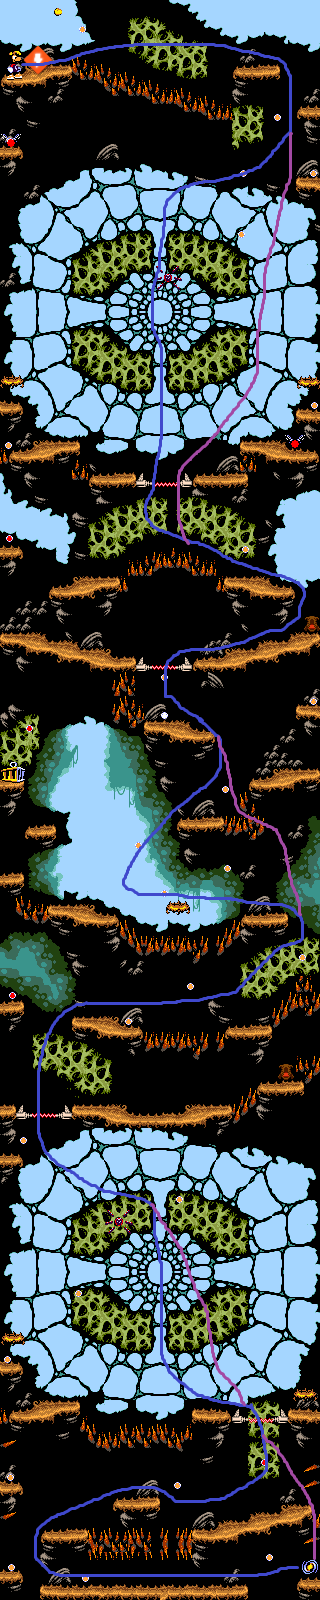
- After the first checkpoint, I use a damage boost to go through some thorns and to take a more direct path through the level.
- At the end of the level, I perform another damage boost to go through some thorns and to take a direct path to the exit.
5-3
- This level mainly has better optimisation and platforming to save over 7 seconds.
Sanctuary of Stone & Fire
Sanctuary of Stone & Fire is a wild world where I managed to save over 50 seconds.
6-1
- I used precise jumps to keep my slope speed when jumping up the bouncy platforms.
- I use a slippery platform boost to gain enough speed to reach the platform before the end of the level without slowing down. Got4n loses his speed on a much earlier platform.
6-2
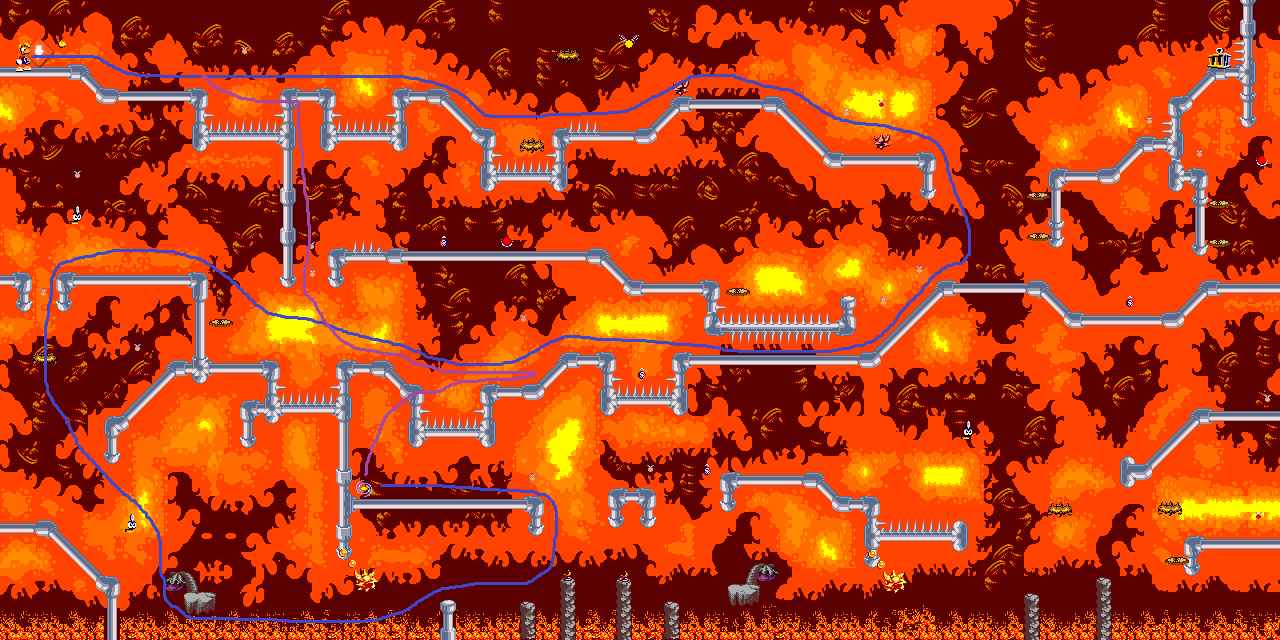
- Got4n takes a most intended route until he reaches the first gust platforms where he then GDJs to the end of the level.
- I however build up enough speed and perform precise jumps in order to squeeze through 2 small gaps in the floor, allowing me to take a very direct path to the end. I saved around 23 seconds in this level.
6-3
- Despite being an auto-scroller, this level has two triggers which slow down the rising lava. Got4n hit these triggers but I avoided them.
- I reach the end goal much faster, even wrapping around the screen to reach it as quickly as possible. Got4n hit it very sub-optimally, even if you ignoring outrunning the camera. I saved around 21 seconds in this auto-scroller.
Echoing Caves
- Echoing Caves had some neat extra things to other, being around 41-42 seconds faster.
7-1
- I use a leaf to perform a slippery slope boost and zoom through a chunk of the level. I saved around 12 seconds in this level.
7-2
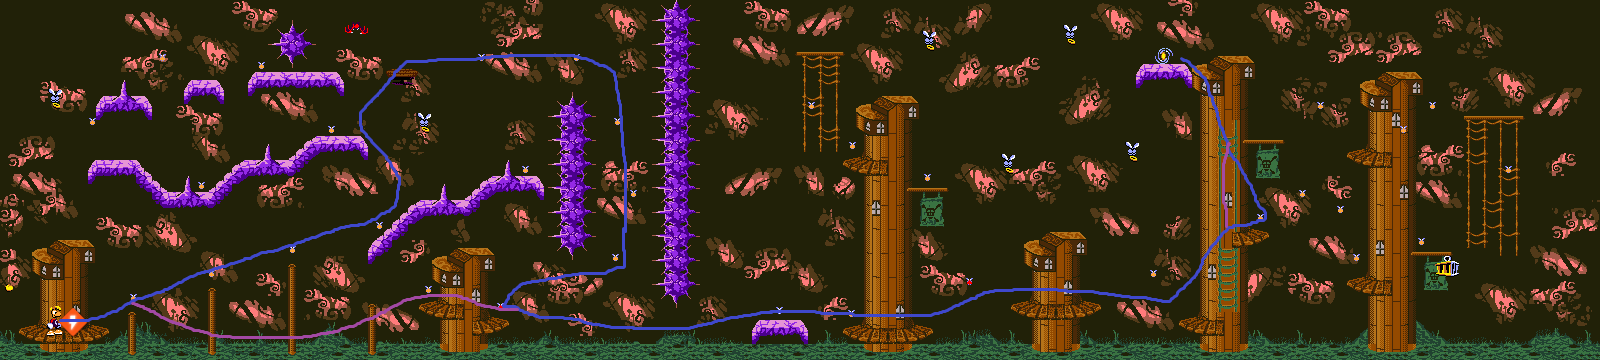
- Got4n goes onto the moving platform at the beginning of the level to reach the checkpoint but I water jump all the way from the beginning to the checkpoint. This saved around 15 seconds and I'm not sure how Got4n missed it considering that he used water jumps after picking up the health.
7-3
- On the moving platform in the cave, I use a GDJ combined with a damage boost jump to skip having to wait for the platform.
- On the last moving platform, I use a GDJ combined with a damage boost jump to reach the top faster.
The Precipice
The Precipice was the world I was able to save the most time in, being around 76 seconds faster.
8-1
- I grab onto a ledge next to the first bouncy platform to get to the bottom faster. The rest of the level mainly has better optimisation.
- Not relevant to the run but for some reason, Rayman instantly spawns into this level without doing his startup animation. This is the only level where this happens, it's really weird.
8-2
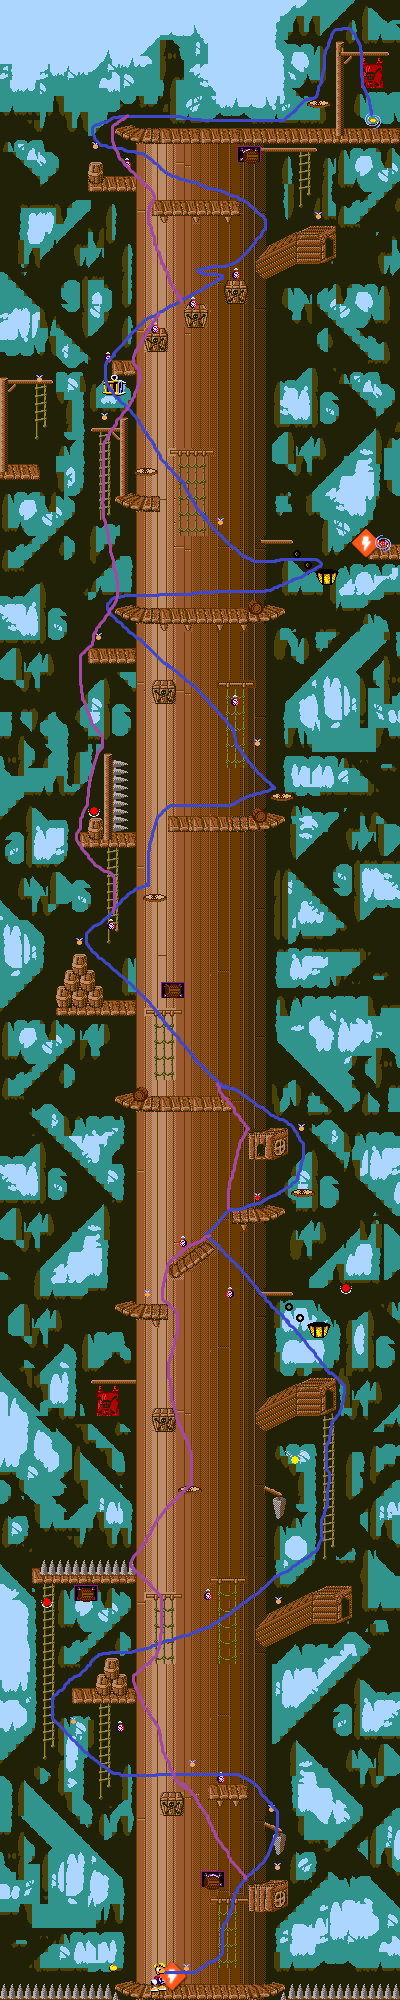
- I use many GDJs to take a much more direct path through the level. It is hard to tell what is happening as the camera struggles to keep up with Rayman but that is basically what is happening. This is the level I saved the most time in compared to Got4n, saving over 28 seconds.
8-3
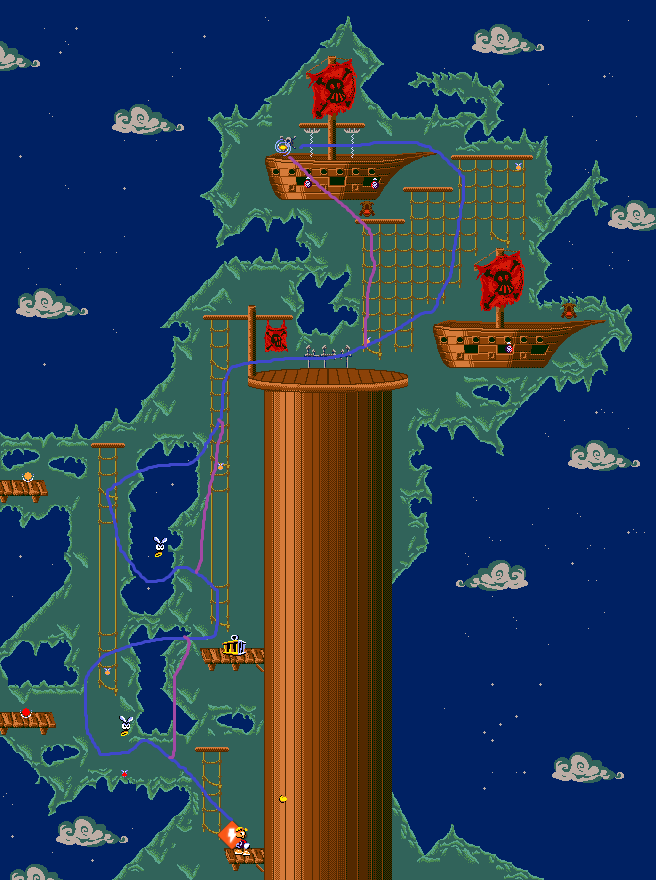
- I jump straight from the ring lums to the climbing frames above.
- On the last climbing frame, I reach the top left side and then I use a GDJ combined with a damage boost jump to take a more direct path to the end. Got4n simply reached the final platform as normal and used a damage boost to skip having to deactivate the electric walls.
8-Boss
- I start the fight by doing a punch jump and for the next 3 hits, I charge a punch and then release it so that it hits the pirate when it is vulnerable. this allows me to take the boss out in 4 hits, 6 less hits than Got4n and saving over 26 seconds.
Sanctuary of Rock & Lava
- Sanctuary of Rock & Lava is a world where I was able to save over 40 seconds with a bunch of extra strats and optimisations.
9-1
- I use GDJs at the beginning of the level to take a more direct path to the checkpoint. Both runs skip a sizeable portion of the level but GDJing to the left side wall, skipping having to walk far to the right and all the way back.
- I use a GDJ on a ring lum at the end of the level to take a more direct path to the exit.
9-2
- I use water jumps on the first pool of lava to go under all of the enemies without needing to slow down or take damage.
- After going all the way left, I go out of my way to go on a slippery platform to get a boost.
9-3
- I used various slippery platform boosts to get through the level much faster, saving around 17 seconds overall.
- Not relevant to the run but this level has a phallic shaped lava stream. It even drips lava out of the bottom. You can get inside the platform with this pp shaped lava but touching it is instant death, preventing a potential skip. I have no further comments.
Tomb of the Ancients
Tomb of the Ancients was a world where I managed to save a ton of time, saving around 70 seconds.
10-1
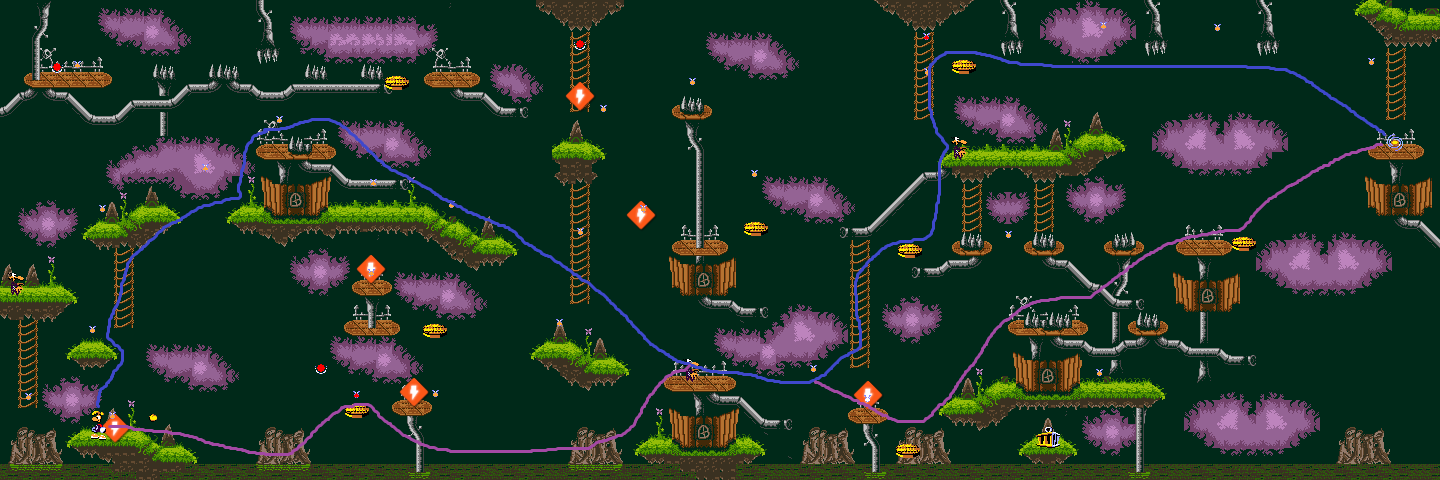
- I use water jumps to take a direct path to the checkpoint.
- Instead of going up after the checkpoint, I continue to go straight and then I use a few GDJs to reach the goal.
10-2
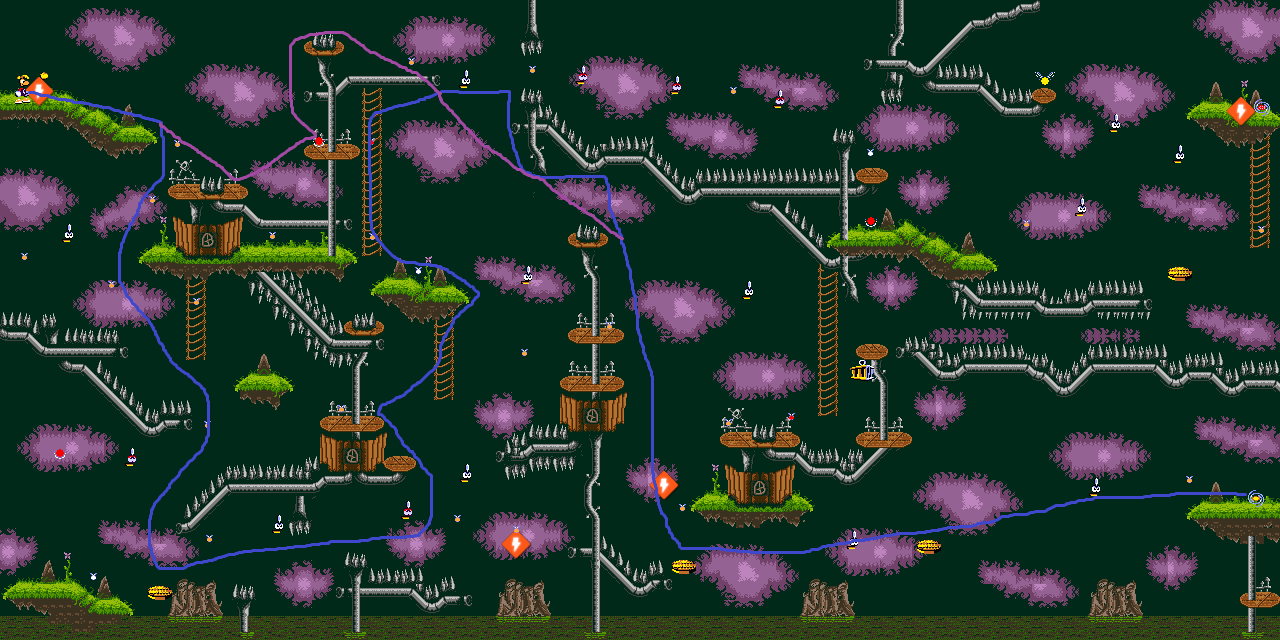
- At the beginning, I go to the platform with an extra life and then I GDJ over the wall to skip a chunk of the level.
10-3
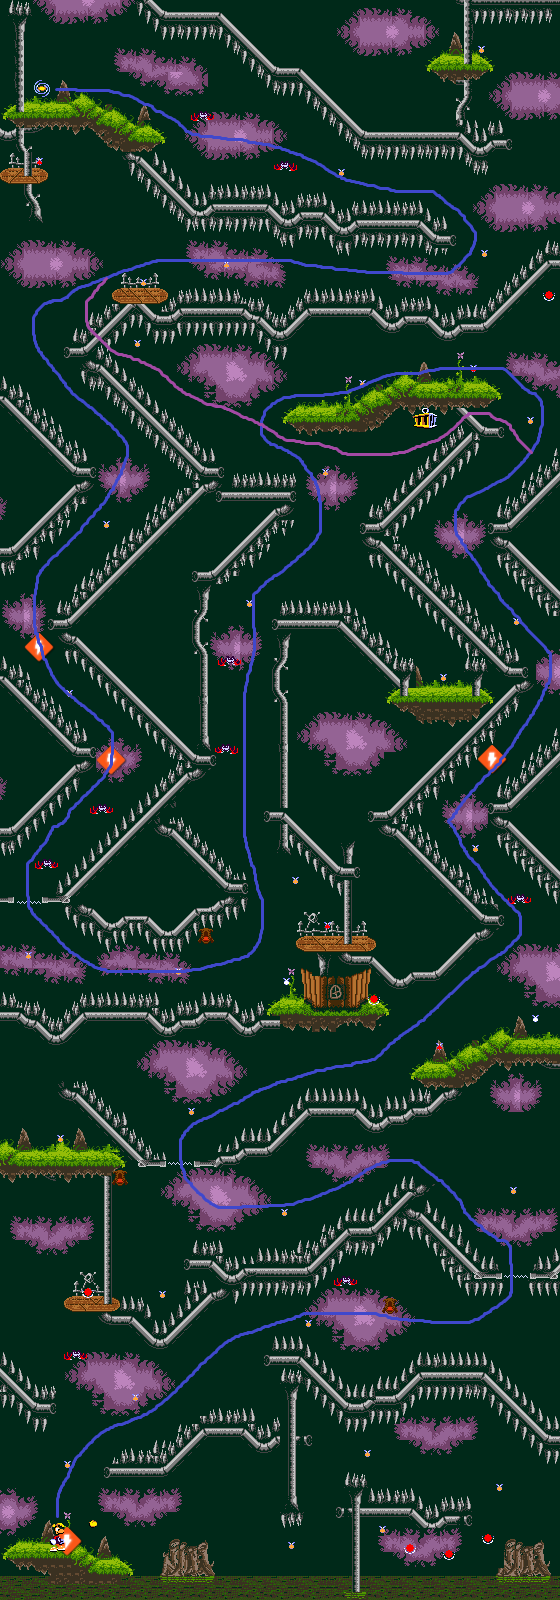
- When I reach the second piece of health, I do a clip under the floor. This alone would be a decent timesave but afterwards, I go to the right and perform another clip, skipping a bunch of the level. I was able to save around 26 seconds in this level.
10-Boss
- I perform the same strat in this boss as the previous boss although I dodge getting hit by the Pirate for the second and third hits.
- My last input is letting go of the punch to beat the boss. Got4n's last input is after skipping the cutscenes which you don't actually need to do.
Conclusion
And that's the run. Rayman 2 on GBC done in 18 minutes and 9 seconds (17:57 RTA) an over 7 minute improvement compared to the previous TAS (although an exact time save is hard to say due to emulation differences). I didn't think there would be that much to save in this game as Rayman 2 lacks a few of the really crazy exploits from Rayman 1 but I was pleasantly surprised.
There is likely still a bit more time that can likely be squeezed out with better optimisation and more lag reduction but I am definitely happy with how the run turned out. It would be nice if the game had some more applicable ways to clip like in Rayman 1 which could save a lot of time but for now, it doesn't and the run is in a solid place currently.
Also, shoutouts to the Rayman speedrunning community for all the things they've figured out, Got4n for their original TAS and extra discoveries as well as the creators of Ray1Map for creating easily useable visuals for these levels which helped a lot with routing.
Challenger: Moviefile replaced with 4 seconds of improvement - 250 frames, once again improved by the same author.
Challenger: Claiming for judging.
Challenger: The comparison video, like the first improvement you've did with the previous GBC Rayman title, it convinced me over the expectations how the amount of efforts were put together into this product that I have to say: Big improvements + over 7 minutes of total time saving = Instant approval!
Accepting as an improvement to [2429] GBC Rayman 2 by got4n in 25:35.66!
McBobX: Processing...