Prologue
On June 7th of 2005, a TAS of Battletoads using 2 players and with no warps created by FODA was published on TASVideos, which beat the game in 24 minutes and 57 seconds. As new TASes for the other categories of Battletoads continued to be published over the years, most people thought that a new 2 player warpless TAS was coming soon. Even more promising, in the early 2010’s, several people who had worked on other Battletoads TASes began working on creating a new 2 player warpless TAS. However, these plans all ultimately fizzled out before any TAS of the category could ever be completed.
Seasons changed, years passed. FODA changed his name to NESRocks. A glitch was found to beat Battletoads in under a minute. A new decade arrived. Coronavirus shut down the entire world. After all of these changes, the Battletoads TAS had remained the same! Eventually, after 15 years of lying in wait, FODA’s TAS became the third oldest published TAS on TASVideos to have not yet been obsoleted.
The question has always remained: how much longer do we have to wait to see this TAS get obsoleted? And the answer: no more! The future is now, and this new TAS finally obsoletes FODA’s now-teenaged TAS!
Why the Long Wait?
Many a TASer has been puzzled by FODA’s TAS remaining unchallenged: Battletoads is one of the most popular games to TAS, and huge possible improvements have been known about for the 2 players warpless category for many years now. Surely, there would be TASers falling over themselves for the chance to obsolete this run!
The reason for this delay is a little complicated. On the one hand, due to random chance, many of the Battletoads TASers started working on TASes for the category but then got sidetracked by other projects over the years. On the other hand, when a game is really popular, or a TAS is really old, it gives off an impression that only the very best and most experienced TASers are up to the task of obsoleting the published movie.
This in turn has the effect of intimidating the TASer who lacks Battletoads TASing experience away from working on obsoleting the category, and sets up a situation where only the handful of TASers with a published Battletoads TAS feel confident enough to work on a new movie. If the few with the necessary experience don’t get around to making this new movie, however, then the old movie can stand unchallenged for quite some time…
For my own part, I (Lobsterzelda) know firsthand how this sort of unconscious intimidation can discourage newcomers to a game from trying to work on obsoleting famous TASes. When I saw the list of TASes from 2005 that had yet to be obsoleted last summer (in 2019), the idea of making a TAS of the 2 players warpless category of Battletoads intrigued me. However, I figured that with how long the movie had stood unchallenged, I would be unlikely to be able to improve upon the TAS at all. I figured that if I TASed the game, I would probably get through all 24 minutes and 57 seconds only to find that I had tied the published TAS to the frame, and failed to find any improvements.
A few months later, I noticed that the 2 players warpless TAS did not make use of the level-end glitch in the turbo tunnel level, which would be able to cut over a minute off the runtime of the TAS. Upon realizing this, I thought to myself, “With this huge potential for timesaves, can I really not improve on this published movie by even 1 frame?”
I knew that the answer to this question was no, and I set out to do just that: to create a movie which was at least 1 frame faster than FODA’s movie, with the goal of ultimately finishing the TAS with the lowest completion time.
With all of this said and done, you’re probably wondering why I’ve written this whole short story, and why I’m putting it here before my description for the actual TAS. The reason for this is that I want to make an important point: you shouldn’t worry about not being good enough to make a TAS. If everybody thought that way, movies would never get obsoleted, and the site would look how it did in 2004 (minus the addition of TASes on newer consoles). Everybody has something they can contribute to TASing, and every movie longer than a few seconds is improvable by at least 1 frame.
So don’t focus on trying to make every TAS that you work on perfect. Just try to do each section of your TAS 1 frame faster than the fastest you could do it before, and keep doing this until you have no ideas left for how to improve things further. If you are willing to do that, then anyone, regardless of skill level, is capable of making a high-quality TAS!
The TASing Process
I started work on this TAS in January of 2020, shortly after finishing my TAS of Battletoads for the Game Boy. I used Alyosha’s WIP of the first 8 levels of the 2 players warpless TAS as my starting input to work with.
After AIVV73 pointed out to me that Alyosha’s WIP didn’t include a void jump in level 3 that would save about 3 seconds, I decided to go back to the beginning, and look for more places to make improvements.
From this, I was able to eventually complete the first 8 levels 7 seconds faster than Alyosha’s WIP did. For the levels that came after that, I copied over the 2 players warps TAS into my tasproject to start with, but then replaced almost all input except for autoscroller sections with my own input.
I asked Alyosha if he would like to be a coauthor for this movie, but he declined, since he said his WIP was mostly based on the 2 players warps TAS. As such, I have included feos as a coauthor on this TAS, since input from his 2 players warps TAS appears directly in multiple spots throughout this TAS, most notably at the start of level 8.
After I submitted my TAS for this category, many people pointed out to me that they felt disappointed that I hadn’t made much of an attempt to entertain viewers during the downtime and autoscrollers in the run. As such, I went back to the very beginning of my TAS to add more entertainment throughout (with the most significant changes appearing in levels 2, 6 and 7).
Resyncing all of the levels after this was somewhat difficult, since the RNG values were completely different on each level. However, pressing select could be used to advance RNG without wasting time, so I was able to use this to resync sections that were no longer syncing my second time around. Levels 1, 3, 4, 5, 9, 10, 11, 12, and 13 all required either very little effort or no effort to resync. Levels 2, 6, and 8 on the other hand were very time consuming to resync, with the worst offender of these 3 being the Robo-Manus fight at the end of level 8. However, I will cover that in-depth when I reach level 8 of my level-by-level description down below – read on for all the juicy details!
Timesave Table
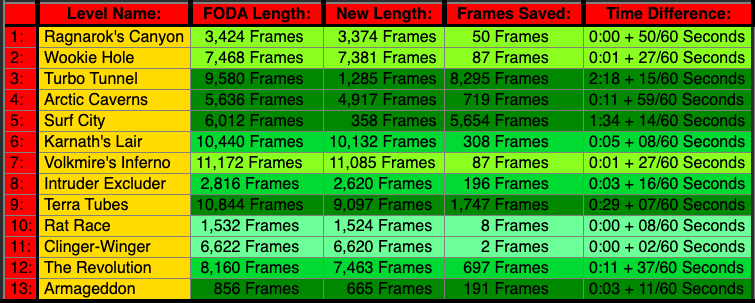
Below is a table I have made which compares the length of each level in FODA’s TAS to the length of each level in my TAS. This table lists the frame length for each level, which is measured as last frame before the screen fades to black at the end of a level minus first non-all-black frame at the start of a level (the one exception to this is the final level, which ends on the first frame that a bonus combo number is visible on screen from the final hit on the dark queen). In the rightmost column, I list the timesave in the format minutes:seconds + frames/60, where frames is the number of extra frames besides the frames included in the minutes and seconds (note that the USA Battletoads which my TAS was made on runs at 60 frames per second). This table is color-coded, with levels with greater timesaves (as a percentage of total level length) appearing in darker green, and levels with less significant timesaves appearing in lighter green:
Three Videos
Below, I have included 3 encodes of my TAS, each of which is slightly different from one another.
The first video is a section-by-section comparison video which shows the differences in strategy and execution between my TAS and FODA's TAS. This TAS divides the game up into sections, with each level consisting of at least 1 section (and some levels containing multiple sections). The first frame of each section in my TAS is synced up to the corresponding first frame of that section in FODA's TAS. Frame counts are shown at the bottom of the screen to show how much time is gained per section, and when a section in my TAS finishes, my TAS pauses on the last frame of the section and waits until FODA's TAS reaches the corresponding end of the section. After that, both my TAS and FODA's TAS continue once again in parallel. This is the ideal TAS to watch to see the differences between my TAS and FODA's TAS, and this is the encode which I would most recommend watching. Special thanks to EZGames69 for making this high-quality encode!
The second video is a side-by-side comparison of my TAS and FODA’s TAS, with the first frame of level 1 synced up for both of our TASes. From there, both TASes play to completion without interruption, which allows for large timesaves to be seen. This video is more helpful for viewers who are less familiar with Battletoads TASes, since this shows off all of the major timesaves used in my TAS.
The third video is just a video of my TAS, with no other video playing next to it. This is the ideal video for anybody who doesn’t like watching videos that have split screens.
1. Comparison Video of FODA's TAS (Left) and My TAS (Right) With Section-By-Section Cuts:
2. Comparison Video of my TAS (Left) and FODA’s TAS (Right) With No Cuts:
3. Video of my TAS alone:
The Plot
In Battletoads, you play as two anthropomorphic toads: Rash, and Zitz. Your goal is to rescue your fellow toad Pimple and the Princess Angelica, who have both been kidnapped by the Dark Queen. Across 13 levels with wildly different gameplay mechanics, you have to defeat all of the Dark Queen’s minions, before you undergo a final showdown with the Dark Queen herself!
This game is known for having comical attack patterns, such as your toads turning into wrecking balls to attack enemies, your toad growing giant fists or boots to punch or kick enemies, and your toad growing rams’ horns when you do a running ram attack into an enemy. This game is also famous (or infamous, to some) for the fact that in 2 player mode, each toad can hurt each other with their attacks. In 2 player mode, Rash is player 1, and Zitz is player 2.
In all of the 3D levels in the game, you have to beat up and kill every enemy on the screen before the screen will scroll. In the game’s 2D levels, some enemies need to be killed for the screen to scroll, while other times enemies don’t need to be killed to keep moving.
Level-By-Level Analysis
From here, I am now going to describe the techniques I used in each level in order to make this TAS as fast and entertaining as possible!
Level 1: Ragnarok’s Canyon
In level 1, you need to kill every enemy in the level to scroll the screen enough to reach the boss. The boss of this level has a 256-frame timer that controls when he throws his ball at you (which you throw back at him to attack him). This timer is stored in address 0X000B, ticks up by 1 every non-lag frame, and doesn’t change during lag frames.
From all of this, we arrive at our strategy for level 1: kill all the enemies in the level with the least amount of lag possible, while making it to the boss before his timer reaches 256 (if you arrive a frame late, you have to wait an extra 256 frames).
After you kill the boss, you can jump to shorten the amount of time it takes to reach the end of the level by a few frames, which is used here as well.
One trick which is used in level 1 and which will come up frequently in this TAS is super-speed dashing. This is done by pressing right for a frame, releasing right, pressing right again, releasing right, and pressing right again. By doing this, your speed gets set to 192 (whereas 128 is the fastest you can reach by just holding right). Additionally, if you press jump on the same frame that your speed reaches 192, you can carry your speed through your jump as well. It is worth noting that bumping into walls in Battletoads causes your speed to be reset to 0, so it’s important to avoid brushing up against them at any point.
In certain cases, you can also press right, release for a frame, and press right again to start super-speed dashing immediately. Which type of technique works depends on both your previous momentum and whether or not you just performed an attack.
Also of note is that the charged power attacks cause several frames of lag, so they are used sparingly in the level. It is for this reason that the two enemies on the platform right before the level 1 boss are pushed to their death off the platform rather than being headbutted.
Frames Saved: 50
Level 2: Wookie Hole
Crow juggling rules the day in this level! You can hit each crow many times, until they give you a 1-up (after which they become immune to future hits). The most I ever have juggled at a given point in this level is 6, although I can’t keep them all up for that long :)
In terms of optimizing this level, the key strategy is to minimize lag and kill enemies before they get high enough up that the screen stops scrolling down. Whenever you turn your toad into a wrecking ball and hit a wall, you create lag frames. However, if one toad smashes an enemy with a wrecking ball and the other toad punches you before you hit the wall, this will stop your wrecking ball animation, and prevent the lag frames from occurring. An example of this occurring can be seen at 2:04 in any of the encodes of my TAS provided above
Another technique I use to minimize lag in this level is that when I hit the two Venus Fly Trap enemies, I hit them both on the same frame (one plant with each toad). This causes the amount of lag that occurs when the toad hits the plant with a wrecking ball to occur once (instead of twice), and for the amount of lag that occurs from hitting a wall with a wrecking ball to occur only once as well.
When you press up+down simultaneously on this level, you immediately get thrown off the screen and consequently lose a life. I use this trick at the end of the level to take away a couple of the extra lives that player 2 got from all of his juggling. Why did I do this, you may ask? Stay tuned for later levels to find out!
To close out this level, I save some frames at the end of this level by scrolling the toads slightly farther down before they are frozen from triggering the end of the level.
Frames Saved: 87
Level 3: Turbo Tunnel
This level starts out normally enough – I save some time over FODA’s run by using a faster combination of attacks to kill the enemies compared to what he does. However, once we reach the infamous turbo tunnel jets, things take an unexpected turn.
First of all, player 1 jumps into the void… and somehow jumps again in midair out of nowhere. Since when can toads double jump in Battletoads?
As it turns out, the toad isn’t jumping again in midair. Rather, there is a spot at the very bottom of the screen, where if your toad falls into a pit, the combination of their y-coordinate and camera position crosses this spot, and you press jump on the frame that you cross this spot, then the game will think that you are on ground, letting you jump out of nowhere. This technique is known as void jump.
By doing this void jump, we are able to grab the jet from underground. This in turn allows us to keep falling after we get on the jet, which lets us die by falling in the pit while riding a jet before we’ve activated any checkpoints. I do a couple of void jumps with the other toad during this also, but this is purely for entertainment (I could have just stood still on the ground after the toad on the jet died and it wouldn’t have made a difference).
This sudden turn of events puts the game in a very unfortunate predicament: level 3 is programmed to restart both toads from the start of the level if a toad dies before reaching the first checkpoint after getting on the jets.
However, once a toad gets on a jet and dies, the game wants to put the toad at the last checkpoint they activated (since the game assumes that you couldn’t have died while on the jet before activating the first checkpoint). As a result of this, the game respawns the toads in a corrupt state, where the pointer that specifies where to load level objects from upon restarting the level is pointing to an invalid location. As luck would have it, as part of the game’s attempts to load objects here, the level configuration pointer that spawns objects is eventually set to the address 0X0016, which contains a number representing the last frame’s button presses from player 2.
As such, by pressing a specific combination of buttons on player 2’s controller on a certain frame after entering this corrupt state, we can spawn an object with the ID value of 0X7F. This object is the same object which appears at the end of level 12, which has the effect of displaying fireworks and triggering the end of the level, which causes level 4 to start immediately afterwards. So long, turbo tunnel!
Some of you may feel cheated by this, since this is a warpless category after all. On the other hand, the category only promises not to use the mega warps to skip ahead 2 levels. It doesn’t promise that levels won’t be corrupted and ended early :P
As a result, we obtain this ginormous timesave!
Frames saved: 8,295
Level 4: Arctic Caverns
We now arrive at a level which took over a month for me to complete! Ultimately, this level took me the second-longest amount of time to TAS of any level in the game. Part of the reason for this is that lag is rampant throughout the level, and opportunities for tight movement optimizations exist everywhere, requiring vigilance to obtain the fastest time. Additionally, lag causes inputs that are copied from one TAS to another to desync (even when adding or subtracting the appropriate number of frames to account for lag), which means you can’t even copy input from one TAS of this level to another for the sections of this level where there are no ways to save any time! Only through persistence and patience can this level be TASed…
Before I get into what tricks I used in the level in order, I would like to first explain how this level’s checkpoint system works, as the system is somewhat complicated, and it will explain the route taken in this level:
In this level, you need to activate all checkpoints and reach the end of the level in order to beat the level. If you skip a checkpoint and reach the end of the level, you won’t advance to the next level (the game just increases the value of a variable keeping track of how many checkpoints you’ve hit). Each of the checkpoints in this level is activated via a wall being destroyed and a toad moving over a certain point where the wall used to be after it is destroyed, so each of the walls that triggers a checkpoint when destroyed must be destroyed to beat this level. Furthermore, at least one toad must stay behind/on top of the checkpoint wall when it’s destroyed in order for the checkpoint to actually be activated.
At 4:08 in my encode of my TAS, I perform some jumps on the very edge of each platform. With precise positioning, the game clips me upwards onto the platform a few frames earlier than usual, allowing me to start my next jump faster. Because I scroll the screen upwards so much faster than the game expects, it actually breaks the scrolling function for the level, which causes the graphics to be messed up for the rest of level 4.
At 4:33 in my encode of my TAS, I hold both left and right simultaneously with both toads. In 2D levels (like level 4), normally the x-coordinate is used for horizontal position, the z-coordinate is used for vertical position, and the y-coordinate is a fixed value which remains unchanged during the level. However, when you hold left and right simultaneously in a 2D level, the game gets confused, and starts increasing the value of your toad’s y-coordinate.
The net effect of this is that your toad’s sprite and the onscreen camera is shifted upwards, while the hitbox for your toad for interactions with most objects stays in place. In this particular spot, by shifting your position up high enough, the game eventually thinks that your position should be below the floor, which allows you to clip out of bounds and skip going through the next hallway, which saves some time. Left+right glitches will play a prominent role in several later levels in this TAS, so stay tuned to see more crazy sprite-shifting antics!
At 4:48, I am able to pass through the yellow spike by simply holding down while passing through it. This was an oversight by the game’s developers, as they allow you to pass through the yellow spikes as long as you are holding down (even when you aren’t ducking).
At 4:50, I am able to clip through the next checkpoint-wall by alternating pressing right and holding nothing for several frames in a row. However, as mentioned earlier, we still can’t beat the level without first activating all of the checkpoints. Thus, we have to wait here for the snowman to throw enough snowballs to destroy the wall and activate this checkpoint. In the meantime, I hold both left and right at the same time with both toads, which causes their sprites and the camera to be shifted very far above where the collision for their character is (which stays in the same spot).
As soon as the wall is destroyed, I can immediately fall down the next ledge (being on the other side of the wall saves some frames here). I then proceed to jump up and to the left. In Battletoads, most objects are triggered to spawn when the camera crosses certain points. Since the camera is shifted so high up here, it causes objects to be loaded in an odd order, which causes the spiky shell to load and destroy/activate the last checkpoint immediately, saving 6 seconds!
After this, I fall down to hit the end of level trigger, but not before forcing player 2 to commit suicide on some spikes on the way down. Killing player 2 reduces lag enough to save about 20 frames here, and the level still completes since player 1 activates the level end object to start the countdown to starting the next level before the death-reset from player 2 dying occurs (as a side effect of this, you do briefly see the level get restarted after activating the level end object, but when the level end object finishes counting down its timer to the end of the level, the game advances to level 5 anyways).
Frames Saved: 719
Level 5: Surf City
Ah, Surf City! The waves, the surfing, the Big Blag – what strategies will this TAS use to get through all of these sections as fast as possible? As it turns out, we won’t be using any of these strategies at all. Instead, player 2 can clip out of bounds using some precise positioning after grabbing the surfboard but before hitting the first checkpoint. Due to a similar logic system to how level 3’s level-end glitch works, the game tries to load objects based on player 2’s controller inputs after you respawn. Once again, we can press buttons so that the object with ID 0X7F is loaded into memory, which once again causes the level to end immediately.
As a percentage of time saved, this level had the biggest timesave of any level in the TAS, with the final length for the level in the new TAS being only 6% of the length of this level in FODA’s TAS! Now that’s the kind of massive timesave that doesn’t come around very often!
Frames Saved: 5,654
Level 6: Karnath’s Lair
At first glance, this level appears to consist mostly of autoscroller sections, since you have to ride each snake and wait for the next one to come out of its hole. However, it’s actually possible to manipulate each snake to go into its hole a few frames faster using precise movement! To be honest, I’m not really sure how or why this works. All I know is that I used trial and error to find the fastest pattern of movement to get each snake to go in their hole as fast as possible, which resulted in a lot of time saved!
Besides that, there are some other optimization tricks used at the end of each of the 4 rooms of level 6 in order to save time, which I will describe below (I refer to the 4 rooms as 6-1, 6-2, 6-3, and 6-4). This level also underwent the most extensive work of any level in the game when I went back to make my TAS more entertaining. Finding ways to be entertaining without losing time to the snakes moving their heads in odd ways was difficult, but I was able to pull it off. Nevertheless, there were a few snakes where I had to move in a precise fashion in order to avoid losing 10 frames, so I had to pause what I was doing at a handful of points to do that.
This level starts off with a quick game of leapfrog (or is it leaptoad?). However, soon after finishing this game, Rash throws a cowardly sucker punch at the back of Zits’s head! Zitz can’t believe that his best friend would do this to him. He turns back to look at Rash to see if it was really him, but Rash just turns away. Nevertheless, the toads have a job to do, so they put aside their issues and continue climbing the snakes.
At the top of the first snake, Zitz suddenly feels another blow on the back of his head. At this point, It's becoming obvious that this is all Rash’s doing – after all, that aren’t even any enemies in level 6 who could be hitting him! Rash realizes he may have gone too far, and tries to run away. He’s a bit too slow to get away from Zitz, who proceeds to pick him up and throw him onto the next snake. After this, he throws him off a giant drop in a snake, and then stands over his body taunting him. Seeing as to how his brother has learned his lesson, Zitz decides to forget about the whole incident, and call it even… for now…
At the end of 6-1, there is a small patch of collision on the center of the snake’s head (while the rest of this section of the head has no collision). By jumping onto this and then jumping to the exit hole, I am able to save some time compared to jumping onto the part of the snake where most of its collision ends. It is worth noting that in 2 player mode, in order to advance to the next room, you need both toads to make it into the exit hole. Additionally, the timer for the next room loading doesn’t start counting down until the second toad enters the hole, so it’s important that both toads make it into the hole as fast as possible. Interestingly enough, though, the game doesn’t check if you are alive or not when you hit the exit hole. More on this mechanic to come later on.
In 6-2, Rash suddenly decides to sucker punch his brother again. Zitz stares him down and warns him to back off. Rash ignores him, and Zitz gives him one last chance. Finally, Zitz catches Rash in the act, and a brawl ensues! The two brothers fight it out across the screen, competing to knock the other one off of the snakes. Who will win this ongoing fight? Even I don’t know for sure, but if I had to guess, I would say that the battle of the two brothers ends in a draw, which is just as well, since this is a 2-player TAS, so we need both toads to stay alive to continue with the level!
At the end of 6-3, I jump up into the spikes to die while running right at full speed. As a result of this, the toads’ momentum keeps them flying right until they hit the exit hole. Even though they are dead, the game loads the next room before restarting the level or decrementing the number of lives left for the toads, which allows me to skip waiting for the last snake to appear to take me to the exit, as FODA does in his TAS.
Finally, at the end of 6-4, I do a long jump and damage boost off of the spikes near the exit hole to reach the end of the level without having to wait for the snakes to reach that part of the screen. Once again, the level end event happens before the toads lose a life or the level resets, which allows me to continue onwards as though nothing unusual just happened.
Frames Saved: 308
Level 7: Volkmire’s Inferno
In the first half of level 7, I saved a little bit of time over FODA’s TAS using faster/more optimized movement.
In the flying section of the level, the fastest strategy is to be as far to the right as possible for hitting all of the level checkpoints except for the last one. Right before you reach the end-of-level checkpoint, you are moving really fast, and you slow down when you hit the checkpoint. You then move a fixed slower distance until you reach the point where the next level loads. However, if you keep all the way to the left side of the screen here, then you move faster for a longer amount of time, and then after you hit the end of level checkpoint and slow down, you have less distance to cover before reaching the end of the level. Since you cover the same distance with a faster average speed, this saves time, which I use to save about 20 frames over FODA’s run at the end of the level.
In the flying sections I draw some shapes with my toads across the screen. Then, I turn my two toads into a DVD pause screen icon, bouncing around the screen together as one unit. After this, the toads bounce around the screen in different directions like the bubbles from the game Bubble Trouble. This is followed by more wave-like up and down movement and drawing more shapes.
It's worth noting that you can control the spawn patterns of the fire balls and missiles just by pressing select on player 1’s controller on different frames to change the RNG, so I am able to fly through these sections without having to move out of the way from projectiles at all!
Frames Saved: 87
Level 8: Intruder Excluder
More left+right shenanigans occur at the start of this level! By holding left+right at the same time, it’s possible to scroll both toads all the way up the screen. By killing one of the toads at the perfect time so that the level-restart action occurs the frame after reaching the mid-level checkpoint, I am able to restart at the mid-point of the level with the toads’ sprites/hitboxes fixed.
I am able to save some time on the rest of the climb up the level by jumping into the edge of platforms, which lets me clip through them to start jumping sooner (the same trick I used in level 4). Additionally, by using this trick on the edge of the moving platforms that shoot out electricity between them on a timer, I am able to clip up to the next floor of the level without taking any damage from the electricity (which skips having to wait for the electricity to go away). After this, we arrive at one of the most formidable and RNG-heavy bosses of the game: Robo-Manus!
Robo-Manus
In this boss fight, you don’t want to use your headbutt attack. Besides creating more lag than other attacks, it also knocks Robo-Manus across the screen. This in turn would waste time, since you would then have to run across the screen before you could deliver the next hit on him.
It is also worth noting that if you hit Robo-Manus on the perfect frame when he is starting to jump off the ground, he will fall back down. Additionally, if you stand in just the right spot, then you can hit Robo-Manus without his cannon being able to hit you (since you are “inside” his cannon).
From all of this, we arrive at a strategy to beat Robo-Manus as fast as possible: by standing inside Robo-Manus’s cannon and repeatedly using a jumping down-smash attack, we can rack up hits on Robo-Manus as fast as possible, without knocking him around the screen. Furthermore, players 1 and 2 coordinate the timing of their jumps so that they don’t hit each other, and so that whenever Robo-Manus is about to jump away, one of their hits knocks him back down.
This was one of the worst parts for me to resync. For some reason, no matter how much I changed input, I kept getting one random extra frame of lag about halfway through the fight. This was also the only lag frame that wasn’t connected to a chain of 5-8 other lag frames, which made it stand out compared to the others. The only way I was able to eventually fix this was to go back to before the Robo-Manus fight started, press select a random number of times, and then redo the entire fight. Getting the climb up to Robo-Manus to resync was also difficult. More specifically, the section where bubbles are shooting out at you took a lot of effort to resync, since RNG controls where and when each bubble spawns, and each bubble creates different numbers of lag frames depending on their exact spawn location and the frame they appeared on. Once again, select was used to save the day here.
When all is said and done, Robo-Manus meets his untimely end, and the two toads rush off to the next level: The Terra Tubes!
Frames Saved: 196
Level 9: The Terra Tubes
This level took by FAR the longest of all the levels in this game for me to TAS. I must have spent at least 2-3 months working solely on this level. Besides the annoyingness of TASing underwater sections, this level also took a while to TAS due to the massive amounts of lag in the level, which makes finding optimal movement strategies more difficult than would otherwise be expected. Also, of all the levels which don’t have a level-end glitch in them, this is the level which is most different from FODA’s TAS of the level (be sure to go to 12:00 of the level-by-level comparison encode to be able to clearly see the differences in movement and strategy used in my TAS).
Beginning of Level
To start off the level, we clip out of bounds. This trick is actually not a TAS-only trick: you could do it in a casual playthrough of Battletoads too if you start off level 9 holding jump and left. It seems that this bug occurs for two reasons: the developers allow you to start the level jumping by holding down the jump button (even though you aren’t on solid ground), and the top part of the wall at the start of the level doesn’t have any collision. Once you are out of bounds, you fall into some out-of-bounds water, which you can then swim downwards through to skip the first hallway of the level.
After this, we do things a little differently than FODA did: FODA went back in bounds at this point, climbed up the level using the jets, killed one player while riding the jets to reduce lag and make the next wheel start moving faster, and activated the checkpoint right before the level-reset event could take place.
Instead, in this TAS, we continue swimming in the below-ground out-of-bounds water. Then, we have one toad clip back in bounds and die from a laser enemy before the section with the jets. After this, the remaining toad quickly swims up through the out-of-bounds water, skipping the slow jets section, and hitting the level-checkpoint right before the level-reset event occurs. When one toad dies, it locks horizontal scrolling, but not vertical scrolling. As such, I have to get far enough to the right to be able to load the checkpoint before I kill the toad.
The astute viewer watching this TAS may at this point be wondering: “You’re already out of bounds, so why do you even bother going back in bounds? Why not just swim straight to the exit?” To that question, my attentive viewer, I answer that you can indeed swim through the out-of-bounds water to the end of the level in about 20 seconds. However, there’s a catch: just like in level 4, you can only activate the end of the level if you have previously activated all checkpoints in the level. Otherwise, when you reach the end of the level, the end-of-level object won’t have been loaded into memory yet, so you won’t go to the next level. Additionally, if you skip a checkpoint, then none of the wheels will load when you reach the next area. As a result of this, we unfortunately have to activate all 4 checkpoints in the level before we can reach the exit (to see the points where I hit each of the 4 checkpoints in my TAS, see 12:18, 12:58, 13:31 and 14:03 of my encode).
It is also worth noting that not every wall broken by a wheel indicates a checkpoint (checkpoints are also accompanied by bonus point numbers appearing on screen and a special sound effect). However, if a given wheel is skipped, then the wheels that follow it will not spawn, and each wheel section eventually ends with a checkpoint wall, which must be destroyed by the wheel to be activated. As such, every wheel must be activated as well. The trigger for a given wheel to start moving is to be within a certain distance from it, and (in the case of any wheel besides the first wheel) to have activated the preceding wheel.
Since my TAS uses such a different route to reach the first checkpoint compared to FODA, it is worth comparing how long it takes for my TAS to reach the first checkpoint compared to how long the currently-published 2 players warps TAS takes to reach the first checkpoint, since it uses the same route that I use. This out-of-bounds segment at the start of this level is one of the laggiest sections of the entire game, with 1 out of every 2 frames being lag frames at the peak of the level’s lag! Using movement through the water which better reduces lag, I am able to save almost a second over the 2P warps TAS, as can be seen in the comparison GIF below (my TAS on the left, 2P Warps TAS on the right):
After The First Checkpoint
With careful movement, I am able to have no lag in this whole section, even though normally there are a few frames of lag when the wheels destroy walls. I am able to clip through the walls by alternating pressing right and neutral every other frame (just like in level 4). However, since the next wheel won’t spawn if I am too far away from it, I can only go so far ahead into the level before I have to wait.
Using a precise jump, I am able to get my toad to stand on the ledge that has a destroyable-wall pressed right up against it. From there, I can alternate left and neutral to clip through this wall, just like any of the other destroyable walls.
Since I have a lot of downtime in this section, I use this spare time to hold both left+right at the same time, which distorts the toads’ positions on the screen. Why did I do this, you may ask? The answer to that question lies in the next section!
After The Second Checkpoint
By shifting my toads up high enough via left+right, I am able to start swimming in the section right after the second checkpoint with 1 of my toads immediately (normally, if you have 1 toad standing by the checkpoint, the screen won’t be low enough down for you to swim into the next corridor, so you just have to wait until the 2nd checkpoint is destroyed to start swimming in it). Since checkpoints only activate when a toad crosses a point under where a destroyed wall used to be, one toad has to stay up on the platform to wait for the wheel to destroy the wall before they can hop into the water.
After this, we embark on the longest swimming section in the whole game. As such, I will make a brief detour to explain how this game’s swim physics work: when underwater, you move much slower than on land. When holding left (or holding right), you slowly build up speed in the direction that you are holding, which maxes out at a certain value. If you bump into a wall, you lose all of your speed, and have to start over from scratch. To swim upwards, you have to press A on certain key frames (the exact timing seems to vary). The only way to swim downwards is to not press A for a while, at which point you begin to sink at a slowly increasing speed. Since you move about 3X slower in water, movement through the air is always faster than movement through water.
In the section with the 3 giant spike columns, I actually swim in-between the gap between the bottom of the first spike and the spiky floor (it’s hard to see this though since my toads’ sprites and hitboxes are very far apart as a result of left+right).
Whenever I reach a land section, I get onto the land as soon as possible, since I can increase my speed to 192 on land (128 is the max you can get from jumping into the air). Eventually, after a lot of patient swimming, we finally arrive at the third checkpoint.
After The Third Checkpoint
A series of normal swimming sections is followed by a longish section running on land. At the end of this land section, player 2 picks up player 1 and throws him above the wall! As it turns out, you can throw one toad out-of-bounds using this technique, since the devs did a bad job programming wall-collision in this level.
The purpose of 1 toad going out-of-bounds and 1 toad staying in-bounds is as follows: the toad that goes out-of-bounds is able to swim underneath the wall at the end of this wheel section (note that this particular wall is in fact the fourth checkpoint in the level), which allows him to get past the wall boundary before the wheel arrives. The out-of-bounds toad then positions themselves so that they will activate the checkpoint on the same frame that the wheel destroys the wall.
While the out-of-bounds toad is waiting for the wheel to break the barrier, the in-bounds toad dies on the perfect frame, such that on the frame after the wall is broken and the checkpoint is activated, the level-reset event occurs. Both toads then respawn at the checkpoint position, which is substantially farther forward then they would have been if they waited behind the wall for the wheel to destroy the wall (as an odd aside, a toad crossing the checkpoint spot must be alive to activate the checkpoint – even though a toad hitting the end-of-level trigger does not need to be alive to successfully end the level!). With all of this done, we are now ready for the final section of this level:
From The Fourth Checkpoint To The End Of The Level
Although we have activated all of the checkpoints, we unfortunately still can’t swim out of bounds directly to the exit to end the level. The reason for this is that besides needing to activate all 4 checkpoints for the end-of-level object to load, the camera also has to pass through the top of the shaft where the end of the level is before the end-of-level object can load. Of course, that won’t stop us from performing more out-of-bounds shenanigans anyways!
Once we reach land, one toad picks up the other toad and throws him out-of-bounds. In the meantime, the in-bounds toad holds left+right at the same time in order to shift their sprite up far enough that the game gets confused and puts them in an out-of-bounds location as well. From here, the thrown toad is able to swim directly into the final water section before the end of the level, and the toad that shifts their sprite is able to fall into the corridor right before the final underwater section (which skips traveling through an entire hallway that FODA went through in his TAS!).
The toads time their swimming here carefully in order to move upwards as fast as possible. Additionally, careful positioning is used to slide between a gap between a spike and the ceiling which your toads were not meant to go through, which saves some time (this trick is actually used in RTA speedruns of Battletoads, though it’s extremely precise, and requires a careful setup to get it consistently).
Once the higher up toad reaches the top of the shaft at the end of the level (thus loading the level-end object), I kill the other toad. This is done because this section has a huge amount of lag, and the lag decreases by a lot when one toad is dead. Nevertheless, the level-end object won’t spawn if I kill 1 toad before loading it. I manage to kill my toad earlier than FODA did, however, which also saves some time.
From here, the farther ahead toad falls down the shaft, weaving through all of the spikes, before finally headbutting into the spikes at the end of the level. The spikes give me a big speedboost forwards, which quickly pushes my mangled corpse into the end-of-level trigger. Since you don’t need to be alive to end a level successfully, this allows for me to successfully beat the level (along with causing some jumbled graphics to appear on the screen). The level-end occurs after the first player to die loses a life, but before the player that hit the end-of-level trigger can lose a life. As such, this player is able to save an extra life (which is good, because player 2 has no extra lives, and would gameover if they died here).
Frames Saved: 1,747
Level 10: The Rat Race
The way level 10 is supposed to go in casual gameplay is as follows: You race a rat to the bottom of a tower, where a bomb is located. If you destroy the bomb before the rat reaches it, then you continue in the level. Otherwise, you die. After destroying the bomb, you start another rat race to a bomb. There is then a third and final rat race after this. After destroying the third bomb, you go to a boss fight at the bottom of the tower, which ends the level.
In this TAS, however, level 10 is going to look quite a bit different from that…
To start off with, player 2 picks up player 1, and then jumps up. When both players are offscreen in level 10, the game keeps continuously scrolling the screen down, which in this case will continue until player 2 throws player 1. Thus, we scroll the screen all the way down to the first bomb, throw player 1, and then destroy the bomb.
After this, something very odd is going to happen. To explain how this works, let’s look at how the game determines when to end level 10:
The boss at the end of level 10 has a boss flag on it, which is set to true when the boss is killed. When the game sees that the boss flag is true, it immediately ends the level.
However, the falling rat has a boss flag set on it also, for some reason. Additionally, the falling rat has infinite health (since your hits are not supposed to be able to kill him). However, when the rat is falling to the ground after destroying the bomb, if you hard hit him and then use a boot attack on him, the game will consider the rat to have died, and thus set the boss flag to true, which immediately ends the level. This skips the second and third rat races, and also the boss at the end of level 10.
For some reason, I was able to save 8 frames over FODA’s TAS here. This is probably due to tighter movement optimizations, but I’m not really sure how or where this timesave occurred.
Frames Saved: 8
Level 11: The Clinger Winger
In this level we have a simple autoscroller, which the TAS can easily take care o- hey wait a minute? Why did player 2 die at the start of this level?
As it turns out, player 2 can’t move on this level on the American release of Battletoads. The reason for this is that during development, the original USA ROM of the game had a timer for when player 1 could start moving and a separate timer for when player 2 could start moving. Unfortunately, player 2 does not have enough time from when his timer starts ticking down to when he can first start moving to avoid being hit. In the Japanese and PAL versions of the game, this bug was fixed by using one timer for both players, and making it start counting down much earlier. Since the game was too hard for even 1 player to make it to level 11 (let alone 2 players), however, this glitch was never found during beta testing for the American version, and thus made it into the released game. Fortunately, after we gameover with player 2, we can continue the level with just player 1, which ensures that the game is beatable with 2 players. This gameover is the reason why you may have noticed that I strategically made sure that my number of extra lives left for player 2 was 0 at the start of level 11 (thus finally answering the burning question you’ve no doubt had since I intentionally killed player 2 in level 2!).
At the end of the level, we do an easy boss fight against the BuzzBall, and then its onto level 12! I saved 2 frames here compared to FODA by doing one of the hits on the boss 2 frames sooner.
Frames Saved: 2
Level 12: The Revolution
Player 2 is reunited with us here on this level! Hooray!
In this level, you are on a circular tower. In reality, your coordinates around the tower are based on your x-coordinate, with your x-coordinate decreasing as you run left, and increasing as you run right. When your x-coordinate reaches a certain point, it wraps around (which is equivalent to reaching the other side of the tower). This effectively simulates the movement of the toads in a circle.
The springs that are placed throughout the level each start in a fixed position when the level begins, and rotate around the tower in a fixed rate in a specific direction (thus, they appear to “move” even when you are standing still).
The disappearing green platforms on the other hand do not actually change their position coordinates in the level – they just appear to change position when the tower rotates from a toad moving far enough towards the edge of the screen. The disappearing platforms appear and disappear based on the values in a timer contained in address 0X000B. This timer is set to 0 when the level starts, ticks up by 1 during every non-lag frame, and is paused during lag frames. When it hits what would be 256, it wraps back around to 0 (since it’s a 1-byte number). There are specific values of the timer in which each of the disappearing platforms is set to appear, and values in which they are supposed to disappear.
To start this level off, I use a different attack pattern than FODA or the 2P Warps TAS uses. This method causes me to lose 4 frames in real time due to increased lag, but lets me save a few frames from the timer counting up in 0X000B. As a result of this, I am able to make a cycle for a disappearing green platform that neither FODA’s TAS nor the current 2P Warps TAS could make. This in turn allows me to make it up the next green platform without waiting either, which adds even more to my timesave.
Since the 2P Warps TAS goes through this section in a more optimized manner, I have made a comparison GIF showing this section in my TAS on the left and in the currently published 2P Warps TAS on the right. As you can see, I save over 2 seconds by beating this timer!
One technique that I use often in this level (which was found by feos) is pressing down for a frame while jumping to switch from jumping right at max speed (192) to jumping left at max speed. Normally, if you just press left, you lose all your speed, but this technique allows you to keep it, allowing for faster turns.
At some of the points in the level where the red faces blowing wind appear, I press left+right at the same time as I am approaching the point where they spawn in in order to force the screen to scroll up, which makes them spawn faster. Your y-coordinates get reset to their normal values after you grab the poles to hang on to during the wind, so this doesn’t affect your sprite for the rest of the level.
On the very last red face (at 18:52 in my encode), I move slower to get to the point where I can spawn the red face than I otherwise could do (in real-time). The reason for this is that the faster movement strategy creates a lot more lag, and after the face stops blowing, you still can’t drop down until the spring is right under you (if you fall elsewhere, you’ll land in the void and die, since the screen has scrolled up high enough that the platform is below the edge of the screen). Since the spring moves on a global timer that doesn’t tick during lag, and since the blowing face resets your position on the screen to a fixed value, I would actually lose time using this faster method, and would not make any gains in in-game time either, since I would still need to wait. Thus, because I have to wait anyways, it’s faster to just go slow through here.
I end the level by pressing left+right at the same time in order to make the screen scroll up to hit the end-of-level trigger faster than FODA did. Finally, we get to see object 0X7F get activated normally, as opposed to the way we activated it to skip parts of levels 3 and 5. And with those fireworks done, we can finally jump into the tower for a final showdown with the Dark Queen!
Frames Saved: 697
Level 13: Armageddon
Time for the final boss!
For some reason, if you do a downwards punch for your first hit with the second toad, it won’t register as a hit. For that reason, for my first two hits on the Dark Queen, player 1 does a down punch and player 2 does an outwards punch. I need for player 2’s punch to hit first, because that way, the downward punch will lock the Dark Queen’s vertical position (otherwise, she would go flying to the right).
After this, I use a strategy which saves quite a bit of time compared to FODA and the currently published 2P warps TAS:
One toad jumps up to do a down punch on the queen. Then, the other toad jumps up and punches the Dark Queen’s feet right after she takes damage from the first toad’s punch. This hit on her feet does no damage to the Dark Queen, but what it does do is that it forces her to fall back down to being pretty close to the ground. If I didn’t do this, the Dark Queen would eventually rise up to the top of the screen, and I would have to wait for her to come down before I could hit her again.
The reason why I need to use the downward punch against her is that it has less lag than other attacks, and it doesn’t knock her across the screen like the other attacks do. Taken as a whole, this strategy saves a lot of time, since it forces the Dark Queen to stay in one spot at the center of the screen close to the floor while the other player racks up hit after hit on her without any interruptions.
When her health is low enough, I perform a headbutt simultaneously with both toads to finish her off and beat the game. This is done at the same time because the move creates a lot of lag when it hits, and TAS-timing stops on the final input. As such, if one hit landed first and then I attacked with the other toad, this would be slower than having both attack at the same moment.
With all of that taken care of, Pimple and Princess Angelica are saved, the Dark Queen and her evil minions are defeated, and peace is restored to the galaxy. Hooray!
Frames Saved: 191
Level-By-Level Attribution
(Note: for the purposes of this list, when I say “I,” I mean Lobsterzelda)
- I copied the input for level 1 of this TAS from input done by feos. However, I did TAS the level 1 boss, since his input desynced at the boss.
- The input for the first half of level 2 is copied from feos. However, I TASed the second half of this level, since it desynced about halfway through.
- I TASed all of level 3.
- I TASed the majority of level 4. There were one or two hallways where I used input for feos, but there weren’t many chances to do that, since copying input on this level caused immediate desyncs in most locations due to heavy lag.
- I TASed all of level 5.
- I TASed all of level 6.
- I TASed all of level 7.
- I used feos’s input for the first 2/3 of level 8. feos’s input desynced near the platforms that shoot out electrical beams right before Robo-Manus, so I had to redo that section. I also TASed all of the Robo-Manus fight.
- I TASed all of level 9.
- Level 10 was an exact copy of feos’s input.
- Level 11 was an exact copy of feos’s input for the autoscroller part. For the boss fight, I TASed it myself.
- I TASed all of level 12.
- I TASed all of level 13.
Special Thanks
Before I conclude these very long submission notes, I have some people that I would like to thank for their contributions to the completion of this TAS:
• Alyosha – For compiling a WIP of the first eight levels from various other TASes of the game, which acted as a backbone for me to figure out strategies for how to TAS the first 8 levels when I first started my TAS.
• AIVV73 – For pointing out that I could save 3 seconds over Alyosha’s WIP in level 3 by using the void jump to grab the jet faster. Also, this realization prompted me to go back and look more closely at possible earlier timesaves for each of the first 8 levels, which eventually led to me saving 7 seconds over Alyosha’s WIP!
This TAS has been a long time coming. I would like to also thank feos, MESSHUGGAH, and koh1fds for their work in hunting for glitches in the game. Had it not been for their efforts, many of the timesaves used in this TAS would not have been found. I would also like to thank the TASVideos community as a whole for being supportive and encouraging towards me while I was making this project. A single group of people may be able to make a TAS, but it takes a village to make a TASing community. And now, after all of the help that I have received to make this TAS, I hope that I am able to return the favor to the community by giving them back this completed TAS. This TAS has ultimately been the project which I have spent by far the most time on of any project that I’ve worked on (over 4 months!). I hope you enjoy watching it!
Emulator Settings
This TAS was made on BizHawk V. 2.3.2. The core NESHawk was used.
adelikat: Replaced movie file with fixed header and sync settings so that it will properly switch to the NesHawk core with 2 player settings. Also will allow it to be played on v2.4.2 or later
ThunderAxe31: No issues found with this submission. In the previous submission
thread, someone expressed doubt about the fact that some levels were skipped in a warpless movie, but I don't consider that an issue because these levels weren't skipped by using intended in-game mechanics, but via glitching.
Optimization seems on point. Aesthetically, it resulted similar to the current publication, and the audience seemed very pleased with the playarounds.
Accepting for obsoleting the
old movie for Moons.