I can't defeat Air Man... but TAS can.

Hack + version information
This is Vs. Airman by ATA, though it's a different version of it. The premise is the same, however; Mario/Luigi is on a special mission to defeat the infamous and notorious Air Man from Mega Man 2 (referred to as "Airman"), with special Mega Man-exclusive enemies awaiting him in this very one stage. As far as I know, Vs. Airman is to demonstrate ATA's powerful ASM capabilities with hacking the original Super Mario Bros. in 2000, essentially combining two games into one hack.
I wondered about what this version of Vs. Airman was meant to be, so I reached out to fellow SMB Arena owner Eden GT about it on Discord.
I believe ATA made some bases for people to make their own levels off of, separate from the main hack.
That's the intention.
That's the intention.
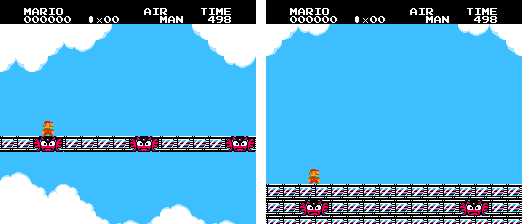 Right off the bat, you'll notice a difference in where Mario/Luigi starts; in this version of the hack, the first room starts with the ground much more planted to the bottom, and in the original, the ground is thinner (one block tall) and higher up.
From there, it's about how the levels are formed; it won't take long to figure it out, but for simplicity's sake, I'll just say this: the original is entirely a near-recreation of the original Air Man stage from Mega Man 2, while the version being played here starts with a World 1-1-lookalike and... I dunno, I guess it becomes its own thing from here? Maybe.
Now, what about the name? Well... I've seen people on the internet refer to it a couple of ways: "Version D" and "Rev. D". Some have even added the "Mario" before "Vs. Airman" (same with the original), but I'm not quite sure about that contributing any worth. While I'm initially set on referring to this as "Vs Airman Rev. D", I'll let you decide on how to settle this.
But in the meantime, you can download the hack here.
But in the meantime, you can download the hack here.
A few tidbits about the hack that are worth mentioning...
After falling to the bottom (
$00B5 is set to 2), Mario cannot move horizontally; his X speed is locked at 0 and his X pixel is locked to its current value for the next room. At the bottom, you can still move one subpixel/frame at a time, but his X pixel won't change in the next room.
Mario can only fall to the bottom on a certain screen and on certain X pixels (usually at the end of every room) to warp to the next one without losing a life.
If Mario is being blown back but he is up against the wall he's being pushed back to, his X speed will not be reset to 0, but he will not move past the wall if he's touching it. I believe this is to prevent a glitch where Mario can be pushed inside a wall by the wind.
Mario's X pixel needs to be 227 or higher to touch the gate to proceed to the next room horizontally; Mario must not be falling or dropping as well to touch the gate faster.
If Mario is in his walking/grounded state when he touches the gate, he can jump midair on the first frame he has control. Regardless, Y speed is reset if he's inside the gate or a wall-catch is performed.
Mario moves 44 pixels to the right after touching a gate.
Room-by-room comments
At most, I have 16 frames to spare before next framerule on title screen; just not enough to press Select twice before pressing Start again.
Room 1
We start with a halfway recreation of World 1-1 from the original Super Mario Bros. before transitioning to something different; a high jump with the Kaminari Goro blocking our path forward. Then it becomes its own Mario-themed thing afterward.
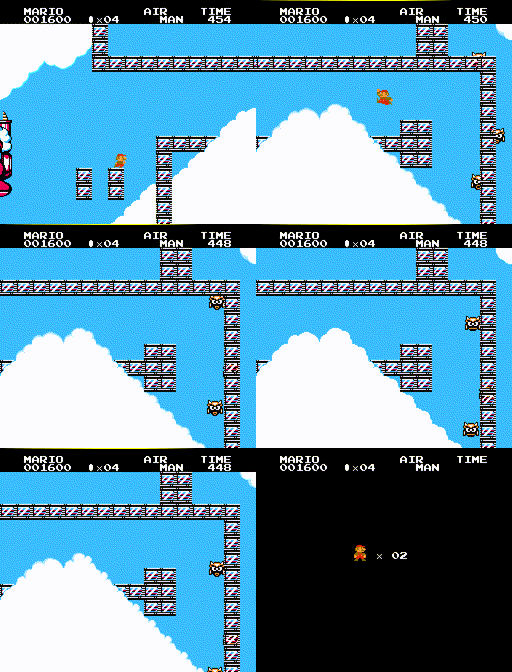 Pressing Start on Frame 47 makes the jump with Kaminari Goro over the pit one frame faster without any pixel adjusting needed.
Spawning a Super Mushroom near the end of the W1-1-like area is possible, but will create lag frames, so it has to be avoided.
At the end of this room, the aim is to fall fast enough and still be close enough to the center when falling (with the aid of Left+Right).
X pixel 167 is achieved here, with the next room appearing on Frame 2043. (I can warp down two frames earlier while keeping the same strat with X pixel 174, but the second room will be slower, causing me to lose my chance to retain a 442 in the in-game time.)
X pixel 167 is achieved here, with the next room appearing on Frame 2043. (I can warp down two frames earlier while keeping the same strat with X pixel 174, but the second room will be slower, causing me to lose my chance to retain a 442 in the in-game time.)
I can overshoot the end warp and force a death instead of a warp, falling to the bottom on player screen 12 (
For the warp to work, the player screen variable must be 11 and Mario's horizonal position (
$006D). A strange predicament.For the warp to work, the player screen variable must be 11 and Mario's horizonal position (
$0086) must be 161 or higher.
Room 2
This is a single-screen showdown where tornados push Mario to the right. Going left is slower but is still required.
I jump over the sole Red Koopa and turn right, achieving an X pixel of 58. The next room appears on Frame 2306.
I jump over the sole Red Koopa and turn right, achieving an X pixel of 58. The next room appears on Frame 2306.
Room 3
Holding Right with Mario in the wall will push him back left, so it's better to delay three frames before moving right.
Letting the Pipi drop the capsule and releasing the many Copipis on ground impact will cause lag, but I can't prevent that here since the capsule is already out and no Pipi is present; thankfully, there's only one forced lag frame for me to withstand.
The next room appears on Frame 2634.
Letting the Pipi drop the capsule and releasing the many Copipis on ground impact will cause lag, but I can't prevent that here since the capsule is already out and no Pipi is present; thankfully, there's only one forced lag frame for me to withstand.
The next room appears on Frame 2634.
Room 4
I can get over the left wall, but it's not very useful since there are no warps.
With a starting X pixel of 227, no inputs are needed for me to touch gate optimally. It's faster to touch the gate normally.
Obviously, there's not enough distance to cross over the insta-death spikes to the next safe platform. Pipi is too high for Mario to perform a higher enemy bounce, so instead, I lure the Pipi over to get it to drop the capsule later, and at an appropriate position. The best I could get it in here was this:
Obviously, there's not enough distance to cross over the insta-death spikes to the next safe platform. Pipi is too high for Mario to perform a higher enemy bounce, so instead, I lure the Pipi over to get it to drop the capsule later, and at an appropriate position. The best I could get it in here was this:
- Spawn the Pipi on Frame 2933.
- Have it drop the Copipi capsule on Frame 2978, then jump on Frame 2984.
On Frame 2998 is where Mario bounces off the capsule, with an X pixel of 197 and a Y pixel of 56. His rise stops at Frame 3029, where his X and Y pixels stand at 19 and 235 respectively (he's a screen higher and a horizontal screen further), and he safely lands on Frame 3055.
Afterward is another blanket of spikes with a pit in the middle. I can't lure the individually spawned Copipis to follow Mario to the right; there's barely any walls for Mario to bonk and move closer to the right edge of the screen.
I believe there is a timer for when Pipi respawns every time it leaves or is defeated, and so I wait for that timer to complete itself. Then I cross the spikes safely down to the pit (with help from a second dropped capsule thanks to the respawned Pipi).
The next room appears on Frame 3456. nice number
I believe there is a timer for when Pipi respawns every time it leaves or is defeated, and so I wait for that timer to complete itself. Then I cross the spikes safely down to the pit (with help from a second dropped capsule thanks to the respawned Pipi).
The next room appears on Frame 3456. nice number
Room 5
This next room is a simple straight-down while trying to not get pushed to the spike walls by the Matasaburo.
After adjusting Mario's X pixel to 53 in the previous room, another adjustment is made here to put it at 101, both times to avoid the spikes.
The next room appears on Frame 3629.
The next room appears on Frame 3629.
Room 6 (FINAL)
The final room before the boss is entirely Mario being pushed to the right. Tornados and very long jumps run amok.
After the first gate in this room, I get 11 horizontal speed, alternating Left+Right and B + Right to push a little ahead in subpixels.
There is a special 4-frame framerule for when Air Man's HP meter fills up, based on how quickly Mario arrives at his boss area.
Air Man starts at the right side of the screen with 28 HP. He takes 2 damage from stomps and 1 damage from fireballs.
Air Man's attack pattern goes like this:
- Create six tornados.
- Wait 70 frames, then blow the tornados (and Mario) in the direction he's facing.
- Repeat the same attack twice more.
- Move to the opposite side of the screen, making two hops (one medium, then one big).
- Repeat the entire pattern from the start.
Air Man's left and right position are offset slightly to the right after the pattern goes through two loops due to an added gap; when he goes and double-hops the second time, he goes slightly down into the gap for his first hop (normally takes ~36 frames) before clipping back up to perform his second hop (added ~12 frames).
Onto the fight!
I simply run up to Air Man, then backwards-jump and stomp on him as quickly as possible before being blown back slightly two separate times. I believe he has 14 injured invincibility frames if hit by fireballs, but it shouldn't matter anyway since we're Small Mario...
As the first tornados are sent:
- One-frame A backwards-jump on X pixel 168 (8 pixels left of Air Man).
- Four stomps for 8 damage are executed (Frames 5301, 5315, 5331, and 5351). Down to 20 HP.
- I need to slow down for the next tornados so I can run under them.
As the second tornados are sent:
- Hold Left for 17 frames, then make a two-frame A jump (still backwards) on X pixel 168 again.
- Five stomps for 10 damage are executed (Frames 5379, 5391, 5409, 5427, and 5447), but I needed to slow down to get those stomps in since I was being blown back right away this time. Down to 10 HP.
- After the fifth stomp here, I land right of Air Man, gather running speed, then make a two-frame A jump again (still backwards) on Frame 5474.
- Five more stomps for 10 damage are executed (Frames 5477, 5489, 5507, 5525, 5545), again adjusting Mario to get those stomps in optimally and to avoid getting hit by the third set of tornados.
Timing ends one frame after Air Man's HP is 0, when Air Man's death explosion particles appear; akin to HappyLee's run of the original Vs. Airman (as Luigi).
Possible improvements?
I found a 1-frame improvement before the boss gate, where I face right in the wall-catch, then Left+Right to gather speed, resulting in gaining control four frames faster. However, I get a worse tornado pattern as I can't run under the second set; I can't seem to find a way around it.
So really, the only way to actually improve any bit of the run at this point would have to be when fighting Air Man. I'd assume any further improvements before then would pose a risk because they'd be changing Air Man's tornado patterns.
What's next?
Surely to complete the catalog of runs for this "Vs. Airman" would have to be to beat it as Mario's slower-skidding but higher-jumping Luigi. From what I could make of a quick test run, Luigi can be just barely faster by the time he makes it to the final room, but of course, his slower speed-gathering means he'll be all but second fiddle when it comes down to fighting Air Man as well. It'd need a little more testing, though, to better understand how much faster/slower Luigi will be than Mario.
Included also is a third version of Vs. Airman, dubbed "Version R" by Vincent Hernández in 2010; this version introduces harder, more unorthodox gameplay, including airborne spikes and the return of most of the enemies featured in Super Mario Bros.
I don't believe anyone's publicly recorded a video of this version, so for the time being, if you wanna try, the patch is here.
I don't believe anyone's publicly recorded a video of this version, so for the time being, if you wanna try, the patch is here.
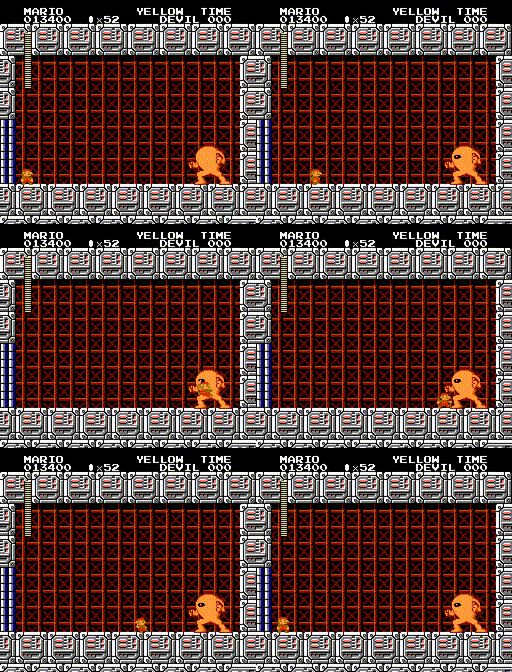 Also available from ATA is another Mega Man-themed hack featuring Yellow Devil, though it is left unfinished since the boss itself, Yellow Devil, won't do anything, nor can Mario/Luigi do anything with it; it's merely for show.
Years later, VMMR discovered that the Yellow Devil is killable using hex editing, which creates a hole and unlocks a second part of the level, including another non-moving boss at the end there, with Yellow Devil's actual boss room from the first Mega Man's first Dr. Wily stage. That boss can be killed as well with hex editing, creating another hole that simply functions as a regular pit.
It's been years since this demo hack was uploaded as well, and it's very unlikely it'll be picked up in the near future, so there's not much we can do about that.
Finally... This isn't much... Just a little secret I found ages ago, even in the original Vs. Airman; when you hold A as you press Start on the title screen, the particles will be replaced by Copipis, and Air Man's name will be written as Nyorobon instead. There doesn't seem to be much else I could find besides the change in Air Man's intro screen, but regardless, the run syncs fine as is even with the added change on the starting input.
(Am I getting anything right? "Particles"? "Intro screen"? There wasn't much information about all of this I could find about this particular scenario, even in regular Mega Man games; and I'm no nerd when it comes to Mega Man, so just... correct me if I got something wrong here.)
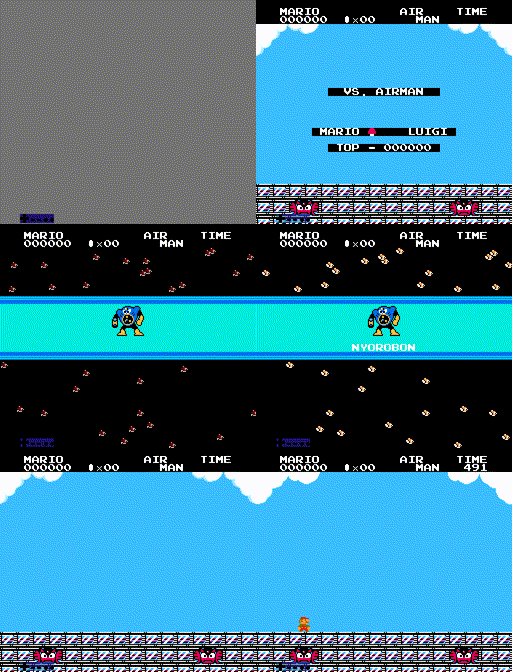
(Am I getting anything right? "Particles"? "Intro screen"? There wasn't much information about all of this I could find about this particular scenario, even in regular Mega Man games; and I'm no nerd when it comes to Mega Man, so just... correct me if I got something wrong here.)
And of course, there's the usual "new quest" staple as seen in just about every SMB1 hack thus far, where certain enemies move faster and Goombas are replaced by Buzzy Beetles - but that shouldn't be something to make a big deal about.
Oh yea, Air Man now creates four sets of tornados instead of three before hopping but that's just about it-
Oh yea, Air Man now creates four sets of tornados instead of three before hopping but that's just about it-
Ahem. Additional thoughts? ...wait... no no NO-
Sorry y'all, but this submission's gotta serve its purpose here. I hope better days are ahead for Maxi and the other fellow beginner SMB1 TASers (as always), but alas, if I have to make an optimized run to show them how it's done, I will. I'm not proud of it; I just hope it can be generally considered a teaching lesson and not an attack.
Besides, I had a much older run (2017? 2018?) which I beat by five seconds. I had to look back on improving it after seeing Maxi's submission.
Besides, I had a much older run (2017? 2018?) which I beat by five seconds. I had to look back on improving it after seeing Maxi's submission.
*sigh* Gotta push it all aside now. I'm sure I'm supposed to care about others' previous efforts, but I'm sure this is a bit too much from me. Anyway...
Special thanks to veteran SMB1 TASer HappyLee for expressing his gratitude for me as an up-and-coming TASer, and of course, huge special thanks to everyone as well for the positive vibes and for helping/watching me blossom into something much more.
Special thanks to veteran SMB1 TASer HappyLee for expressing his gratitude for me as an up-and-coming TASer, and of course, huge special thanks to everyone as well for the positive vibes and for helping/watching me blossom into something much more.
Suggested screenshots
-1612.png "Mario stands on the edge of the first Kaminari Goro's cloud without actually touching the enemy.")
Frame 1612, room 1
-2493.png "Mario weaves through Copipis on his way down to the pit after jumping.")
Frame 2493, room 3
-3301.png "A tight jump over spikes, though Mario is aided by a Pipi's capsule falling towards him so he can bounce off it.")
Frame 3301, room 4
-5378.png "Mario jumps and weaves between Air Man and one of his tornados.")
Frame 5378, Air Man boss room
Darkman425: Claiming for judging.
Darkman425: So that input to make the birds appear during the Air Man intro screen? That's a reference to the inputs in Mega Man 2 where you can replace the particles with the tiny birds, and does nothing else besides look funny. there's your Mega Man 2 fact for the day.
As for the submission, the gameplay looks well optimized, and I certainly didn't know about the extent of the vertical position preservation between screen drops when I looked into the game over 4 years ago. The versions for this hack are quite distinct and I'm fine with having both as publishable alongside each other. I also added Mario to the branch since the gameplay differences are distinct enough to warrant a split between the brothers. Overall, nice work!
Accepting to Standard as a new branch under "Mario, version D". I'm not super sure if it should be "version", "revision" or something else entirely though. I've personally called it version D for at least a decade now.
fsvgm777: Processing.