Hetfield90 & RachelB's Wii Muramasa: The Demon Blade "Momohime" TAS in 1:03:44.55. It is a 1 minute and 24 second improvement over the
published run after accounting for ~9 seconds of intro differences from not playing on NG+.
Goals
- Genre: Action
- Genre: Adventure
- Genre: Platform
- Aims for fastest completion
- Heavy luck manipulation
- Takes damage to save time
Emulator Settings
- Emulator Used: Dolphin 5.0
- Dual Core: Off
- Idle Skipping: Off
- DSP Emulator Engine: DSP HLE emulation (fast)
- Standard Gamecube controller in port 1
- Wiimote 1 connected
About the Run
Difficulty Choice
The reason for switching from Shiguri to Shura difficulty is because the two difficulties are exactly identical for a TAS outside of having Shura having a ~9s longer intro from not being on NG+ and being able run through the butterflies in the final act(which saves a very small amount of frames). Shiguri also allows you to parry enemy attacks while attacking, but this is useless in a TAS because you want to avoid the hit lag caused by parries. Also, recording input files from NG+ doesn't work on Dolphin 5.0.
General Info
Random Encounters
As far as I was able to tell, the pseudorandom distribution for encounter luck in this game uses some sort of algorithm that increases the chance of a random encounter for each iteration that yields no encounter. Therefor, the general strategy is to just delay encounters from happening for as long as possible and then either use a smoke bomb or manipulate something that dies very quickly like wooly eyeballs or a pheasant.
RNG in this game does not increment frame by frame, and the only thing you can do to advance rng in non-combat zones is kicking up dirt or snow by running, or grabbing a treasure if one happens to be in your direct path. You kick up additional dirt sprites by pressing down for a frame while moving, or reduce the number of sprites you create by pressing backwards for a frame.
The unfortunate part about this is that most of the acts, at least the ones with the most difficult RNG manipulation, don't have terrain that kicks anything up to advance the RNG. There is at least a silver lining in random encounter manipulation in the form of dirt always being generated just before a screen transition regardless of the type of terrain. Since you can only create one small dirt sprite from running or 1 large dirt sprite from jumping each screen transition, you usually end up having to waste a lot of time manipulating encounters away in these acts. As such, pretty much all of your money over the course of the run is spent on smoke bombs, and some are even worth acquiring by taking slight detours to grab them, and some are also needed to be manipulated from high level ninjas.
Combat Zone Movement
Momohime gains access to a much larger array of movement options when she is in a combat zone.
Rolling is the fastest form of horizontal movement, followed by continuous blade dashing, followed by running. Since running has an acceleration period to it, you generally want to start these zones by either blade dashing or rolling, and since rolling normally has a long stand up animation, you want your last one to always be followed by a blade dash, jump, falling off a cliff, etc...
There are 2 main tricks for vertical movement, the first being corner jumping. Normally Momohime has a large delay period after landing before she can jump again, but if you land on the corner of a ledge and fall off you can jump immediately. The second most commonly used vertical movement tech blade dash zipping/canceling, where you zip great distances up to passable floors by using a blade dash and cancel the blade dash with an air slash that is subsequently interrupted by landing on the ground.
Boss Fights
The most notable mechanic in the boss fights of this game is the dynamic difficulty timer. Each time you deplete a boss' large yellow health bar, their small orange bar above it will deplete an amount relative to how long it took you to do it.
Because there is a minimum amount of time you must wait before reaching certain dynamic difficulty thresholds, optimizing each phase of boss fights sans the final phase entails generating as little hit lag as possible while still being able to transition each phase right when the decrement threshold increases to a given value.
This table shows how many frames of hit lag each type of slash generates. It doesn't include the damage/hit lag ratio of each type of slash, but suffice it to say that blade dashing is significantly more efficient than all other slashes in this regard. I also forgot to include special abilities from swords, but Flash(the only one that's really used in this run) is pretty comparable to the 1st-3rd combo slashes, and if you do need to another type of slash in one of the non-final phases, whether you use Flash or combo slashes generally boils down to RNG manipulation contingencies.
Since you want to be doing as few hits as possible in the first several phases, you generally want to do two 30% decrements and one 40%. The IGT would still be the same with other combinations of decrements, but the real-time would be slower from additional hit lag. Dynamic difficulty does not apply to the final phase, so DPS should be maximized without any regard to hit lag.
Base-Damage Transfer: Selecting the secondary or tertiary sword slot before entering a boss battle will overwrite the base damage of either of those swords to your primary sword. This is a very useful glitch because the ideal sword length, special ability, and base damage for each fight do not typically coincide all within the same sword, so it is nice to be able to combine specific properties of different swords.
Blade Dash Canceling: Blade dashes can be used up to 3 times in a row before touching the ground again, but only the first 2 can be interrupted by an air slash. Additionally, the air slash itself will be interrupted if you are too close to the ground. As such, the ideal way DPS bosses in their non-final phases is doing pairs of ground-level blade dashes interrupted by air slashes. Blade dash canceling is very much a TAS-only technique. For RTA, I would say it's best to just use the 3 preliminary combo slashes without a finisher to minimize hit lag.
As far as the final phase of each fight goes, the general breakdown of different slashing combos' DPS is as follows:
- Flash spam
- Triple combo with Flash finisher
- Air combo interrupted by downward stab
- Triple combo with sliding slash finisher
Some other things to note about sword DPS are that blades barely beat long blades of identical base damage in DPS, and it is in fact slower to cut your combos short instead of using all 3 preliminary slashes.
Act 1
You start with 3 bamboo flasks, which aren't needed for their healing properties, but are still consumed anyway to gain Spirit for later sword forgings.
The explanation box at the start of the mandatory samurai fight can be avoided by delaying your quick draw, but this will merely move it to the Yukinojo fight instead. This might be worth doing in the Kisuke run since I don't think you have to fight any more samurai for the remainder of the run.
Even though random encounters do not end until the final corpse hits the floor, there's no other way to keep every ninja together than by juggling them, so this is still the fastest way to do the mandatory ninja fight.
Which side of an NPC you talk to them from during dialogue zones depends on several factors:
- Whether or not you can reach them before the minimum amount of time has passed to be able to start talking to NPCs(if you reach the first NPC with time to spare, part of their turnaround animation may occur during this grace period)
- How long it takes each NPC to turn around
- Whether or not Momohime is possessed by Jinkuro(since Momohime walks so slowly by herself, it's generally faster to walk through an NPC before talking to them so Momohime quickly steps backwards before the dialogue, but only if that NPC has a quick turnaround animation.)
Blue Monk: The base damage transfer glitch is used to overwrite Sazanami's base damage onto the Chizuru Muramasa. The Chizuru Muramasa's special ability, Misty Slash, is particularly useful on this fight since it interrupts Blue Monk's desperation attack. It doesn't particularly matter what Blue Monk does in the first two phases, but he should be manipulated to use the fire pillar attack or his desperation move in the 3rd since those keep him stationary the longest for more blade dash cancels. Once he reaches his fourth and final phase air comboing is by far the fastest form of DPS in the game at this point before obtaining the Umitsubame Muramasa.
Act 2
The two swords I equip in this act are the Hasabe Kunishige, obtained from Blue Monk, and the Botan Muramasa, forged at level 3. The Hasabe Kunishege is used for its passive +1 strength bonus, which adds a small damage increase to other swords, but more importantly helps meet strength requisites for more powerful swords throughout the run. The Botan Muramasa is another essential blade in Momohime's weaponry. Not only does it have the highest base damage of any sword available at that level, but it also gives a passive 5% damage increase to the other two swords you have equipped, which makes it stay useful until the end of the game.
Wanyudo: This boss was one of the trickier bosses to manipulate without generating extraneous hit lag since he likes to move around a lot, and getting a long horizontal dash makes it pretty much impossible to make a 30% threshold on time with just blade dashes. Wanyudo automatically gets knocked into the air after his first phase which gives him a long period of invulnerability at the start of phase 2, which pretty much mandates a 40% decrement for that phase. Manyudo must also be manipulated to a specific permutation of actions so you can force him to start a rotating fire move just before his final phase to get him to stay still. This needs to last long enough for you to finish him off, otherwise he will dash in between the two fire puddles he created to do his desperation attack.
Act 3
The Tengu Mask, which gives +1 str/+1 vit, is acquired so that I can equip the Hibari Muramasa at level 5, which yields a 67% DPS increase over the Botan Muramasa which I was previously using. I also fight a birdmen encounter to hit level 5, since wooly eyeballs don't give as much XP.
Along with the Hibari Muramasa, the Umitsubame Muramasa is also equipped in this act. The Umitsubame Muramasa is by far the best sword in this run and is used in the primary sword slot for all but one of the remaining boss fights. Not only is its passive, Income Boost, useful for buying more smoke bombs throughout the run, but it's special ability, Flash, is one of the most versatile abilities in the game. Momohime unaffected by attacks while casting it, it interrupts any animation while on the ground(making it a faster combo finisher than any other slash), it receives all the benefits of the damage overwrite glitch, and it can hit enemies from range if need be. The only drawback to this ability(other than being restricted by Soul Power constraints like all special abilities are) is that its target and trajectory are determined by RNG, and it has a high likelihood to miss its target, so each use must be manipulated.
I don't take a detour above the Yukinojo fight to visit a shrine to teleport to later since the one I tagged in Act 2 happens to be closer to Kai, just from the opposite direction.
Yukinojo: The drawn back slash the most effective attack for breaking Yukinojo's sword since it isn't worth using a quick draw on a single samurai. Also, quick drawing nullifies the effects of the base damage overwrite glitch, and I want to keep the Hibari Muramasa's base damage on my Umitsubame Muramasa for the entire fight. You have to roll to dodge Yukinojo's telegraphed attacks in the first 3 phases, but Flash can be used to dodge the attacks in the 4th phase without sacrificing DPS. The drawn back slash at the end is used to juggle Yukinojo, otherwise he will pull out another sword, which has a much faster timer on it in desperation mode.
Act 4
It was relatively easy to make it through Mt. Hida without using any smoke bombs since snow offers much greater opportunity for RNG manipulation than most other terrains.
Ippondatara: I had originally anticipated Ippondata's first foot phase to be one of the harder phases to execute since his foot is either high up in the air or offscreen for most of the time. Conveniently, you can stunlock him in place by spamming blade dash cancels. Attacking Ippondatara's hand in his body phase with a special attack like blade dash will cause his eyes to stop shooting out onion rings and shoot explosive orbs instead. This must be avoided since reflecting the rings back at his eyes deals significant damage, and has an extremely high damage to hit lag ratio. It is possible to bring Ippondata to 0 hp during his last foot phase, but you will still have to wait out the next transition and attack the boar once to kill him, so it's better to bring his foot to 1 Flash from death.
Act 5
The two Doburokus from the shack are essential to meet the Spirit needs to forge the two remaining swords I need to forge in this run.
Chimera: You always want to manipulate Chimera to do his dive bomb attack in phases 2-4 each time he does a random action since he takes a long time to recover from it, letting you get plenty of blade dashes in phases 2/3 and high damage Flash combos in phase 4.
Act 6
The Shura Mask is needed in order to equip the Kisaragi Muramasa before the Big Oni fight, which has 63% increase in damage over the Hibari Muramasa, irrespective of the additional DPS provided by the mask's superior stats.
This is where RNG manipulation starts to get really difficult since there's no dirt in hell and each screen has has a very high chance of spawning an encounter that has to be smoke bombed.
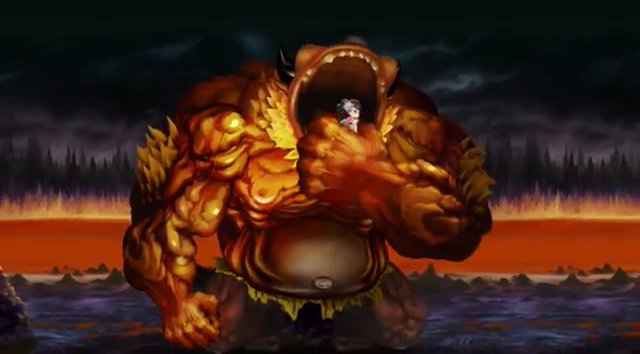
Big Oni: The Big Oni takes significantly more damage from inside his stomach than his body does, so I let him eat Momohime in phases 2 and 3. Since one of these phases has to be 30% and one has to be 40%, the 30% requires maximum DPS to make it in time whereas the 40% can be done with all blade dashes. I have to get out of the Big Oni's field of view for a brief moment in the final phase to prevent him from enraging.
Act 7
Kumori stones are very powerful items which apply a buff that prevents the decay of Soul Power for a certain period of time, and Jyokenji stones refill Soul Power. I need 4 Kumori stones and 1 Jyokenji stone for the final boss fight.
Raijin: This is the one fight you go back to the Chizuru Muramasa since Misty Slash can force Raijin out of the air in each phase, allowing you spam blade dash cancels all fight and prevent her desperation attacks which make her become immune to damage.
Act 8
I kill 2 ninjas in one of the fixed enemy encounter zones so that I can buy an additional smoke bomb from the upcoming shop.
This act is the worst for manipulation since once you get inside the temple there is no more dirt, and nearly every other screen is a fixed encounter zone, which prevents you from repeatedly screen transitioning for manipulation, so all of the random encounter manipulation has to be done during the fixed enemy encounters.
Fudo-Myoou: As far as I'm concerned, it's effectively impossible to maintain constant Flash spamming throughout this fight because there is no way to advance RNG on the floating rocks other than waiting for the boss to do it for you, and Flash really likes to hit random stuff or just miss its target completely. After the statue's weak spots become exposed, they have a very long period of invulnerability in between each set of 4 instances of damage. For whatever reason, Flash completely bypasses this immunity, which is why its so important to load up on Kumori stones before this fight.
Possible Improvements
Since random encounter manipulation poses the majority of the difficulty in this run, and encounter luck isn't simple enough to be able to manipulate all unwanted encounters away, Muramasa is in desperate need of some RNG disassembly. I did the best I could with trial and error, but it would be invaluable to be able to plan out the entire random encounter/smoke bomb route for the whole run. Hopefully with aldelaro5's new Dolphin debugger tutorial out I'll be able to convince Flameberger or someone to help me with this for a v2 and/or Kisuke improvement.
Acknowledgements
RachelB: for her published Momohime run and the work she did on Dolphin development to make TASing Wii games possible.
Bernka: for his recent Kisuke run, through which I discovered this gem of a game and became interested in TASing it.
Trineas: for his Momohime RTA runs which I also used as a reference for making this TAS. A number of the routing/boss strategy improvements over the published run came from RTA developments.
Screenshot Suggestion(102584)
Because how could the screenshot not involve bathing in a hot spring with a giant mountain boar god?
Alternatively, I suppose something like frame 7152 would also be acceptable.
GoddessMaria: Alright, so I have to say that this is an interesting movie. Despite the difficulty change-up caused from NG versus NG+, it still manages to hold up well in entertainment and be faster than the previous movie. I also must commend the inclusion of the previous author as this movie has taken quite a bit of inspiration from. As far as the decision for the placement of this movie is concerned...
Accepting for Moons as an improvement to the previous movie.


 The first half or so of the TAS is probably the weakest in terms of entertainment; it gave the impression that the TAS was going to be mostly running through empty fields that all look the same. It is only after numerous forced encounters later in the run that the game really shows what you can do. Then the final fight against Fudo Myoou is completely different from everything else I've seen so far, and it was great.
Some things about the game itself caught my eye:
- The text at some point says "Act 2: Hurry to Edo, Musashi Province to recover the Soul of Momohime stolen by Rankai." You mean, the soul of the character you are playing as right now? XD
- So the Ippondatara sequence is really weird. There's a giant foot, then a giant monster trying to hit you with a giant hand, then a giant pig, then a bath scene with the same giant pig. I mean, what?
- Big Oni eats you. The first time it happened, it caught me off guard. It's kind of funny now. Also, that voice.
- Raijin is really annoying. Then again, with a name like "Raijin", I expected an awesome boss, not whatever this boss turned out to be.
The first half or so of the TAS is probably the weakest in terms of entertainment; it gave the impression that the TAS was going to be mostly running through empty fields that all look the same. It is only after numerous forced encounters later in the run that the game really shows what you can do. Then the final fight against Fudo Myoou is completely different from everything else I've seen so far, and it was great.
Some things about the game itself caught my eye:
- The text at some point says "Act 2: Hurry to Edo, Musashi Province to recover the Soul of Momohime stolen by Rankai." You mean, the soul of the character you are playing as right now? XD
- So the Ippondatara sequence is really weird. There's a giant foot, then a giant monster trying to hit you with a giant hand, then a giant pig, then a bath scene with the same giant pig. I mean, what?
- Big Oni eats you. The first time it happened, it caught me off guard. It's kind of funny now. Also, that voice.
- Raijin is really annoying. Then again, with a name like "Raijin", I expected an awesome boss, not whatever this boss turned out to be.


